


posted by roman, jarhead, kong
As far as i can remember i talked about writing a tutorial up on this latest painted Tyrant Guard from Games Workshp. Happy that my brain is with me these days and so here we go... one moment, need to grab a cup of coffee first.

Priming has been done with only black primer in the start.Ah yeah, before i forget: Sorry for the crappy pictures of the Tutorial... didn't do much of them so i had no chance to choose. Some are really bad others are ok. Sorry.
Basecoating Wet in Wet

I did start this guy with a mix of Jade Green, Chaos Black, Hawk Tourquise, Shadow Grey and Sunburst Yellow. Sounds weird, i know. I did put these colours on my wetpalette and mixed it upon the miniature while it was wet, bringing in colours like this is easier at the beginning, i could work on soft shadows and lights without having much trouble as the colour is wet while mixing it in together as once. There will be a tutorial about this theme sooner or later as this is really hard to explain in words, maybe we will manage to make a video of it too. Did this as a basecoat. Main colour in this mix was for sure Jade Green in a mix with Chaos Black, leaving those heavy chitin plates without attention at this first step.
Here you can see the model while it is still drying from the Wet in Wet butchery on it. I'll promise there will be a tutorial about it, it is so hard to explain as there is not much time while doing it... the apes keep an eye out for this task.

Next i waited until it was dry. Then i took my white primer to bring on some white priming from the top of the model to have a little help where to set my bright colours while working with a zenithal lightning.

Next i have concentrated my brain at the chitin plates and choose to give them a dark colour started with Chaos Black + Shadow Grey, again wet in wet with a tip of codex grey to lighter parts... really gentle. Now you can see the lighter areas from the white priming pretty nice. Those will be the places where i'll set my lights later on.

I did choose to paint about 2~4 gently glazes of Codex Grey + Jade Green at those light places. Moving my brush upwards to the light areas, like described here in this article about glazing.

This made the model look like this, damm crappy picture, even a bit if yellow found its way into the lights and mixed with the blueish Jade Green it looks like a bright yellow green... ah damm photo taking, haha. Hope you get what i mean.
 For the next step i have used Scorched Brown + Vermin Brown as a wet in wet basecoat at the base, it is some kind of butchering creamy colour upon the area you wish for... oh dear, there will be a tutorial needed and a video (kong brain marker activated):

This Wet in Wet stuff is nothing special, it most times helps to bring in some colour difference in the area, like her on the base. With a little practice in this painting technique (as soon as we managed to explain it in full) you will be able to paint your miniatures way faster and have less more work when the basecoat with lights and shadows has been done with wet in wet. It's like painting on canvas... here comes the base with a randomly colour difference of Schorched Brown and Vermin Brown, butchered up there in a frenzy - simply the basecoat:
 Next Step has been working gently on first lights with a mix of the basecolour, that Jade Green Grey and a small tip of bleached bone in it:

Applied mainly to gently start working on the light areas (upper areas, which are hit from the light above)...

I repeated these steps while slowly bringin in more bleached bone into that mix and focused more and more at the brightest parts. Done this about 5~7 times to bring the lights in. I made this also with the dark chithin plates, also brought some light in there by mixing in a bit bleached bone in its basecoat. When i was done with this - had done it several times, always strengthen the lights i am able to show you what i mean with the next photo. It is in black and white and you may see the light areas i have worked on much better, still rough for sure but i am not finished yet:

 Here pops another WIP in to show you what i mean with thispainted light from above thing, you may see this at the moment especially on the naked leg:

Now i grabbed some colours up for cleaning up the mess. I did use Citadel Washes mixed with the middle tone of the green. I mean not the light green on the miniature instead i mean the area not in deep shadows or bright light, i mean the colour in between. I've mixed it with Badab Black and a bit of Thrake Green (washes) to glaze down the hard edges by moving over them for several times. I have no idea what i did with that opened Bronzed Flesh in that picture, haha... really no clue.

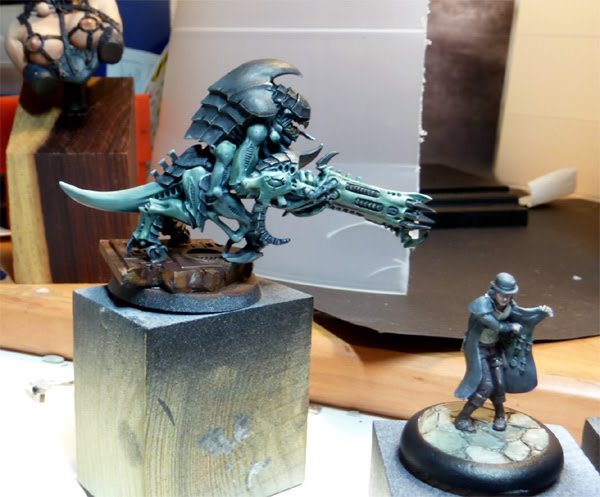

Final step has been bringing in red dots on the alien's limbs by using this dot technique and working on those little deeper skin areas which pop out at the limbs by basecoating them with some glazes of Scorpion green highlightedd up by adding bleached bone to white, followed by glazes of Thraka Green. I used some pigments on the base to make it look more rusty (Tutorial is in the back of my head about this). The miniature was now finished up for gaming purposes.

I am sorry if this Tutorial looks a bit unclean, i mean of the photo quality and steps. Please take this as an inspiration. I am sometimes sorry that my brain won't make the things i am hoping to...
Hope you like it and i hope my thoughts on painting may help the one or the other. If so, always feel invited to drop a comment - for sure do this too if some questions come up...
Keep on happy painting!
Regards
Roman
As far as i can remember i talked about writing a tutorial up on this latest painted Tyrant Guard from Games Workshp. Happy that my brain is with me these days and so here we go... one moment, need to grab a cup of coffee first.

Priming has been done with only black primer in the start.Ah yeah, before i forget: Sorry for the crappy pictures of the Tutorial... didn't do much of them so i had no chance to choose. Some are really bad others are ok. Sorry.
Basecoating Wet in Wet

I did start this guy with a mix of Jade Green, Chaos Black, Hawk Tourquise, Shadow Grey and Sunburst Yellow. Sounds weird, i know. I did put these colours on my wetpalette and mixed it upon the miniature while it was wet, bringing in colours like this is easier at the beginning, i could work on soft shadows and lights without having much trouble as the colour is wet while mixing it in together as once. There will be a tutorial about this theme sooner or later as this is really hard to explain in words, maybe we will manage to make a video of it too. Did this as a basecoat. Main colour in this mix was for sure Jade Green in a mix with Chaos Black, leaving those heavy chitin plates without attention at this first step.
Here you can see the model while it is still drying from the Wet in Wet butchery on it. I'll promise there will be a tutorial about it, it is so hard to explain as there is not much time while doing it... the apes keep an eye out for this task.

Next i waited until it was dry. Then i took my white primer to bring on some white priming from the top of the model to have a little help where to set my bright colours while working with a zenithal lightning.

Next i have concentrated my brain at the chitin plates and choose to give them a dark colour started with Chaos Black + Shadow Grey, again wet in wet with a tip of codex grey to lighter parts... really gentle. Now you can see the lighter areas from the white priming pretty nice. Those will be the places where i'll set my lights later on.

I did choose to paint about 2~4 gently glazes of Codex Grey + Jade Green at those light places. Moving my brush upwards to the light areas, like described here in this article about glazing.

This made the model look like this, damm crappy picture, even a bit if yellow found its way into the lights and mixed with the blueish Jade Green it looks like a bright yellow green... ah damm photo taking, haha. Hope you get what i mean.


This Wet in Wet stuff is nothing special, it most times helps to bring in some colour difference in the area, like her on the base. With a little practice in this painting technique (as soon as we managed to explain it in full) you will be able to paint your miniatures way faster and have less more work when the basecoat with lights and shadows has been done with wet in wet. It's like painting on canvas... here comes the base with a randomly colour difference of Schorched Brown and Vermin Brown, butchered up there in a frenzy - simply the basecoat:


Applied mainly to gently start working on the light areas (upper areas, which are hit from the light above)...

I repeated these steps while slowly bringin in more bleached bone into that mix and focused more and more at the brightest parts. Done this about 5~7 times to bring the lights in. I made this also with the dark chithin plates, also brought some light in there by mixing in a bit bleached bone in its basecoat. When i was done with this - had done it several times, always strengthen the lights i am able to show you what i mean with the next photo. It is in black and white and you may see the light areas i have worked on much better, still rough for sure but i am not finished yet:


Now i grabbed some colours up for cleaning up the mess. I did use Citadel Washes mixed with the middle tone of the green. I mean not the light green on the miniature instead i mean the area not in deep shadows or bright light, i mean the colour in between. I've mixed it with Badab Black and a bit of Thrake Green (washes) to glaze down the hard edges by moving over them for several times. I have no idea what i did with that opened Bronzed Flesh in that picture, haha... really no clue.


Final step has been bringing in red dots on the alien's limbs by using this dot technique and working on those little deeper skin areas which pop out at the limbs by basecoating them with some glazes of Scorpion green highlightedd up by adding bleached bone to white, followed by glazes of Thraka Green. I used some pigments on the base to make it look more rusty (Tutorial is in the back of my head about this). The miniature was now finished up for gaming purposes.

I am sorry if this Tutorial looks a bit unclean, i mean of the photo quality and steps. Please take this as an inspiration. I am sometimes sorry that my brain won't make the things i am hoping to...
Hope you like it and i hope my thoughts on painting may help the one or the other. If so, always feel invited to drop a comment - for sure do this too if some questions come up...
Keep on happy painting!
Regards
Roman


I have just discovered your site with all these wonderful tutorials and inspiring work!!! Thanks you very much. Time for me to get my brushes back out :)
Very nice - i am just missing the biohazard sign on your wet palette ^^
Pretty good tutorial, even with the brain-problem issue ;)
Do you use dullcoat or something on your gaming models?
@CthuluPunk
Keep your brushes wet, great you did find your way :)
@Count
There will be none, i just let it eat you up next time we'll see, haha.
@Jpwyrm
Thanks ... I am not using dullcoat afterwards, i choose to let the customer decide what he wants to do with them, as this was a comission piece... and i have no own gaming miniatures :)
Regards
Roman