WIP: MV Killteams #01 - Josua, Johannes and Roman

by Roman aka jar

Hey Jungle,

inspired by the call of Volomir to raise a #Killteam2020 with 100 points some MV Team Members are following it. Josua, Johannes and Roman are fully into that Warhammer 40k vibe and do start their Kill Teams with 100 Points or more to create a playable force. Gaming boards are in the making. Here are their WIP logbooks, this is #01 ...

A really helpful and inspiring article to plan and execut a themend army is also the one of Johannes:
http://massivevoodoo.blogspot.com/2020/06/tutorial-themed-armies-part-one.html
______________________________________________________________________

Johannes - Work in Progress #01
Craftworlds - Asuryani Force

Well, I always loved Eldar.
I mostly played Warhammer 40k in my youth and stopped many years ago. But even without the intent to play, I started to collect an Eldar ( or now "Craftworlds") army bit by bit in the last years only because I just love the models. 

So when Roman's idea to start a Kill Team inspired me to also jump into the Kill-Team hype, it could only be Asuryani for me.

But I tackled it a bit differently: I have not set up a single Kill Team roster yet. Instead I put together a Variety of Models to choose from when setting up my first Kill Teams.


Bildunterschrift hinzufügen

And as a second step I airbrushed the main colour on each model:


While assembling I really fell in love with the new Howling Banshee models, so it went without saying, that I had to paint the Banshee exarch first.


Next step for me is painting the guardians, but more on that in part 2.  

Johannes


______________________________________________________________________


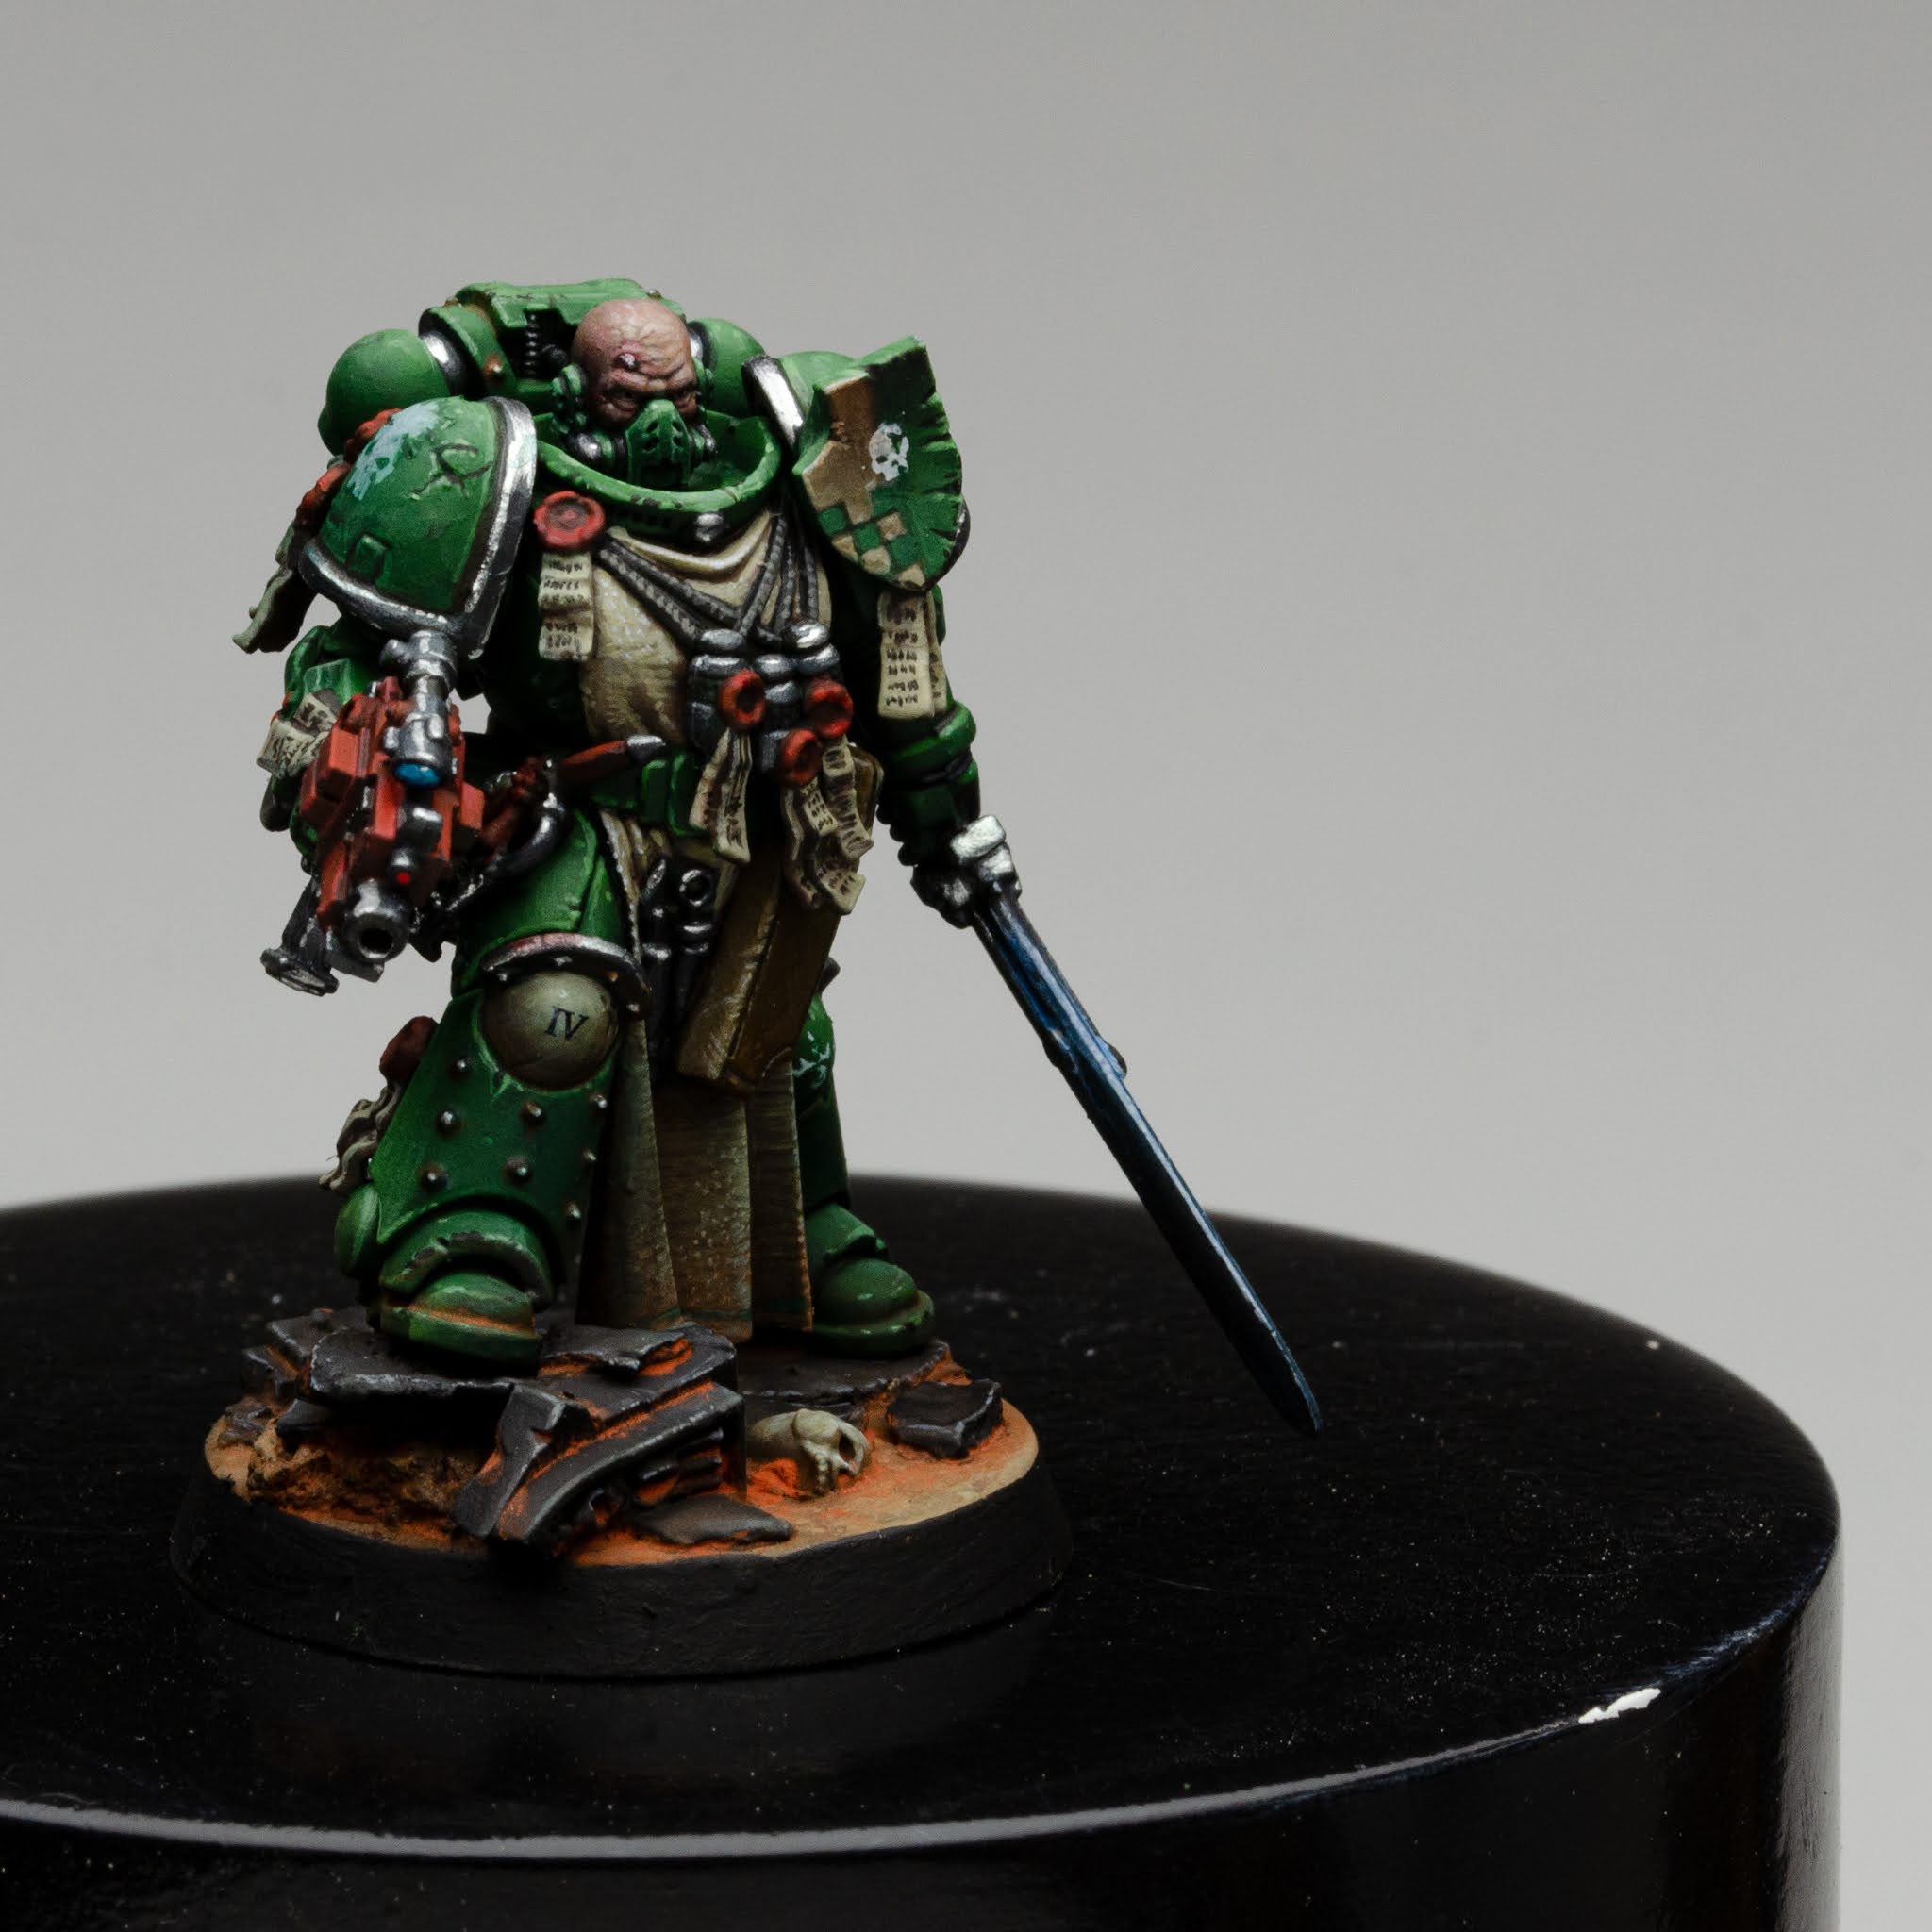
Josua - Work in Progress #01
Space Wolves Tactical Strike Force

Since I talked to Roman about the Killteam he was building I was totally hooked on the idea. A Killteam gives you the perfect opportunity to enjoy all aspects of creating characters in the 40K universe without building an army of to many figures. I started an warband or killteam a few times in the past already and they always faded away after the first figure. This time I took things pretty seriously and started by reading the rules and building a Team in the comand roster first.


After I got myself covered up with Space wolves bits from a local player who collects space wolves since 7 years now I started my first Intercessor Marine. I tried to come up with a fairly quick and easy way to paint him and I have to say I am really pleased how he turned out. He still needs some deatials here and there, but he is mostly done. 

 On the base I probably spend almost as much time as on the figure itself... What should I say to defend myself you most certainly know I am quite serious when it comes to bases.


After a week a support package by Roman turned up stuffed to the brim with even more space marine bitz to continuing my killteam. I swiftly started with my Eliminator Sniper. The way this figure is built makes it rather difficult to let him look like a spacewolve. After some thinking I had a crazy idea and just cut up a wolfe from the Rippa’s Snarlfangs warband and added it as a really cool hood to the head.


He soon will receive even more color and a proper base. I leave you for now with a teaser photo of the next member which resembles a scout. Scouts in spacewolve armys are mostly veterans that switch they're powerarmor for a light scout armor as much as I understand with my very small lore knowledge my goal is to clearly show that with my conversion. See you soon!


Josua


______________________________________________________________________

Roman - Work in Progress #01
Dark Angel Tactical Strike Force
"Wing of Vengeance"


I decided to play Dark Angels Space Marines. Why?
Well, I used to have an army of those guys way back in time and always liked their background story as the first legion. Their sad story, their story of vengeance and their brother's betrayal that put them into this mysterious position they are in. Also I do like their organisation in wings and their color scheme. A perfect match for me ...

I plan to do several conversions. As I do not have many models to work on I really want to take my time to convert, kitbash and paint until I am happy with every miniature and character I creat.

I got myself some stuff, some also lucky via ebay ..

The Warhammer Community's Kill Team Command Roster was a great help to setup the basic formation of the Team:


I started building, building the gang and really enjoyed kitbashing around and picking certain bits on ebay for this task ...


I realized quickly that I had to wait a day or two when I was done and found myself often in front of my cabinet, looking at the gang, picking out what I still do not like and changing that until I was fully happy ...

This is the gang, fully happy me ...
 

When it comes to the painting I decided to work on the armour with a basic stock on Citadel paints to get the colors of the armour homogenous in the full squad ...

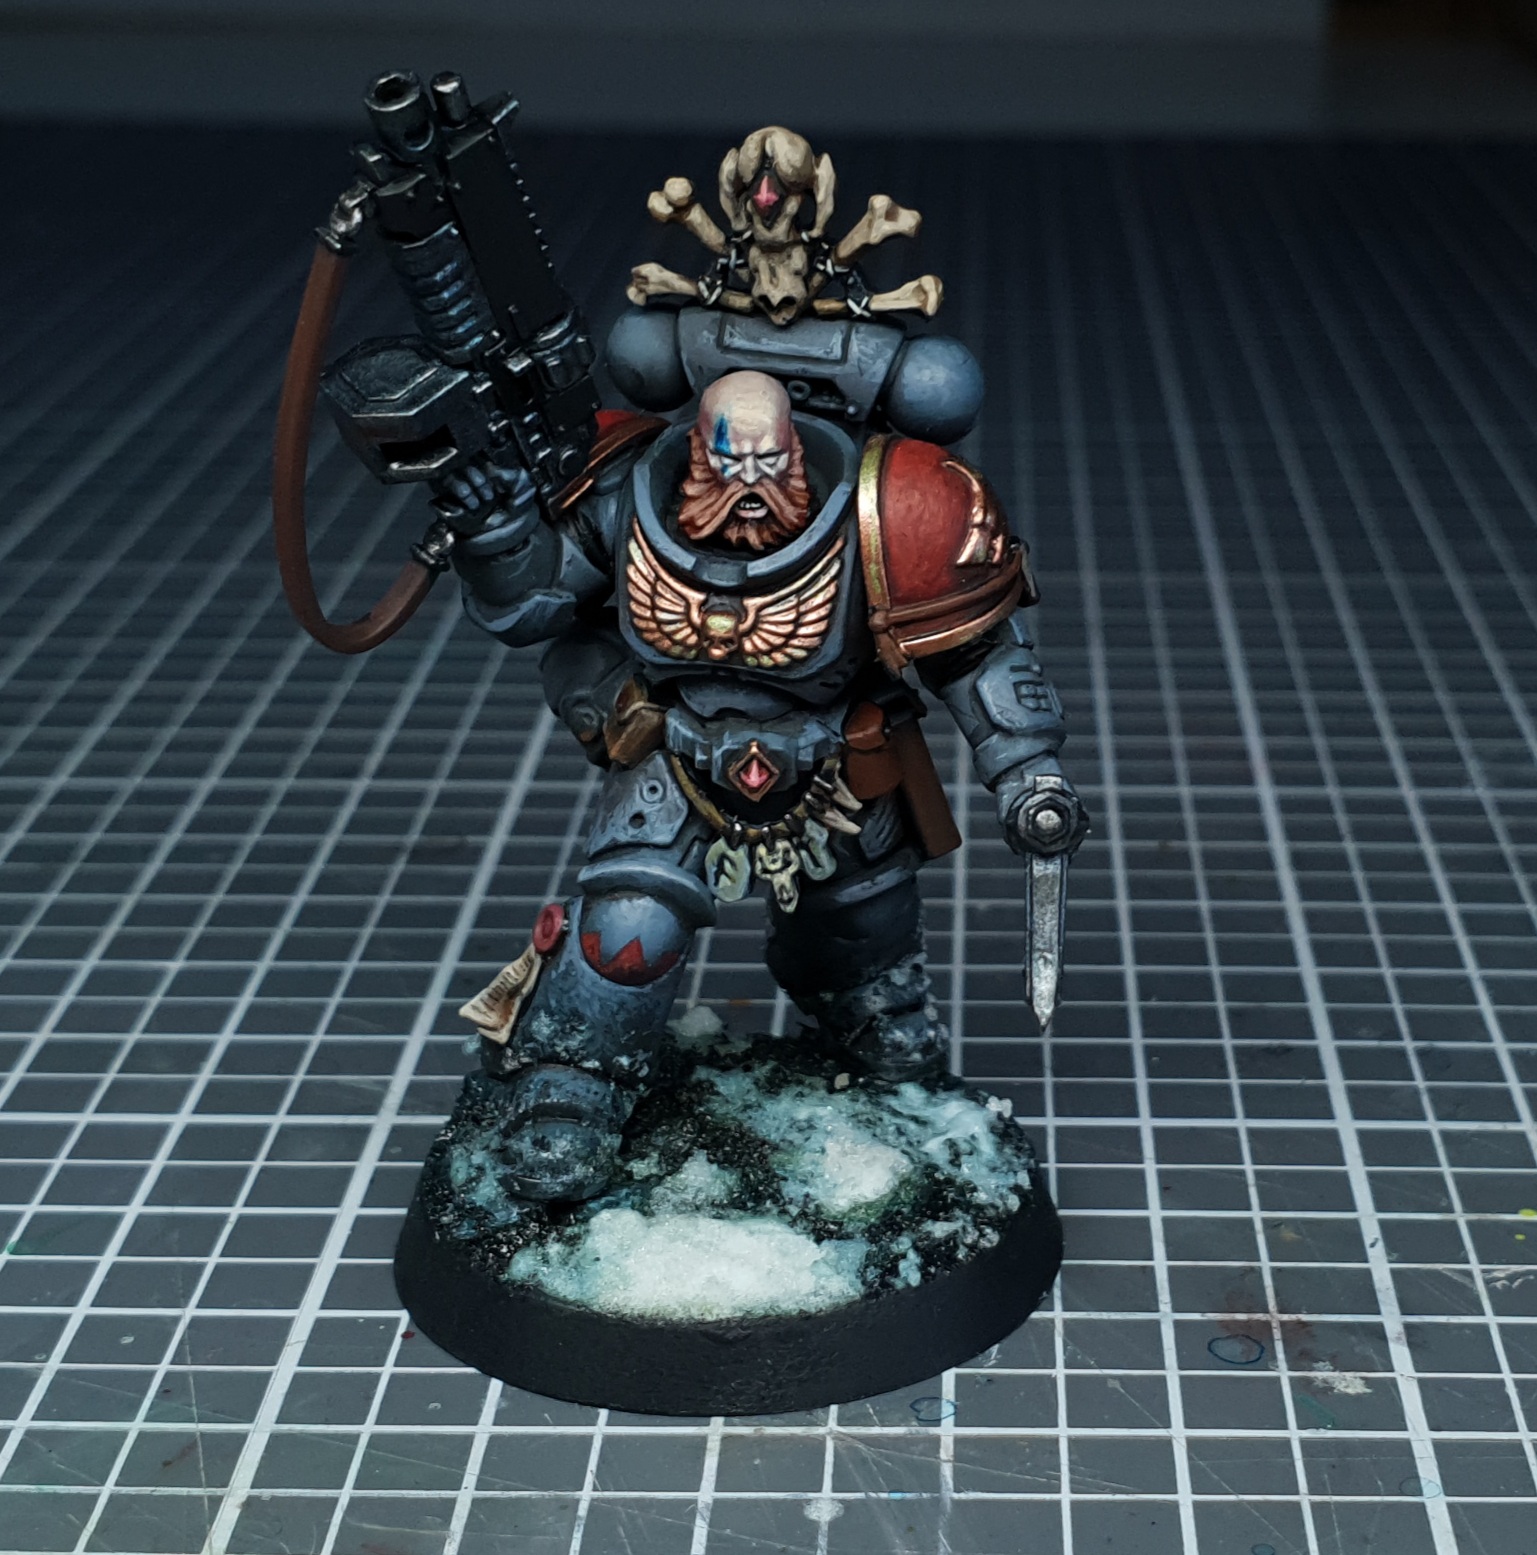
I did the first run on my Sergeant Brother Isaillius', Dark Angel Primaris Sergeant, Leader of the DA Tactical Strike Force Killteam 'Wing of Vengeance'. A stubborn warrior who pushes his brothers to heroic actions during the heat of combat. He does not speak much, if he does he mostly calmly speaks his battle prayers.

Painted him first as I really liked the conversion based on a Primaris Apothecary.


 I also decided to keep my bases simple: Dark black/grey ruins compared with a desert look and orange pigments ... easy to execute, strong contrast and also the way I want to paint the gaming board.


Really happy on how he turned out. Keeping it somewhat simpler from effort and time invested compared to a full display piece, but this is the plan. Using transfer sheets in the process and including them with battle damage was also a nice touch ...

Roman

______________________________________________________________________


Read more about our #killteam2020s, next week!

Tutorial: Improper use of two component water effects and hot glue

by Roman aka jar

Howdy Jungle!

Waterbases.
And me ...

Want to know what happened here?

Well,
Josua wrote this amazing article a while ago,
called "Proper use of two component water effects" and gives inspirational insight into a great preparation and his way of doing his beauties of water bases, like the ugly truth.

The ugly truth is:
I am not Josua. I do things different, even I try to follow his instructions.
I did a small waterbase recently and was happy with the result:


Plain, simpel, one corner

Of course I thought, now I got it. I mastered waterbases.
I did not, but I still think this is an important article ...

Tutorial: Improper use of two component water effects and hot glue

I was working on one waterbase already and had another in the pipeline that I was about to begin soon: A comission piece for a collector and friend.

Base building start

Baking Milliput to make it harden faster under a
warm lamp ...

Painting the beauty ...

Preparing the pour

Hot Glue involved, extra tablet underneath and pouring ...

Looks great, it worked, I am happy ...


Fck!
It is pouring out somewhere ...

I can stop that with my hot glue gun. I will fight it.

Please look at this beautiful studio sunset, while I spent 3 hours fighting with hot glue, burning my fingers and trying to stop the leak ...


Interesting ...

An intense fight was lost as it really found its way
all the time.

Had a little leftover of 2k water and pourred it in,
still it lost height ...


11 hot glue gun sticks later ...

Some different kind of beauty appeared ...

Told myself: You shall not win. This base is not a fail ...
and left the studio for some days. I thought, as soon as it dries, it shall work :)


While giving this some days to harden, I did different things in the studio or outside, ignoring this completly ...


... listened to fine music ...

... or watched cats doing cat things ...


Allright,
some days later I gave this another pour.
And thought to myself, like I always do: Everything happens for a reason. Painted some fish, a skull and some shells and added them before the pour :)

I was right, it was not pouring out :)

Still staying close by to check back and remove air bubbles ...

Getting this out of my 'hot glue artwork' was still a miracle to me ...

I did this one with better preparation and wow it works better :D

Time to protect the process of hardening from dust and wait again ...

While waiting I started to scratchbuild a 40K Inquisitor and his retuine ...


3 days later ...

Yay!

Yay #2!

Now to the ugly truth, getting this out of ... this ...

Did the first rough work with my table saw ...engine power!

Still weird ...

More detail work ...


What a mess, but I made it ... base was already at the sanding machine ...

Now I recieved some interesting pieces from Hot glue and 2k water effect.
A strange mixture, but I might find good use for it for future astronaut
projects to sent them on weird adventures ...

Ok,
to be honest: I am proud that I fought that beast and won without hurting myself too much.
My best tip from this experience: Avoid it. Prepare yourself better and do not be lazy in the preparations ...

Thank you, Josua for your great article that explains it all so good:
http://massivevoodoo.blogspot.com/2017/05/tutorial-proper-use-of-two-component.html

Do it like Josua!
Or do it like David:
http://massivevoodoo.blogspot.com/2019/04/sbs-wading-ashore.html

... and if you do like I do, know that you can rescue it, if you got the will to fight!

Happy Painting to all of you!
Yours,
Roman


PS: Kyle Maitland posted his story on failing with two component water effects so funny on facebook, that I decided to include it here - a lesson can be learned from this too:

"I can do worse, never fear. Whenever possible I will rise from the ashes to detail what not to do.
I started a large base in a tile base. 3x3 square of probably 50mm tiles. So a 150x150 base, which I built on. This base though, it needed a column of water on one side. With a little crab, and some fish, and a cave. About 100mm tall, 50 wide 40 deep. Something like that, 250ml volume they say.
So I bought a litre of polyester resin and some catalyst, thinking this was the best way to deal with a deep placement like this. Hint, this stuff is never the best way to deal with a placement like this. It is nebulous, it requires witchcraft. Catalyst amount depends on temperature and layers and varies and omg... Polyester resin also stinks to high heaven of styrene as it cures. I read warning of the smell (not the headaches) but I figured I have a balcony. That was not really Enough.
 
So it's 2am (working nights at the time) and it's time to start my resin pour. Got my mixing cups (this stuff melts styrofoam) so they are not styrofoam and I start pouring layers. And watching them get lower... Slowly. It's 2am. It's dark. Whatever. I'll stop the flow with more resin!. So I begin overpouring a bit to compensate for loss, it is of course, only coming out the bottom and curing pretty quick. And I can cure it faster with more catalyst. This continues until something dawns on me. My base is bulked out with blue foam insulation. You think you seals everywhere with paint, primer, etc right? WRONG. So this realization changes modes a bit, a few thin 'coating' layers set to flash fast, like A skim coat. Eventually this did work. But between layers and an overall unpleasant experience I ended up texturing the surface for a moving water look . This stuff was also incredibly hard and sanding it to buff it was days of work. I also had rivulets of water randomly on my cliffs, but that was actually ok. I had to clip the tiles into an organic shape in a bought of I meant to do that
 
Paul (Stockley) can tell you how heavy that base is , having had all the foam replaced with resin wholesale. I do not recommend polyester resin . Or resin in the dark. These simple lessons are sometimes better learned through others."

_____________________________________________________________________________
You want to support Massive Voodoo? 
If you like to support or say thanks the monkeys of Massive Voodoo in what they do, please feel invited to drop a jungle donation in their direction via paypal or check their miniatures they got on sale here.
_______________________________________________________________________________