


posted by Mati, Badsmile, orang utan


mati
How to sculpt a 32 mm miniature out of super sculpey firm.
A step-by-step brought to you from the far putty-jungle, by jungle brother mati.
First I'd like to say a few words. There are many ways to sculpt and this is just one of it. It requires a lot of checking proportions and the silhouette to get it to look right. Feel free to do things different.
This mini I will be doing in this tutorial is for Deltadog Designs. Thanks for allowing me to publish it !
This mini I will be doing in this tutorial is for Deltadog Designs. Thanks for allowing me to publish it !
I tryed to take as many pictures as possible on my way but sometimes, in the "heat" of the moment, I forgot to take some shots inbetween. There are some parts that would have needed a little more foto material, specially the face sculpting part could have done with a few more pics. As this won't be the last sculpting step by step seen on Massive Voodoo, I'll try to take more pics and talk a bit more about this part in the next one. I am really sorry for the bad quality the pics have but I am a total dork when it comes to photography.
Enough talking let's get to business !
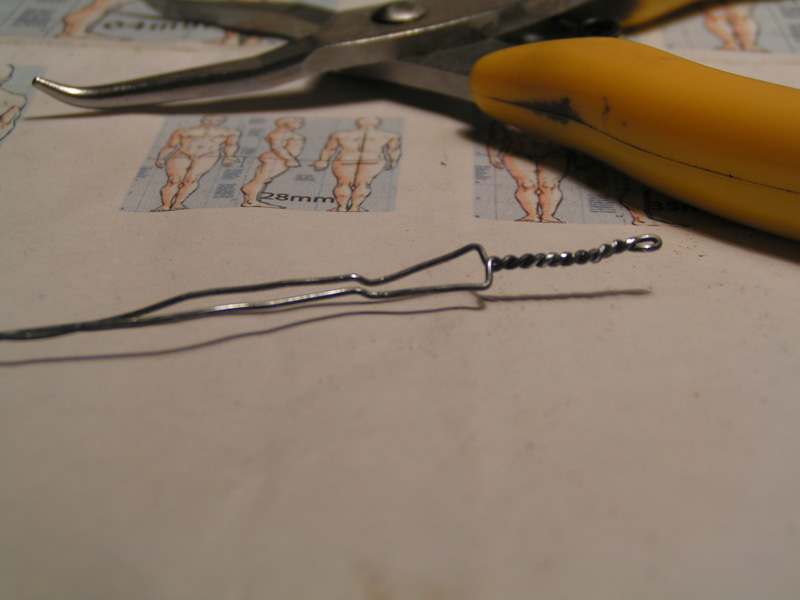
PART ONE: Materials needed
First things first, the materials of choice:
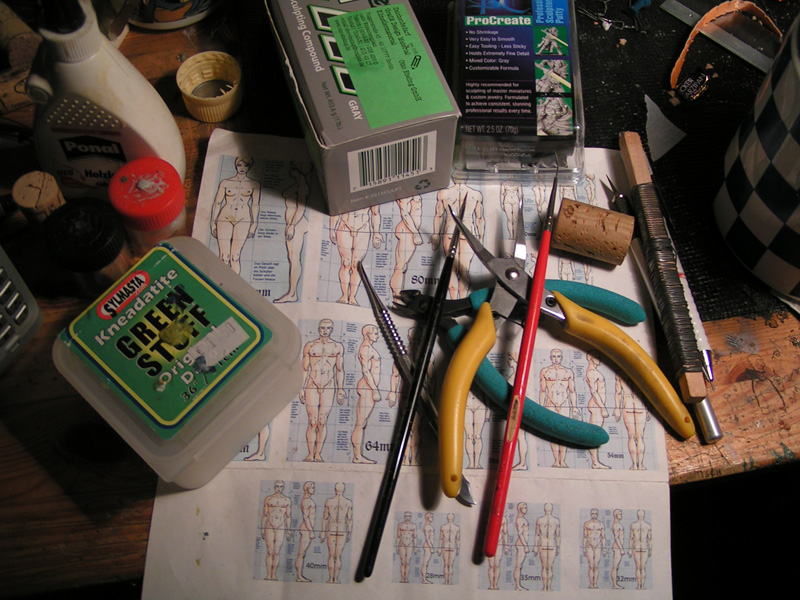
Description:
-a kork ( natural kork in one piece and not the glued nugget ones are better imo )
-a wirecutter
-some pliers with a thin tip
-wire of course ( mine is 0,8 mm )
-green stuff or pro create ( preferably green stuff as it is better for the armature because of its
radical stickiness )
-skalpel ( watch your fingers ! )
-sculpting tool ( I like the "Zahle A" tool, available at dental lab stores on the internet )
-sculpting needle ( made by myself, everyone can make one, a tutorial on how to will follow
soon. )
-fine detail brush for smoothening ( any soft brush works quite good, no need to get all fancy. )
-talens odourless white spirit for smoothening too and for some structures
-a tkpencil to draw stupid stuff if you get bored along the way and to make funny holes and
rivets with the tip
-creative chaos ( my desk is a mess )
-proportion chart ( always useful )
-MASSIVE VOODOO youtube channel playlists ( very important ! )
-bananas if you get hungry on the way ( not shown on picture )
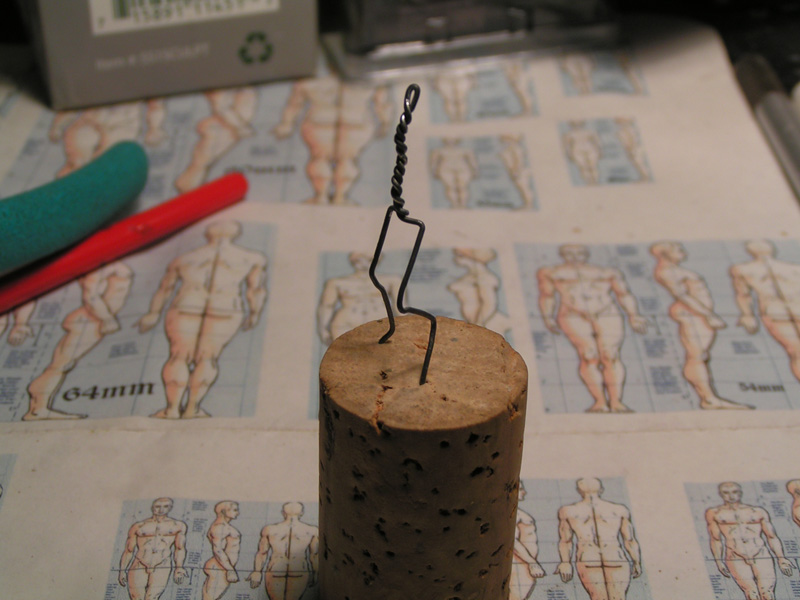
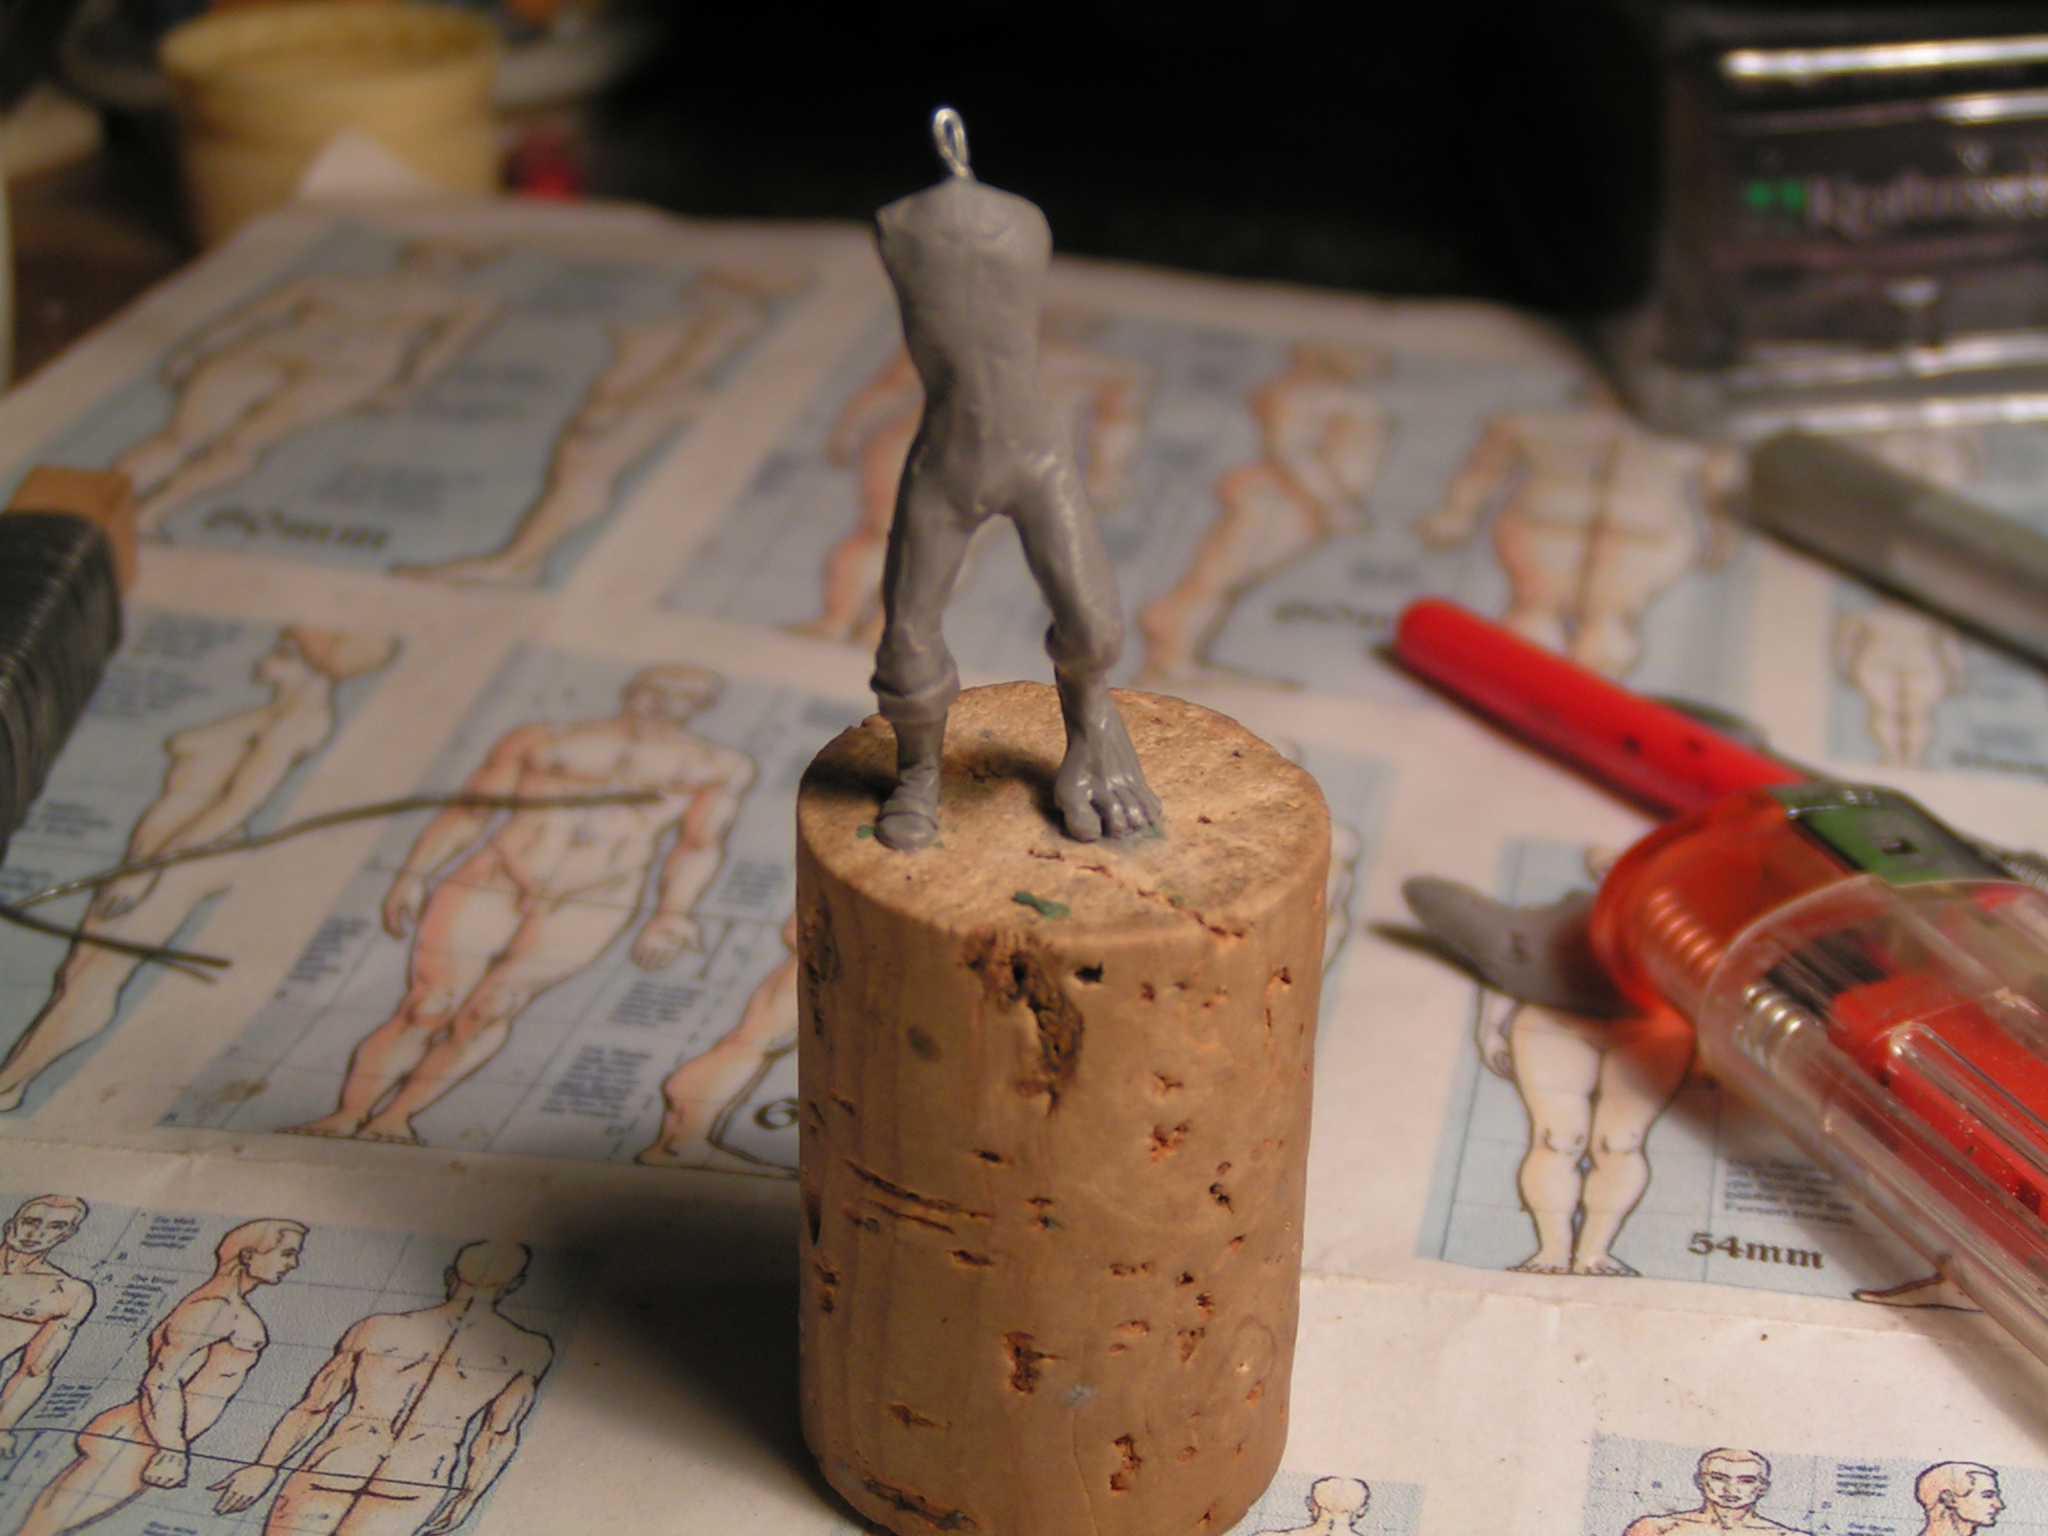
PART TWO: The armature
An important thing when starting a project is to make sure your armature is correct in the beginning. Any mistakes done now are carried along through the whole sculoting process and will make corrections very time consuming, annoying and partially impossible to achieve without having to sculpt half the miniature again. So take your time for the armature, if something is not as you want it to be, try to correct that. If you notice the wire is getting soft because of too much bending around or you have a mistake that is not correctable, then throw it away and make a new armature. It's just a piece of wire at last and this will save you lot's of time and swearing.
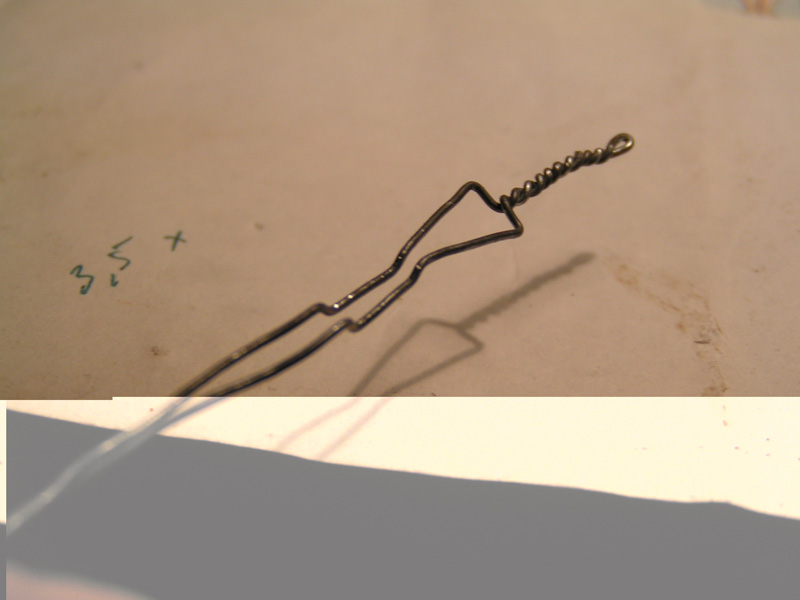
So here is how it starts. Take the wire and straighten it if nescessary ( very often it is ). Now grab it in the middle and bend it to a little loop. Make sure the loop is about half the size of the head on the proportion chart max. It's important as your sculpt will grow a giant head if you make the loop too big now.
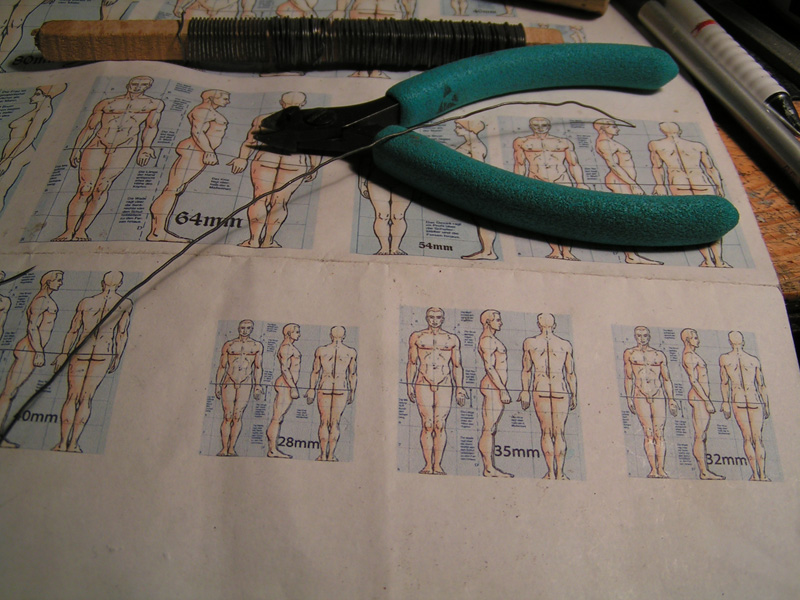
Next thing to do is twisting the wire. There are many ways to twist but only one is valid. ;) Make sure you twist both wires around eachother and not only one wire around one straight end.
See pictures: left wire: YES MAMA !, right wire: Doh, now I gotta do it again !
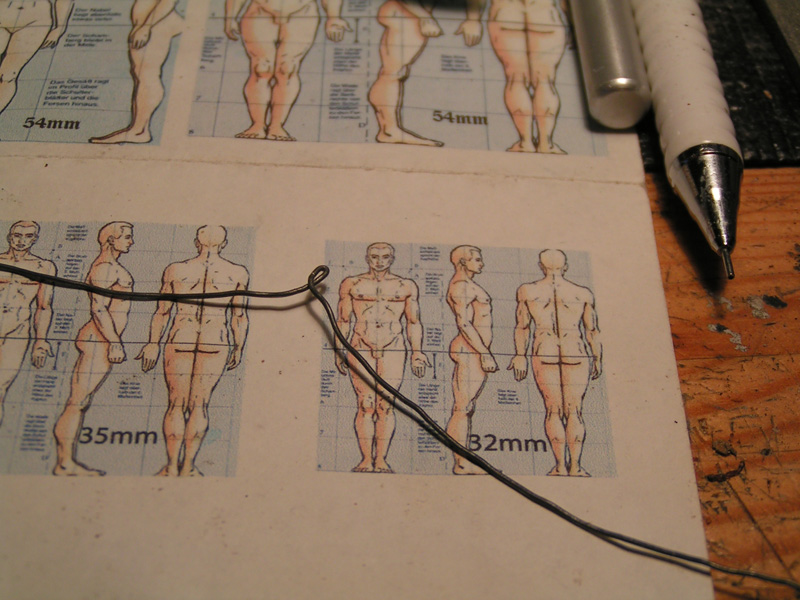
Twist it all down until the middle Line ( where the hip/leg joints are ) which is marked on the propotion chart.
If a human stands normal, his knees touch eachother, make sure your armatures knees are together and at the same height.
An important thing is to be careful with, when bending the knees into the armature, is to have a clean L form bending and not a rounded knee joint. Often mistakes are done with the length of the single segments as no clear defined point is given in a round joint. a pointy knee gives you a certain point to refer to.
Behind the knee just about a mm below bend the wire with another L shaped sharp bend as a reference point for the calves. When done it should look somehow like this:
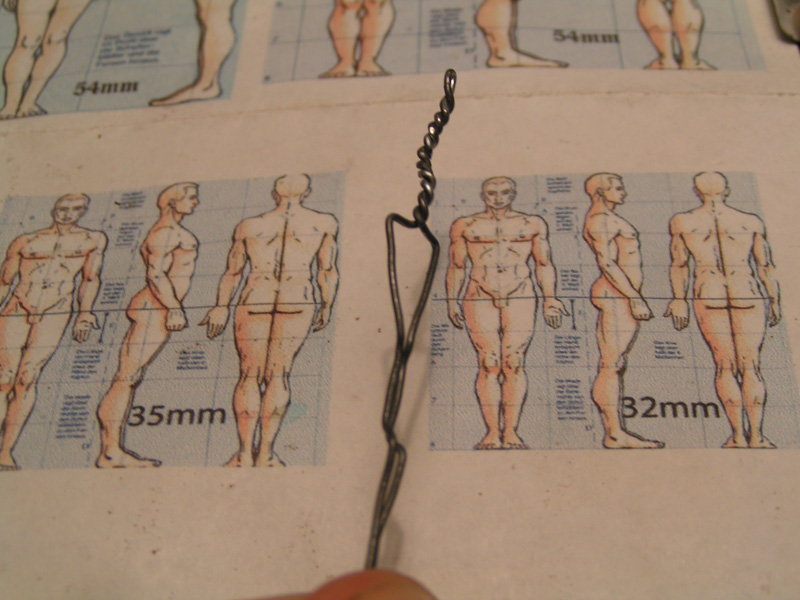
Next thing to bend are the ankles. Check the proportion hight and bend to the front. Create a little instep about a mm long and bend the wire down.
Now there is just a little bending left. give the column the typical S form it has when seen from the side. Compare with your proportion chart again and make sure the column follows the line of the back of the guy on the drawing. Don't forget to leave a little bit straight for the neck and head.
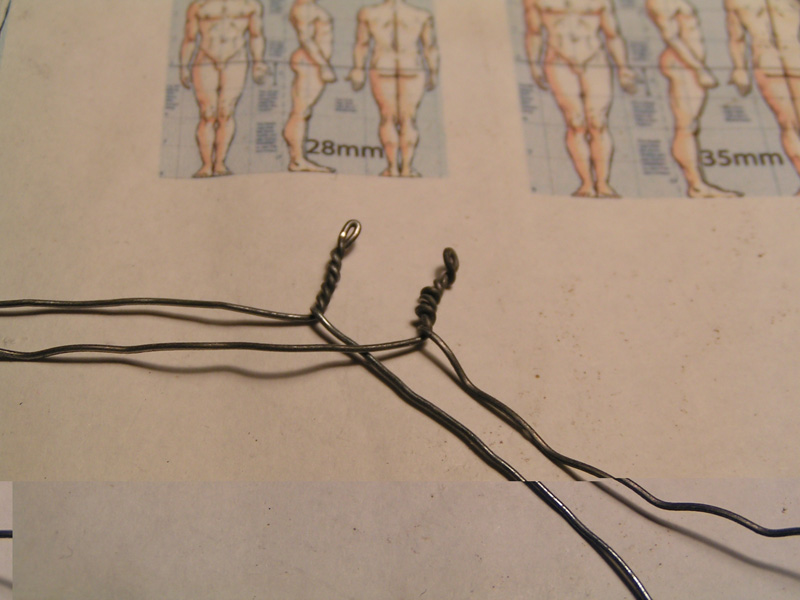
Now it's time to cut any excess of wire that is already too much to stick into the kork. leave about 1,5 cm from the foot down of wire and make sure to cut it off in an angle. It gets a pretty sharp and pointy end like that and will make it way easier to stick it into your kork.
Let's push one footwire into the kork now. Push it in until the instep front touches the kork. It's a good thing to put the wire in quite close to the border so you can just turn it around and position the second foot after giving the armature the basic pose it will have in the end. Don't worry about the arms yet, they will be added later on.
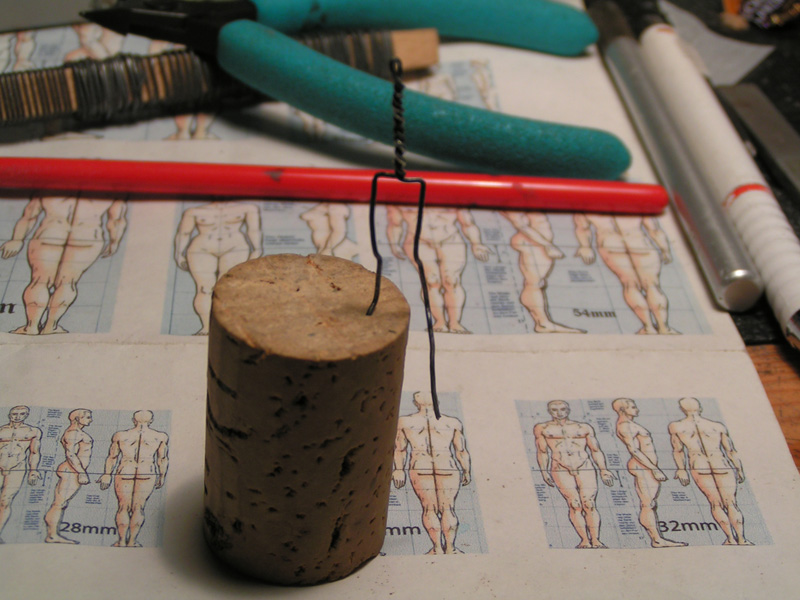
Adjust your armature to your concept or to your mental picture of what you want to do.
I changed the legs a little so the mini will fit the concept I was given.
And....that's about it concerning the armature for now. The next thing we will work on is the fine coat of green stuff, that will be our "glue" to make the sculpey stick to the model.
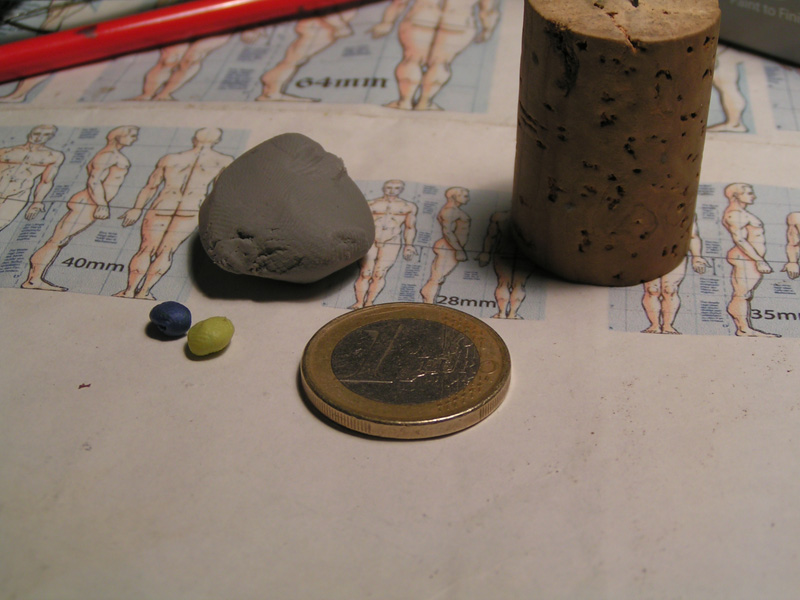
PART THREE: The green stuff coating
The coat of green stuff will be our cement to glue the sculpey to the wire. So have some sculpey ready to apply directly after your green stuff coat is on the wire as the fresher it is the stickier it is.
Enough blabla, the jungledrums tell us that it is about time to start with the green stuff now. So let's take a little bit of it and mix it up pretty well until it gets the nice green colour the monkey jungle has. You won't be needing that much green stuff as the coat should be rather thin so the mini does not get too massive. And shown next to an 1 €uro coin for amount and size comparison.
When your green stuff is mixed directly apply a thin coat to the armature ( without bending it, treat it nice and soft like a lady ). Leave the head and neck area free so you have a point in the upper area that you still can touch without deforming the work you have done so far.
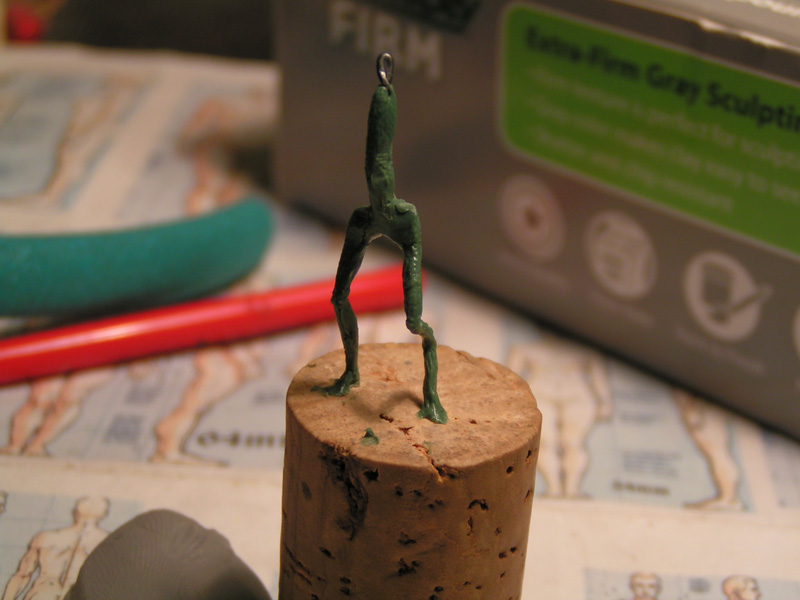
Don't worry now for right volumes, you can do so later on. what is importatnt is to keep the green stuff as thin as possible by still covering the wire completely. For this step I prefer to use mostly my fingers to apply the green stuff as the tool cleaning is less annoying like that. ;)
Now it is time to hurry ( specially me as I am writing the tutorial and take the pics while doing the stuff above... ) get the sculpey onto the wire that is covered in green stuff ! Don't worry about the form too much yet,, there is still time to do so after the green stuff is set.
What is really important at the time of applying the sculpey is to make sure no air is caught beneath it. This will make sculpting very difficult and annoying later on. So double check on that. I prefer to use the "finger" tool at the end of my sculpting tool as it is little and rounded and I can press the sculpey onto the green stuff everywhere. Make sure not to put too much pressure on it though.
Now it's time to let the whole thing set for about at least an hour, even better two hours.
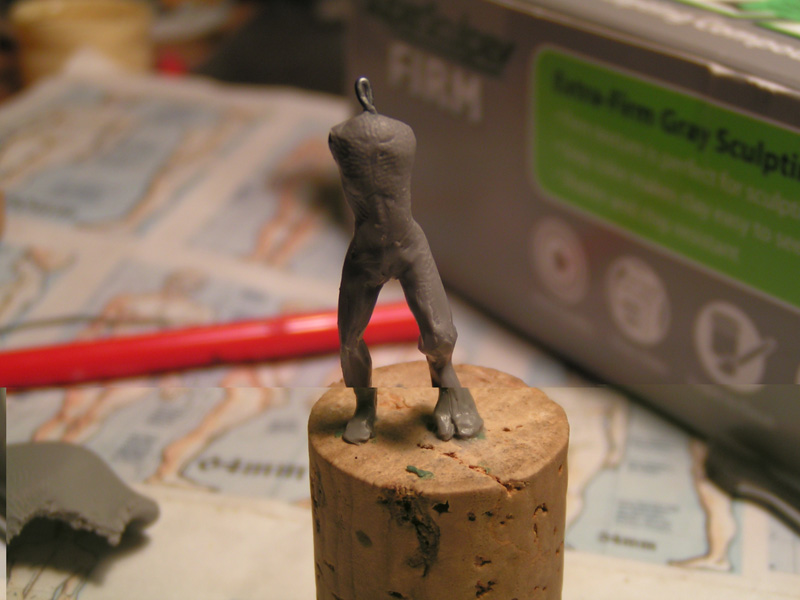
PART FOUR: building up and reducing the volumes
This probably is the most hardest part. The most hardest as it is absolutely nescessary to be self-critic at this point. Don't forget, you can always check and compare your concept to the sculpt and don't forget to look from all angles onto the mini.
Let's look at the concept and the mini a bit closer now. Starting from the feet we will work our way up. To make the feet I personally start looking at it from above as if I would look down at a persons foot standing right in front of me. I "draw" the basic shape of a foot now when seen from above. Next turn the mini around again and add putty or remove putty if needed and give the feet the shape they are supposed to have. Be very critic with yourself now. Look at it closely and if you ain't satisfyed, work a little more on it. There are lots of reference pictures in the net but you always can check with your own feet/shoes too.
After the feet start working your way up. At this point you can already start to put in some detail. Don't worry if you have to change a few things along the way or if you accidentally touch them. Just do them again.
It is very important to always check the volume from several perspectives to have a nice silhouette. The amount of putty you have can be increased, cut off, smeared or pushed away to another place where it is needed. It takes a little practise but you'll get used to the sculpey soon and learn how and what to do with certain areas.
As soon as the Volumes are right nothing stops you from putting a little details in. They don't have to be perfect yet as you'll probably touch them anyway somehow. At the end we will be doing a complete makeover and get the detail nice and sharp and smooth areas really smooth.

Work your way up to the knees always using the same method. Build up volume, correct if nescessary, check again, start detailing. Then go on to the hip.
As the mini I am doing is wearing a trenchcoat I added a rectangular flat piece of sculpey, not too thick, not too thin. I'd say it is about 1 mm thick. Just attach it to the mini ( if desired ) and smear the borders to the mini to make sure it stays in place.
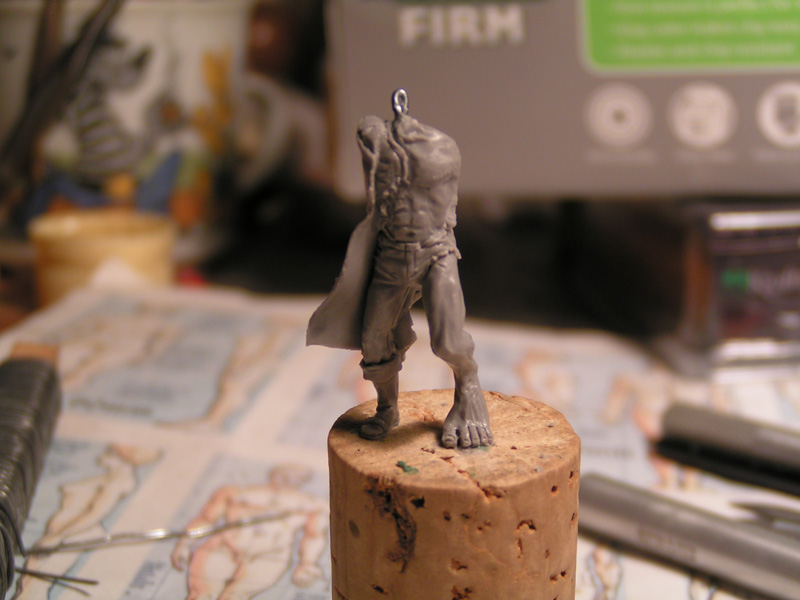
PART FIVE: Adding arms
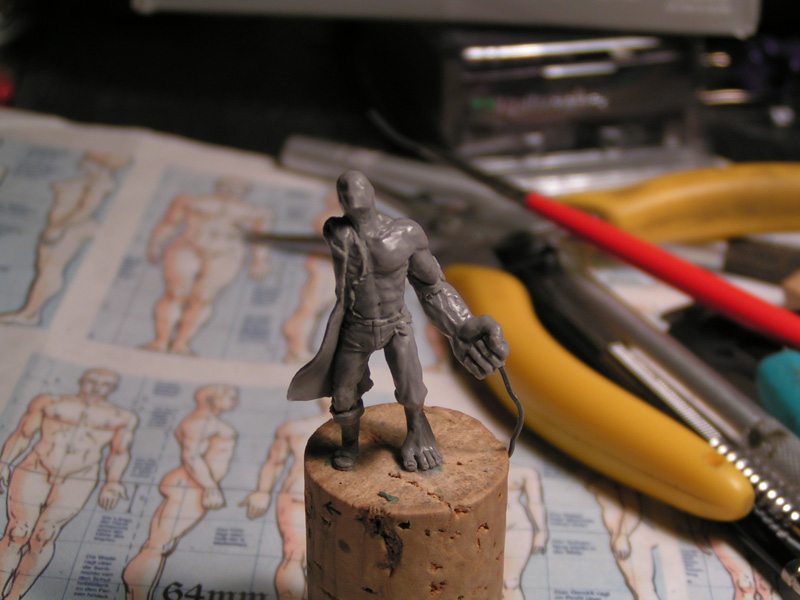
As soon as the mini is build up with the essential volumes you can add the arms. For this mini I made a quite big left arm as he is somehow mutating. Now it's bending time again !
If you want to keep it anatomically correct, check back with the propotion chart ( again and again...^^ ). I always leave a little pointy tip for the shoulder. This tip will go into the mini and give a little stability. The next bend is the elbow, then the wrist and then I bend the wire where the knuckle of the middle finger would be. Bend it downwards and insert it into the side of your kork. Like this you can go changing the position of the arm without attaching it yet. Notice the propotions on this arm are "wrong" as it is mutating.

When the arm is in the right position it's time for some massive green stuff mixing. Again remember to take just a little bit of it, no big amount as we only need to cover the wire with a thin coat again.
To aplly the green stuff it is a smart decision to take the wire out of the mini as you'll be using way more pressure than you do on the sculpey. So cover the arm in a thin coat of green stuff being out of the mini and insert it back into the mini. Remember I said something about putting the wire into the side of the kork ? This is because that makes it easy to twist the wire back and forth without having to bend it or taking it out again and like that making it weak due to material fatigue ;)
After your arm is covered by green stuff it's time to aplly the sculpey again. Don't worry too much about the correct form yet, just make sure no air is trapped beneath the sculpey. As soon as the green stuff is completely covered get on with adding basic volumes and then let it set for an hour again. This is the perfect time to grab a banana and relax for a minute ( or a little longer ).
Once again it is time for adjusting volumes a little and after that getting some detail in. Often you will cover a part that has already be done. Add some sculpey or cut some off, depending on the silhouette of your mini from several angles. Then start putting the details in.
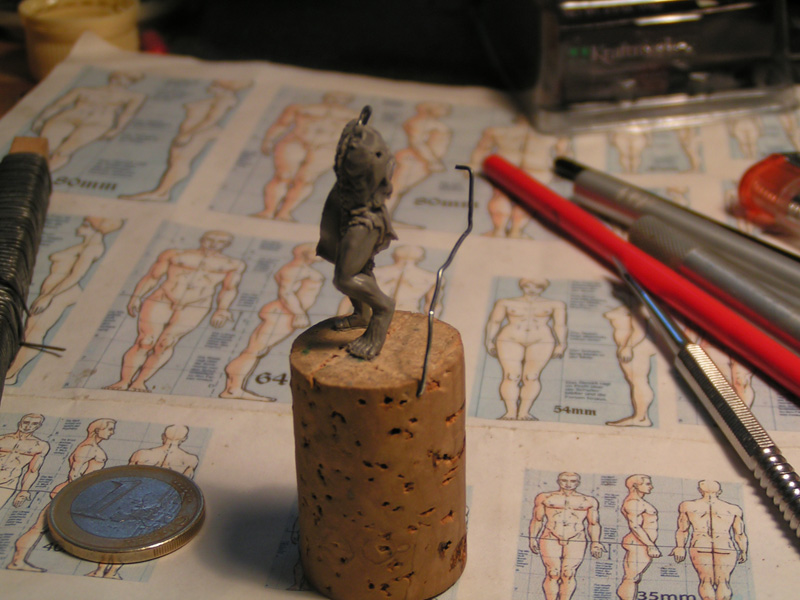
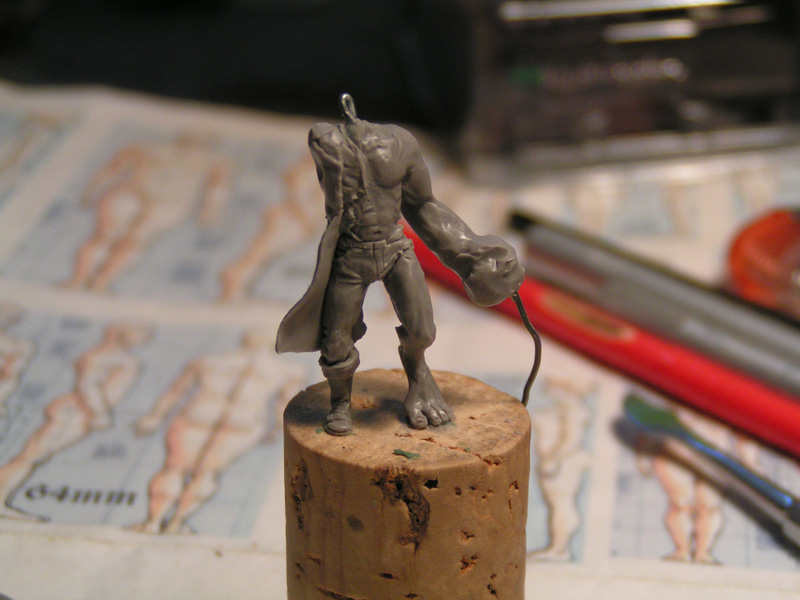
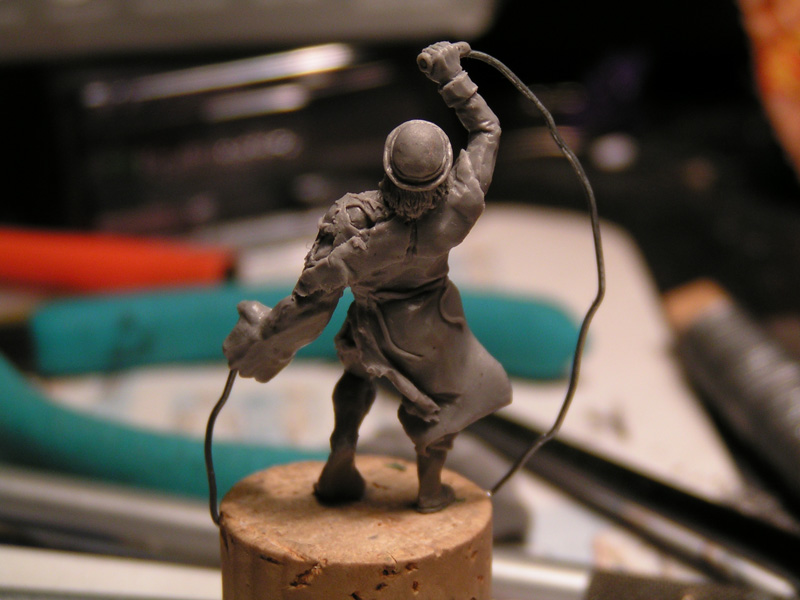
This particular mini is quite complicated concerning the second arm. So I chose to make the head first to make sure I can look at it from all angles, something I would not be able to do if the right arm would be there as it will be lifted up holding something.
For the head it's the same as before. Cover the wire in green stuff and add super sculpey right after. Let the green stuff set for a while and go on then starting with the structure of the skull. Don't forget that your mini needs a neck too. ;)
Sculpt the face starting with the eyesockets and cheekbones. Make the nose and the mouth. Facial expressions are quite complicated to do so get a picture for reference. It is always a good idea to have a mirror right infront of your working place to check how it looks when shouting or laughing for example.
At the same time you set up the basic volume for the face you can start adding material for the hair to the back and the sides ( depends on what you do of course ). This hair in the neck will give the whole head a little bit more stability and make it easier to sculpt.
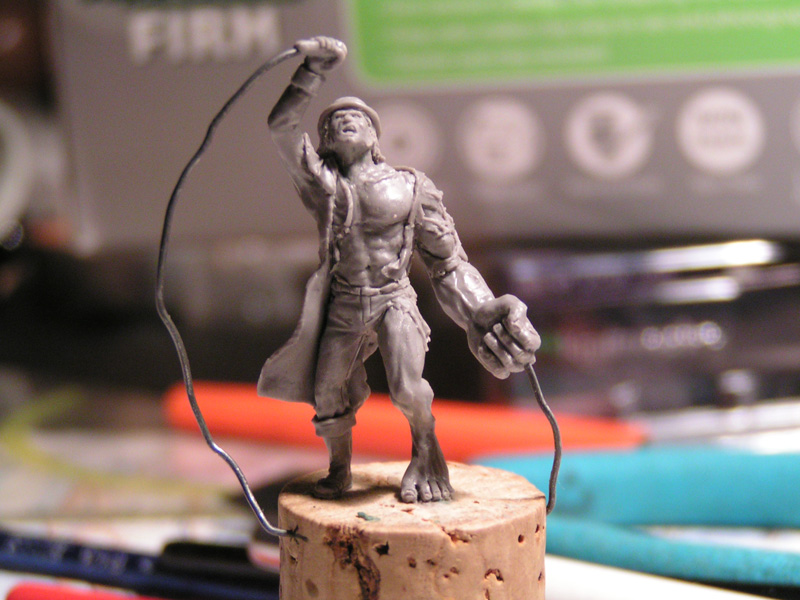
PART SIX: Details
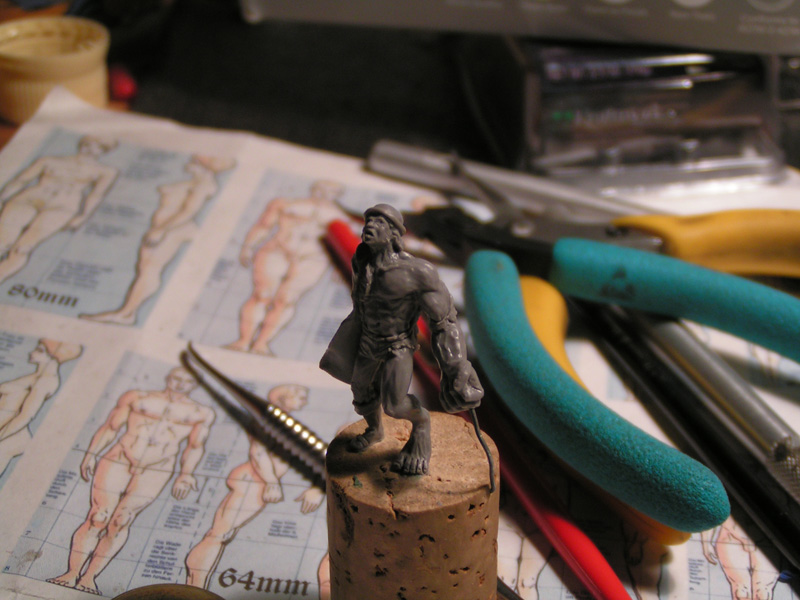
Time for details. Sculpt the face beginning with eyesockets, build up volume for the nose add a micro portion of putty to the mouth area and sculpt the lips out of it. In this case the mini has the mouth wide open. You do this by cutting into the putty bulb you built up and stretching it into the desired form. Don't forget about the jaw, if the mouth is widely open, it's due to the jaw being pulled down. ;)
Next sculpt the nose and after that the eyes. At this point I added some more detils to the mini in several areas. I added some ripped clothes here and there. To underline the transformation progress that is going on with this Mr Hyde I made his face asymmetrical.
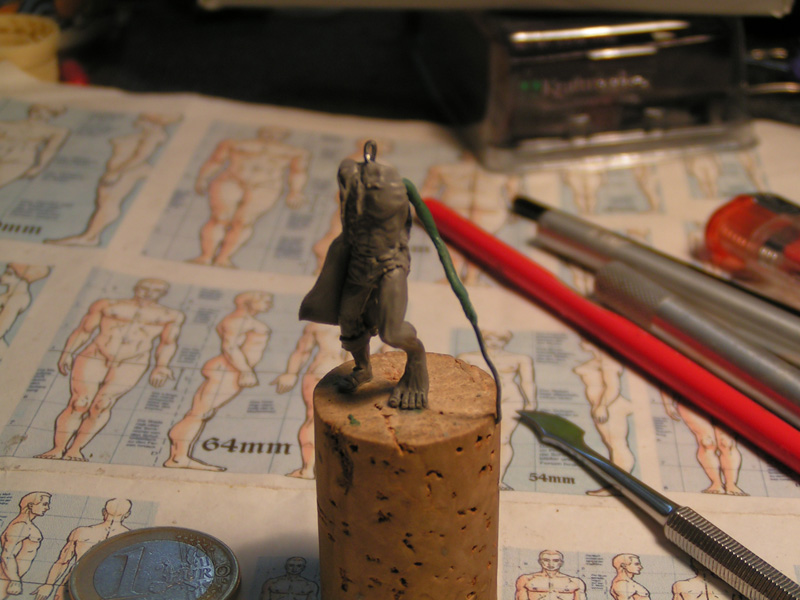
Now that the face is done a monkey notices that there is an arm missing. So bend the second wire and cover it in green stuff as usual. After this cover it up with super sculpey directly and try to keep everything nice and thin. To make sure not to touch the face don't do this with the wire attached to the mini, you can always put the wire out at this point and add material before doing the actual connection. So check for the wire being in the correct position.
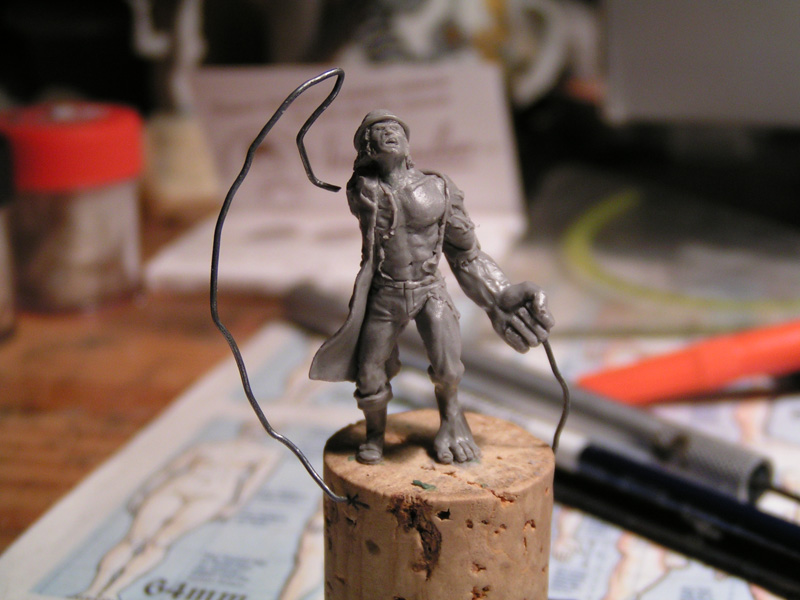
Let the green stuff set a while and start sculpting the arm. This requires to be done very careful. Do not touch the face. This is quite complicated at the beginning but as soon as you have a little practise it won't be no problem. Sculpt the arm starting at the shoulder and work your way to the hand.
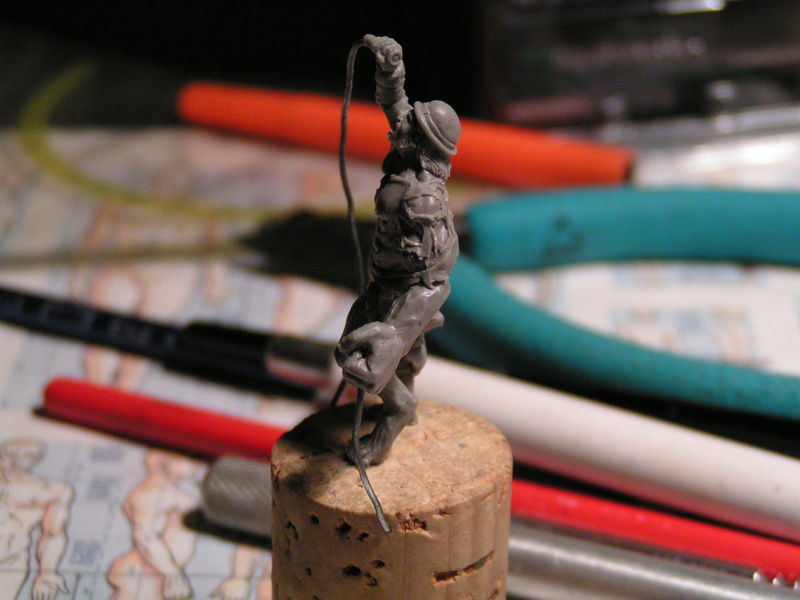
PART SEVEN: The end
Quite done. Just some corrections, details and some more smoothening here and there and the mini is ready for the oven. At this point you want to make sure there is no old food in the oven as your client or your friends will make strange faces as soon as they notice your mini smells like fries. Bake it at 100° C for about 12 minutes. Let it cool out as super sculpey doesn't get hard until cooled out after baking. Let's cut the wire now, try not to bend it to avoid the arms from breaking off. If nonetheless something should break, you can glue it back on easily and use a very liquid mixture of water and milliput white to cover the area where it broke off.
Now clean off the wire that still sticks out of the hands. I am lazy monkey so I use the dremel for stuff like that. Remove the mini from the kork and get a banana as a reward because you just finished a sculpt. If you want you can add a tag beneath the feet of the mini to fit it easier to a base. Do this by drilling two holes into plasticard or some rectangular piece of pro create (already set) you have prepared. Stick the wires in, glue it and you are done.
A big thx for visiting Massive Voodoo, keep the jungle bouncing !


ahhhh romi ! help !!! I fucked up the blog as I am too dumb for the internet ! ahhhhh !
Done - no problem, but no idea what you've done, haha... Thanks for this awesome Tutorial my dear! Great to have you here on MV :)
awesome tutorial!
Great Tutorial Homie! Remenbers me to sculpt again a little bit but the time.......
Awesome!
Where did you get the proportion chart? Looks really handy.
you can get this particular picture in the web. just type proportions at google images. next go to photoshop and scale it into the desired size. print it out and have it right next to the putty.
Create. But where can i order this [B]Super Sculpey Firm[/B] here in Germany? Can't find a familar German Online-Shop.
In this case, try ebay ;)
Otto Ebeling Kunstbedarf sells that stuff too.
Wow!!! What a great tutorial! .. looking forward to your workshop. uh uh ah ah
image-size reduced ;-)
A pretty rough tutorial, but it gives a great idea of how to start modelling a mini. Thats something I was missing for a long time.
I would really appreciate a little step-by-step tutorial of "How to create a Head". Roman showed it quite roughly on his workshop in Cologne1, and mentioned that ure one crazy monkey.
regards Marc
Excellent tutorial!
Always nice to see other people's process for sculpting. Really need to get myself some sculpey and test it out as, at the moment I've only used GS and milliput.
Will be favouriting this one for sure.
Thanks again,
Andrew
Finally had the time to read all of this. Thank you a lot, mati for sharing this with us all - really impressed :)
Nice article with pics. You forgot to mention, the loop for the head can be cut at the latter stages, to make a hook, for minis with thin necks (so that only one wire makes for thinner necks). I'm glad I got to see this process in person, and ask lots of questions.
I've had a quick read through, column=spine for those who are wondering. ;)
The armature steps are definitely impressive. Very logical, following all the major skeletal joints, then reposition for a pose.
Question about attaching the arms. I always bake my torso first and then drill holes and glue the wires when I do arms. How do you put the arms in while the clay is soft and keep them from moving around when you sculpt the arm?
well they are stuck into the kork and the green stuff holds it in place quite well as long as you don't treat it too rough. when you applied the sculpey on the green stuff it becomes "one mass" if you want. the larger the scale the better it works. but like this it is no problem either, just treat the mini nice and soft and you will see you can attach the arms without baking the torso first. the problem when baking the torso for me was that I lost the possibility to adapt the torso to the arms and vizeversa using only sculpey. if any changes were to be made at this stage, it was always going back to 2 component putties. this method takes a little practise but is easy to learn and to do as soon as you tried it a few times. give it a try ! ;)
for everyone interested in sculpting and more information about it. visit the drueckepeter forums. you can find a link on the right in the list. Happy sculpting !
Cool :-) Thank you. That comes at the right time because I want to start a human sculpt soon. I`m also a bit anxious about adding the arms to the soft sculpey but I will give it a try. If it won`t work you will have to give all your bananas to me as a compensation, lol.
Very cool article. I have been interested in trying to do some full sculpts... all my stuff to date has been seriously modified stock minis. How do you rate Procreate over Greenstuff? I've not used it enough to really judge.
i typed proportions in google but i cannot find your chart that you use can you give another tip or post this somewhere
i cannot find the chart in google, is there a way that you can post it for me please
by the way great scupting and great site
It seems like you've done everything very quickly. How many hours aproximately did it really take?
For those who are wondering where to sculpt the muscle and stuff visit www.posemaniacs.com
-snu
You really should make a face sculpting tutorial too, with more pictures. The face is amazing but the instructions how to sculpt it are too brief. More pictures please!
-snu
where did u get the proportion Chart 32mm? I was looking on the internet for it but I didn't find it for 32mm figures.
Not the same, but equally useful: 3dpower.free.fr/Plans/
Download Femme.gif and Homme.gif to get the relevant pictures.
Great tutorial! When I'll try to sculpt my own miniature, this article will be very useful.
Hail!
Hi,
thanks for the great tutorial and the gigantomatic website.
When sculpting for myself I came across some questions, I just wanted to ask - I really would appreciate, if you'll find some time to answer:
1) how do you get the putty so clean and smooth? My results look always a bit ruffled (I tried green stuff, magic sculpt and fimo)
2) how do you add more putty to already hardened surfaces? I did not manage to let the putty in the place I wanted it to be and sculpt it as well.
3) Is there any way you can create a tutorial on how to create two different facial expressions and the different approaches to get the right result? (in best case from drawing to sculpt) / sth like what do you have to do with the result you want in mind.
I know especially in the third question I asked for a lot, but maybe you like the idea :) if not, never mind.
Thanks a lot for your great work,
yo-chen
this has seriously inspired me to start some sculpting of my own, thanks for the great tutorial, you're very talented.
hi
great tuto realy usefull, is it not possible to scan a peace of your proportion chart and mention the scales please? If i have one i can make my own chart with the different scales.
Many thanks and keep up this great tuto, realy helpfull
Franky from Belgium
Duuuude! That is a ridiculously good tutorial and precisely what I needed - big thanks to you great apes!
It is possible to line to the image used for proportions? All the ones I found were either fuzzy or just plain bad.
Check: http://massivevoodoo.blogspot.com/2011/08/hello-friends-of-jungle-i-got-asked-few.html
This sculpture tutorial is great. Thanks. How did you get the miniature off the base, off the cork?
Genius! I hadn't thought of connecting arms that way.
Amazing figure...!!! I love all the details.
The pictures also are great, and it's a very good tutorial. For those who are starting this raises our level of aspiration.
Thanks for sharing.
Where did you get that proportion chart? Also, what is that green stuff called? Thanks, awesome work btw.
Hi Oscar,
http://massivevoodoo.blogspot.com/2011/08/hello-friends-of-jungle-i-got-asked-few.html
http://massivevoodoo.blogspot.com/2011/09/proportional-paula.html
Just scale them down as you like.
The green stuff is just casual green stuff, called green stuff.
Hey I just found this, and want to give a huge thanks for this post. I am just starting out and this is hands down the best, most informative blog out there on actually working with miniature sculpting/ painting. Cheers!
These blogs are quite incredible that have provided the best knowledge. tutoring english
I really need those propportion charts you have. I cant find anything similar.
Mmh ... unfortanetely this is a look on Mati's table. I am not sure how to get hold of these charts. Please write to badsmileundbadone(at)yahoo(dot)de and ask him :)
I would love those charts as well!
It is possible to line to the image used for proportions? All the ones I found were either fuzzy or just plain bad.
Tamil HD Movies and Dubbed Movies
https://boldwap.net/tamil-gun-tamil-play.php