posted by roman, jarhead, kongHi.
Here you will find the complete Step by Step Article of the
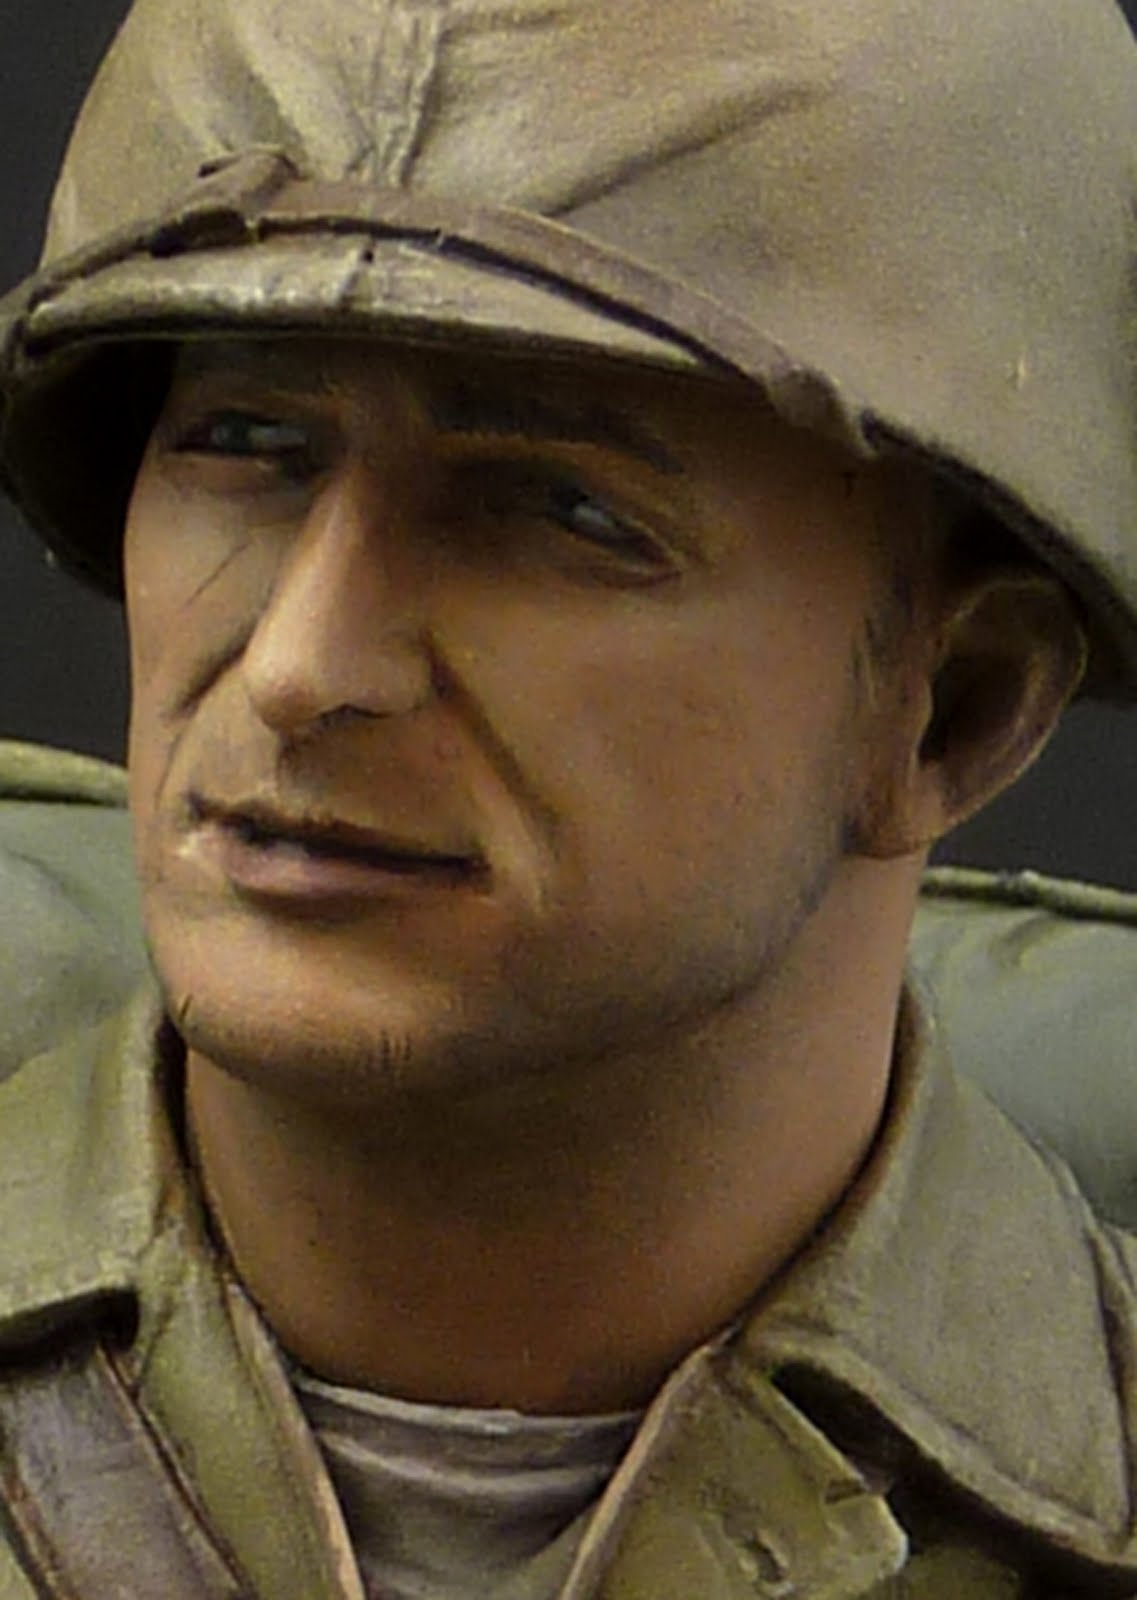
Young Miniatures bust of an
USMC (at Iwo Jima / WWII) i did paint up.
This Step by Step is far more to me than only a Miniature Progress Explanation (MPE). You will see that there is a lot of emotion from myself in it - i hope it helps you to see more and get included in the progress of the way on how i sometimes got struck by a miniature with all senses... Hope you like it and it could inspire!
Leave a comment if you do so, that would make me happy :)I want to say thanks to
Raffaele (Picster, Massive Voodoo Crew),
Jim and
Robert (Muhani, Massive Voodoo Crew, for his all time motivation) who really helped me a lot during this project, for sure everyone else who commented at the WIPs and helped me bringing this project further. Also big credits to Young B. Song for the wonderful sculpt and the great inspiration! Also i want to thank Tom Hanks and Steven Spielberg for inspiring. Mr. Hanks i have a gift for you (this bust) and someday i hope to hear from you. Until then the Bust will be a gift to Raffa :) -
anyone who thinks he has an idea how to reach Mr. Hanks is invited to help...To see a
review on this bust while unpacking it
click here!As this article is really massive i would recommand to those intrested in getting inspired by it should read it completly first, as this shows my way of thinking during the painting process and sometimes you'll get what i mean in the end after reading it 3 times, haha.
Introducing thoughts_____________________________________________
Sometimes when i got struck by a good series it can deeply touch my soul. This has happened again while i did watch the latest HBO Series by
Tom Hanks and
Steven Spielberg called
"The Pacific". You know those two guys really are great in the things they do, but i guess you know what i mean. I saw the series
"Band of Brothers" some years ago and i am not a fan of war at all i was fascinated by the touching portraits of the men who became soldiers there, how they're life did change during these days and what their sacrifice meant for history... i still can't believe such things did happen only 70 years ago and i have the deepest respect for those who fought, who died and those who are still alive of these gentleman. I don't want to do a political statement here about the reasons of the wars humanity did fight in the past, this is not my goal. I just can say that i do greatly respect the portraits of men shown in such series... whatever reason they had to fight and had to die in such big numbers. I don't want to lose anymore words about who was evil and who was not, everyone should have learned from this horrible days of humanity. I am simply touched by the past and what this time periods did to people, families and friends. I am intrested in history that's all.
I was touched lately by the Miniseries "
The Pacific". It is about the war the US fought against the Japanese in the WW2 and brings some background of the events and a closer look on individual soldiers who fought there, it is also commented by some of the real persons who have been there and survived.
Here is the Intro to the series which i really love by looking at the visual impact this brings!Here you can find a trailer to series, by HBOIf you are intrested in some background to these events i could only recommand to you the movies by
Clint Eastwood, who takes a closer look at the battle of
Iwo Jima from the view of the Japanese and the Americans. It is really intresting. Here are two more links:
Letters from Iwo JimaFlags of our Fathers I don't see these films as action movies or something like that - personal for me it is some kind of education, hope you get me right with this one. It is important to me that you get me right, that is why i am telling you all the time :) - When a miniature is so deeply connected to my inner soul due different content i have read, seen and searched about this theme it is always something special to me. I will dirupt the Step by Step sometimes with my own inspiration i was searching for.
This has been my own beginning thought after assembling the bust:
"...and i am looking forward to make him look like he has survived the horrible and fierce landing hours on the beach of Iwo Jima. I do like the painting master a lot (and i have to thank Young B. Song for his great sculpt and inspiration), but from my personal view this guy is way to clean and did not land on a vulcanic sandy beach where japanese artillery did strike with full force at the landing USMC... i will try to catch this vision - more soon, maybe :)"
Historical background____________________________________
Before to start painting a bust with such an historical non-fiction nor fantasy background it is always important to
inform yourself about the historical events which took place. For sure the above named movies and series is a good start and might be a good idea doing additional reading about the event in detail - for example here on
Wikipedia.If you are intrested in even more background here are some links following that can bring you the events closer:
Additional Reading about Iwo Jima 1 Additional Reading about Iwo Jima 2Additional Reading to the Pacific War Scenarioa series of photographs taken by USMC Photographer Douglas H. PageIf you google "
Iwo Jima" you'll find a lot more places to spent your time with if you want to add this to your own education. I did read a lot.
For me it was
important to get a bigger view on the events, not only the battle of Iwo Jima. There was truely hell going on in the Pacific World War 2 and i was searching for the books the series "The Pacific" was based upon. I found them and read them, first hand telling of enlisted young men that fought there on several island operations and survived. Highly recommanded for those really intrested in, but as those books have been my first "real war books" they changed my view completly and touched something deep inside my soul. They are no fun to read, nor is it a tale about heroism, you'll get the naked brutallity of the Pacific War hammered in your soul and smashed in your face...
I am not really able to explain what i feel after reading these books... i can say that i am a really lucky person not to have lived in these days of war, not have to fight in my life, living the easy life i can live. I can say that i pay my deepest respect to those who fought and those who died whatever reason they had to do so on both sides, respect to those who keep their minds intact during these nightmares of war. I can say that i am completly struck and overwhelmed by the additional education i've walked into... tongue-tied, soul shaken, shocked and completly overwhelmed fits best... i can say that i hate WAR, i am lucky to say that i have not seen my own.
"With the old Breed" really gave me a lot of historical background, not only the telling by
E. B. Sledge also the side notes through the whole books about the detailed events that took place.
Robert Leckie's "A helmet for my pillow" was a bit harder to read due of the english slang written there but it also is truely recommandable.
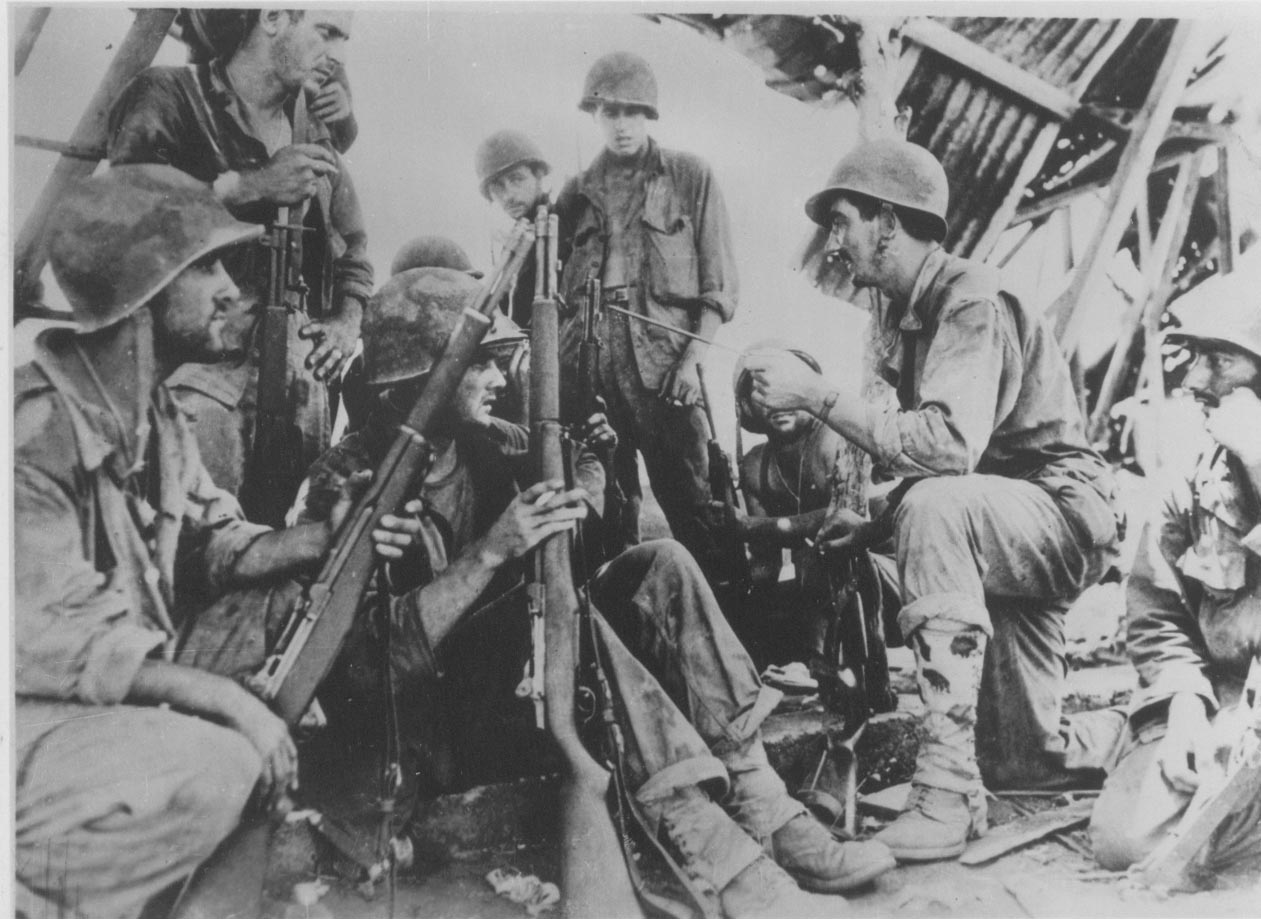
Here comes a
quote out of the book "With the old Breed" about the appereance of an USMC during the campaign of Peleliu, sure it is not Iwo Jima, but when you think the person survived one campaign and was sent to another, for example his clothes must have been different than back in boot camp in the states. This really gave me a good impression:
"With the old Breed" by J. B. Sledge, page 144, Peleliu: A Neglected Battle, Brave Men Lost
"During the latter phase of the campaign the typical infantryman wore a worried, haggard expression on his filthy, unshaven face. His bloodshoot eyes were hollow and vacant from too much horror and too little sleep. His camouflaged helmet cover (if it hadn't been torn off against the rocks) was gray with coral dust and had a tear or two in it. His cotton dungaree jacket (originally green) was discolored with coral dust, filthy, greasy with rifle oil, and as stiff as canvas from being soaked alternately with rain and sweat and then drying. His elbows might be out, and his knees frequently were, from much "hitting the deck" on the coral rock. His boondockers were coated with grey coral dust, and hsi heals were worn off completly by the sharp coral.
The infantryman's calloused hands were nearly blackened by weeks of accoumulation of rifle oil, mosquito repellant (an oily liquid called Skat), dirt, dust, and general filth. Overall he was stooped and bent by general fatique and excessive physical exertion. If approached closely enough for conversation, he smelled bad"
With the Old Breed is the book i am reading at the moment and it is really moving and shocking and i am glad to read it to learn again that i just can sing with this
Mister!Huh! Strange days doing such a research in this theme, the book really shakes my soul and meanwhile i am enjoying painting a soldier from these days.... somehow strange but to me it seems that it is some kind of education to me, fascination for the theme, and really making my soul a speech for the things i feel ...
It is really intresting to get in touch with the thoughts of a casual soldier who had to fight for his country in these days... very intresting as you can see so much in the character of the people what war does to them that it is really shocking and totally mind blowing... really something different than reading fine historical books, for example about the middle age written by a great author including a hero-character ... this is truely something different...
Keep on happy painting!
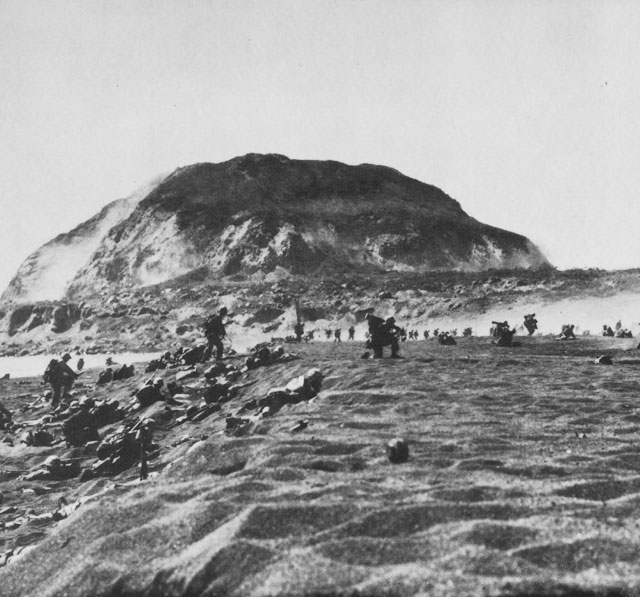
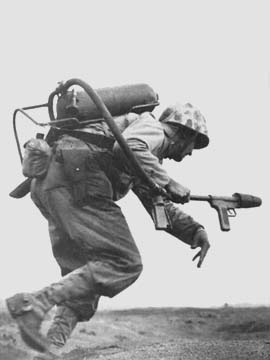
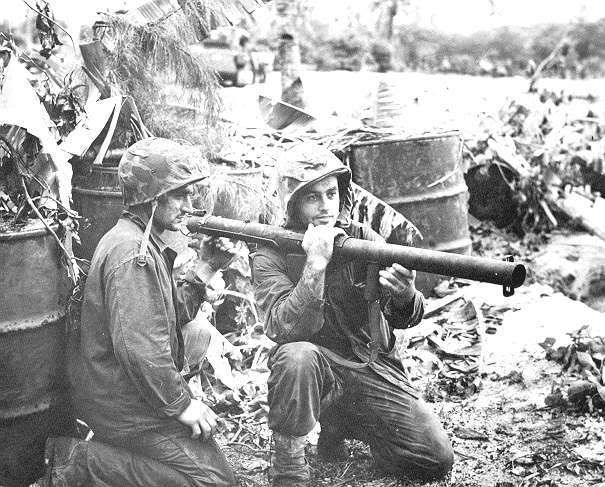
RegardsRomanI allowed myself to attach some photos i found (click to enlarge), including the source where i found them (if this is not allowed and anyone is angry about it please let me know, i will delete them and just link them up). You will see more inspirational links attached during the process of the article, this shall bring you a closer view on the research i had done and is to underline this article with its historical brutality (and is maybe a help for those lazy in reading). Here is a view on the landing US Force on Iwo Jima,
found on
I really found tons of more photos, some cruel and brutal as war is, in the end i will not show them all -
With all the background in my head, heart and soul i did start to paint the bust - a feeling inside myself that is beyond words.
Preparing the bust__________________________________________________
First, again a view on the
First Steps of Preparation while unpacking and cleaning the bust -
here!More about the preparation progress you can find here in the
Basics Tutorial Article Section.
If painting miniatures is your every day way of life i can promise you there will be some WIPs all the time. Some grow, some stand still, some are waiting for the right moment ... WIPs don't stress my anymore as i have learned to look forward to this right moment, the moment when your inspiration kicks your butt to a project and maybe to the projects end... don't worry about your right moments, if you are honest to your heart and skills they will come... those right moments...
I did some tiny sculpting work on the
USMC bust - to make him look like he has seen some action and survived there on Iwo Jima. I did fine cuts with the scalpel in the skin to later on show scratches, bigger areas have been cut out with the scalpel in the clothing and did recieve a little sculpting work with mostly dry Magic Sculp to show damaged clothes. He thought of some shrapnell wounds on his left arm but decided to remove them again as i guess such wounds are nothing you stay calm with... i am glad to have no experience in that. Every edge of the leather belts and clothes did get some fine scratches to make them look more used, i waited with glueing the machete grasp and the helmet belts til the painting will proceed as they might bother me while painting... pinned him on a
wooden Socket for
better handle (not the final one) and he already is
primed.
Painting the bust_____________________________________________________You know will have an insight in my painting process, indeed also my additional comments, like a painting diary. I did start to read
"with the old breed" by E. B. Sledge and i got to say i slowly get into the mood to paint up the USMC of Iwo Jima (Scale 1:10). When i talk about mood in this case it is not about feeling happy, it is more about respect to those young men like me and you who had to suffer during the war... My today's photo inspirations which i did find by using google:
OneTwoThreeFourFiveSixSevenEightNineTenElevenI choose to start the painting with the
face - you now got to open your eyes because my mind thinks fast.
I also wanted to change my colour palette a bit so i decided to use Andrea Skin colour set for a start. First steps -I did start with 1st and 2nd Base in a mix as a
basecolour then used only 1st base to sketch the first light areas in the skin and only 2nd Base for sketching the shadows (will work with a zenithal lightning, light from above the sculpt).
Left from right is 2nd Base, 1st Base and 1st Light (which i did not use in the first step explained above):
At the moment the areas are not completly opaque, but that is ignored by me as further steps bring me further and will change this subject.
Second step was strengthen the highlights by adding 1st Light to the 1st base and a tiny drop of yellow - here you can see what i have done on the right lower side of my wet palette:
Also gave the cervical and the chops areas another run with the
basecolour to achieve a bit more covering of the layers, having in mind that there will be shadow down there- The Eyes have been painted black. not perfect at the moment, simply a sketch for preparing further steps:
Next and third step was using Yellow Olive from Vallejo Model Air colour and a drop of Andreas Skin 1st shadow, mixed together to strengthen the first deeper shadows, you can see the colour i have used here on the left upper corner on my wet palette:
Also i have taken some advantages in sketching the clothing colour - it is not right at the moment but it is just a sketch for further getting to the point i want to be later on - here are the colours i choose for this sketch, not yet finished and i am not thinking about the historical right colour and carefully paintwork at the moment (that arrives sooner or later), painting from feeling i'd call this...
No resting time in the jungle... after reading the book by Sledge like a whirlwind i really got stuck into this theme... wow, i have to paint and think on the USMC all the time...
today's inspirationand another one Explanation about my painting: Short Explanation about how i paint on this model. I really try to catch my inner feelings and imagination i have of this USMC on Iwo Jima. For me it is not the most important thing to catch the right production colour of new Marine Uniforms. Important to me is that there is to see that these guys had to suffer every single day in the Pacific, sometimes short of supplies and for sure no soldier that has seen some battles and survived has 8 new uniforms in his backpack to be dressed for dinner every day... that is what i try to catch.
I did find most of my equipment colour inspiration by the feeling the series "The Pacific" left behind inside me but also checked other inspirations, like this:
Click!
Working on the
clothing was the next step - the face for the moment is at rest as i am always making progress everywhere to see to have the option of having the final result in mind. I have used glazes of Vallejo's Air Yellow Olive + Citadels Camo Green + Catachan Green + Graveyard Earth, totally mixed in a storm of mixing joy... + a drop of chaos black into this mix for the shadows. Placed shy first lights with a tiny addition of Kommando Khaki - also i made a sketch of the fabric pattern of the clothes which you can also see
here with a brighter tone than i have used for the areas.
For the
leather parts i have used a was mixing the colours at the miniature itself using the following, Citadel's Schorched Brown, something bright from the Andrea Flesh paint set i still had on my wetpalette, a drop of black for the shadows and yellow olive by Vallejo Model Air + somewhere in between was for sure a mixture where the nice brown from Andrea's Skin 1st Shadow jumped into it...
For the
belts and the
backpack i have used Graveyard Earth for the basic which i did bright with some bright skin colour again and sketch the shadows with a drop of my leather colour mix in it. Wow, that sounds like paintin', huh?
I did paint the working socket in pure black to have a better view on the bust itself without the distracting white primer...
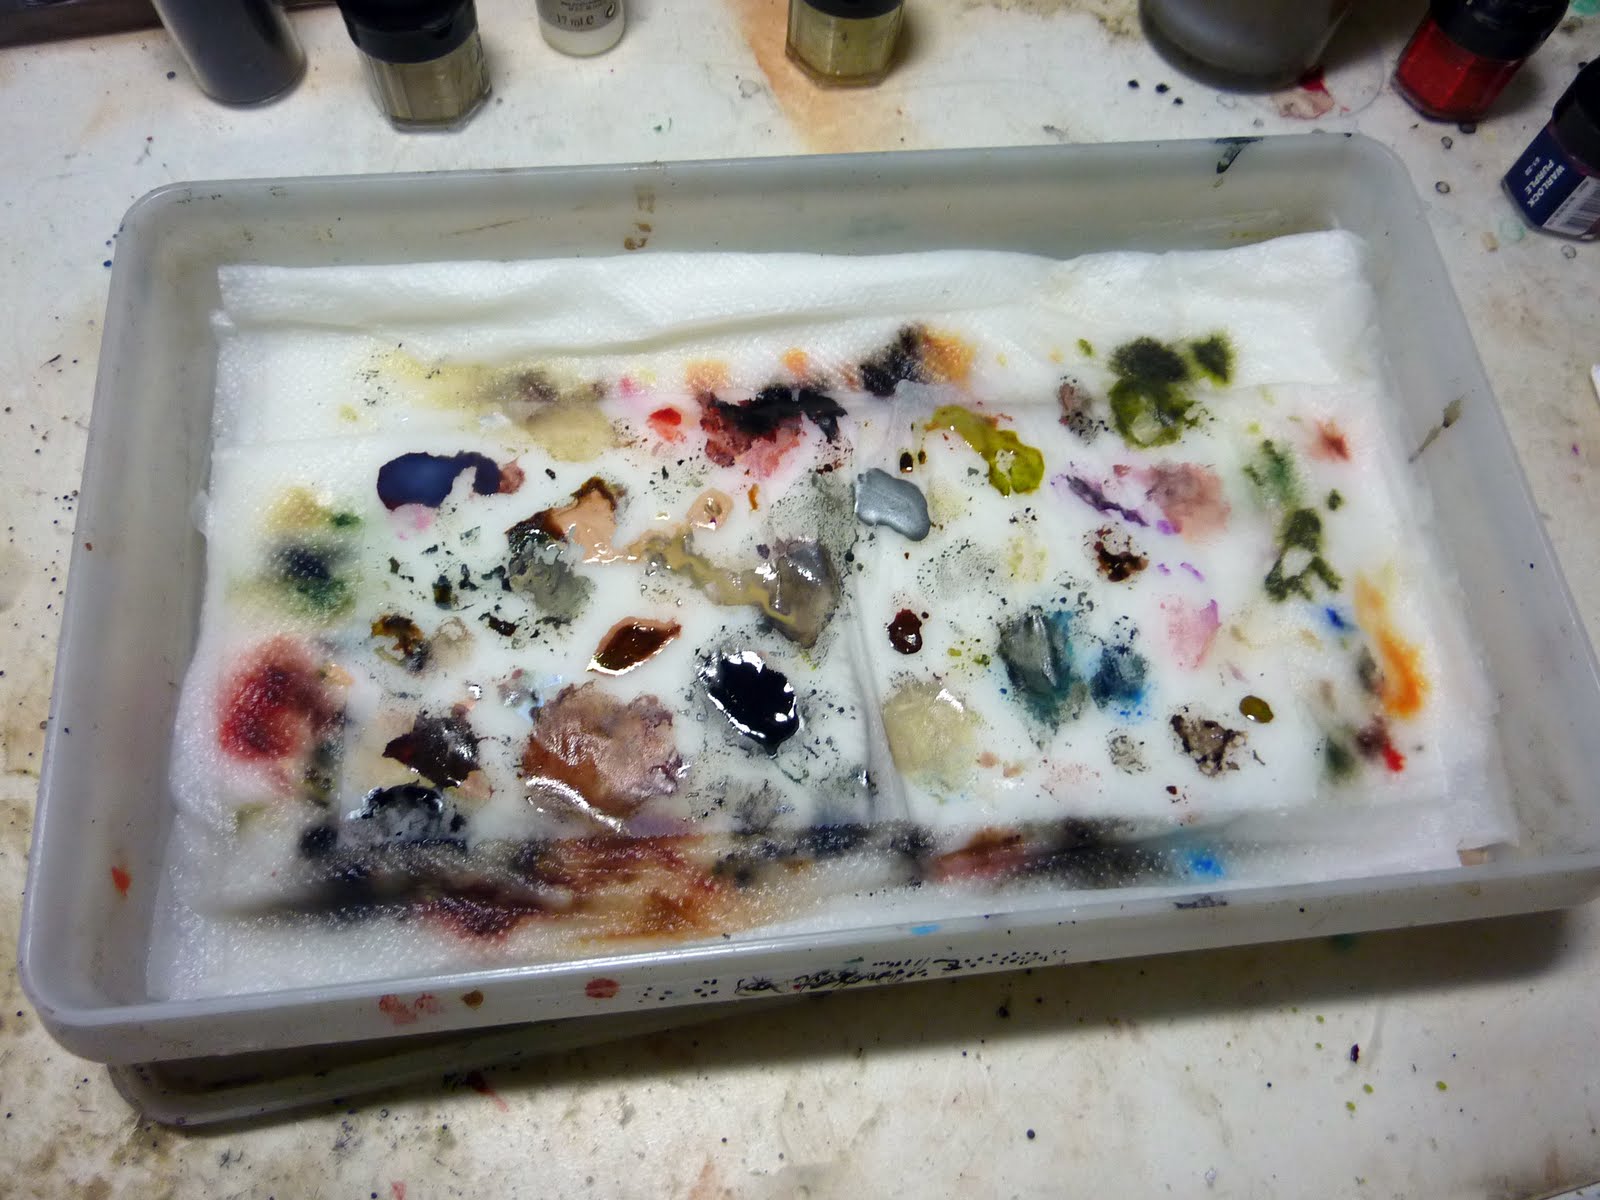
My
wetpalette looked like this, but i have made this photo after i did paint the basecoat for the helmet and sleeping bag, so i hope it is not too much... tourquise marks the spots i have used for the clothes, orange/yellow marks the spots i have used for the leather and the belts... working my way from detail to the end... please remember this is Work in Progress so it is dirty and i guess it will stay dirty but with a bit more charme in the end, haha...
Next i've went for the helmet's and sleeping bag basecolour with sketched shadow and lights... using everything that has been on my wetpalette already... mixed in some green here and some brighter tone to make it brighter there and some darker tone to make it darker here and there... hard to explain but it isn't that important at the moment as those are basecolours...
Important: I now took
this photo from the Series of "the Pacific" for additional inspiration.
Still everything is mostly base colour and it isn't covering everything, that ain't a problem as this happens later on... important to me was to catch the colour i feel for the helmet and the sleeping bag, camouflage comes later on and covering colours will work out the contrast of light and shadow soon... i missed a belt here on the left...that happens easily during painting fever, going from Chaos to clear and sharp painting in time:
Next i concentrated a bit of bringing in details on all the equipment and the clothing by using a fine brush with a good tip, pure bleached bone to set strong
fine spots of light to the edges of the gear and the upper areas of the clothing, for example like the shoulders. This will be done again later on, but at the moment this sketch is important to me for further progress planning. The
eyes have been painted with a mix from Space Wolfs Grey, Skull White and Bleached bone. I did not want to use pure white here as this might get too strong in popping out. The eyebrows have been sketched with 2~3 glazes of dark grey/black/olive.
The
clothing did get some further attention with greenish/greyish/and darker glazings, really gently while my brush catched the colours on my wet palette in wild fury. The lower shirt has been painted with a brownish grey and lights have been set with bleached bone, additional with bleached bone + a tiny drop of skull white again.
The
face/skin did get more shadow contrast by mixing in a bit of yellow olive and 1st Shadow of Andrea's Flesh painting set into the basic skin colour. All done with repeated
soft glazes. Deeper shadows have been sketched around the eyes and under the helmet areas, which lay in the shadow because of my zenithal lightning source by adding a tiny drop of Skincolour Set's 2nd Shadow into that mix, again sometimes a drop of yellow olive found its way into that mix and i did mix in a gently touch of purple for the deeper shadows in these areas, The warm tone now comes from the Second shadow colour (i have also used this on the shadows of the backpack and the sand coloured gear belts)
, which looked like this on my wet palette:Sorry, some of the next photo series are a bit too yellowish, my fault somehow while doing the shots.Important: A tutorial on how i did paint the leather belt you find by
clicking here!Further progress has been bringing more warm tones into the
face by using thin glazes of Blood Red mixed into the basic skin colour i hav used, again a drop of yellow olive found its way into it somehow.
I did strengthen the lights in the face with glazes on several tiny areas of bleached bone, followed by bleached bone and a tiny, tiny drop of skull white (simply to make bleached bone brighter).
Again i am focusing the skinwork on this reference. The lips have been painted in dark skintone with a tip of red in the brown to make them more alive. The
eyes progress has been setting the Iris with dark blue as a sketch. Check out
this article about painting eyes.
I began cleaning up the the mess on the clothing area by using a dark olive/black tone to confine different materials like the gear and clothes from eachother. This will be finished in the end as this process walks all the way along with me while painting the bust to finish.
The three day beard has been sketched to the lower face area by using the greyish, bit blueish black mix you find on my wetpalette again, in the upper left corner. Thin glazes have been spotted carefully in lead angle with a randomly fine brush tip in several layers to intense the strength of the beard in the shadow areas below the chin and jaw. Also used this mix and technique to sketch the back of the head and the neck normal hair. I then followed the same idea up with painting tiny lines into that beard sketch to strengthen this look.
Don't you wonder know that the photo series now are sometimes really lacking in good colours on the photos as some are made on the balcony, some are made in the photobox and some are made with lightning by the camera... all with different light conditions, i know it's stupid, but i hope you get what i mean, sorry:
I intensed the
warm colours in the
face area by using thin glazes of pure Blood Red and sometimes a bit of Warlock Purple in it. Take care not to have too much water in your brush as this might bring dirty looking places. If you still encounter dirty looking places get back to your basic skin tone to glaze them away. Also used this to bring some gentle colourful shadows into the belt equipement.
I now glued the machete grip to the model. No idea why but i did :)
Next i did paint the
machete black, might need several thicker layers, but you can also prime it in single and then glue it to its place.
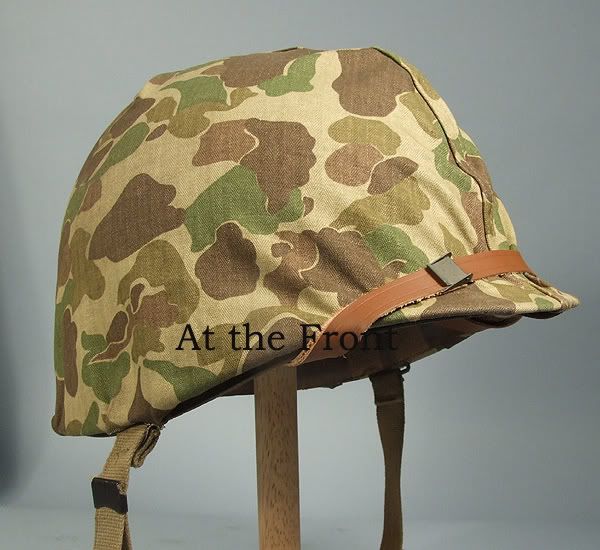
I did start my work on the
helmets camouflage by taking these 2 references as a master:
Click! and
Click!But in the back of my head was still this reference -
Click!I did start the camouflage pattern by sketching the brown areas. I did use Schorched Brown for this, as far as i can remember i did also use the 2nd skin shadowtone which still was left on my wetpalette (following photo). Also i did start the greenish camouflage by using a dark green mix from yellow olive and camo green. As i saw it was getting to dark i mixed in more camo green.
I now did paint the sketch up with the colours i have used before. If you do so and unclean areas appear do another layer on top of it to have it oquape. In the upper area of the green and brown i used the same tone just a bit brighter.
I did choose
this photo as a reference and there the
cloth and camouflage on the helmet is really worn out and dirty. The dirt comes later on but for giving this are a more worn look i did use a tiny amount of yellow sandish pigments a bit of Bleached Bone, Kommando Khaki, Desert Yellow and Graveyard Earth in the mix as a glaze and tipped it on the upper areas in several goes for making it dusty and washed into eachother.
The next step has been applying
the dirt in his face and on the clothes. As you can see again on the same refernce photo, there seems to be material in it. Raffa brought me to the point using the same technique i used here for
snowflakes, natron and matte varnish, only by adding black pigments into the mix for making the natron black. I've also added some Scorched brown in the mix and then gone wild on the bust. If you are unhappy with an area take another wet brush and move it in the place you want it to be - or remove it. Test effectivness proved, haha. Matte Varnish and Pigments will keep it dry looking in the end.
Again i am still on the dirt. Looking on my reference photo i also find there some
blood in it. Blood from an injury and blood from maybe other soldiers who got woundet next to this person. I was really fascinated by those blood spots on the worn out helmet and tried to apply them to look the same way afterwards. Here you find a tutorial about
how to paint blood. So i've used Clear Red again but this time thinned it a lot with water on my wetpalette and applied it very wet. While looking at it you can see that it starts drying. At this point pick up a dry brush to remove most of the water from its place, some will stay and after applying it for several times and in different tones of brighter and darker red (to make it more dark, mix in Schorched Brown).
After i had applied a black basecoat on every
metal part, i went for the metal painting but having in mind that it might be very stupid if you got shiny metal while fighting, so i choose to not use total contrast here. I did apply a mix from Oily Steel and a drop of Chaos Black (50/50) on the black basic colour. After this i mixed in more Oiliy Steel to brigthen it and finally some fine detail work with pure Oily steel (can be compared to the detail dots and edge attention of the clothing and gear). Here you can find an article about
my thoughts on metal colours and here is
Andrea's way to go for it with Oil Colours.
As i was making coffee with these modern coffee pads we have i found them drying on a tissue and thought i'll give it a try on the helmet and the clothing and gear, everywhere except the face. Simply pushed them into place and removed them with a dry brush if it was too much. After painting so far, therefore you
need balls!
In between has been some higlighting the some edges of the busts equipement again with a mix out of a tip of grey, bleached bone and 1st base Skin Tone by Andrea. Also darker lines have been set again for the so called darklining and seperating differnent stuff from eachother.
Also the
machete grip broke loose while painting and i completly left it behind, for me it has been out of place very much in the overall look. So he might is holding it its hand at the moment, lost it or lent it away... who knows when all hell broke loose. I will paint it as a empty leathery scabbard.
You now might ask what these letters mean in the upper photo. I'll now explain you the painting process of the sleeping back. I also took
this photo again for reference. It seemed to me it was in the same material than the camouflage cloth on the helmet was made from so i've went the same way here. My basic colour from the beginning has been a dark green, but that was just a sketch so it was up to me to catch the right colour again. I am never scared when it comes to change a colour in its appereance because this is everything painting is about. I've mixed Graveyard Earth, a tip of Yellow Olive again for the first appliement.
Now i will explain how i did apply it. I using a bigger brush (Windsor & Newton, Series 7, long, Seize 1) for it as i did for everything else til that step. The colour was no glaze at all, it was more a colour out of the bottles with a bit of water to make it creamy. Then i've applied this by making only strokes in one direction, i call them strokes to the lighter place in the end. You can still see how creamy and wet the colour is on the basecolour which comes through in the lower areas. I only did it so far at the place everyone can identify i hope.
Now is not the moment to be frustrated because it doens't look the way you want it to look right now. Let it dry and do this several times, always stroke in the same direction with your brush. It will get oquape and the main pigments and strength of the colour will remain in the upper parts of the place, where later on some lights will be made stronger. Everyhting is fine, easy and unhectical...here is the photo again that shows you the progress:
A) is done 4x
B) is done 3x
C) is done 2x
D) is done 1x
After i had done it everywhere for 4x i did bring in a drop of bleached bone into this mix make it brighter and set some lights at the wrinkles. Some final detail Spots and Edges in pure Bleached Bone have been applied. At the moment the sleeping back will stay like this - now there has to be the camouflage again - same procedure like the helmet's progress.
Next
the leather did get some glazes with Vallejo Model Air Tank Brown 71041 to make it more warm in its material look. This also provides that i soften the texture on the leather.
Some thinned with water mixed
Gloss Varnish (Vallejo Model Colour 510) was placed on some areas in the face like the chin or the the cheeks and has been placed randomly at the earthy explosion dirt.
I also applied some really soft glazes of it into the
skin area . Talking about skin i have say that the final work on the skin went hand in hand with the last work on the
sandy gear stuff. I did use a drop of Grey found on my wetpalette mixed with the 1st base of Andrea's Skin colour set and a drop of bleached bone to work my way into the lights and bring some structure in. I did use this
photo as a main refence, but always thought about the worn out look and the use in the battlefield just a moment ago. With this colour i did also strengthen the final lights at the clothes, at the front gear stuff, at the helmet cloth and in the skin. I did highlight it once more by using more Bleached Bone in the mix on several tiny important places and did some minor darklinging everywhere it was needed. Then used the explained dirt work like done before at the backpack too. Now i finally had the muse to take the time to do some good photos out of the
lightbox again.
At this point i had my fun playing around with making these photos black and white, some might have seen the WIP i did post back in
this posting. Thanks to Flann, i really missed the point for such a fun trip by not making the contrast stronger, here you can see Flann's Version. This test has nothing to mean for the painting at all, but as i was looking on so many black and white photos in the last couple of weeks by searching references i simply had joy doing so - thanks @ Flann:
Next Step has been painting the camouflage to the
sleeping back using the same procedure like done before on the helmet. Also done the same final work with dirt, highlighting and blood there. Same procedure like on the helmet's finish... i hope you all did read well :)
I also have applied the
dirt on this area, but this time again with something experimentel. I did use ash from my ashtrey (never start smoking!!) with matte varnish and applied it. I have also seen that some of my earlier experiments wasn't really dried out (Black Natron Stuff) and i applied this also by using my finger. Blood and Coffee Pads were also included in the finishing process.
In the
face i did some minimal minor highlights with pure white on really tiny spots.
This is the finished bust - i will attach it to a non WIP Socket soon and Raffa will told me that he would do the final photos of the model with his super equipment - thanks for that buddy :) - i did never think about giving him the cigar he has on the master, i thought about a worn smoke of Lucky Strike, but this would have made him to heroic in my eyes, that was not what i wanted to catch even most men there did smoke or did start to smoke due of the "Meat Grinder"... i still got to fix the helmet belts and paint them but this is nothing new and i am off with this article now...
This is how the bust looks in my
cabinet with lightning by the camera:
This is how my wet Palette looked in the end. I did change int twice during the progress. Now it is time to clean up the mess on my workbench again, haha:
I finally glued the helmet belts in their place (
using superglue and a toothpick for it) and painted them the same way like i did with the other sandish equipment. Again i made them dirty with the techniques explained above.
Socket Change_________________________________________________________As you might have seen i've worked the bust on a WIP socket, which i did paint and stuff, so it won't be for display. Raffa had the great idea to take another one, saw it with an angle that the Bust fits well and burn it. I did -
here you can find a tutorial about how i did.
After drilling the new hole for the bust's metal pin i was working my way with sandpaper over the complete socket and painted in black, drybrushed the areas which i've burned before.
Final Photos:
Aditional photo material
click to enlarge

_________________________________________________________
Again i have thank everyone who has motivated and inspired me during this progress, from choosing the bust to paint it up to finishing it. There is a lot i have learned due this process, lots of unknown feelings i did encounter by informing myself about the background, a lot i have learned from these historical events, a lot respect i have born for those men back in history - all in all it was a true pleasure, but also a hard burden to encounter the terrors of the Pacific Warfare by reading and searching references. I won't tell that it is hard to read about war or something, it is hard simpy imagine it and i don't want to make the experience to really see it. That is what i have learned by painting up this bust.
Second, i hope you like the Article and there is something for you in there that might inspire you, maybe some of you have learned something but in the end i hope that this gives a good feeling to the way i sometimes bound my heart to projects like this. Feel invited to let me know what you experienced, if you did read it all, let me know what you think of the article or simply leave behind a small "thanks" - that would make me happy after hours of writing and photo making for you -i did this not for myself :) -
if you got any questions, please feel free to ask them via comment.
I am grown by this project inside my soul... somehow, it is hard to describe, really. I can only tell you that it should be always important to get yourself into this theme you are doing at the moment, it doesn't always happen like this, especially when you are painting up your 223th Space Marine Captain, but heart is always important when swinging the brush.
For those intrested: I did work around 40~50 hours on this bust, without the time needed to write this or taking the photos or searching for references...
This bust will not be on Sale, it will be at Raffa's until Tom Hanks will get it. If anyone got an idea or can help to reach Tom Hanks i would be very thankful. Don't you now write comments with a strange new name, haha. If anyone really takes this serious like i do and if you think you could help me, please contact me this
way!Hope you like it!
What makes me sad about this article is that i have asked the german publisher of the
"Figuren International" via mail if they would be intrested in the article. I did so, because in every issue i have they are telling and crying that there are not much more younger artist who are active in this hobby and that they hope the recieve also stuff from german painters - hey, i am young, good looking and german and i guess that article is not bad at all... they never answered me and i had to finish this project because of my inside - this really is weird and won't help the hobby to grow. Whatever, they never responded to me (this is the second time btw)... I think this article could have been in the Figuren International and might have looked well in it.
You might have seen that the last days on the blog have been really, really busy. This bust and July was the reason and the way everything around me struck me hard. I completly lost my Sanity, haha... Sorry that this article totally busts the site and all other postings are not shown anymore - this is something about blogger i don't understand, but such big articles are not very often.
Now i will be off for some days to recover and reach new energy. The whole thing is still working inside me. I'll be back with the final photos of the bust, maybe soon, maybe not soon. Quiet days are rolling in after my girlfriend has 6-weeks vacations from now on and we are also on the hunt to find a new place to live as soon as she knows where she has to work as a teacher... i'll be back - i need a break from the emotional painting circus.
Keep on happy painting!
Best RegardsRoman


