


posted by roman, jarhead, kong
I am really some kind of Rodeo Clown, here comes the next article out of the happy painting forest. This time it is about painting a freehand again. There is already one article in the Tutorial area, a quick and simple one to paint up a flag of a gaming model.
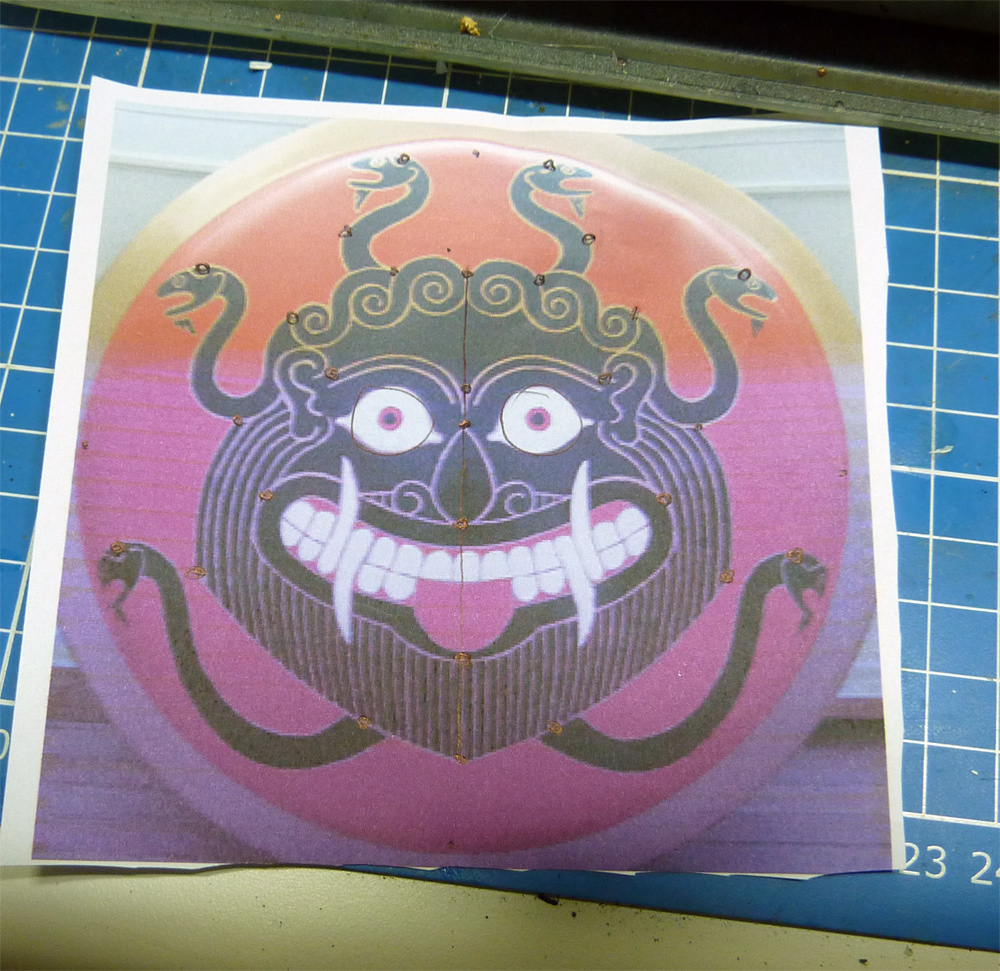
This article now brings you an advanced technique describtion but nothing perfect yet as i did it, haha - there is still a lot to learn and practice for sure. The main difference now is that i had a plan and took my time and did take care of my Brush tip while doing concentrated painting, instead of the first article linked above where i mainly did only sketch and paint roughly. The model you are watching during the describtion is still Work in Progress. Here you can see the plan...

The miniature shield was basecoated with some Citadel Red Gore, with minimal shadows already included. So i took my sheet of plan which i did find in the depths of google and marked important spots to have a guide during painting. These spots have then been placed at the shield via a toothpick and some bleached bone, Citadel.


After this was done i took a colour that is not that saturated, like Charadon Granite of Citadel to make a simple mask out of my points. If you would go there with a strong, saturated colour it will get hard to redefine lines and areas later on, that is why i choose something more desurated to still have the option of cleaning up my sketch. Oh yes, i am sketching at the moment - i am always working from a sketch to finer detail, please remember that too when you are at home, not every brush strokes must mean you destroyed everything, sketching is fun and getting finer is hard work :)

Next i took some brighter tone to paint the main bright lines to the face, still a sketch as you all can see. I did take Citadels deneb stone of the foundation colour series to achieve that. Nothing fency, still ugly and sketchy.

After this step it was time to clean up the mess. I now took some Red Gore again and did redefine the areas where the dark tone hits the red, trying to paint sharp edges. After this i took some Chaos black and did the same to the main body of the face, redefining the white lines. It is kind of simple, but it takes much time. Just paint a thin dark line beside the white line to make the white line smaller. When an accident happens and you don't hit the right spot just go back to the other colour and redefine from there.

It all dried out and i went for a glaze with Cryphon Sepia Wash by Citadel to bring it all more together. You see this glaze does transform my white into yellowish lines, just like i wanted. While it dried i've checked if it is still too ugly to be given to her hand and found out yes it is...

Waiting until everything is dry brought me to the point that i now have to rework some lines again. It is the same procedure like described above, working with reds, blacks and whites to sharpen the complete motive. You have to know that this took some time after all, sometimes i was finding myself at the balcony with daylight watching the shield and searching for massive mistakes i had done. Then hurrying back to the workbench and redifining. After this was finished i again did use a glaze of Cryphone Sepia to bring it all togehter. Put a highlight in the reds on the upper part of the shield and a gentle shadow on its red dark areas. I still found something to be cleaned up afterwards and did the procedure once more, saying this was the last one as i could do this a hundred times more to get everything sharper. Then i fixed the shield to my model by using the pin which was prepared for this action, simple glueing with shaky hands.

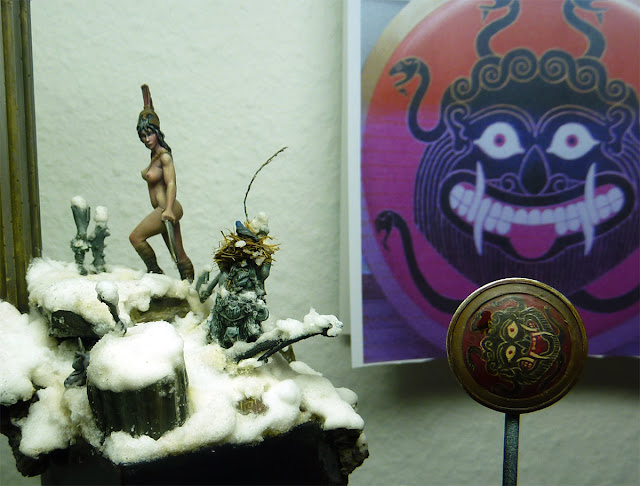
 Still i got some things to do at the shield like redefining, more light shadow, working with metals and painting some damage but i wanted to look at it in the complete context of my base to have a better overview over the scene before it goes further. The shield won't be the main part, that i can tell so far... there will be a story far more important. But still a lot of plans to be executed on this vignette. Even i am happy with how everything comes together there still seems an ocean full of work ahead. Sorry for the bad photos of this article, i am not really able to do good ones with my camera as you can see, randomly sorted in quality and colour.
Closing Words
I hope my thoughts could inspire you. This is not a perfect freehand, i know that. There is still much space to improve, but for myself this one really means something as i had a plan and did execute it.Maybe next time there will be an article about a perfe... nah, i will never be able to paint a perfect freehand as i am who i am :)
Some tips for painting freehands and redefine them: Use a sharp brush with a great tip, mine is a Windsor and Newton Series 7, long, Size 1. I would not recommand using too small brushes, a smaller size is not important as it just brings problems like there is not enough water in the brushs hair and you got to "refill" it all the time, starting at different points of your freehand again and again - that might bring more accidents. A longer brush with space to keep your liquid colour floating is half the rent. Concentration will be next - don't hurry at all. I am just telling you what i found out during the process of this painting. I was listening to classic music for hours today while i did execute my plan. You got to have a plan to do advanced freehand painting. i've learned that. Robert aka Muhani tells me that he always does his freehands while listening to "Benjamin Blümchen stories", that keeps him calmed. This is just just find your own way - may this article help you. I don't use my colours too wet, i mean not too thinned glazes as if i have to hit the same line several times it is getting harder and harder. I remember repainting the nose several times because of my failure in being calmed - it is training i say to my self, nothing more, so i will train... and search if there is maybe even more, haha. Oh dear, hard to explain... whatever it was a hell of a fun and a good feeling to have learnt something for the future. Hope my approach on thoughts could help you on your own freehands...
Skeeve added these tips via comment, many thanks for sharing your thoughts:
Keep on happy painting!
Best Regards
Roman
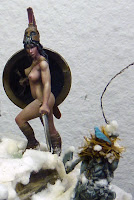
PS: A front preview so far...
I am really some kind of Rodeo Clown, here comes the next article out of the happy painting forest. This time it is about painting a freehand again. There is already one article in the Tutorial area, a quick and simple one to paint up a flag of a gaming model.
This article now brings you an advanced technique describtion but nothing perfect yet as i did it, haha - there is still a lot to learn and practice for sure. The main difference now is that i had a plan and took my time and did take care of my Brush tip while doing concentrated painting, instead of the first article linked above where i mainly did only sketch and paint roughly. The model you are watching during the describtion is still Work in Progress. Here you can see the plan...

The miniature shield was basecoated with some Citadel Red Gore, with minimal shadows already included. So i took my sheet of plan which i did find in the depths of google and marked important spots to have a guide during painting. These spots have then been placed at the shield via a toothpick and some bleached bone, Citadel.

After this was done i took a colour that is not that saturated, like Charadon Granite of Citadel to make a simple mask out of my points. If you would go there with a strong, saturated colour it will get hard to redefine lines and areas later on, that is why i choose something more desurated to still have the option of cleaning up my sketch. Oh yes, i am sketching at the moment - i am always working from a sketch to finer detail, please remember that too when you are at home, not every brush strokes must mean you destroyed everything, sketching is fun and getting finer is hard work :)

Next i took some brighter tone to paint the main bright lines to the face, still a sketch as you all can see. I did take Citadels deneb stone of the foundation colour series to achieve that. Nothing fency, still ugly and sketchy.

After this step it was time to clean up the mess. I now took some Red Gore again and did redefine the areas where the dark tone hits the red, trying to paint sharp edges. After this i took some Chaos black and did the same to the main body of the face, redefining the white lines. It is kind of simple, but it takes much time. Just paint a thin dark line beside the white line to make the white line smaller. When an accident happens and you don't hit the right spot just go back to the other colour and redefine from there.

It all dried out and i went for a glaze with Cryphon Sepia Wash by Citadel to bring it all more together. You see this glaze does transform my white into yellowish lines, just like i wanted. While it dried i've checked if it is still too ugly to be given to her hand and found out yes it is...


Waiting until everything is dry brought me to the point that i now have to rework some lines again. It is the same procedure like described above, working with reds, blacks and whites to sharpen the complete motive. You have to know that this took some time after all, sometimes i was finding myself at the balcony with daylight watching the shield and searching for massive mistakes i had done. Then hurrying back to the workbench and redifining. After this was finished i again did use a glaze of Cryphone Sepia to bring it all togehter. Put a highlight in the reds on the upper part of the shield and a gentle shadow on its red dark areas. I still found something to be cleaned up afterwards and did the procedure once more, saying this was the last one as i could do this a hundred times more to get everything sharper. Then i fixed the shield to my model by using the pin which was prepared for this action, simple glueing with shaky hands.


Closing Words
I hope my thoughts could inspire you. This is not a perfect freehand, i know that. There is still much space to improve, but for myself this one really means something as i had a plan and did execute it.Maybe next time there will be an article about a perfe... nah, i will never be able to paint a perfect freehand as i am who i am :)
Some tips for painting freehands and redefine them: Use a sharp brush with a great tip, mine is a Windsor and Newton Series 7, long, Size 1. I would not recommand using too small brushes, a smaller size is not important as it just brings problems like there is not enough water in the brushs hair and you got to "refill" it all the time, starting at different points of your freehand again and again - that might bring more accidents. A longer brush with space to keep your liquid colour floating is half the rent. Concentration will be next - don't hurry at all. I am just telling you what i found out during the process of this painting. I was listening to classic music for hours today while i did execute my plan. You got to have a plan to do advanced freehand painting. i've learned that. Robert aka Muhani tells me that he always does his freehands while listening to "Benjamin Blümchen stories", that keeps him calmed. This is just just find your own way - may this article help you. I don't use my colours too wet, i mean not too thinned glazes as if i have to hit the same line several times it is getting harder and harder. I remember repainting the nose several times because of my failure in being calmed - it is training i say to my self, nothing more, so i will train... and search if there is maybe even more, haha. Oh dear, hard to explain... whatever it was a hell of a fun and a good feeling to have learnt something for the future. Hope my approach on thoughts could help you on your own freehands...
Skeeve added these tips via comment, many thanks for sharing your thoughts:
Great work. Just to add to it. It helps (to me) to do couple of preliminary sketches with incrementally decreasing scales on a paper first. This especially helpful if I paint original designs - "normal" scale designs are not always transferable to a miniature. It is important for complex freehands painting like this is very clear understanding what happens with your brush stroke when you touch the surface. I suppose this is what Roman calls "planing".
Here is an example.
With a brush curved lines are always easier then straight. Short lines are often easier then long. Long thin lines are probably the most difficult.
1)You need to paint a relatively long line.
Look at the whole composition. Can you approximate that long straight line by a series of curved lines? May be by a series of short straight lines? Does it have to be thin or you could make it thinner later by using "background color"?
2) You need to paint two parallel lines. What is easier to paint two thin lines next to each other or to paint one thick line and then "subtract" the space between them with a background color.
Trying this on a piece of paper first really helps optimizing painting later.
Keep on happy painting!
Best Regards
Roman
PS: A front preview so far...


O.O So Shiny
Awesome Freehand. This enhances the miniatures value.
Nice painting indeed not completely convinced about the motif though it feels a bit too much south east asia to me.
I mean the colours and the snakes are very greek but the leering face feels like it belongs somewhere else.
Anyways a great job.
/Cato
Bah after a quick google fu i see now it's a common place "barbarian face" motive!
Too quick to judge, sorry!
/Cato
i love it. such a nice base so far, and great work on the shield. is that a bird's nest on the dwarf statue?
NOW I KNOW WHERE MY GRYPHON SEPIA IS YOU THIEF!!! :D :D
Very nice tutorial, the motif is a good choice and the execution is pretty good too!
"Benjamin Blümchen stories" - I kill u
Muhahaha! Benjamin Blümchen!
and when the mini ist finished, Muhani makes "Töröööö"? :D
Sorry...I have to do this,
Bavaria and Austria are still in war! ;)
I like the freehand, the motiv looks a bit strange to me,
the face looks asian, the snakes fits in the grrek mythology.
But it was every time your way, to do strange things withe the minis and the colours, and the most time, it was the right way! ;)
Greets
Shejtan
Great work. Just to add to it. It helps (to me) to do couple of preliminary sketches with incrementally decreasing scales on a paper first. This especially helpful if I paint original designs - "normal" scale designs are not always transferable to a miniature. It is important for complex freehands painting like this is very clear understanding what happens with your brush stroke when you touch the surface. I suppose this is what Roman calls "planing".
Here is an example.
With a brush curved lines are always easier then straight. Short lines are often easier then long. Long thin lines are probably the most difficult.
1)You need to paint a relatively long line.
Look at the whole composition. Can you approximate that long straight line by a series of curved lines? May be by a series of short straight lines? Does it have to be thin or you could make it thinner later by using "background color"?
2) You need to paint two parallel lines. What is easier to paint two thin lines next to each other or to paint one thick line and then "subtract" the space between them with a background color.
Trying this on a piece of paper first really helps optimizing painting later.
@Skeeve
Wow many, many thanks for your additional words. I allow myself to quote you in the article and also learn from it. There will be more freehand tryouts for sure by me. Many thanks again.
@all
Big Muchas Gracias for your words. And Benjamin Blümchen rocks the house, really - Tööörrrrrööö!!!
What Miniature is that woman? Looks good :)
as far as listening to music I memorize all my favorites such as Dark Crystal, and other thing themes too many to write.