


posted by roman, jarhead, kong
How to make a Skaven look gritty and dirty
This article is something different as it was done as a request by Carl who asked me if i could help him with some inspiration that he gets further in his very big Warhammer Fantasy Skaven Army he has at home. I won't do articles on request very often, but i was intrested in painting a Skaven up the way i maybe could help Carl a bit. So here it goes. The main focus on this Step by Step article is at the armour parts, please feel free if you got any questions beside to what i might have not mentioned in the article. I had my problems taking good photos of the True Metallic work i had done, but you will see what i mean soon, haha - sorry, some photos are really bad.
Please keep in mind that this is not a "have to be - Order", it is just how i did work on the model and there won't be a problem changing the order as you like for your own result. So this is just sugar in the morning, sugar in the evening, sugar at supper time - only inspirational material...
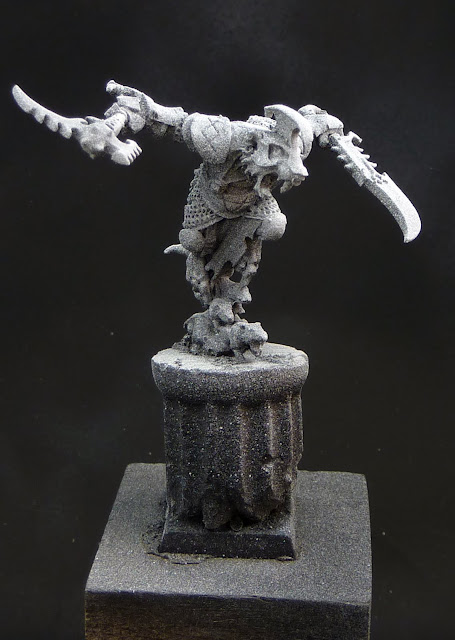
I did take Quiek the Headtaker, 28 mm by Games Workshop as the model of my choice and started with a small conversion by removing parts i didn't like on the basic model. So here you go with the primed model, where the priming went a bit too dusty as i didn't shake the primer for the needed time... it was night and dark, damn:
The next step was sketching the colours i want to use on this model. I did start with a lot of dark brownish tones everywhere, a little bit of purple mixed by. For the metal parts on the armour and chainmail i did choose a basic colour of Warlock Purple and Chaos Black. For the blades i've used Chaos Black with some Dark Angels Green as i wanted to make the blades look different from the armour. Also the skin colour was done with a bit of Warlock Purple and Dwarf Flesh and Codex Grey for the basic. I am always working like this, doing a colour sketch before i work my way to the details - here you can find an extra article about this topic.

Further on with the painting i went to the metals first and mixed in some Oily steel into the basic colour of the armoury and did some highlighting of the metals, true metallics work well if you keep in mind zenithal lightning and these thoughts about True Metallic Metal. With the dark basic colour i now only have to work my way into the lights, sure it is not clean at the moment but that will follow soon. I did went through the model for 2~3 times to intense some areas more than others. The colour was not really a glaze, it has been more a strong setup for the lights with only a bit of water for making it liquid.


Next i did intense the lights even more by mixing in Model Colours Silver, it depends that you mix in a bright silver, like Mithril Silver or whatever you have as your brightest silver tone at home. Intensing the contrast. I did mix it into the colour mix of the step before. Using only the brightest tone alone will come to the end for the final edges. I've did the same to the blades but using the basic colour i have used for them, mentioned some steps above.

Now there was some intresting stuff going on i guess. I did switch back to Oily steel and mixed in a bit of Hawk Tourquise and Warlock Purple - two different spots on my wet palette. I wanted to create the a bit of colour contrast into the metallics and used this mix to clean up some really hard edges that have appeared while working so far. The Purple also went into the browns and hit the rats and some clothing... nah, i can't remember, damn my brain. I hope you can see the spots where the colour contrast hits the metals, you can see it very good at the helmet area. The gold parts have been painted in Schorched Brown and Chaos Black mix before and now where started with a mix from a tip of Dark Flesh in Shining Gold to make it look warmer and somehow more gritty... uha? First Highlights in the gold have been set with pure Shining Gold...

It keeps being intresting i hope? - now it will for sure. I took a bowl of an experiment which stood around for some while now. I did throw some metal parts, like old hair clips from my girlfriend, steel wool, nails and put water over it for about 2 months. You will see the water will disappear very fast in about 2~4 days, keep it wet over a while and you will get a bowl of sloppery rust, yeah. I now took a small brush and worked with the rust sludge which appeared on the border of the bowl and moved it in places at the armour where i want to have some rusty look later on. Another way to use real rust at your miniature painting sessions you can find here!
You can also add these rusty effects with thin glazes of Vermin Brown or Schrorched Brown or Dark Flesh, just for example, but you won't achieve the dusty look with all of them, mostly it will work with Vermin Brown. If you have a copper armour you can use glazes of Hawk Tourquise for the look of Oxidation. Or you can also use pigments to achieve rust effect - check out the weathering overview here.


For the next step i took a glaze made from Vallejo Model Colour's Smoke, Game Colour Sepia Ink and some Model Air Olive Green in various mixes, sometimes a bit more of this one, then of the other... in the end i can tell that i've used Smoke not that often as far as i can remember. I now glazed the metal areas with this mix to achieve the rust looking more included in the overall concept and move away the extreme dusty look of the experiment. I've also put a tiny drop of black into the mixes to intense the darker areas of the armour.


Now i worked my way on the metals into some detail edge highlighting with pure Silver and also went into the final shadows by using some Warlock Purple and Chaos Black to define different areas on the model from eachother, thin and fine lines. Again Purple in the mix, somehow this model made me paint purple, no idea why. I did shot it on the workbench as you can really see where i did hit the final highlights at the armour, same was done to the gold areas and weapon areas, edge work. The chainmail was highlighted by gently stroking the brush over it first with some blue in Oily steel and then with a tip of Silver in it.


Now the final detail work at the skin, rats, base, leather and everything else was done with my brain completly off it seems. I did use some blood on the weapons too, but i guess this article ends here with a final picture and some Final thoughts of mine to it - done in the photo box:


Final Thoughs
Oh dear, now this article was finished cold-turkey. Sorry for that. In the end it was putting 2~3 hours only in doing an edge highlight here and there or intensing a shadow here and there or glazing here and there... damn i was happy to finish him :)
Sorry for these circumstances, but i hope there is something in this article for everyone to pick out and maybe try at home. Carl i hope i could help you with this article in an useful amount.
My brain is playing tricks on me more often when i try to concentrate while painting... honey in the morning, honey in the evening, honey at supper time - this is meant as inspiration - i hope it could help! Purple everywhere around... don't ride the purple train :)
Keep on happy painting! I am off for the painting class...
Best Regards
Roman
How to make a Skaven look gritty and dirty
This article is something different as it was done as a request by Carl who asked me if i could help him with some inspiration that he gets further in his very big Warhammer Fantasy Skaven Army he has at home. I won't do articles on request very often, but i was intrested in painting a Skaven up the way i maybe could help Carl a bit. So here it goes. The main focus on this Step by Step article is at the armour parts, please feel free if you got any questions beside to what i might have not mentioned in the article. I had my problems taking good photos of the True Metallic work i had done, but you will see what i mean soon, haha - sorry, some photos are really bad.
Please keep in mind that this is not a "have to be - Order", it is just how i did work on the model and there won't be a problem changing the order as you like for your own result. So this is just sugar in the morning, sugar in the evening, sugar at supper time - only inspirational material...
I did take Quiek the Headtaker, 28 mm by Games Workshop as the model of my choice and started with a small conversion by removing parts i didn't like on the basic model. So here you go with the primed model, where the priming went a bit too dusty as i didn't shake the primer for the needed time... it was night and dark, damn:

The next step was sketching the colours i want to use on this model. I did start with a lot of dark brownish tones everywhere, a little bit of purple mixed by. For the metal parts on the armour and chainmail i did choose a basic colour of Warlock Purple and Chaos Black. For the blades i've used Chaos Black with some Dark Angels Green as i wanted to make the blades look different from the armour. Also the skin colour was done with a bit of Warlock Purple and Dwarf Flesh and Codex Grey for the basic. I am always working like this, doing a colour sketch before i work my way to the details - here you can find an extra article about this topic.

Further on with the painting i went to the metals first and mixed in some Oily steel into the basic colour of the armoury and did some highlighting of the metals, true metallics work well if you keep in mind zenithal lightning and these thoughts about True Metallic Metal. With the dark basic colour i now only have to work my way into the lights, sure it is not clean at the moment but that will follow soon. I did went through the model for 2~3 times to intense some areas more than others. The colour was not really a glaze, it has been more a strong setup for the lights with only a bit of water for making it liquid.


Next i did intense the lights even more by mixing in Model Colours Silver, it depends that you mix in a bright silver, like Mithril Silver or whatever you have as your brightest silver tone at home. Intensing the contrast. I did mix it into the colour mix of the step before. Using only the brightest tone alone will come to the end for the final edges. I've did the same to the blades but using the basic colour i have used for them, mentioned some steps above.
Now there was some intresting stuff going on i guess. I did switch back to Oily steel and mixed in a bit of Hawk Tourquise and Warlock Purple - two different spots on my wet palette. I wanted to create the a bit of colour contrast into the metallics and used this mix to clean up some really hard edges that have appeared while working so far. The Purple also went into the browns and hit the rats and some clothing... nah, i can't remember, damn my brain. I hope you can see the spots where the colour contrast hits the metals, you can see it very good at the helmet area. The gold parts have been painted in Schorched Brown and Chaos Black mix before and now where started with a mix from a tip of Dark Flesh in Shining Gold to make it look warmer and somehow more gritty... uha? First Highlights in the gold have been set with pure Shining Gold...

It keeps being intresting i hope? - now it will for sure. I took a bowl of an experiment which stood around for some while now. I did throw some metal parts, like old hair clips from my girlfriend, steel wool, nails and put water over it for about 2 months. You will see the water will disappear very fast in about 2~4 days, keep it wet over a while and you will get a bowl of sloppery rust, yeah. I now took a small brush and worked with the rust sludge which appeared on the border of the bowl and moved it in places at the armour where i want to have some rusty look later on. Another way to use real rust at your miniature painting sessions you can find here!
You can also add these rusty effects with thin glazes of Vermin Brown or Schrorched Brown or Dark Flesh, just for example, but you won't achieve the dusty look with all of them, mostly it will work with Vermin Brown. If you have a copper armour you can use glazes of Hawk Tourquise for the look of Oxidation. Or you can also use pigments to achieve rust effect - check out the weathering overview here.


For the next step i took a glaze made from Vallejo Model Colour's Smoke, Game Colour Sepia Ink and some Model Air Olive Green in various mixes, sometimes a bit more of this one, then of the other... in the end i can tell that i've used Smoke not that often as far as i can remember. I now glazed the metal areas with this mix to achieve the rust looking more included in the overall concept and move away the extreme dusty look of the experiment. I've also put a tiny drop of black into the mixes to intense the darker areas of the armour.


Now i worked my way on the metals into some detail edge highlighting with pure Silver and also went into the final shadows by using some Warlock Purple and Chaos Black to define different areas on the model from eachother, thin and fine lines. Again Purple in the mix, somehow this model made me paint purple, no idea why. I did shot it on the workbench as you can really see where i did hit the final highlights at the armour, same was done to the gold areas and weapon areas, edge work. The chainmail was highlighted by gently stroking the brush over it first with some blue in Oily steel and then with a tip of Silver in it.


Now the final detail work at the skin, rats, base, leather and everything else was done with my brain completly off it seems. I did use some blood on the weapons too, but i guess this article ends here with a final picture and some Final thoughts of mine to it - done in the photo box:


Final Thoughs
Oh dear, now this article was finished cold-turkey. Sorry for that. In the end it was putting 2~3 hours only in doing an edge highlight here and there or intensing a shadow here and there or glazing here and there... damn i was happy to finish him :)
Sorry for these circumstances, but i hope there is something in this article for everyone to pick out and maybe try at home. Carl i hope i could help you with this article in an useful amount.
My brain is playing tricks on me more often when i try to concentrate while painting... honey in the morning, honey in the evening, honey at supper time - this is meant as inspiration - i hope it could help! Purple everywhere around... don't ride the purple train :)
Keep on happy painting! I am off for the painting class...
Best Regards
Roman


Hello Roman,
fantastic report. Thanks very much for the many, many, many,..... time and work you invest in your report and the Jungle of Massive Voodoo. The picture of the gorilla in your previous report is making mediative.
Thank you also for the small movie from jungle book. In front of my computer I was dancing, shaking and singing. I went to a shop and bought some coconuts, to look like Balu the bear.
Yeaahhh, schubidu .....I want to be like you, hu hu ... schubidubap - walk like you -- talk like you .... hu, hu hu... schubidubab.
Wuuuaaaah, thats real Massive Voodoo Jungle feeling!
Regards @Daddy Cool
Awesome I love your use of rust to add rust effect to the model yet another thing for my to add to my work bench.
thank you
@Daddy Cool
Thanks for your nice words, they make my heart dance, even early in the morning :)
@Howard
Your welcome!
^^ funny imagination Daddy cool ^^
Regards Count
Thanks so much for this, it has been a great help! As the Carl mentioned in the post i can only say that you have gone well out of your way to help someone you don't know, and i am extremely greatful