


Tutorial by Maurizio Bruno aka MAB
translated by Andrea Terzolo aka MXP
posted by roman, jarhead, kong
Introduction by roman
This one is a wonderful article sent to the jungle by Maurizio Bruno. The article was written in italian over at the Legio Pictorium Forum and other forums, this version here is translated by Andrea aka MXP. Many thanks to you both. The jungle is very proud to have this article in his sculpting section. From now on there follows the article by Maurizio. Grazie Mille!
And thanks for making the jungle heads ringing with this article, Mr. Bruno!
the Creation by Maurizio Bruno
Well here we are, we start with some data, such like on the horse "Roustam".
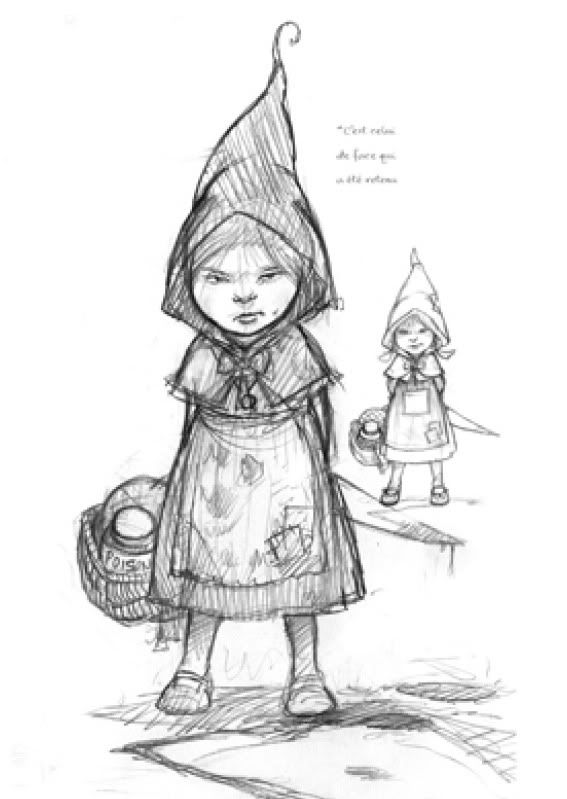
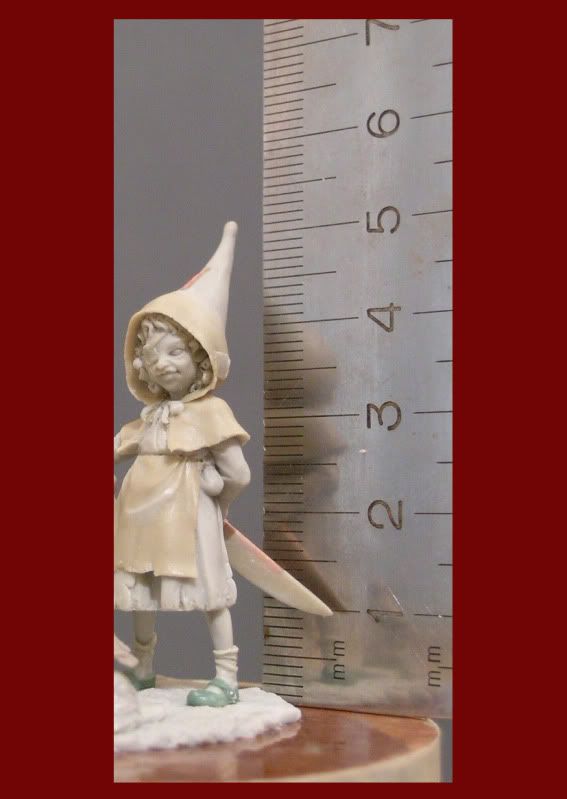
This project started as a small test and will remain unique, the desire is to create something small and looking a little fantasy in "ideas store" I came across a sketch made by Monge and I would say that was brilliant, made my case ... ... I started to fantasize about that little red riding hood because it had that air surly, nasty experience that could have passed ... .. it was obvious the cause of all was the wolf from that ... well ... 'I started to create input all the history and featuring the concept of customizing starting in my vision.

---------------------------------------------- first day
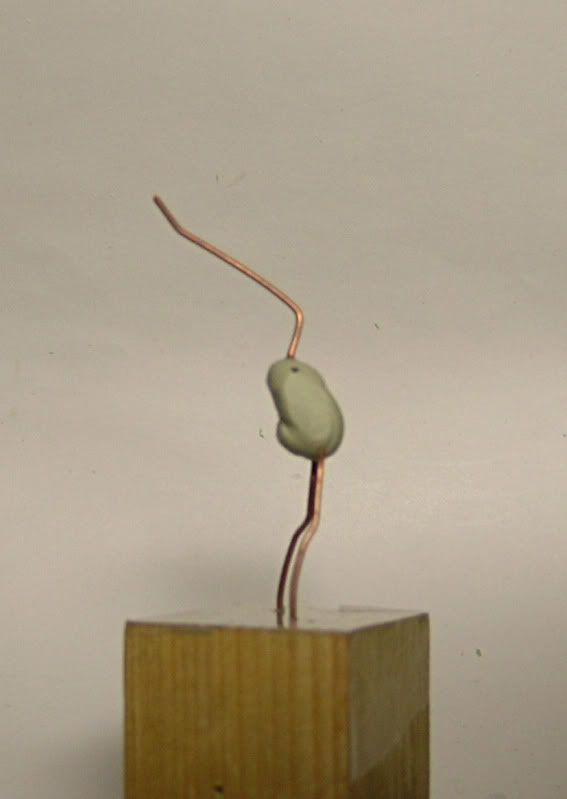
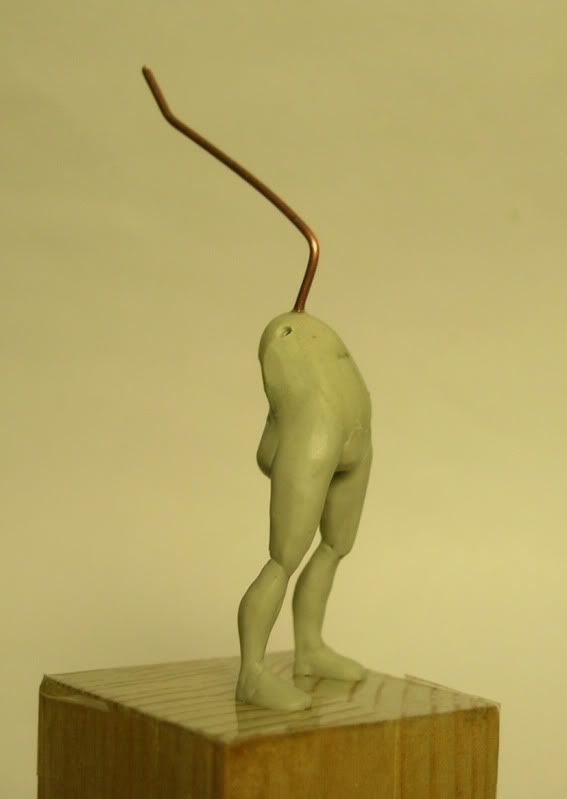
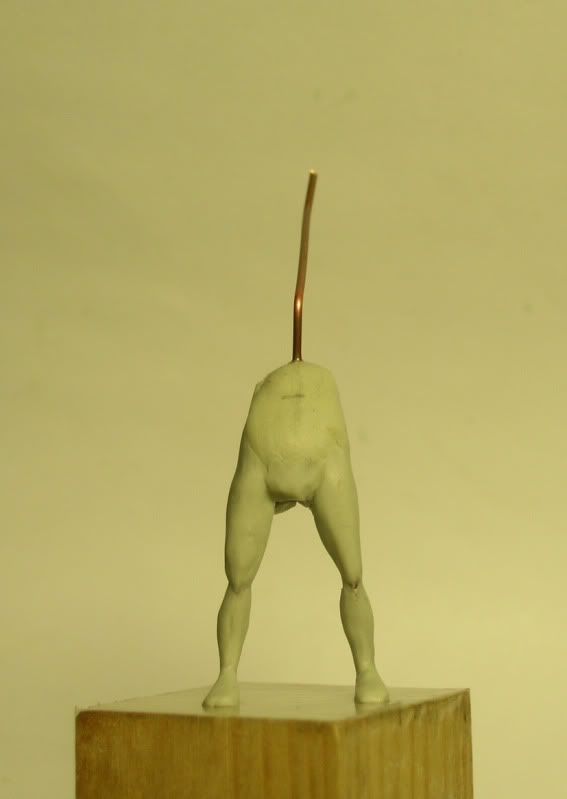
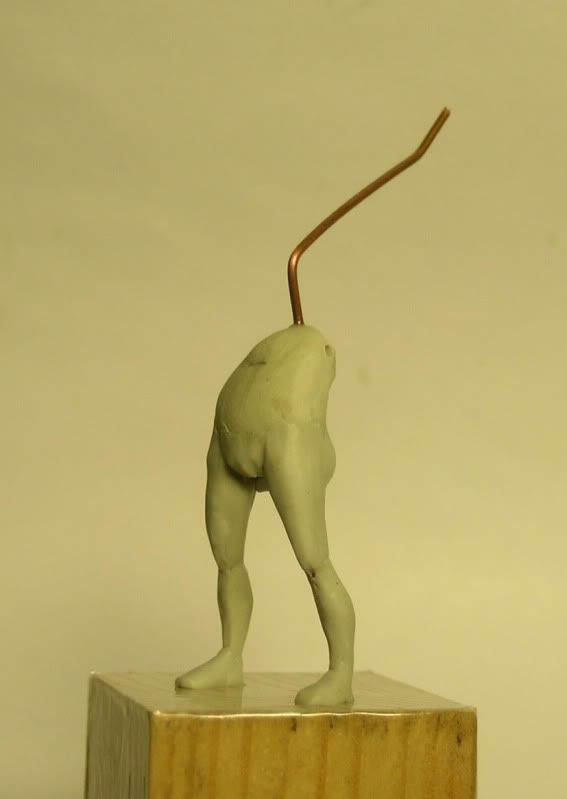
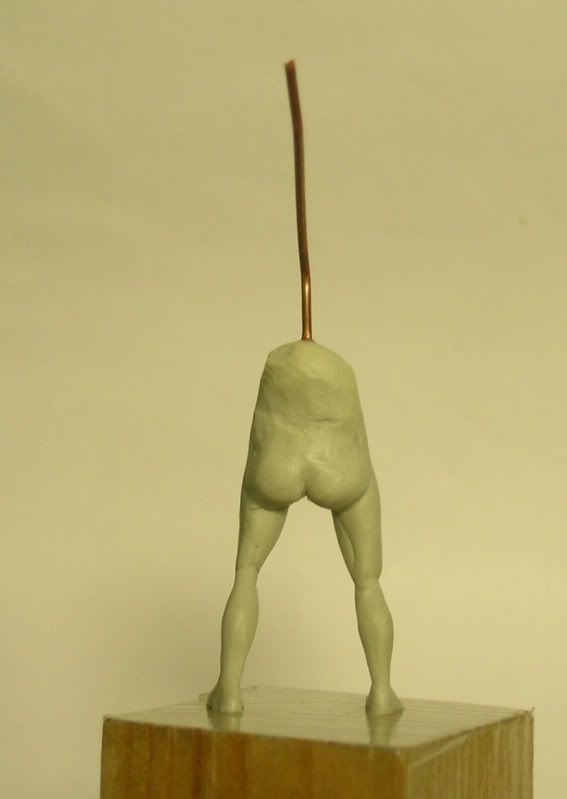
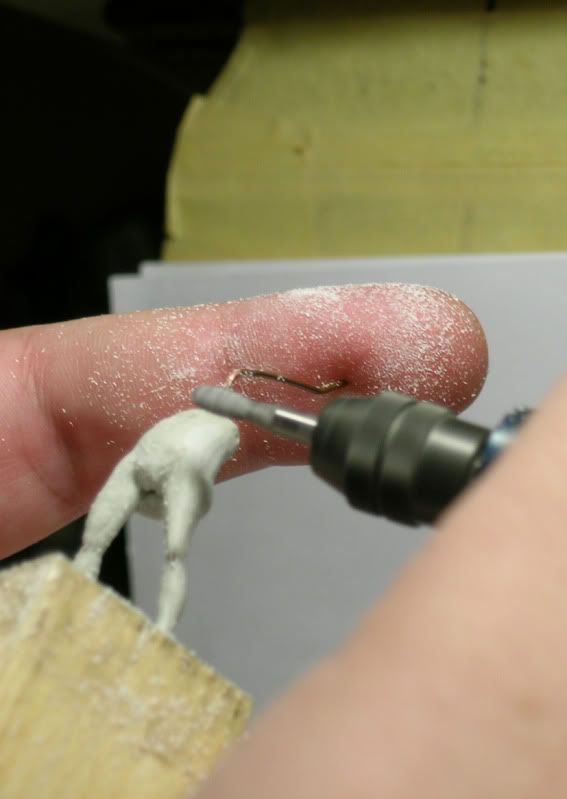
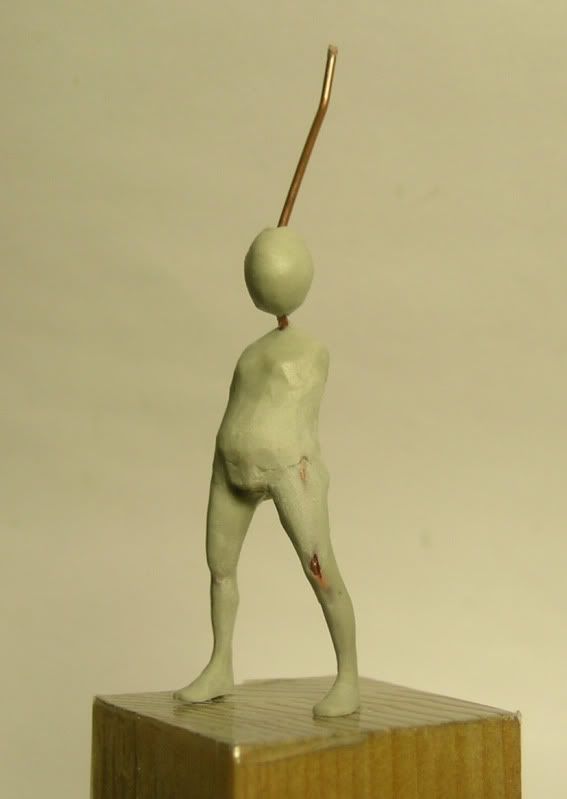
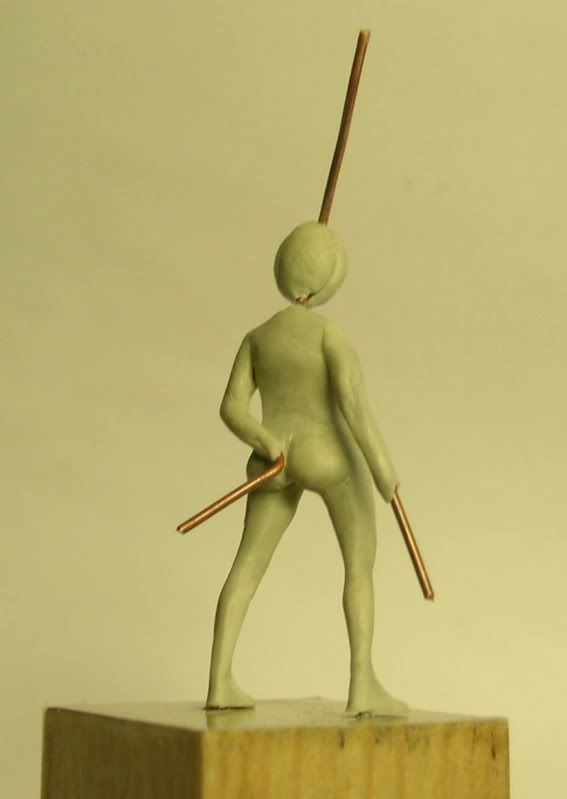
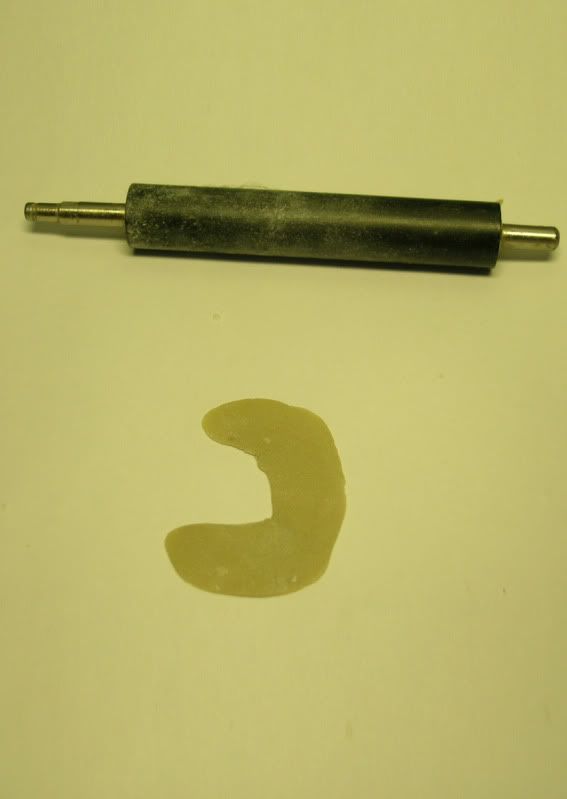
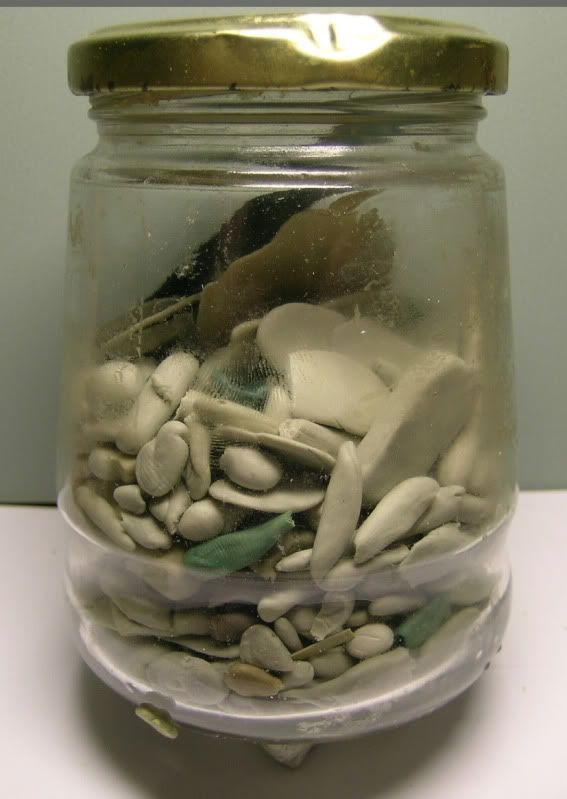
Start a filler ball recovered from the can "dry balls", do not throw anything away, plus the grout is not biodegradable was perfect for a first check was made a little ground ... ... the first holes create the armor base phyllo two brass rods for the legs and one that will stand head and hat, her arms I'll think about later.


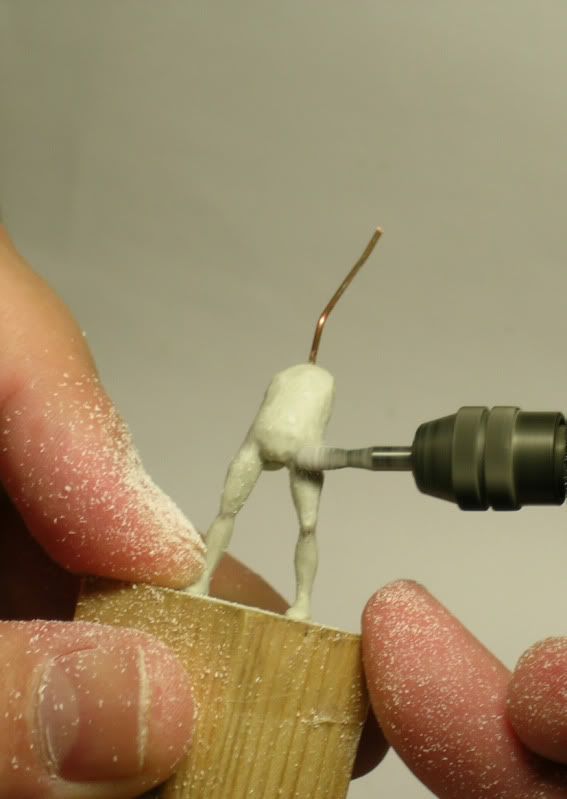
Adding small pieces of armor and filler fitting, creating the small masses of fresh legs and calves
the anatomy of children is simply not exaggerated muscles so you have to stay within the lines of basic anatomy, adding a little of both buttocks and put everything under the lamp to make it hard and dry faster.


At this stage, I begin to rough out the dummy, they generally do it with the cutter but since the figure is very smalland a misguided pressure could be fatal, I prefer it to drill, you better check the removed material and has an immediate baseline vision.


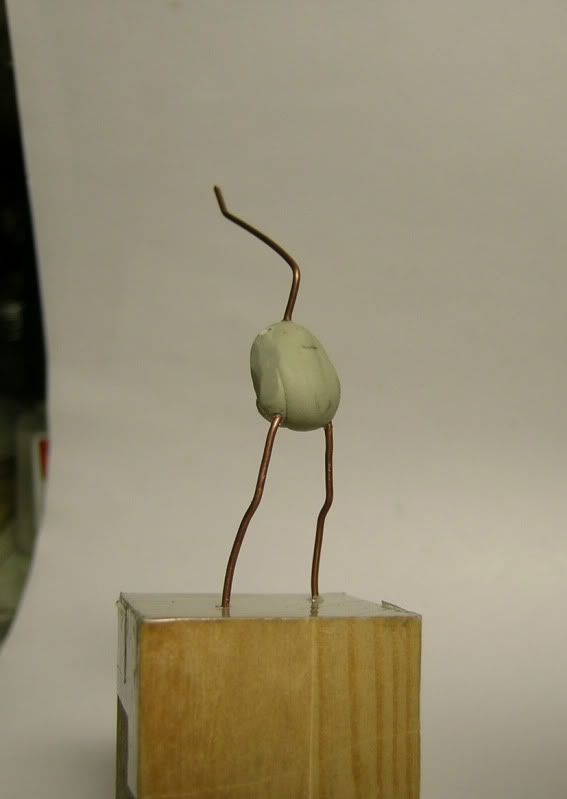
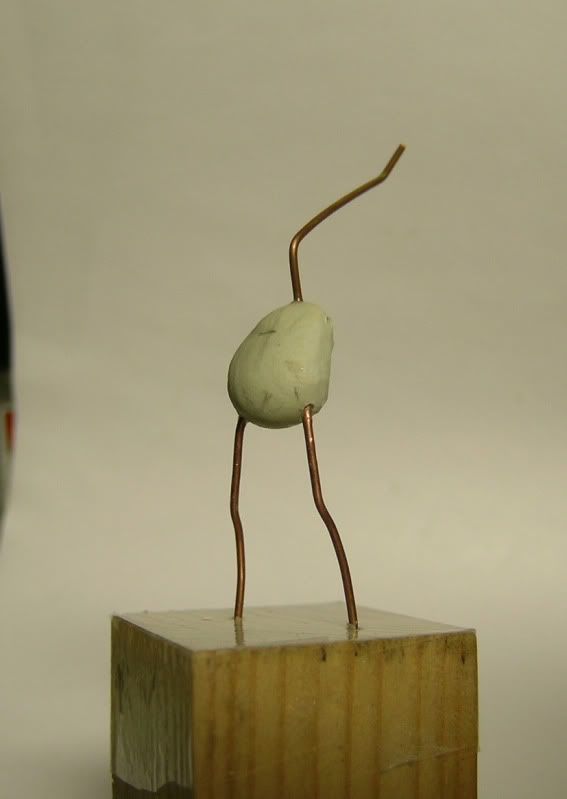
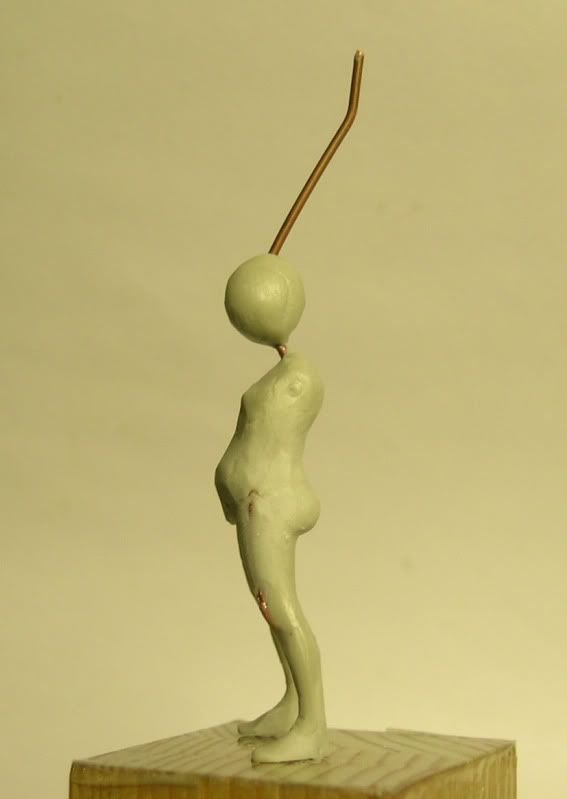
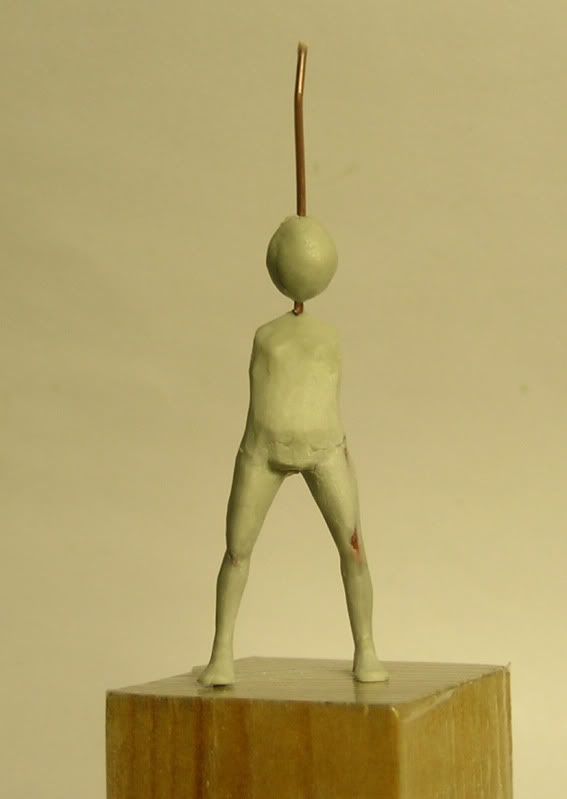
Here the dummy over, add a ball of putty as a ground for the head, two micro beads for breasts
connection to the chest and you're done.


I hope that everything is clear who has the face of questions as well :)
Greetings and Happy viewing to all
MAB
---------------------------------------------- second day
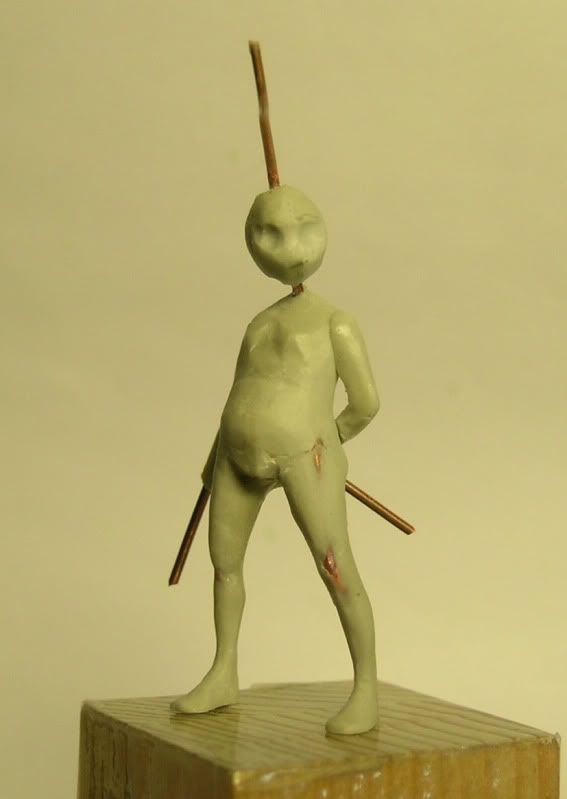
Here I am struggling with the lady, beginning with the first outline the facial volumes, in a face there are three levels.
basic principles:
the facial surface let us consider the zero level - the nose level + 1 and the orbital cavity level - 1.
these levels has created a first draft of the facial features and then you can start giving the final approach to anatomy.
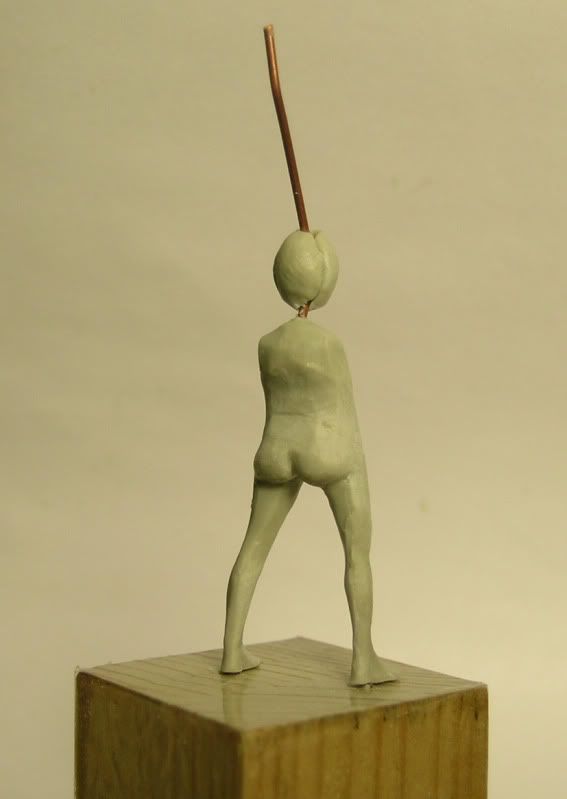
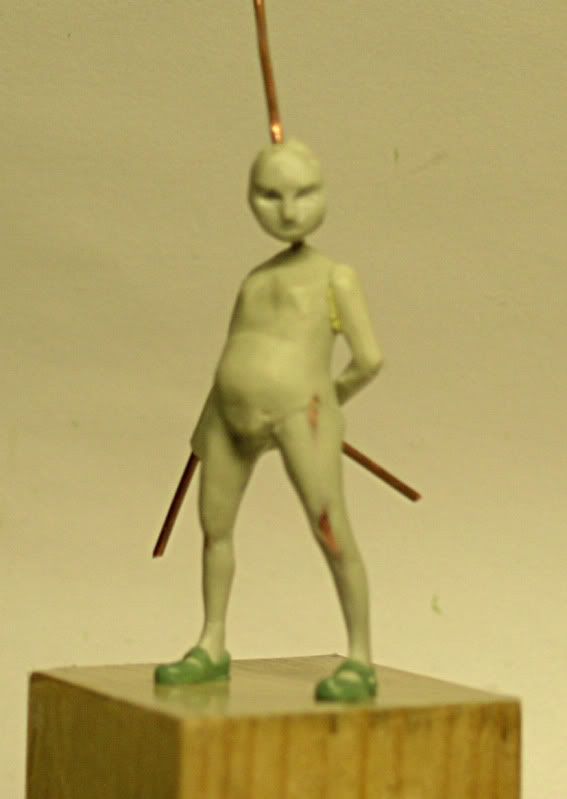
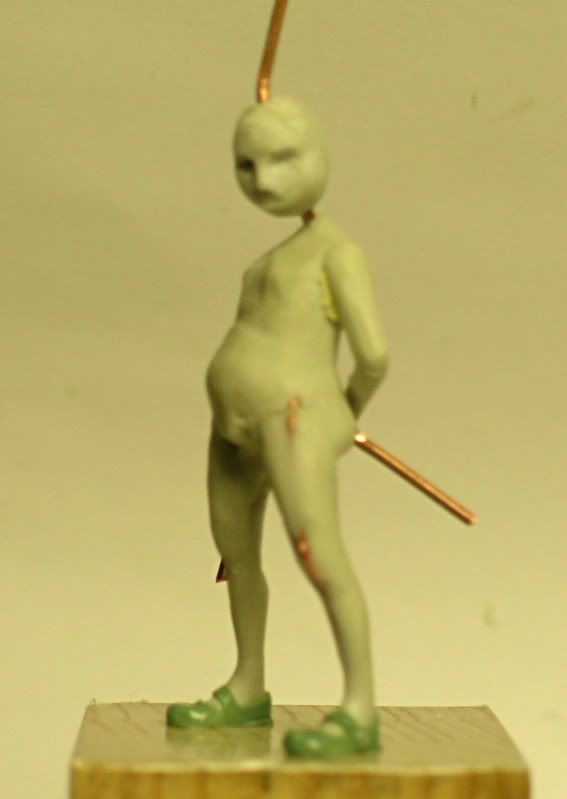
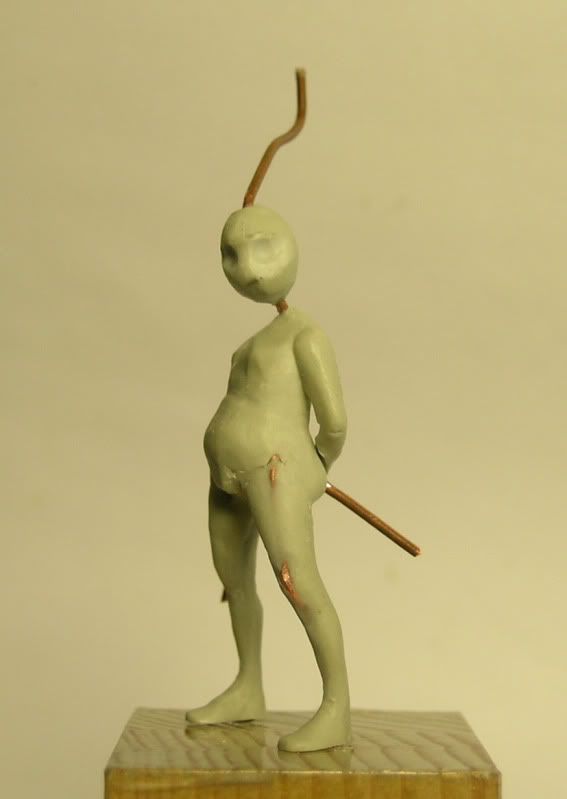
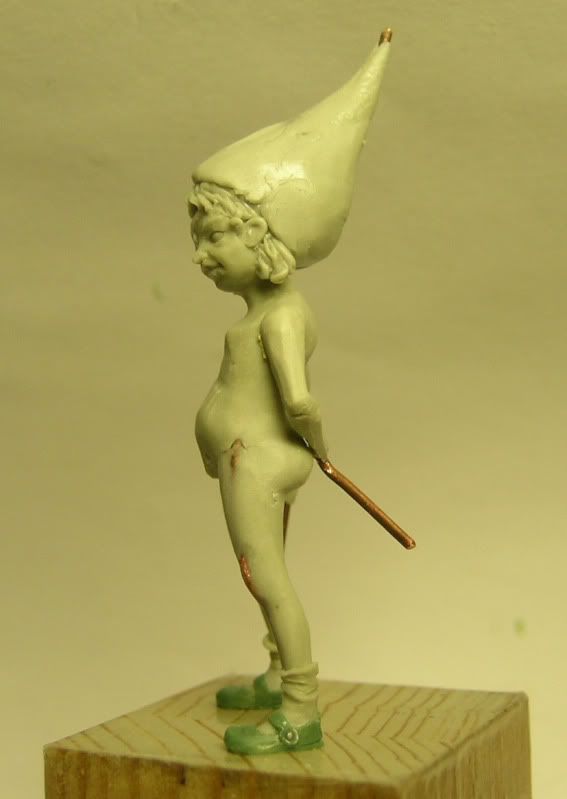
He then created her arms, they too have a 'brass wire armature to which I gave summary of the muscles (almost zero). For convenience when I leave the detachable arms ... ... because I have yet to clear the movement or action of the right arm - while the left has a quasi-final, considering both the idea of the concept. In the picture you can see the back of the copper wire that protrudes from both. My left arm certainly will serve as support for the dagger.
In the end I make the shoes in hard, meticulous work for these is a great medium, the shoes are simple and reminiscent of the dolls. The stud is made of lead with the stick., sorry if some are blurry picture, but it's done :).


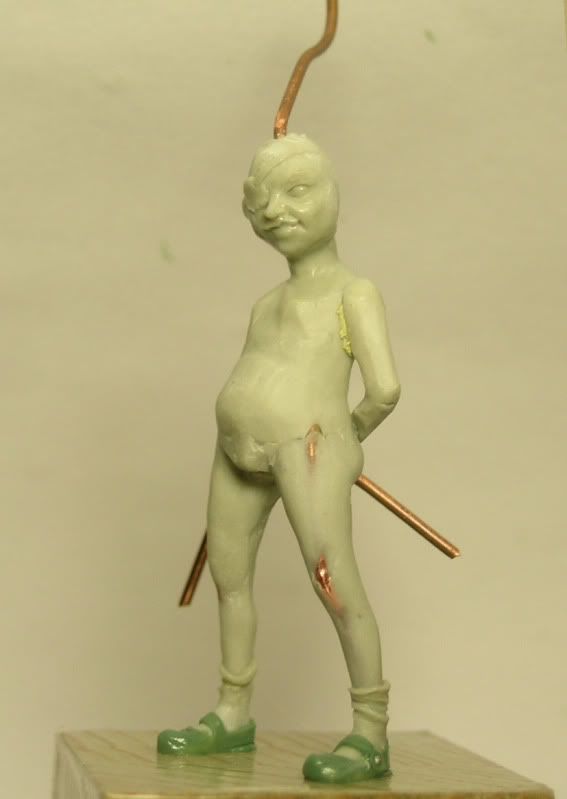
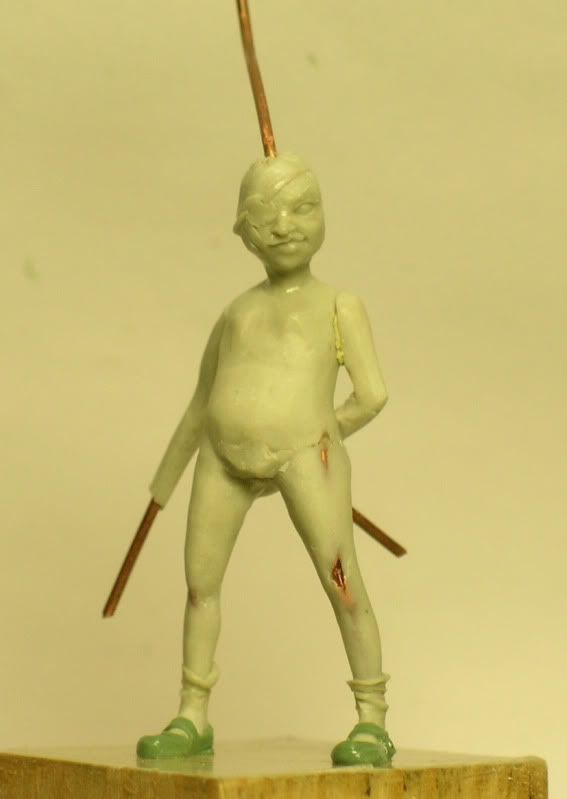
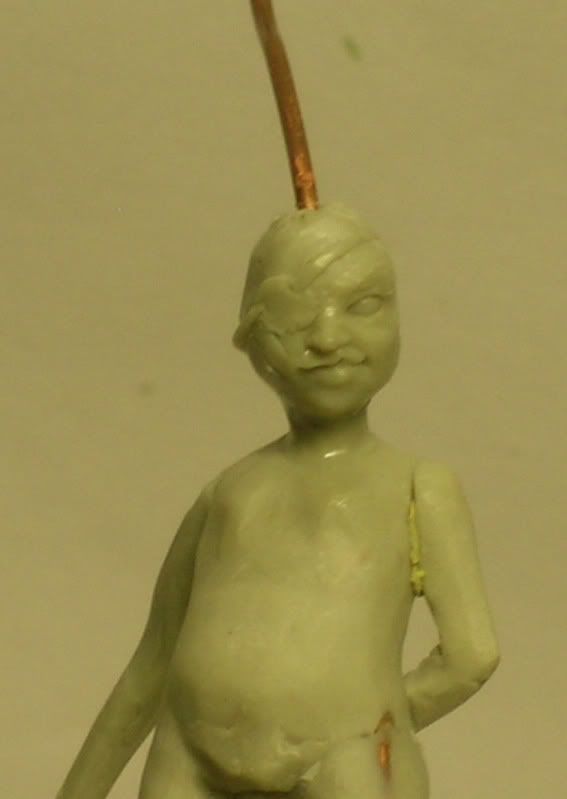
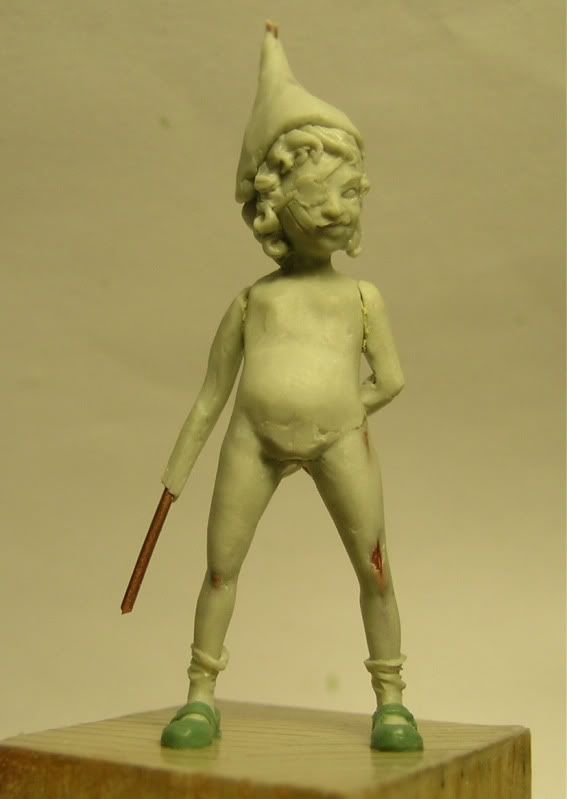
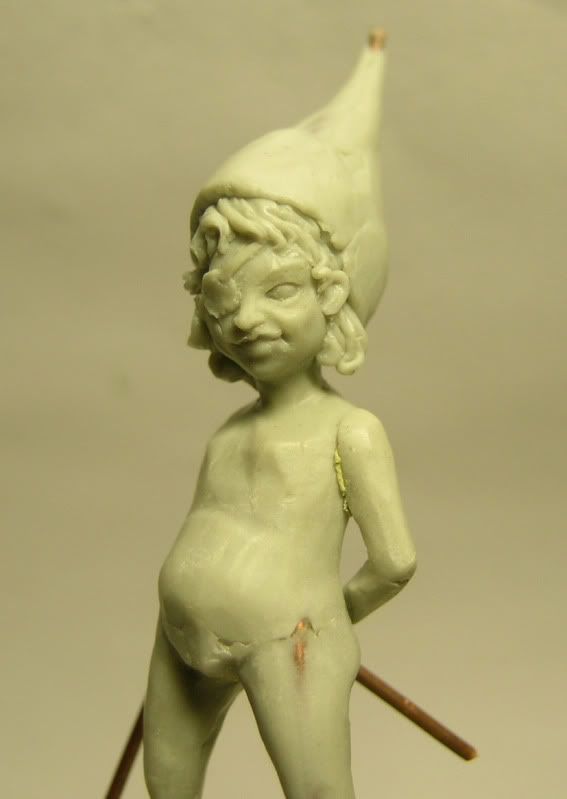
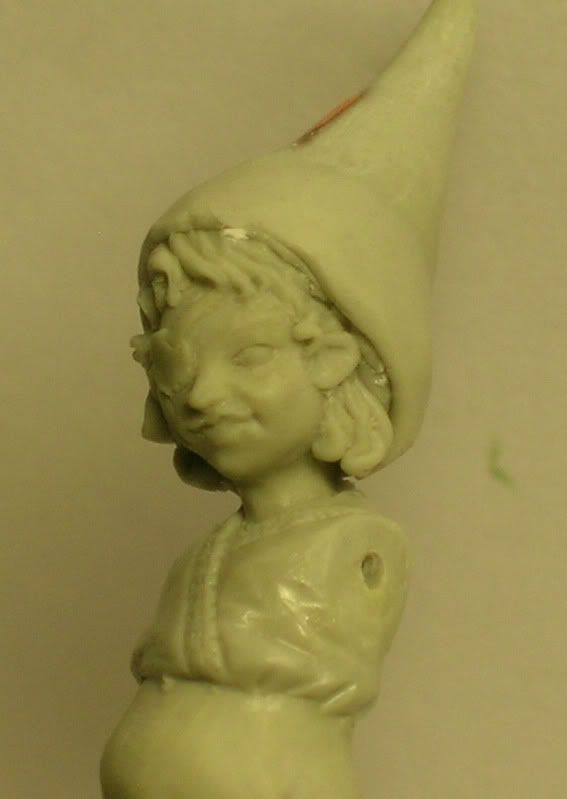
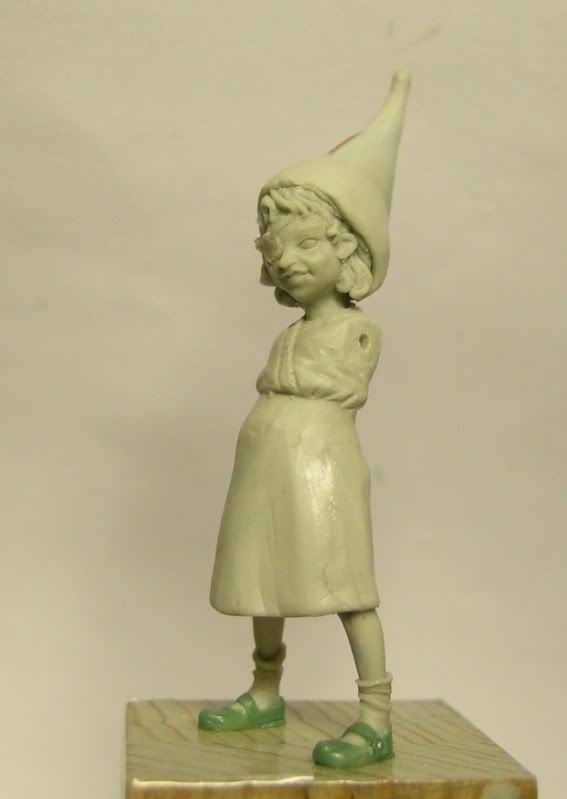
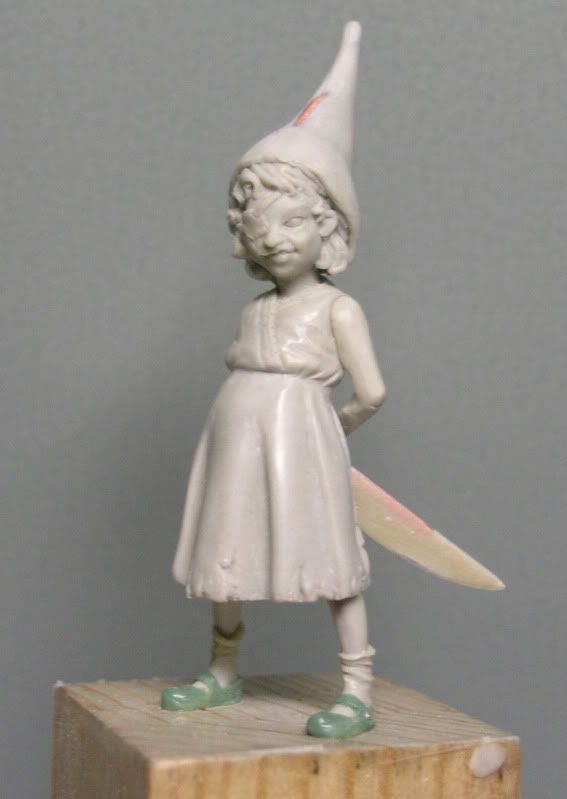
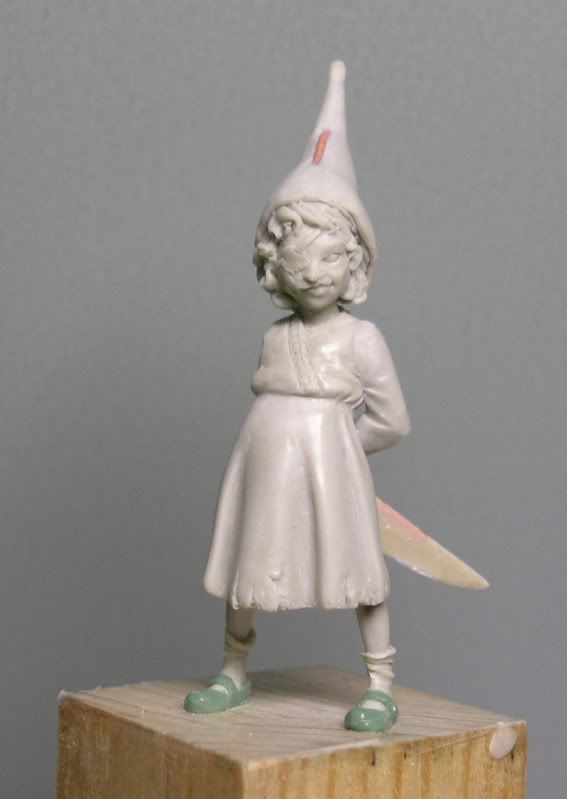
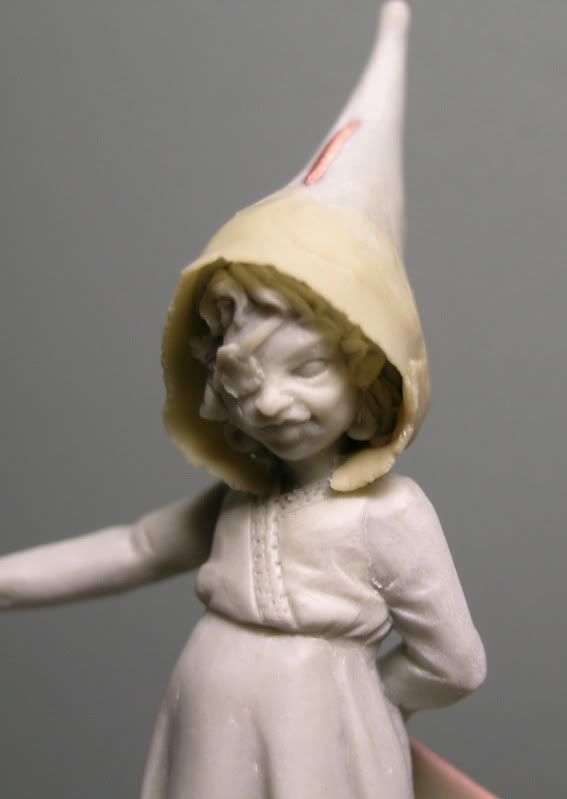
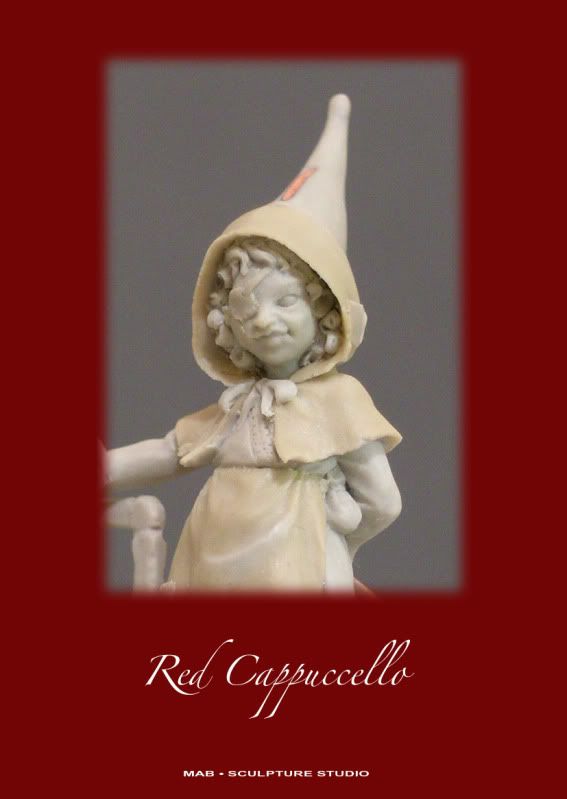
At this stage I give life to the face, all made fresh using magicSculpt, beginning with giving volume to the cheeks, after fitting of small balls for nostrils, lips and eyes, here you start to imagine the character and give the following characterization of the imagination is that the data from the fairy tale.
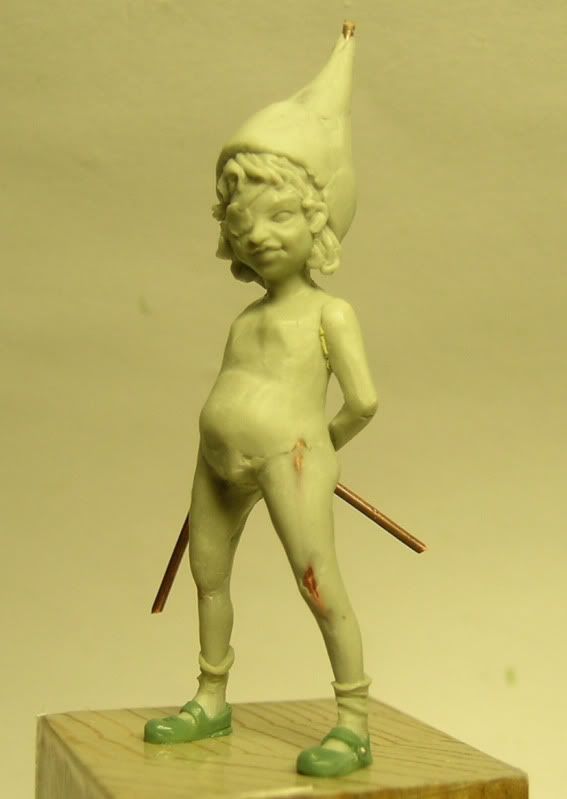
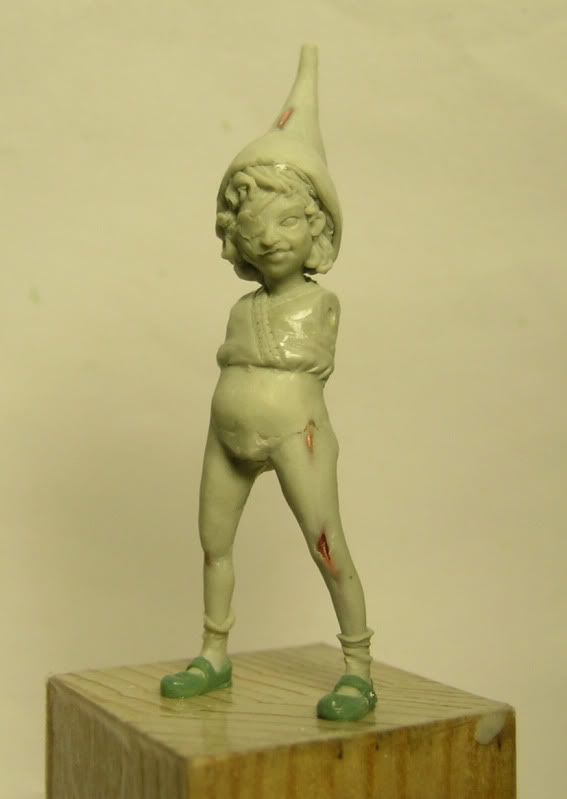
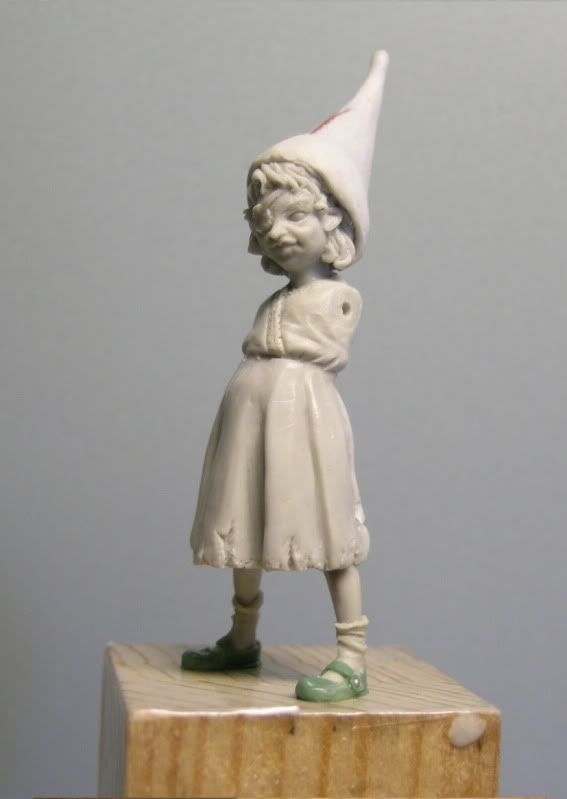
I imagined a young girl with a plump face, with a friendly attitude but at the same time with a small, satisfied smile, his right side shows signs of combat, and large scars that have warped a little bit the volume of the cheeks and a beautiful eye bandage cover. Soon after I made the socks with small masses of plaster that I've modeled carefully ... .. must give the little touches with the tool
otherwise the stucco push it from side to side, in practice it leads to walking :)


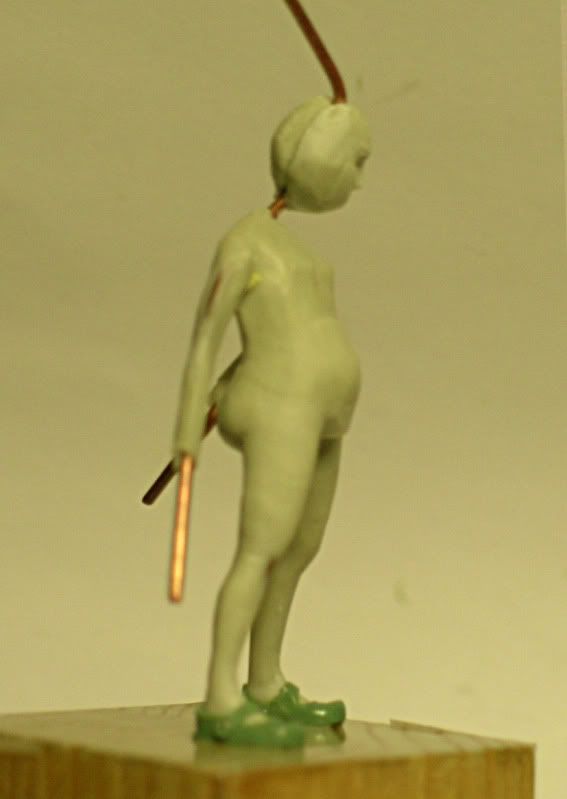
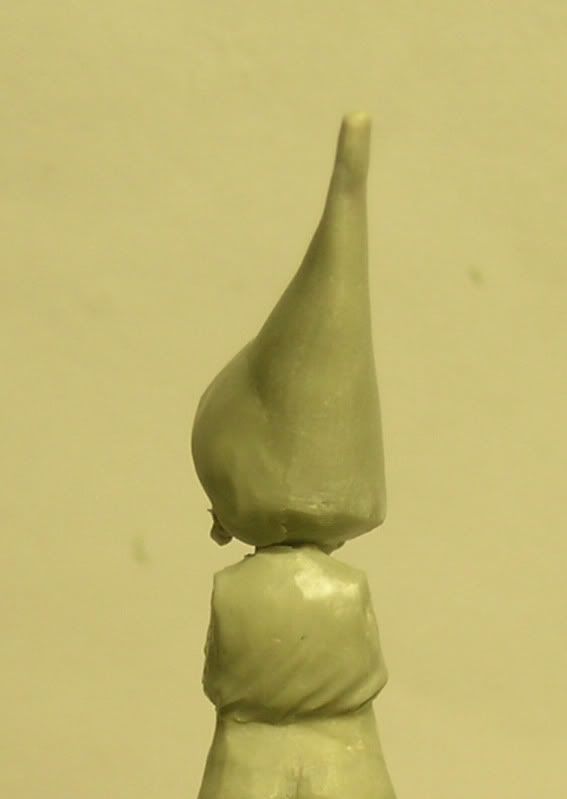
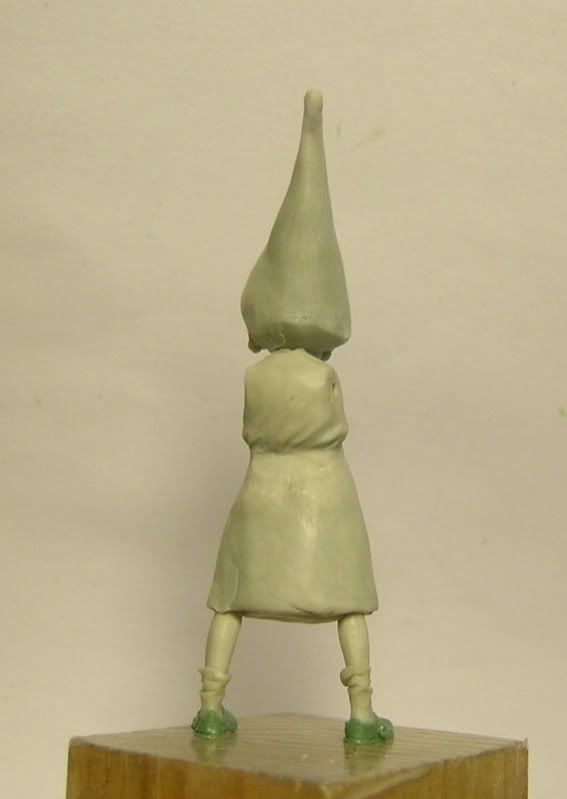
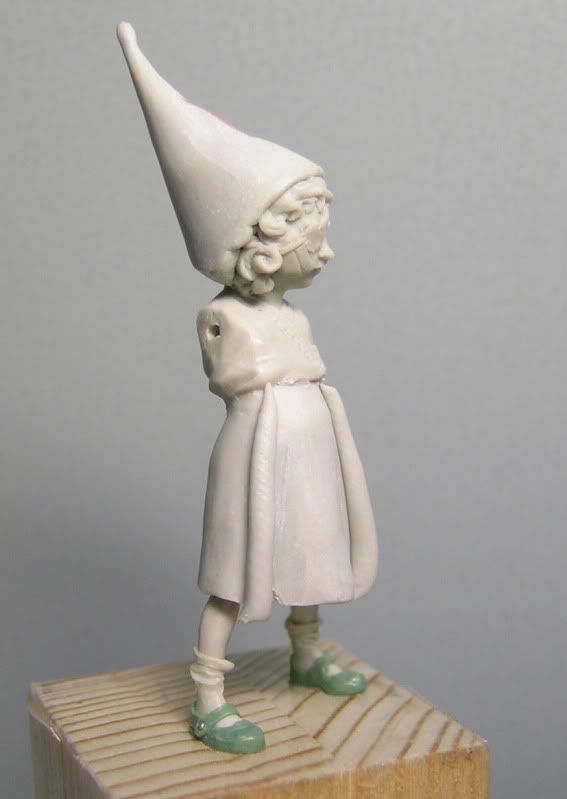
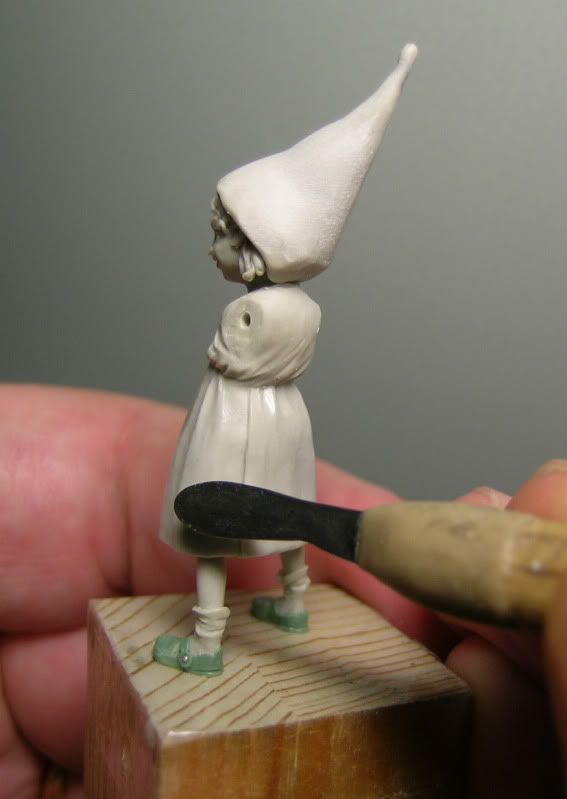
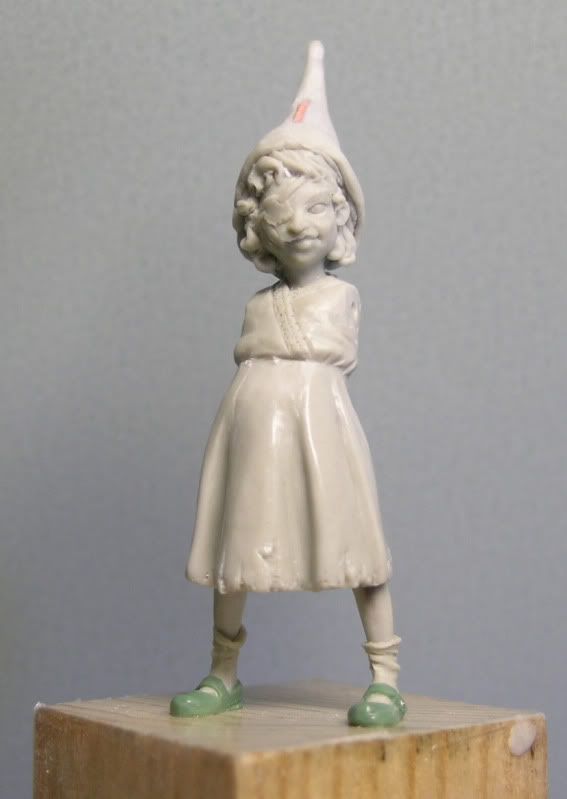
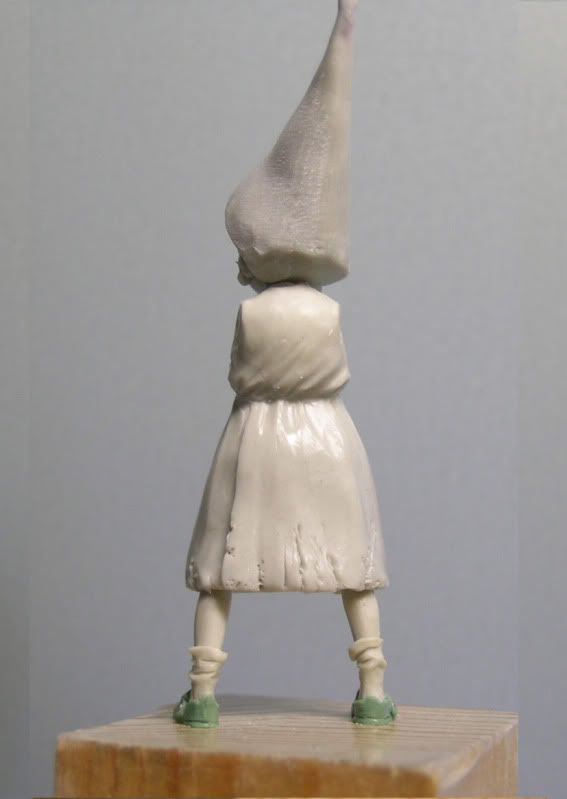
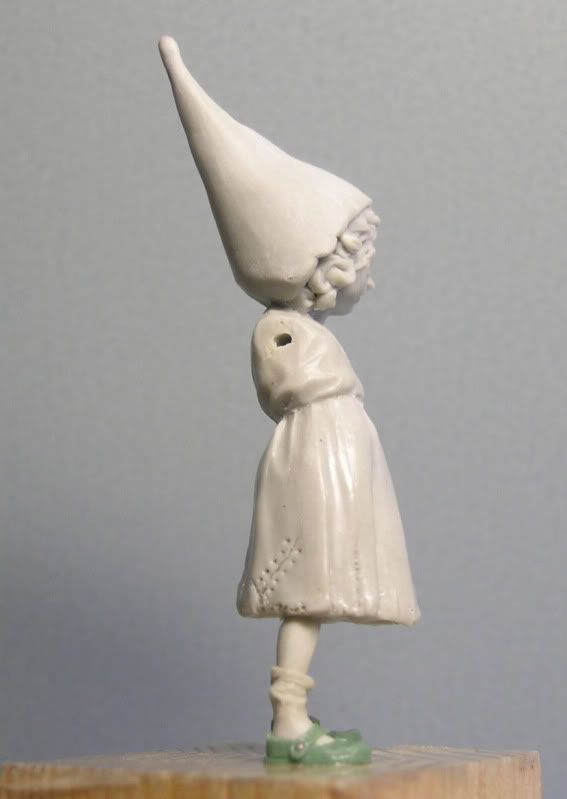
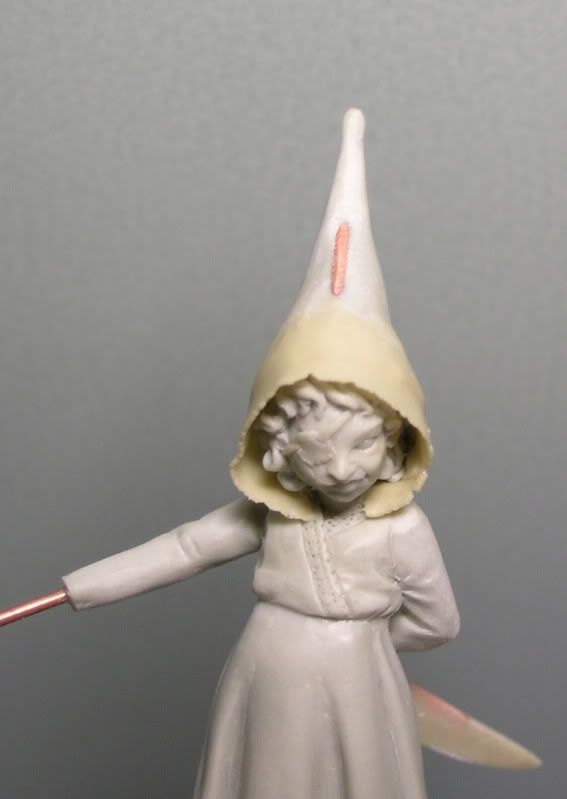
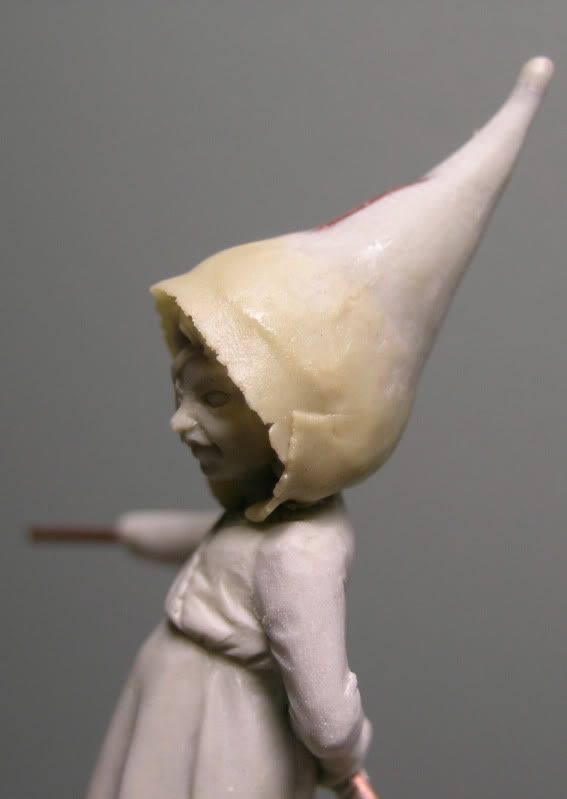
At this stage I increased the volume of the neck and gave small adjustments to the face, after adding the ears and hair I begin to prepare the first big mass for the big hat.


---------------------------------- third day
Hello everyone ... .... Today we begin to dress the little lady.
The first step is to create a small shirt, also in this case, start with small masses of stucco Magic
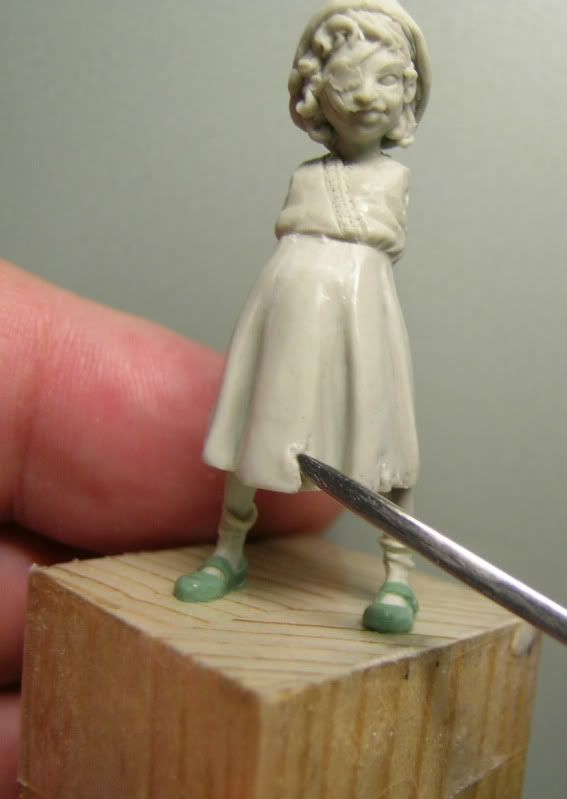
distributed in the chest area, usually a sausage do all that I put around the waist and then smear towards the shoulders, gradually create the shirt considering the small masses of blusatura front and back. In a second step I make small folds that simulate the effect of pressing in life ... .. which should result in the skirt when worn.
Finally, some small mark on the neck right down to simulate a possible life lace or decoration of the edges of the shirt.


As you can see the hat also has undergone minor changes in the various sessions with the stucco was give small corrections and then to produce the final ... .. Meanwhile in the mass start to crush the skirt a beautiful ball of putty and begin to shape. Always keeping in mind the interesting lines for both the severity of the cloth is the attitude and the final ... .. in this case I was almost fitting on the outer sides of the legs, when dry rectifies all the possible lifting of the cutter blade or lumps steps and modeled data from the bottom edge of the skirt.


Well once adjusted the skirt ... .. I take the little sausages of stucco in the area of the skirt I place them where I think there are folds, when working on small scales must be possible to add synthetic ... ... might exaggerate a little too folds the optical vision and lose the interest of other focal points ... connection with the spatula around and helped me with my infamous fat when I began sculpting
about 12 years ago has always done his part very well ... .... Once created the folds continues with main and secondary ... always taking into account effects caused by the tight skirt at the waist by the apron and also put in a second time.


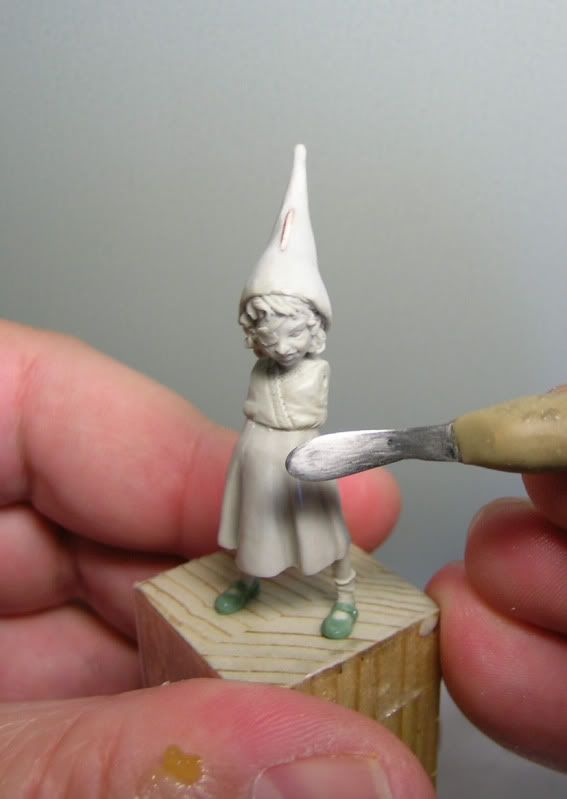
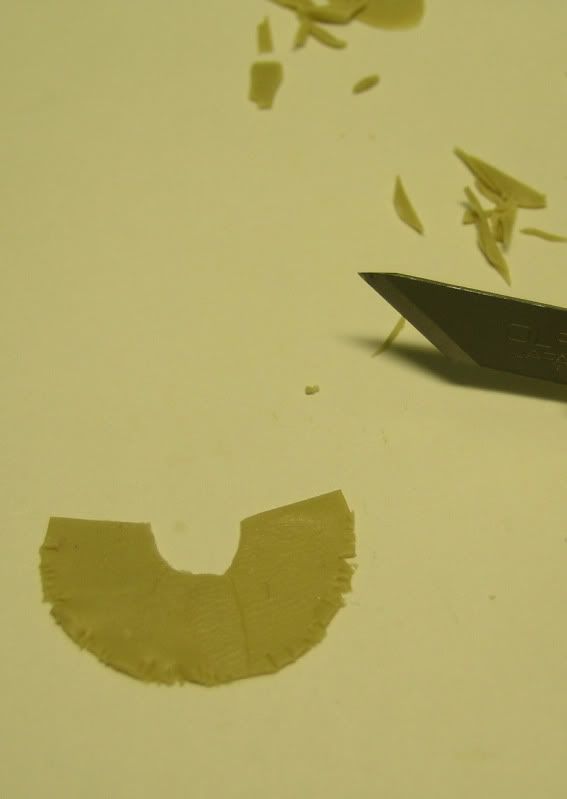
After the skirt, still fresh with the stucco am very experienced ruining the edges and creating the necessary tears, that also respect the history of departure naturally a girl who decided to live in the forest will be subject to continuous wear and micro tears.


Enjoy all the next ..:)
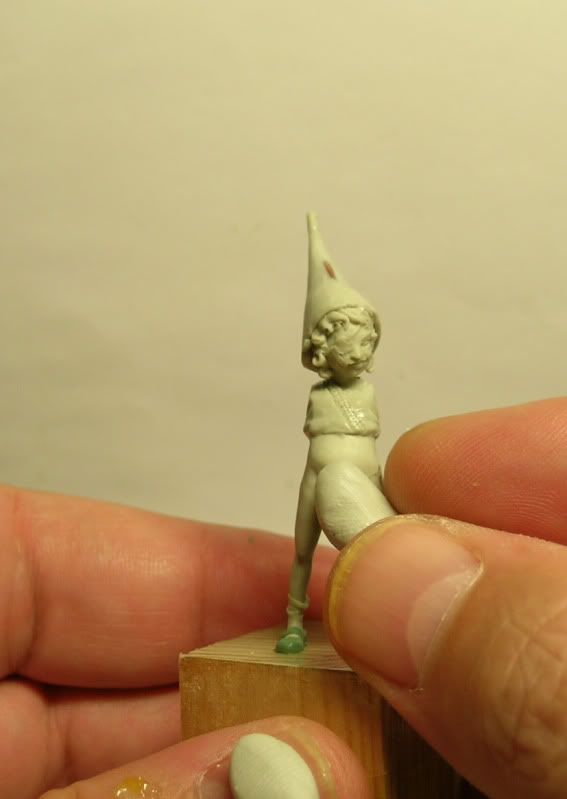
---------------------------------------fourth day
Hello to everyone after a little break ... .. reflexive and you'll understand why ... ... we are more forward again with the little Red.
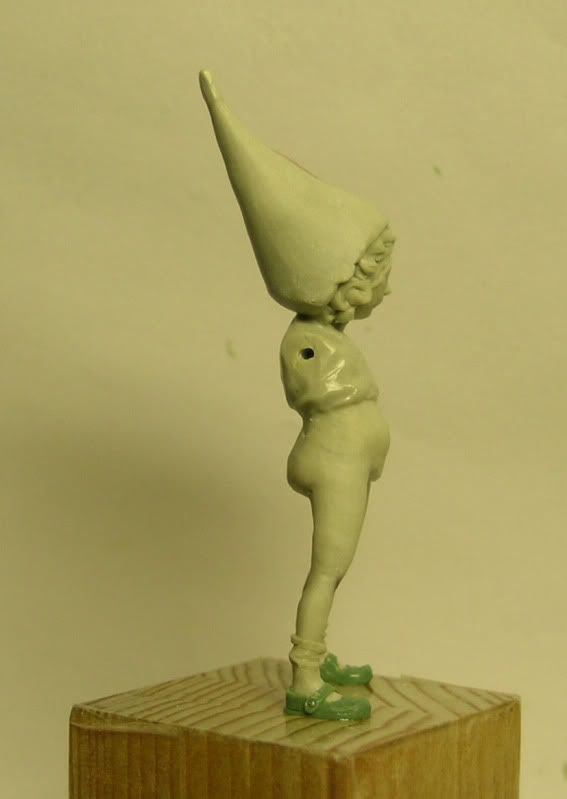
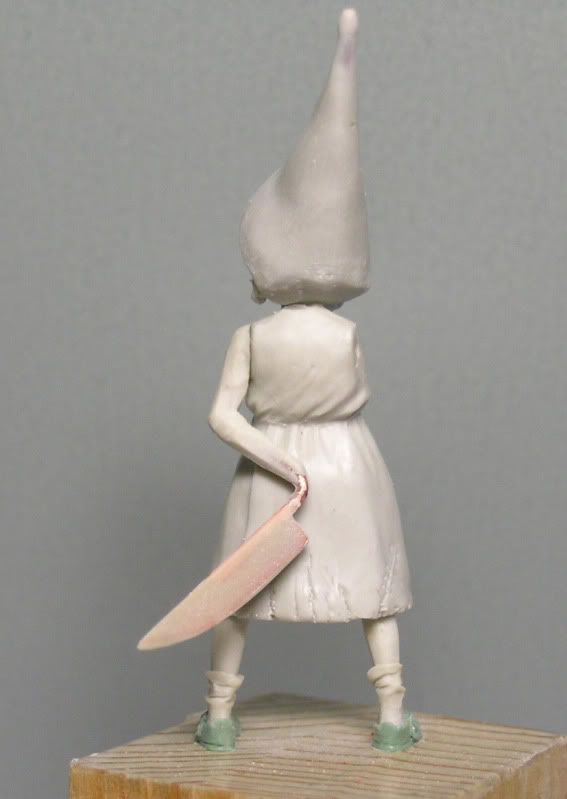
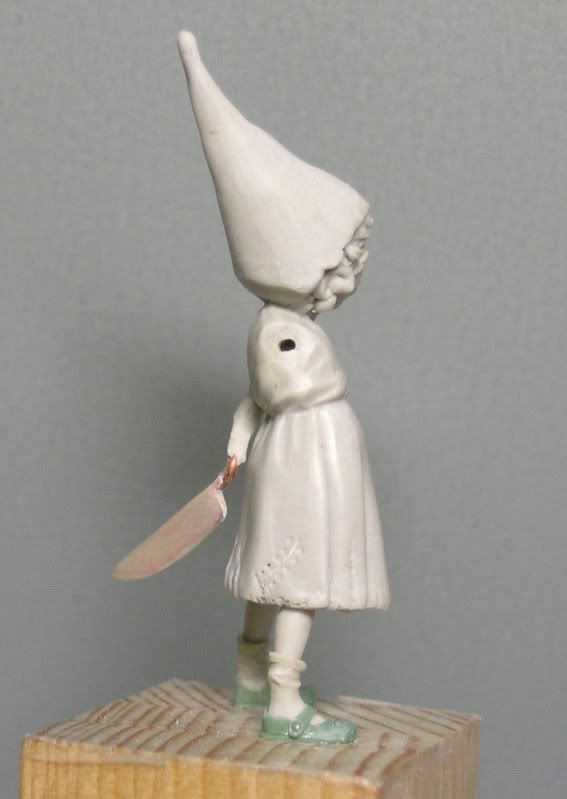
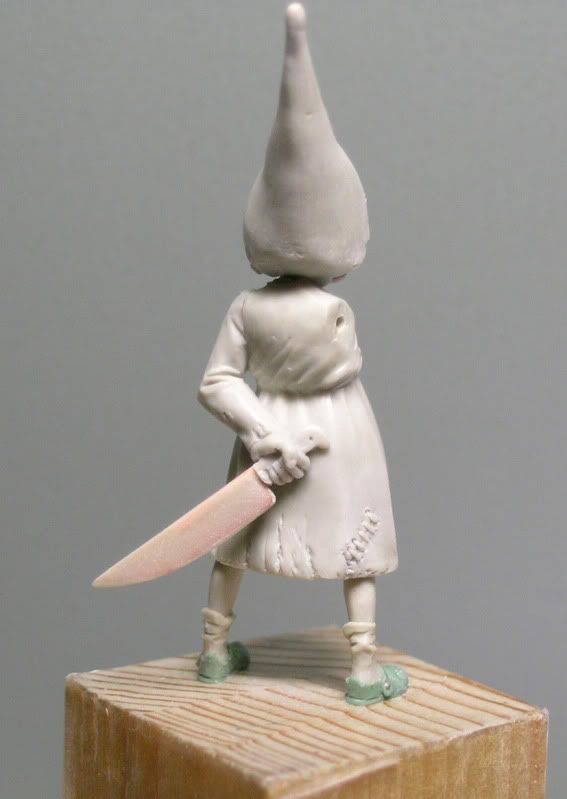
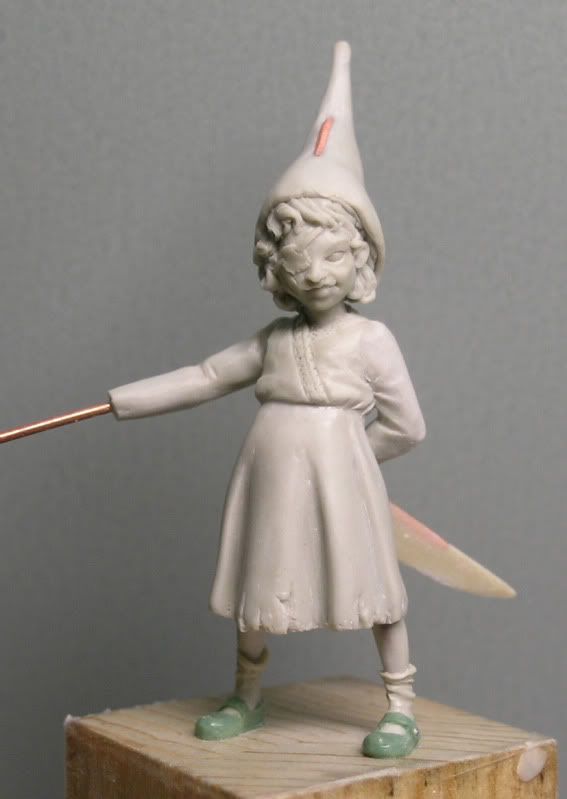
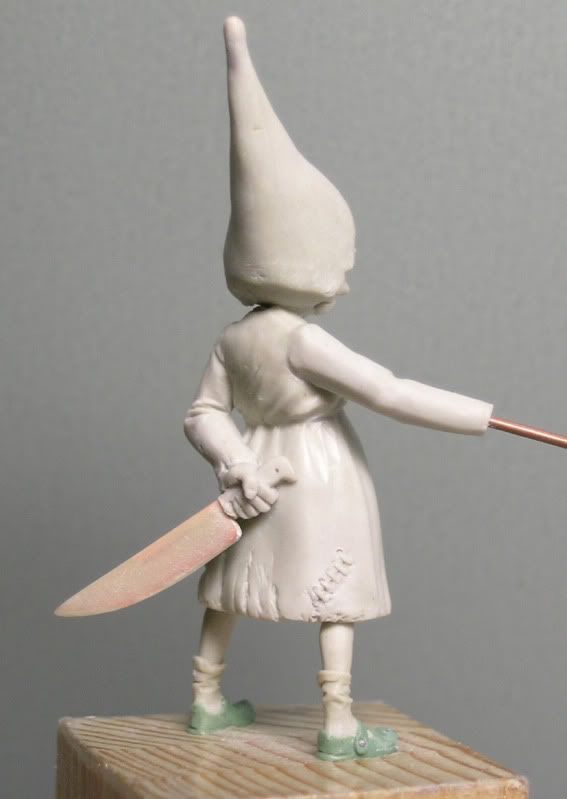
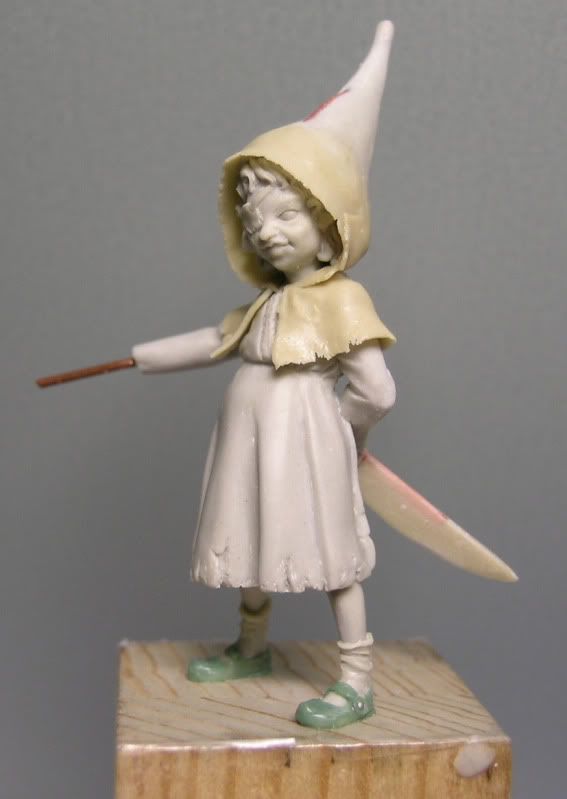
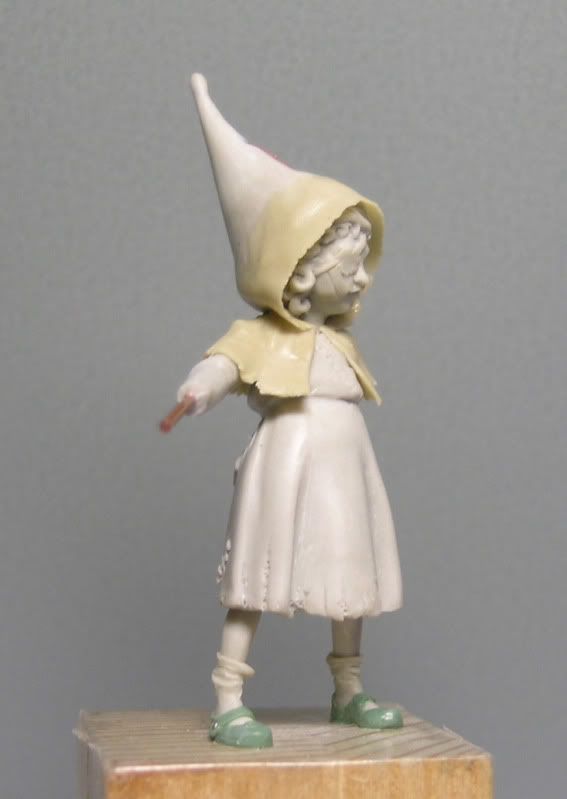
Today we begin to put the weapon that kill wolves and define the position of the arms ... .. notice how the arms are a hair longer than normal but it is one of those attentions which I described at the beginning of the fantasy in which the proportions are distorted by the effect and the attitude you want to give to the part ... ... such as not even the head is not ... well ... REALSCALE begins with the folding of the spike protruding from his left arm brass that glue a small blade reinforced zinc and then covered with a mix of A + B + Magic ... ... made once the knife grinding sandpaper and add
and a portion of the hand grip that protrudes beyond. Finally, her arms full with the same previous technique ... .. that is, with small portions of Magic.


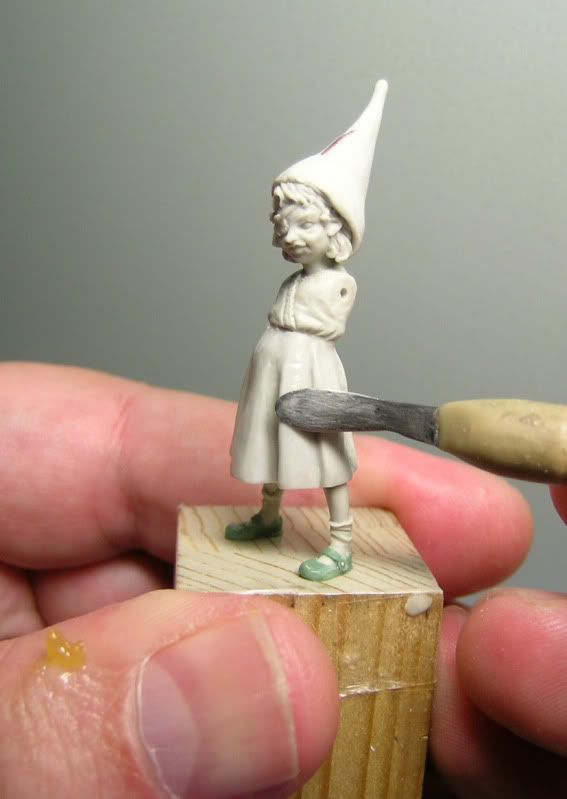
Complete the donning of the pupa, creating small sheets of A + B and Magic, take a strip of plaster mixed the connection to the hood and smear the back making sure that no steps remain inconvenient and difficult to remove when it's all dry, the I do the same for both the mantle and for the apron, once positioned are also adhered to the surface by controlling not to have exaggerated proportions, in this case just like a job.
Tailor scissors and carefully cut the excess with a once stabilized the dough, gently folds give the first, when everything is dry with sandpaper and rectify if necessary add additional drapery


Greetings to all ... ... MAB. The next session will be the last, be patient:)
---------------------------------------fifth day
This is finally the last session of progress.
Remember .... (for those who have read the story) that he felt certain that squeak nights at home Dixon, RED good was coming home to donate a new Wolf coat to his Mother.
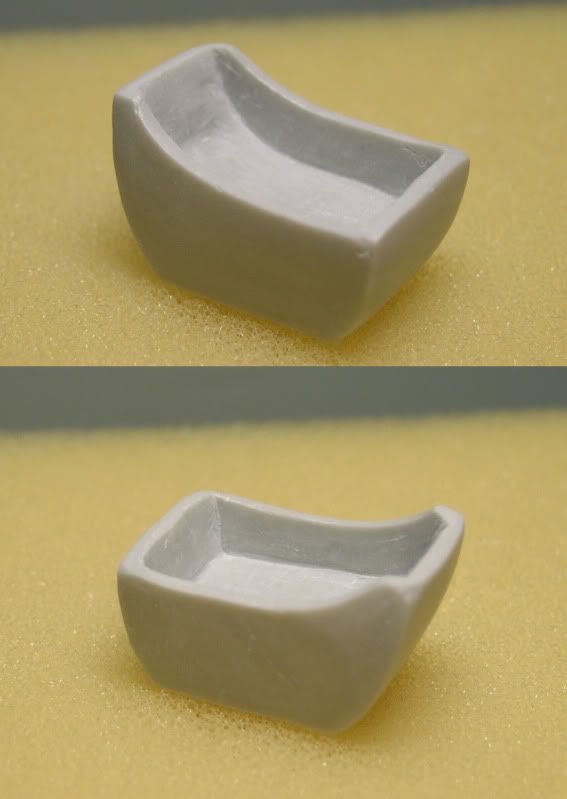
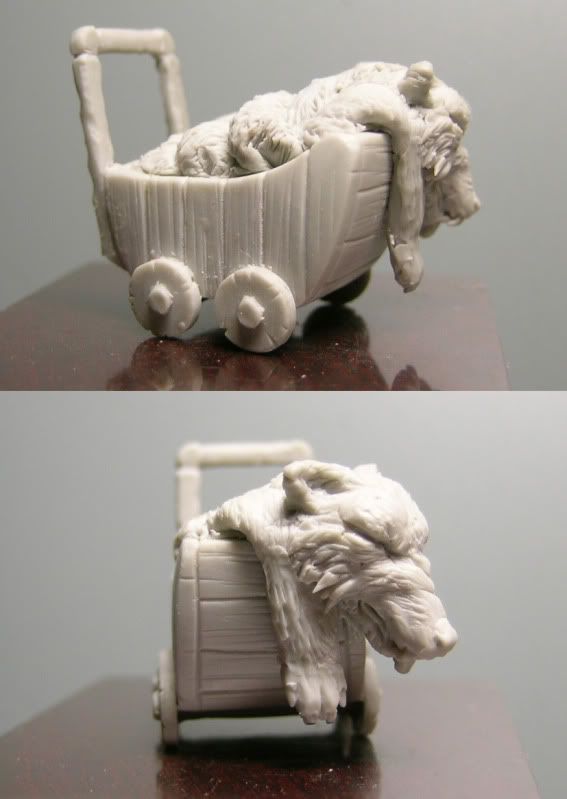
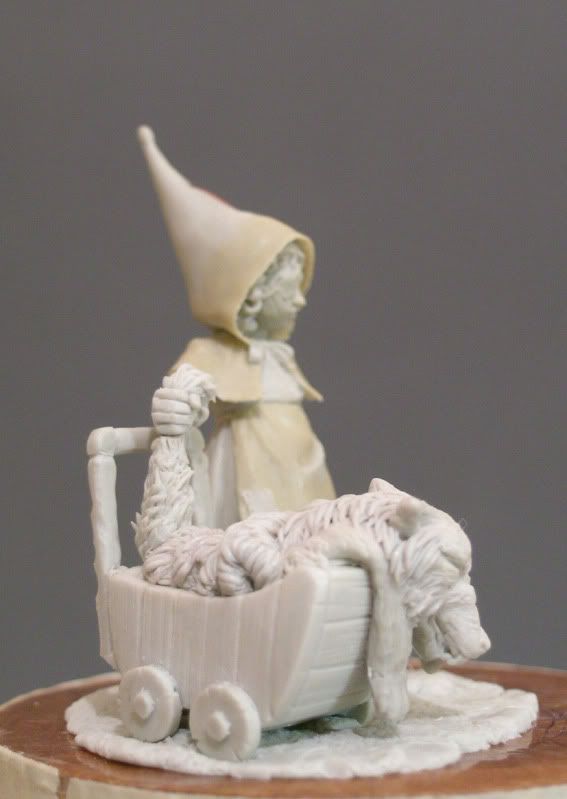
This seemed almost superfluous detail that was hidden there the rest of my initial design, rewriting the history of Red. I imagined it in the woods with a basket full of goodies, but in fact she then went away from home, how he would carry wolf fur ...? . At the beginning I decided to create a larger basket but he seemed pretty trivial, ... ... .. suddenly as if struck by lightning the dearest thing I thought that a girl would have probably brought with him was a toy. A stroller seemed a perfect idea for its usefulness.
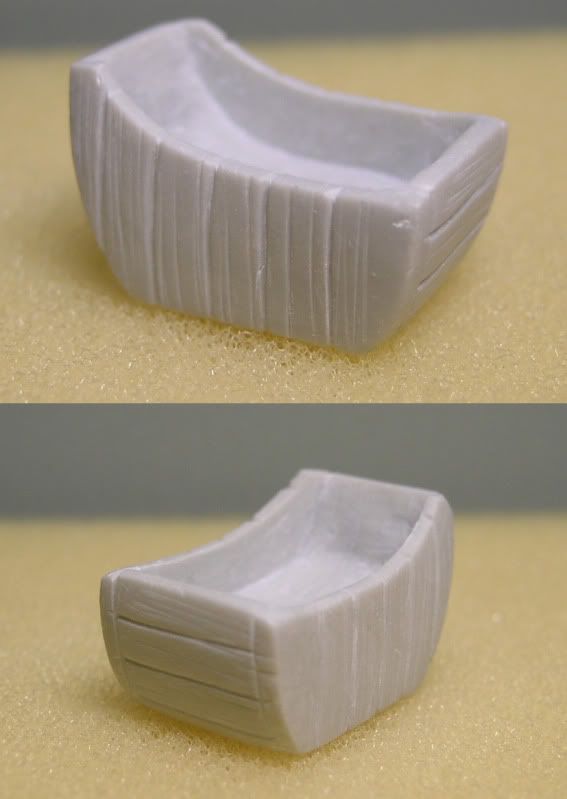
Well we continue with the progress, as you can see I made the first mass-imagining of the stroller quite simple invoice. Wooden wheels with more wood, once dry, the basic form begins to correct everything with the files in order to simulate wooden tablets, and create a hollow where they will be housed the fur of the wolf.
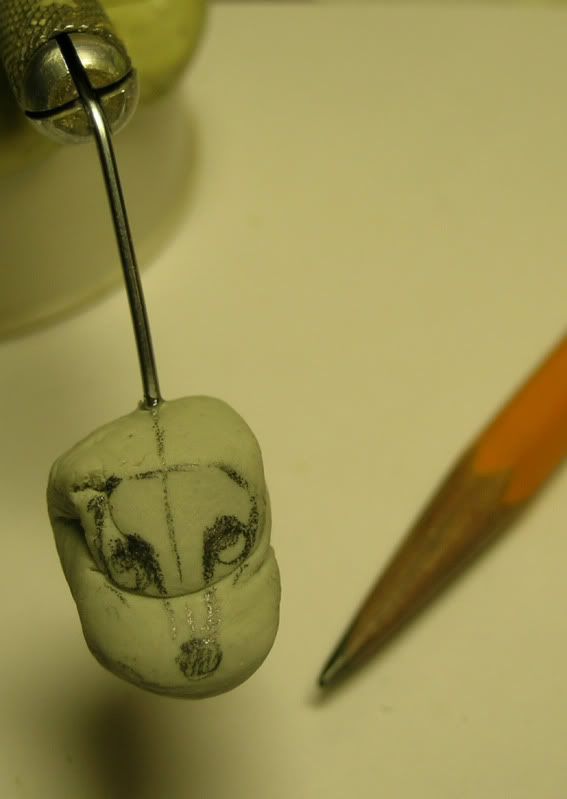
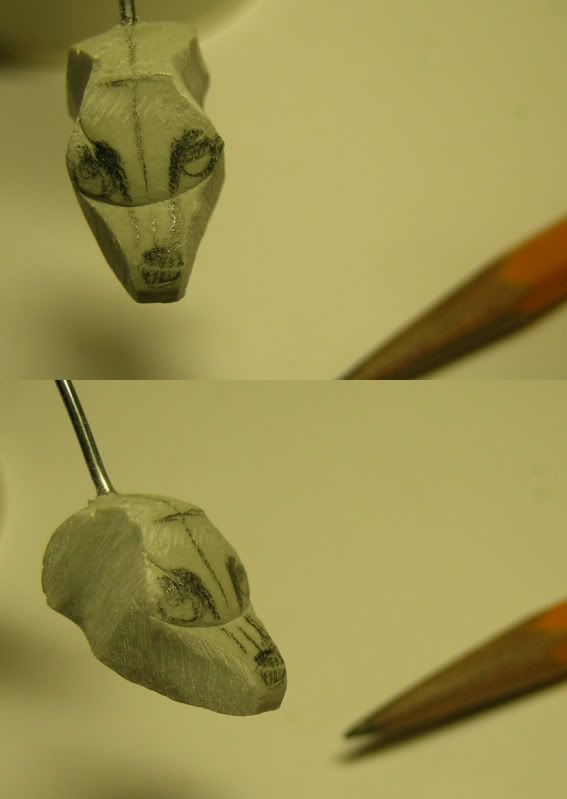
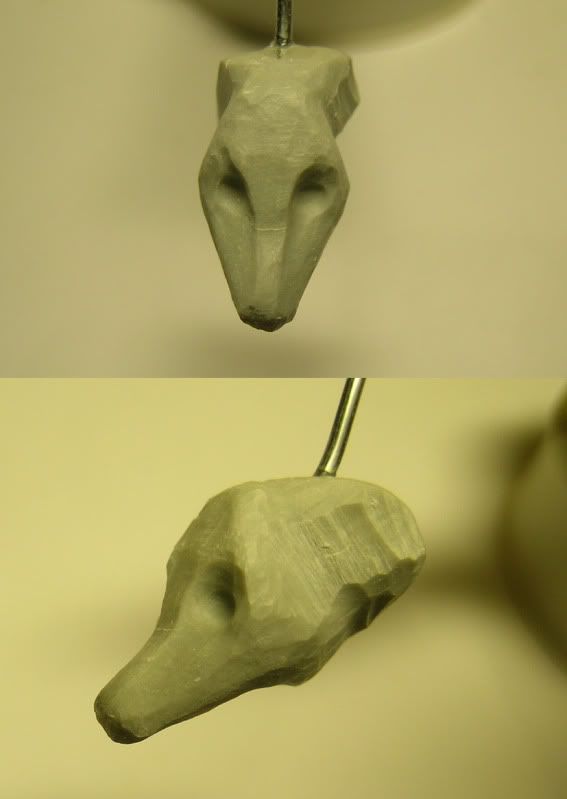
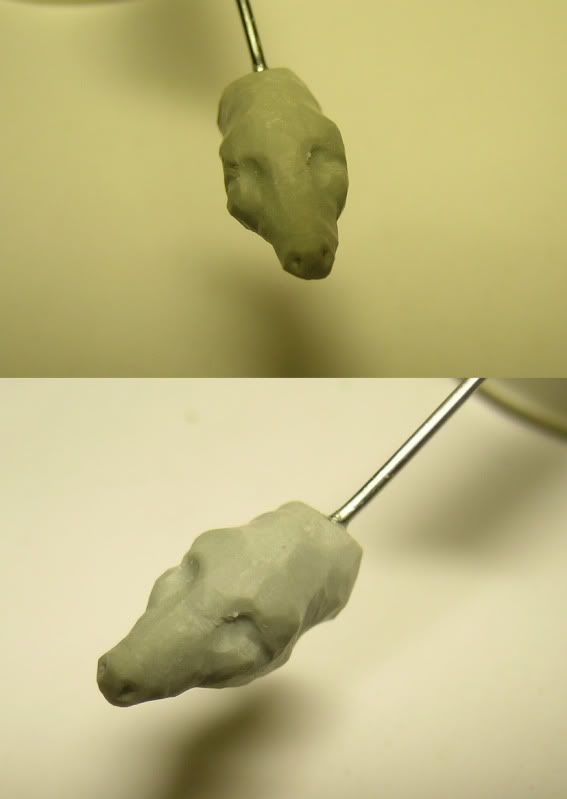
Start to make the wolf, I usually take the ball from Dry storage ... .... I will indeed present ... .... that give you some tap pencil to take the proportions of the head first and begin to rough out the shape by milling, then arriving at the final outline sketched this time with the cutter blade ... .. obtained the desired shape. Begin to add small pieces of plaster to make the head ... ... the almost complete I will finish once placed in the stroller.


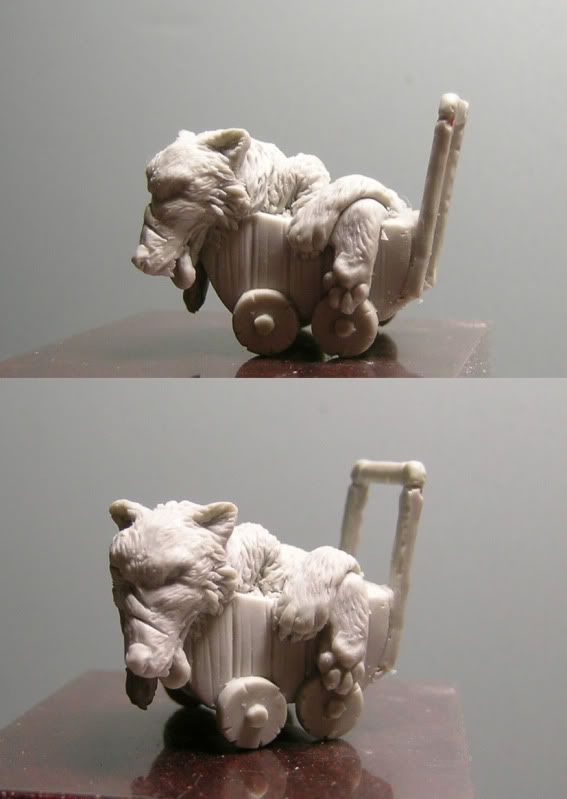
The stroller is fully ... unfortunately I have more photos. while I was making the fur the camera I left on foot direct the unexpected:) ... .. however, I positioned the head with a small pin to hold it in place and then I pressed the putty fresh, creating curly fur ... .. Of course there was curled up in the stroller if you do not, I preferred to leave the language to give more effect.
Comic and dilute the potential impact animal welfare ... ...:) I have completed all of the hair creating the session summary that also will take up later when everything is dry, add small sausage of putty.


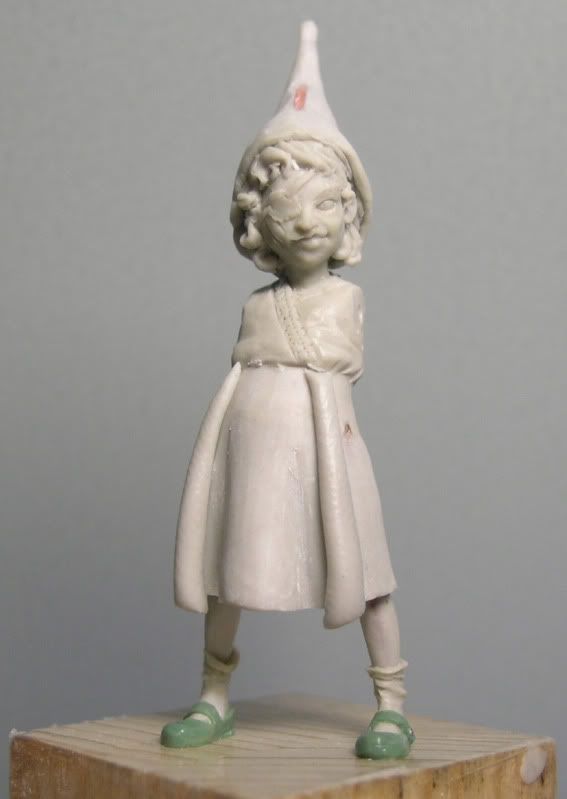
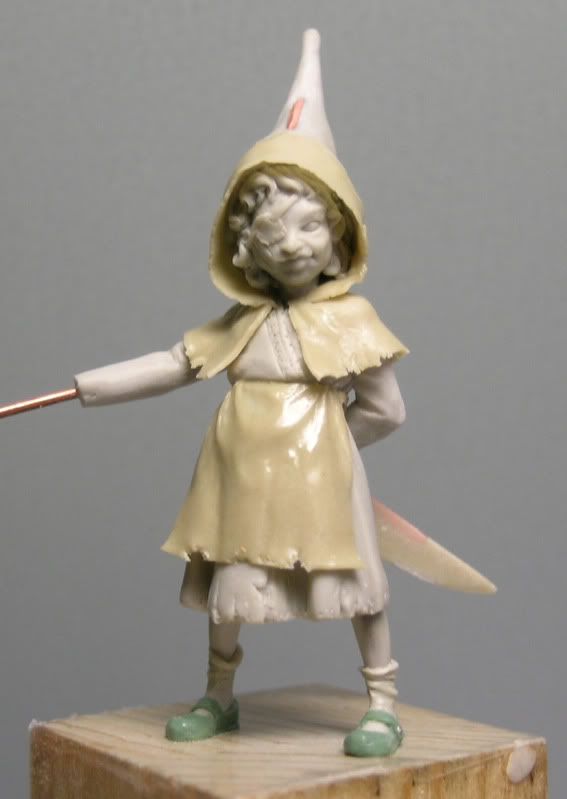
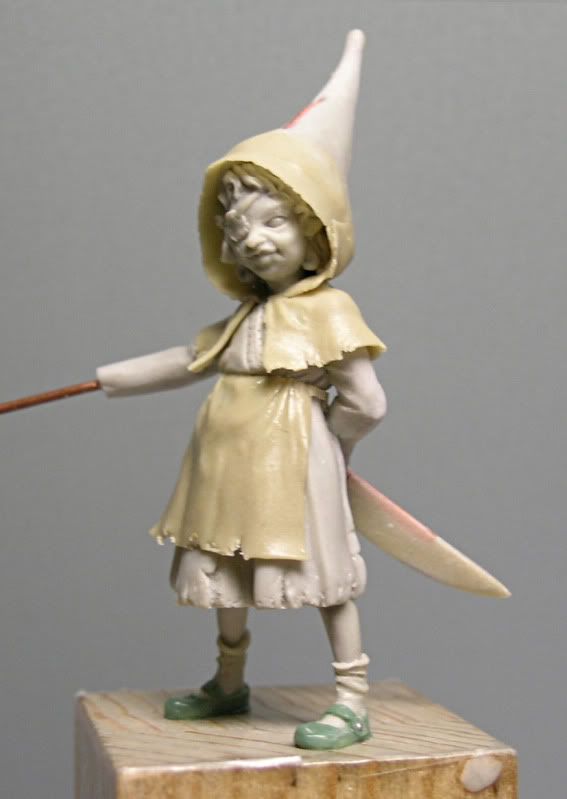
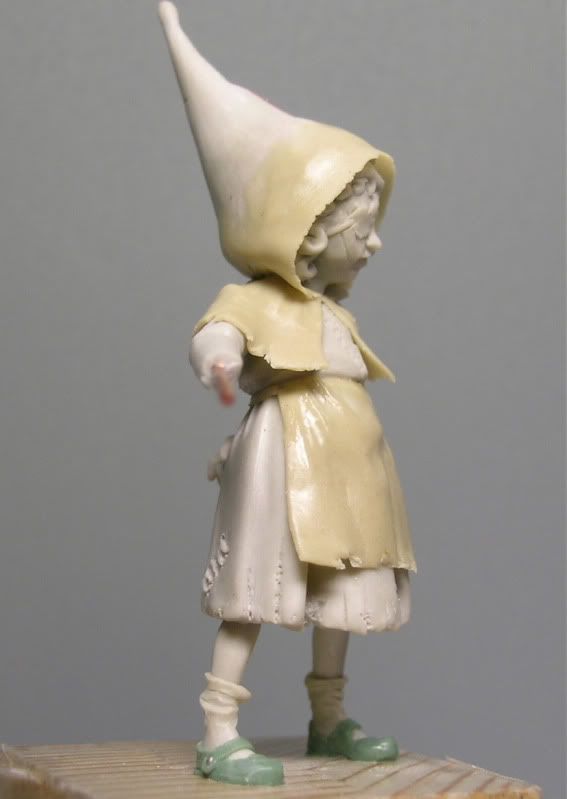
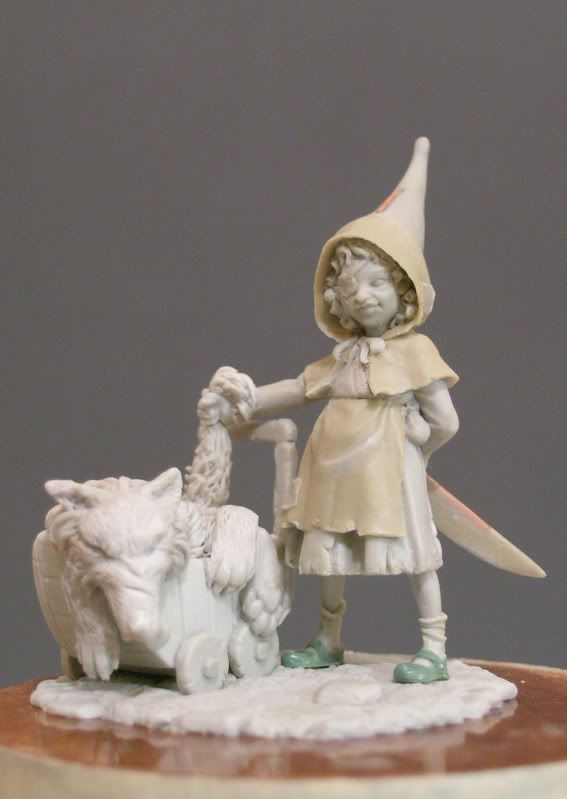
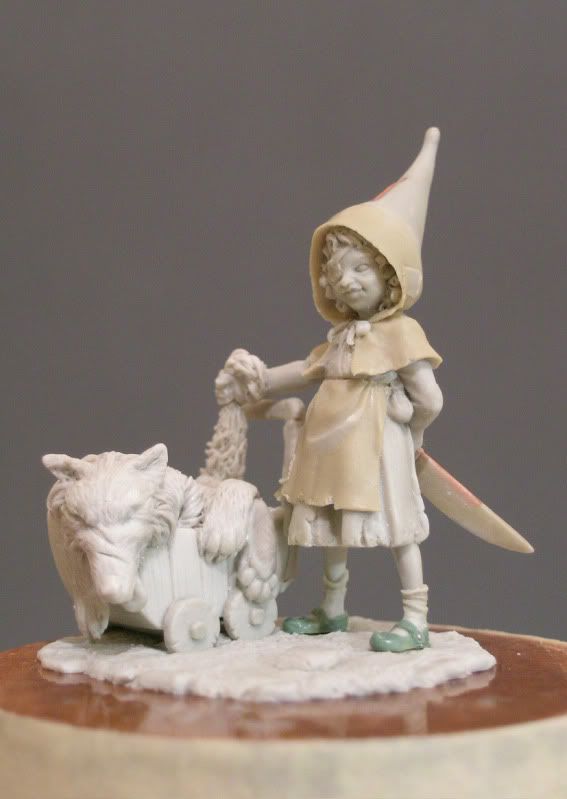
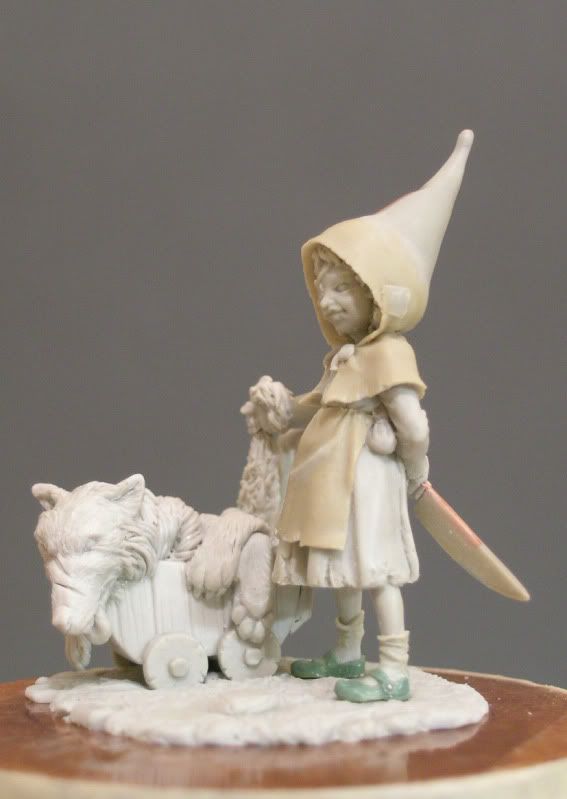
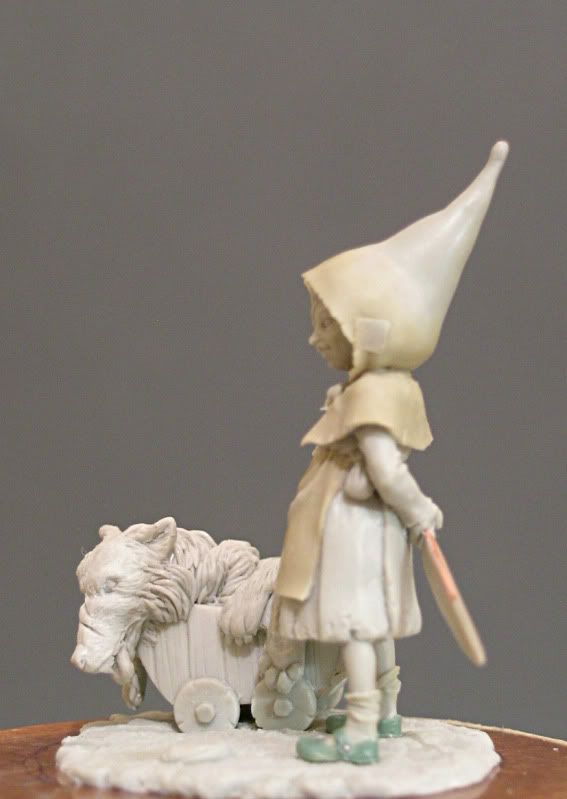
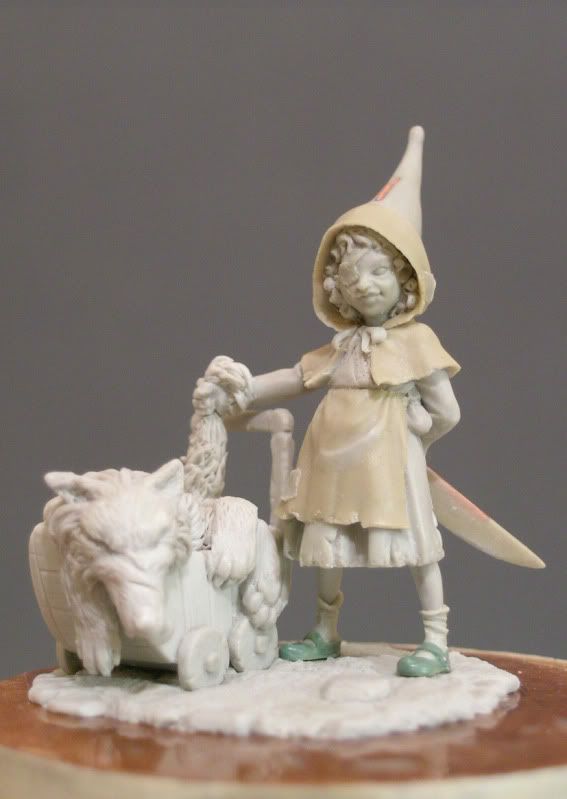
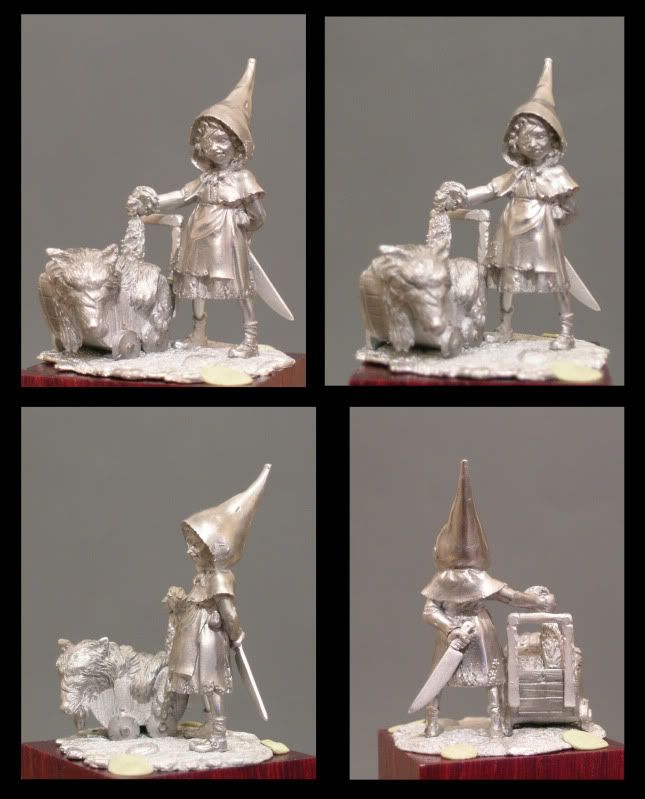
Well here is the end of this adventure ... ... Last but not least here is pleased that the small Red shows his trophy holding the tail of the wolf.
I hope you enjoyed this progress and has turned on the creative ideas in you, as I said earlier decided to make this work as a single piece, just for fun and to celebrate my small goal, but after your request public on the desire to haveone just for you, I thought it was fair to share with you all this miniature.
The piece will be played in the lead, those of you who want to paint this little beast let me know via contact on my blog.
Thank you all for your comments and for the company in this 3D Step by Step article.


______________________________________
Roman again:
Thanks again, Mr. Bruno - it is really worth the read and so much to learn from.
Thanks Andrea for the translation. For me it had some lacks in understanding sometimes but I don't think it is not that bad. Hope everyone understands what is important - most information comes from the photos. Enjoy!
Keep on happy sculpting!
Best Wishes
Roman
translated by Andrea Terzolo aka MXP
posted by roman, jarhead, kong
Introduction by roman
This one is a wonderful article sent to the jungle by Maurizio Bruno. The article was written in italian over at the Legio Pictorium Forum and other forums, this version here is translated by Andrea aka MXP. Many thanks to you both. The jungle is very proud to have this article in his sculpting section. From now on there follows the article by Maurizio. Grazie Mille!
And thanks for making the jungle heads ringing with this article, Mr. Bruno!
the Creation by Maurizio Bruno
Well here we are, we start with some data, such like on the horse "Roustam".
This project started as a small test and will remain unique, the desire is to create something small and looking a little fantasy in "ideas store" I came across a sketch made by Monge and I would say that was brilliant, made my case ... ... I started to fantasize about that little red riding hood because it had that air surly, nasty experience that could have passed ... .. it was obvious the cause of all was the wolf from that ... well ... 'I started to create input all the history and featuring the concept of customizing starting in my vision.
---------------------------------------------- first day
Start a filler ball recovered from the can "dry balls", do not throw anything away, plus the grout is not biodegradable was perfect for a first check was made a little ground ... ... the first holes create the armor base phyllo two brass rods for the legs and one that will stand head and hat, her arms I'll think about later.
Adding small pieces of armor and filler fitting, creating the small masses of fresh legs and calves
the anatomy of children is simply not exaggerated muscles so you have to stay within the lines of basic anatomy, adding a little of both buttocks and put everything under the lamp to make it hard and dry faster.
At this stage, I begin to rough out the dummy, they generally do it with the cutter but since the figure is very smalland a misguided pressure could be fatal, I prefer it to drill, you better check the removed material and has an immediate baseline vision.
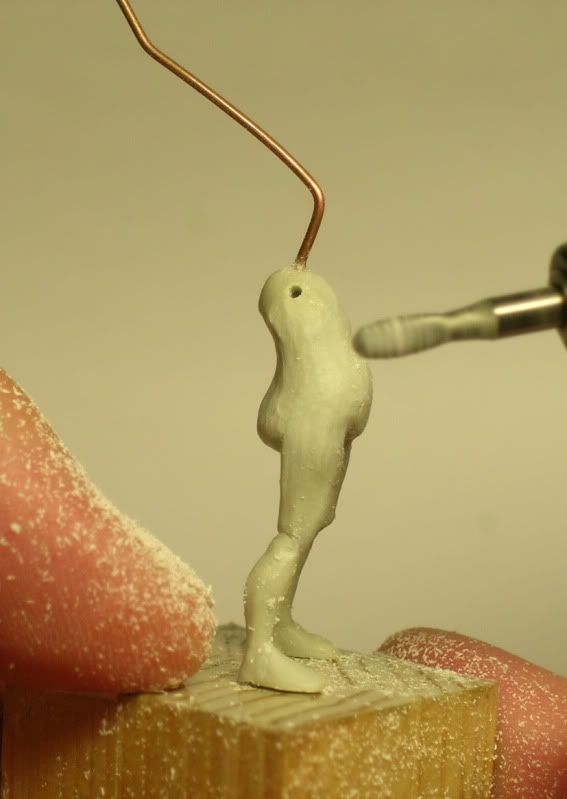
Here the dummy over, add a ball of putty as a ground for the head, two micro beads for breasts
connection to the chest and you're done.
I hope that everything is clear who has the face of questions as well :)
Greetings and Happy viewing to all
MAB
---------------------------------------------- second day
Here I am struggling with the lady, beginning with the first outline the facial volumes, in a face there are three levels.
basic principles:
the facial surface let us consider the zero level - the nose level + 1 and the orbital cavity level - 1.
these levels has created a first draft of the facial features and then you can start giving the final approach to anatomy.
He then created her arms, they too have a 'brass wire armature to which I gave summary of the muscles (almost zero). For convenience when I leave the detachable arms ... ... because I have yet to clear the movement or action of the right arm - while the left has a quasi-final, considering both the idea of the concept. In the picture you can see the back of the copper wire that protrudes from both. My left arm certainly will serve as support for the dagger.
In the end I make the shoes in hard, meticulous work for these is a great medium, the shoes are simple and reminiscent of the dolls. The stud is made of lead with the stick., sorry if some are blurry picture, but it's done :).
At this stage I give life to the face, all made fresh using magicSculpt, beginning with giving volume to the cheeks, after fitting of small balls for nostrils, lips and eyes, here you start to imagine the character and give the following characterization of the imagination is that the data from the fairy tale.
I imagined a young girl with a plump face, with a friendly attitude but at the same time with a small, satisfied smile, his right side shows signs of combat, and large scars that have warped a little bit the volume of the cheeks and a beautiful eye bandage cover. Soon after I made the socks with small masses of plaster that I've modeled carefully ... .. must give the little touches with the tool
otherwise the stucco push it from side to side, in practice it leads to walking :)
At this stage I increased the volume of the neck and gave small adjustments to the face, after adding the ears and hair I begin to prepare the first big mass for the big hat.
---------------------------------- third day
Hello everyone ... .... Today we begin to dress the little lady.
The first step is to create a small shirt, also in this case, start with small masses of stucco Magic
distributed in the chest area, usually a sausage do all that I put around the waist and then smear towards the shoulders, gradually create the shirt considering the small masses of blusatura front and back. In a second step I make small folds that simulate the effect of pressing in life ... .. which should result in the skirt when worn.
Finally, some small mark on the neck right down to simulate a possible life lace or decoration of the edges of the shirt.
As you can see the hat also has undergone minor changes in the various sessions with the stucco was give small corrections and then to produce the final ... .. Meanwhile in the mass start to crush the skirt a beautiful ball of putty and begin to shape. Always keeping in mind the interesting lines for both the severity of the cloth is the attitude and the final ... .. in this case I was almost fitting on the outer sides of the legs, when dry rectifies all the possible lifting of the cutter blade or lumps steps and modeled data from the bottom edge of the skirt.
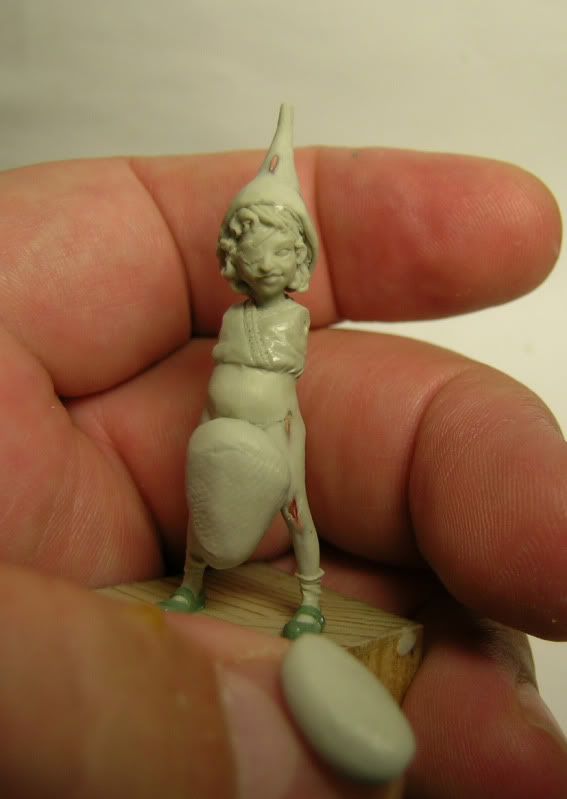
Well once adjusted the skirt ... .. I take the little sausages of stucco in the area of the skirt I place them where I think there are folds, when working on small scales must be possible to add synthetic ... ... might exaggerate a little too folds the optical vision and lose the interest of other focal points ... connection with the spatula around and helped me with my infamous fat when I began sculpting
about 12 years ago has always done his part very well ... .... Once created the folds continues with main and secondary ... always taking into account effects caused by the tight skirt at the waist by the apron and also put in a second time.
After the skirt, still fresh with the stucco am very experienced ruining the edges and creating the necessary tears, that also respect the history of departure naturally a girl who decided to live in the forest will be subject to continuous wear and micro tears.
Enjoy all the next ..:)
---------------------------------------fourth day
Hello to everyone after a little break ... .. reflexive and you'll understand why ... ... we are more forward again with the little Red.
Today we begin to put the weapon that kill wolves and define the position of the arms ... .. notice how the arms are a hair longer than normal but it is one of those attentions which I described at the beginning of the fantasy in which the proportions are distorted by the effect and the attitude you want to give to the part ... ... such as not even the head is not ... well ... REALSCALE begins with the folding of the spike protruding from his left arm brass that glue a small blade reinforced zinc and then covered with a mix of A + B + Magic ... ... made once the knife grinding sandpaper and add
and a portion of the hand grip that protrudes beyond. Finally, her arms full with the same previous technique ... .. that is, with small portions of Magic.
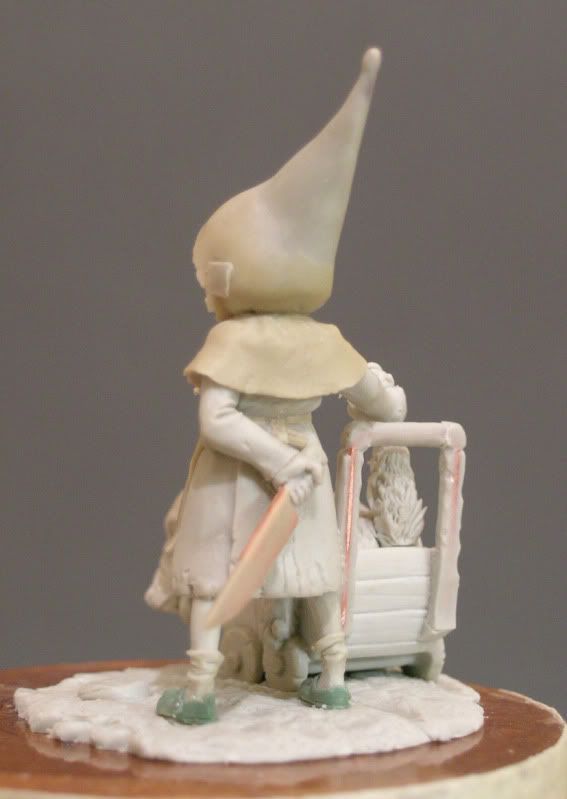
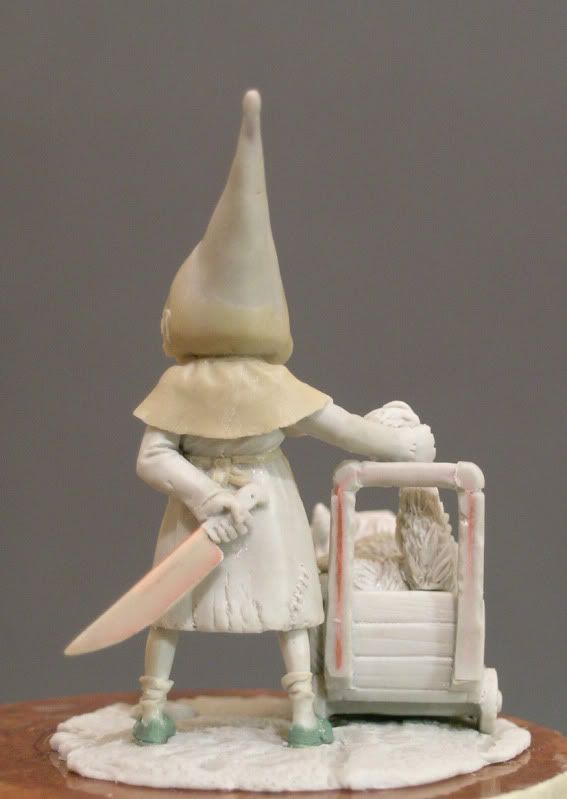
Complete the donning of the pupa, creating small sheets of A + B and Magic, take a strip of plaster mixed the connection to the hood and smear the back making sure that no steps remain inconvenient and difficult to remove when it's all dry, the I do the same for both the mantle and for the apron, once positioned are also adhered to the surface by controlling not to have exaggerated proportions, in this case just like a job.
Tailor scissors and carefully cut the excess with a once stabilized the dough, gently folds give the first, when everything is dry with sandpaper and rectify if necessary add additional drapery

Greetings to all ... ... MAB. The next session will be the last, be patient:)
---------------------------------------fifth day
This is finally the last session of progress.
Remember .... (for those who have read the story) that he felt certain that squeak nights at home Dixon, RED good was coming home to donate a new Wolf coat to his Mother.
This seemed almost superfluous detail that was hidden there the rest of my initial design, rewriting the history of Red. I imagined it in the woods with a basket full of goodies, but in fact she then went away from home, how he would carry wolf fur ...? . At the beginning I decided to create a larger basket but he seemed pretty trivial, ... ... .. suddenly as if struck by lightning the dearest thing I thought that a girl would have probably brought with him was a toy. A stroller seemed a perfect idea for its usefulness.
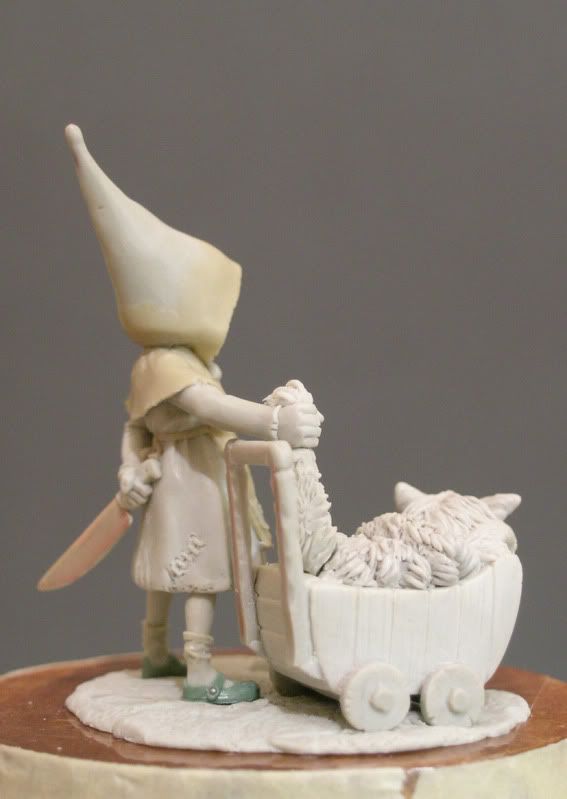
Well we continue with the progress, as you can see I made the first mass-imagining of the stroller quite simple invoice. Wooden wheels with more wood, once dry, the basic form begins to correct everything with the files in order to simulate wooden tablets, and create a hollow where they will be housed the fur of the wolf.
Start to make the wolf, I usually take the ball from Dry storage ... .... I will indeed present ... .... that give you some tap pencil to take the proportions of the head first and begin to rough out the shape by milling, then arriving at the final outline sketched this time with the cutter blade ... .. obtained the desired shape. Begin to add small pieces of plaster to make the head ... ... the almost complete I will finish once placed in the stroller.

The stroller is fully ... unfortunately I have more photos. while I was making the fur the camera I left on foot direct the unexpected:) ... .. however, I positioned the head with a small pin to hold it in place and then I pressed the putty fresh, creating curly fur ... .. Of course there was curled up in the stroller if you do not, I preferred to leave the language to give more effect.
Comic and dilute the potential impact animal welfare ... ...:) I have completed all of the hair creating the session summary that also will take up later when everything is dry, add small sausage of putty.
Well here is the end of this adventure ... ... Last but not least here is pleased that the small Red shows his trophy holding the tail of the wolf.
I hope you enjoyed this progress and has turned on the creative ideas in you, as I said earlier decided to make this work as a single piece, just for fun and to celebrate my small goal, but after your request public on the desire to haveone just for you, I thought it was fair to share with you all this miniature.
The piece will be played in the lead, those of you who want to paint this little beast let me know via contact on my blog.
Thank you all for your comments and for the company in this 3D Step by Step article.
Thanks for your time watching little Red Riding hood grow!
______________________________________
Roman again:
Thanks again, Mr. Bruno - it is really worth the read and so much to learn from.
Thanks Andrea for the translation. For me it had some lacks in understanding sometimes but I don't think it is not that bad. Hope everyone understands what is important - most information comes from the photos. Enjoy!
Keep on happy sculpting!
Best Wishes
Roman


awesome! Great model too :D
Oh I love the face of this model!
Unfortunately the text is very difficult to understand at some places...
Wow, a big thanks to Roman to Andrea and all the jungle to have made this small progress in this great place.
Thanks to all of you who commented, if any passage it is not clear there will be a pleasure to meet.
Greetings and good fun.
MAB
Cool miniature and a great tutorial at all :) Where can i get this ;)
@Anonymous
To get the Red Riding Hood you have to directly contact Maurizio - you can find his contact on his blog: http://mab-sculpture.blogspot.com/
I already enjoyed this tutorial over at planetfigure. Great to have it here in the jungle's article section now.
Maurizio, you're a master of your trade! Thank you so much for letting us have a little insight in your technique :-)
Awesome tutorial, it's great to have such an excellent sculpting tutorial available for everyone, thanks to the Jungle and Maurizio. :)
I find the text understandable, but i'm not a english native speaker... it seems they have a lot of problems with languages... even with their own language :P
AWESOME! :D
the pics are away :(
@Robin
Thanks, we already know - there was too much web traffic on Maurizios photobucket space - we will have this repaired as soon as possible then the pics will be back again :)
Fantastic
Morfeas62
what materials did he make this with? it looks like he used green stuff and magic sculpt. is that correct?