


Aloa.
This time Roman wants to talk about light. As you know Miniature painting lives from Light that you paint on your miniature. Highlighting here and there to give areas a more clear order. Light works only with shadow and shadow only works with light - the so called Dark/Bright Colour Contrast. This article shows my personal view on the topic - additional comments always welcome...
I will also do italic side notes while talking about light to give an overview on my personal painting order. Not the colours i use, just a plain explanation on how i work my way through a miniature.
_______________________________________________________________________________
You want to support Massive Voodoo?
If you like to support or say thanks the monkeys of Massive Voodoo in what they do, please feel invited to drop a jungle donation in their direction via paypal or check their miniatures they got on sale here.
_______________________________________________________________________________
Talking about light sources
There is for sure one light source that will influance your models everytime you look at them. It is the light from the sun, the daylight while they are standing on the gaming table or the light of a lamp while painting or in your cabinet - this light source has not to be painted at all. In this article i want to give you a hand on the question why areas can be highlighted and brought to light with a reason. If you are walking around in your every day you might see that light influances your sorroundings everywhere:


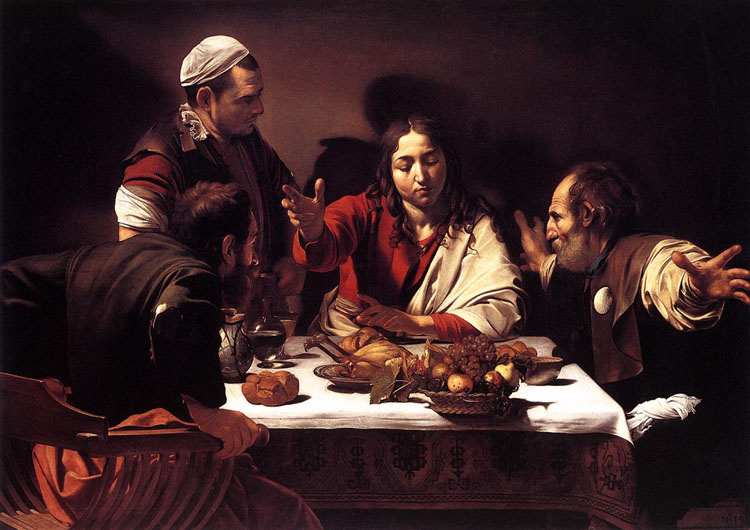
Dramatic Light situations can often be found in Artist paintings - this is always a good inspiration to learn from. Here is one for example, found at: http://upload.wikimedia.org/wikipedia/commons/7/72/CaravaggioColumn.jpg

Or this one, found here: http://de.academic.ru/pictures/dewiki/67/Caravaggio-emmaus_750pix.jpg

Raffaele, our beloved Chapuchin, already wrote this great article about light in common. He tells on how light works and influances areas. Check it out! To his article i've added something intresting i found while hanging around in different forums, thanks to Thomas at this point for linking this up!
Now i will get one step deeper into detail light painting as there is one light source, which can make your painting a real joy when you get to understand it. If you can understand it and imagine it, you can paint it! :)
Zenithal lighting theory
Means an imagined light source, unreal first - up to you to make it real and alive hitting from the top at the miniature. Light that you see in your painting plans and which has to be painted up to the miniature. It is nothing less then the common work with light and shadow contrasts but offers you help while painting as it is clearly and always hitting the miniature from the top.
Why from the top? What is he talking about? Ok, Step by Step... here you go with a miniature painted in its basic colours with some additional highlights and a bit of shadows, no special light source at the moment- doing this uncoloured for an easier explanation:

Next i let Zenithal Lighting hit the model. Shadows are getting stronger due to the opposite direction the light hits the spots:

Now i even make this light from above more intense. This provides i get my focus on the miniature where i want it to be - at the upper areas, concentrating on the head/face/character of the miniature. This is an excessive example to make it understandable, you can see the legs don't get that much attention by the light as the most important place is not the right big toe on a model:

When a light hits an edge, the edge always might appear brighter as it sourrounding areas - just take a look at the chair photo in the beginning. This is caused by the edge itself as it breaks the light but that is getting to much into scholarship for me so i keep my mind simple by knowing this. If you are intrested in more light theory - check Wikipedia for it! Always know that light looks different due to the material it hits, for example on metals you get more intense reflections compared to a dark wool cloth. Keep your eyes open, everything is out there!
It often helps to look at your model from the top. Your line of sight is the zenithal light and you can see the areas it will hit, those areas you only see parallel to your line of sight are still influanced by the light but not that much, those you can't see are in the shadows. Always remember the fact that a skintone hit by zenithal light at a bald head is brighter than the right toe on the ground, even it is hit by zenithal lighting. I will explain this in the following exercise.
This is the simple theory from zenithal lighting. Be aware that it is you who chooses if he paints with such an intense light and for sure you should think about if you use this for a complete army, but very often you'll see miniatures painted with this light theory when you keep your eyes open wide and use your eagle eye. In the end it is nothing very hard to paint, i guess for those Tabletop Gamers among you it would be a big change but you can believe me, that it is just a matter of practice and after your eyes went through this school for a couple of goes you will learn to paint light like a machine. You can certainly use different angles on how your light hits the miniature - zenithal lighting is the easiest one. I can only speak for myself and have to say from my experience that it is easier to paint something with light or highlighting if you know why you are doing so.
Why does he want me to paint with light anyhow? Good Question - an excessive use of light makes your model way more realistic and the higher contrast between dark and bright makes our small friends look more impressive in the end as you have to be excessive in such a small scale to make kaboom! With the use of zenithal lighting you get the focal areas into a good view for the beholder and most time you'll get the face/character of the miniature as focus by using this light source (depends on the sculpt for sure!). Training is needed, like always.
Zenithal lighting exercise
I will now give you an overview on how i start my work most of the time, including the view on zenithal lighting. The additional comments on my personal painting order will be in italic.
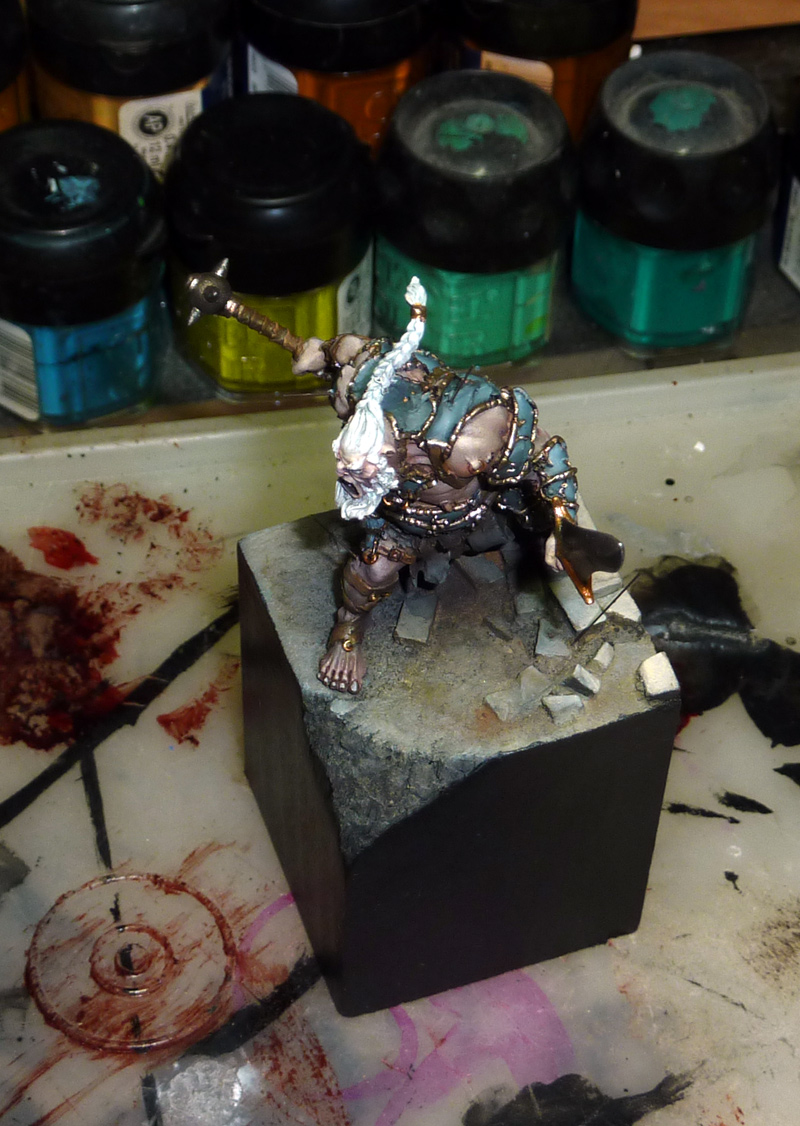
After priming the model (Son on Onimos, Rackham) i do start painting the base colours up to the model, already thinking myself into the light situation (zenithal) and bring the areas affected by light up to the model with a brighter tone. I do this step mostly completly wet in wet, that means i mix up the colours on the model itself. This is so damn hard to explain with words, but there is a Video Tutorial planned for this, sooner or later. For painting theory of the metallics you can check this article.
1 hour of concentrated Painting - finding basic colours, depositing them at the model with painting them wet in wet, already including a gentle bright/dark contrast which is caused by the zenithal lighting... the focus already is at the face and the shoulders... i already like his right foot and i am looking forward to set it into light later on.


At the moment the zenithal light source becomes less important to me as i working my way through the unpainted areas on the model. I did start with some lights at the dark tourquise armour areas.
Further Steps now include painting every area with its basic colour to get the right view on the model. While painting the dark basic colour for the metal areas i do not look on the light situation on the metals yet. I simply basecoat them and bring in lights later on (this is far easier when doing small metal areas). I did some work on the weapons, a bit more brightness in the skintone and some glazes of red to make the skin look more alive. Also i've added some gold areas, not much, because gold makes everything important very fast. I had 3 gold tones for this, a dark one, a middle tone and a bright tone and applied them like described here. I've added the idea that this Kick-Ass-Barbarian looks so angry because he got hit by several arrows (using accupuncture needles). I drilled a tiny hole at place and glued them in (yes, already in the painted areas, because there will be blood in the end) - after that was dry i did use black to paint them at the moment. I've worked a bit on the base with pigments and bright colours - alternate working here, not really describable. I wanted his pigtail not so straight in the skies, so i used a gentle force of my Gorilla Arm Power and did break it, haha - but it was glued and replaced again. At the moment 3~4 hours of painting have passed...
The following photos seem a bit too dark, but they show you good what i mean about the light situation:


Next Step: Put on some good music for painting :)
I did intense the lights and a bit more by going brighter in the skin, only on tiny areal spots. Intensing red glazes. Worked my way through the detail metallics on the armour with bronze and a brighter tone of it, always having in mind the light hits from above. 6~7 hours of painting at the moment..
Totally different photos, lighting on the table, outside on the balcony, completly weird but i am sure you'll get the point - first is one without the intensed red glazes out on the balcony:


With this next step i did overpaint my red glazes a bit, they still appear gently. But that is not a problem as i will work them out later on. Just brought back the lights a bit more. From this point on it is all cleaning up that mess, blacklining (seperating different areas from eachother by bringing in a dark fine line). Intensing a light here and there, working on details like eyes, fingernails, tattoos working out the leather parts this way, blood, final skin variation glazes, building up the feather tail on the arrow in the ground... and stuff and stuff... it'll take a while and i choose not to finish this off as i want to concentrate on the painting itself at the moment when it gets to such details instead of shooting photos for you all the time, haha... here it is after about 10 hours of painting work... i guess 5~10 hours will follow now for the detail work...

Here are some further WIP shots, to show you how the intensed light spots work out til i work my way to the end of the miniature - it also often helps to look at a b/w photo to check your light situation and focus without disturbing colours in it - hope you can learn something from this article - here you go:


Closing Words
I hope you get the point of what i wanted to show you about zenithal lighting. The Work Order should also give you an insight on how i give a miniature a go... sure not til the end but that can be another article in the future - i am too lazy now and want to finish this guy up. Also i have to pack for the upcoming painting class...
Keep on happy painting! ...and drop a comment if this article helps you... also additional thoughts to this topic are very welcome... share your experience with us in here, if it is ok with you i'll add it to the article by quoting you in.
Regards
Roman
_______________________________________________________________________________
You want to support Massive Voodoo?
If you like to support or say thanks the monkeys of Massive Voodoo in what they do, please feel invited to drop a jungle donation in their direction via paypal or check their miniatures they got on sale here.
_______________________________________________________________________________


Amazing again. Great article as always. Thank you!
Regards
amazing article! Thank you very very very much
Masterful work.
My first visit here - the best blog I have seen on the subject, very inspirational. Thanks for the hard work sharing these inisghts.
We are really grateful for your blog post. You will find a lot of approaches after visiting your post. I was exactly searching for. Thanks for such post and please keep it up. Great work.
Aircraft Warning Lights | Aviation warning lighting - CEL
This tutorial was really useful, thank you! I've included a link to your work in my article: Painting light effects - Miniature painting guide