


Hello dear MV readers,
during MV's last Tutorial vote you skipped the Step by Step of the Pirate bust again and decided to see the birth of "The Nightwatch".
"The Nightwatch" diorama that took Roman a long time to be finished due several reasons.
This is article will not be a detailed step by step of which colour was used on the different figures. The reason to call this still a step by step is the following explanation that tries to show you how such a project grows from an early start, how it gets stuck, how it grows again, how it comes to an end. It is about Motivation, little tricks here and there and some composition thoughts of the whole scene.
Have fun reading it!
________________________________________________________________________________
The initial idea of doing such a project came up because of my love to Red Box Games Miniatures.
I always do and will enjoy Tre's sculpts, full of character and power.
He is one of the greatest Fantasy sculptors outthere in 28 mm Scale in my eyes. While I already did enjoy painting up some single figures from Red Box Games I decided to catch a group shot of them together, somewhere in an old long forgotten, dangerous dungeon. A gathering. A gang that gets ready to slay the dungeons end boss. So the working title for me first was "The Gang is all here!" ...
I did build up a base for the dungeon scenery ... you can see the progress in the following video. Good for me to see the video again, I now know when I did start the project, it was May 2011. A long time ago it seems. Enjoy the video and watch in high quality:
Well, after the base was build it was time to check how I want to place the "gang".
For a start I took a photo of the base I did build and checked it for the composition thoughts I made initially while creating it. As the base is a "one front" base I looked at it like a flat picture or painting. Having in mind that the human brain reads information from left top to right bottom, like a book ( for sure many countries with different languages read different or drive on the opposite side of the road) this information can still be transported. With the wood pieces I created straight lines to frame the scene and to make the upper left corner more interesting. Heavy stone pieces to the right low base helps the viewer's eye subliminally to get drawn there. So the frame was set up and the position of the figures was sketched with red colour too. It is always good to have a plan :)

If you are interested in more thoughts on how to build up a base I can only recommand the following article for you. Read it carefully and you will learn a lot:
Basing Composition Introduction
A guide that takes your bases to a higher level.
So I did several "positioning-tests" to find out what figures I will use and where to place them. You will find out that the figures changed their position until the project was finally completed. Even some did not appear in the final concept. This looked like this:

Next on the working order was finishing basing preparation and work until the point of no return was reached to finally throw some paint on that base. And so I did with pure joy and painting madness. You can see the video of the first colour sketches here and I got to say: "Yeah, I love the song I did choose for this video! It sums up all the joy I had!"
Enjoy the video and watch in high quality:
After the sketch was done and the colour was dry I started to paint some figures. First I did paint my plinth black. Why? Read this. While I painted on the figures I once in a while got back to the base and used the brown I used on a figure also for some wood pieces on the base or some tourquise used on a figure for some glazes on the base. This is not a strict plan I follow, this is more improving the sketch to find out where colours lead me in the overall look of the scene. It is good to see colours repeated on figures and base to get both of it connected.
Start of the paintwork on the figures...

The base looked like this in early September 2011.
The progress went slow in this project as it was just a private project and I had many classes, comissions and other distractions going on back then, but I did not want to hurry myself with this piece. I really live the thought, "everything happens with a reason" and "there is the right time to finish a bigger project". You can also say: "A project is finished, when the time is right!"
For me this means: surely I can push myself through this project and finish it fast, but when I lose the grip on such big pieces I rather wait until it returns. It is better for the heart, for the motivation and better for the project in the end.


More figures were finished on their working plinths and placed to the base. You might have recognized the "straw" I did place here and there. This was just, yeah well, straw made smaller and some soil. This stage was still sketching on the base environment for me. Instead of placing a colour here and there I did place material. Let it grow from itself I always say!

Even it was all ok for me at this stage of work I did another bigger break. I can not say it was lack of motivation, more distraction to more important stuff I had to spent my time with. It was just like that. And so time went by and the project got lost in the depths of my cabinet once more for some months. I think this was the biggest break I did during the work on this project. I did not really stop working on it. I did physically, but not mentally. Here and there, once in a while I checked the web for more RBG figures I maybe wanted to put into it. Once in a while just looked at the piece to make thoughts. I did so, because I never wanted to feel I have to push it.
Well, time went by too fast it seems and in January 2013 I took some of the figures again and painted further progress on them. There has been a big break on the work on the project since the last time I hold it in hands, I told you. New things were learnt in that time, new experiences made and it felt good to see them used in this long timer.
The Monk and Druid were painted in between some other projects. I also had to dust off the diorama with a big soft brush to work on it again.

I took some of the initial figures out of their boxes again and started to plan where to place them. I used Pattafix or bluetac for it to place them on the base and find out where I want them to be in the end. Following you can see the brave dwarf and another sorcerer, this time a female:

Oppourtunity was taken and the big barbarian, who normally is meant to be a Half-Orc was prepared together with the female sorcerer. Readied up on a wooden working plinth to be painted side by side:
.jpg)
During that work flow I also finished the male warrior you can see in the following photo. The male warrior is seen to the left front in this wip shot, but in the final result his place was a different one. In the back you can see the dwarf ready for painting. The base stayed untouched in this work time. No, it did not. I used the airbrush to spay a gentle, thin blue/green into the base. I can not really even tell you why but I had to find my way into it again after that long break.

.jpg)
 Dwarf gets colour
...
After the dwarf was placed I got stuck again. I wasn't sure about the colours I used for the female sorcerer and the barbarian brute wasn't going better at all. I lost motivation and track once again. I took me a while again to get back to it, but therefor I had to skip doing further painting progress on the barb and girl. They just got me stuck. So I decided to pick out another couple of RBG's figures. A dwarfen crossbowman and a girl which reminded me of "Red Sonja", but just because I have painted strong red hair to her. See them here in WIP ...
 So the gang grew ... and as they grew fun came back.
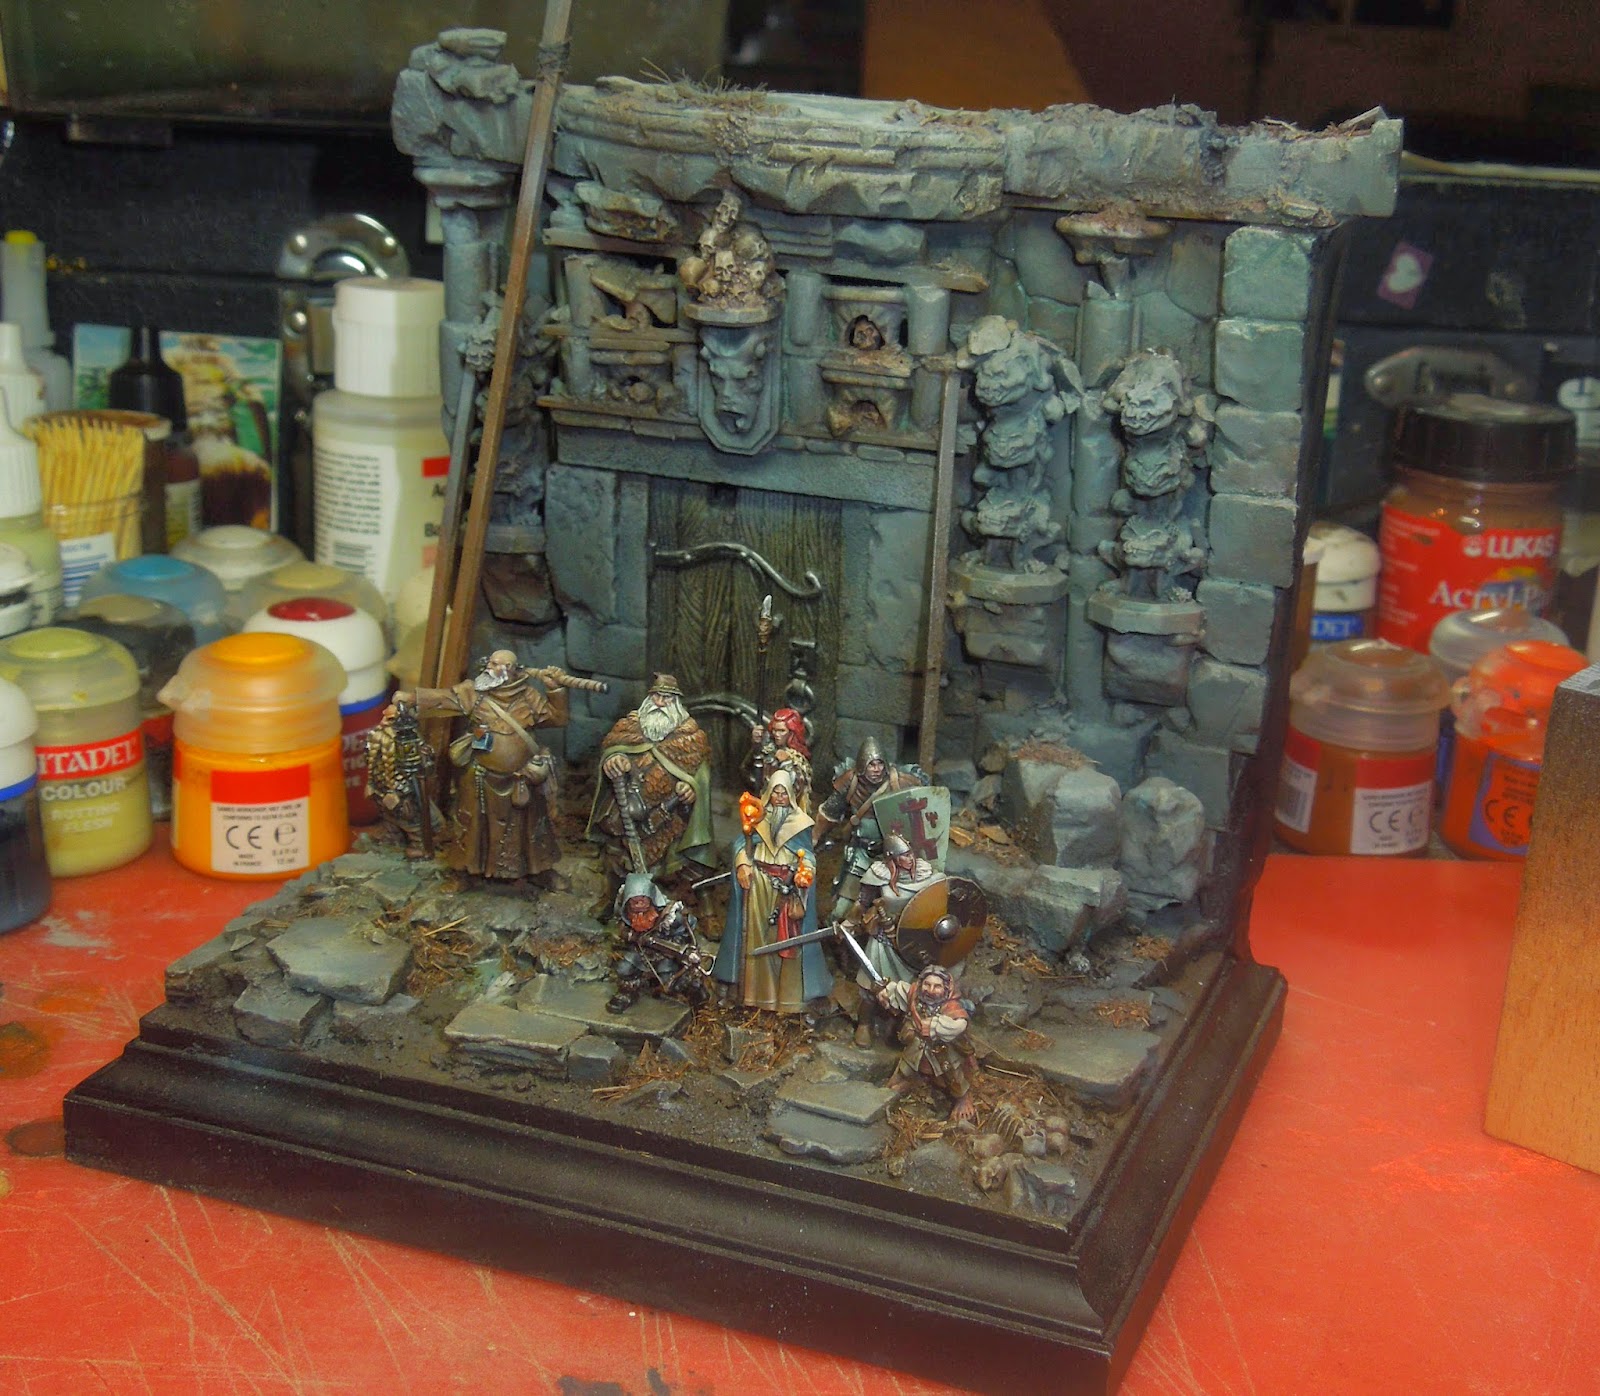
... fun returned even I was really unhappy with the base at this stage. So much detail to work on that base and such a long road to go. Edge Highlights on the base, more shadow work, etc. but I was only feeling good by doing more members of the gang. So why not? Do what inspiration tells you, let them grow and I will find time for that base when the time is ready and all comes together.
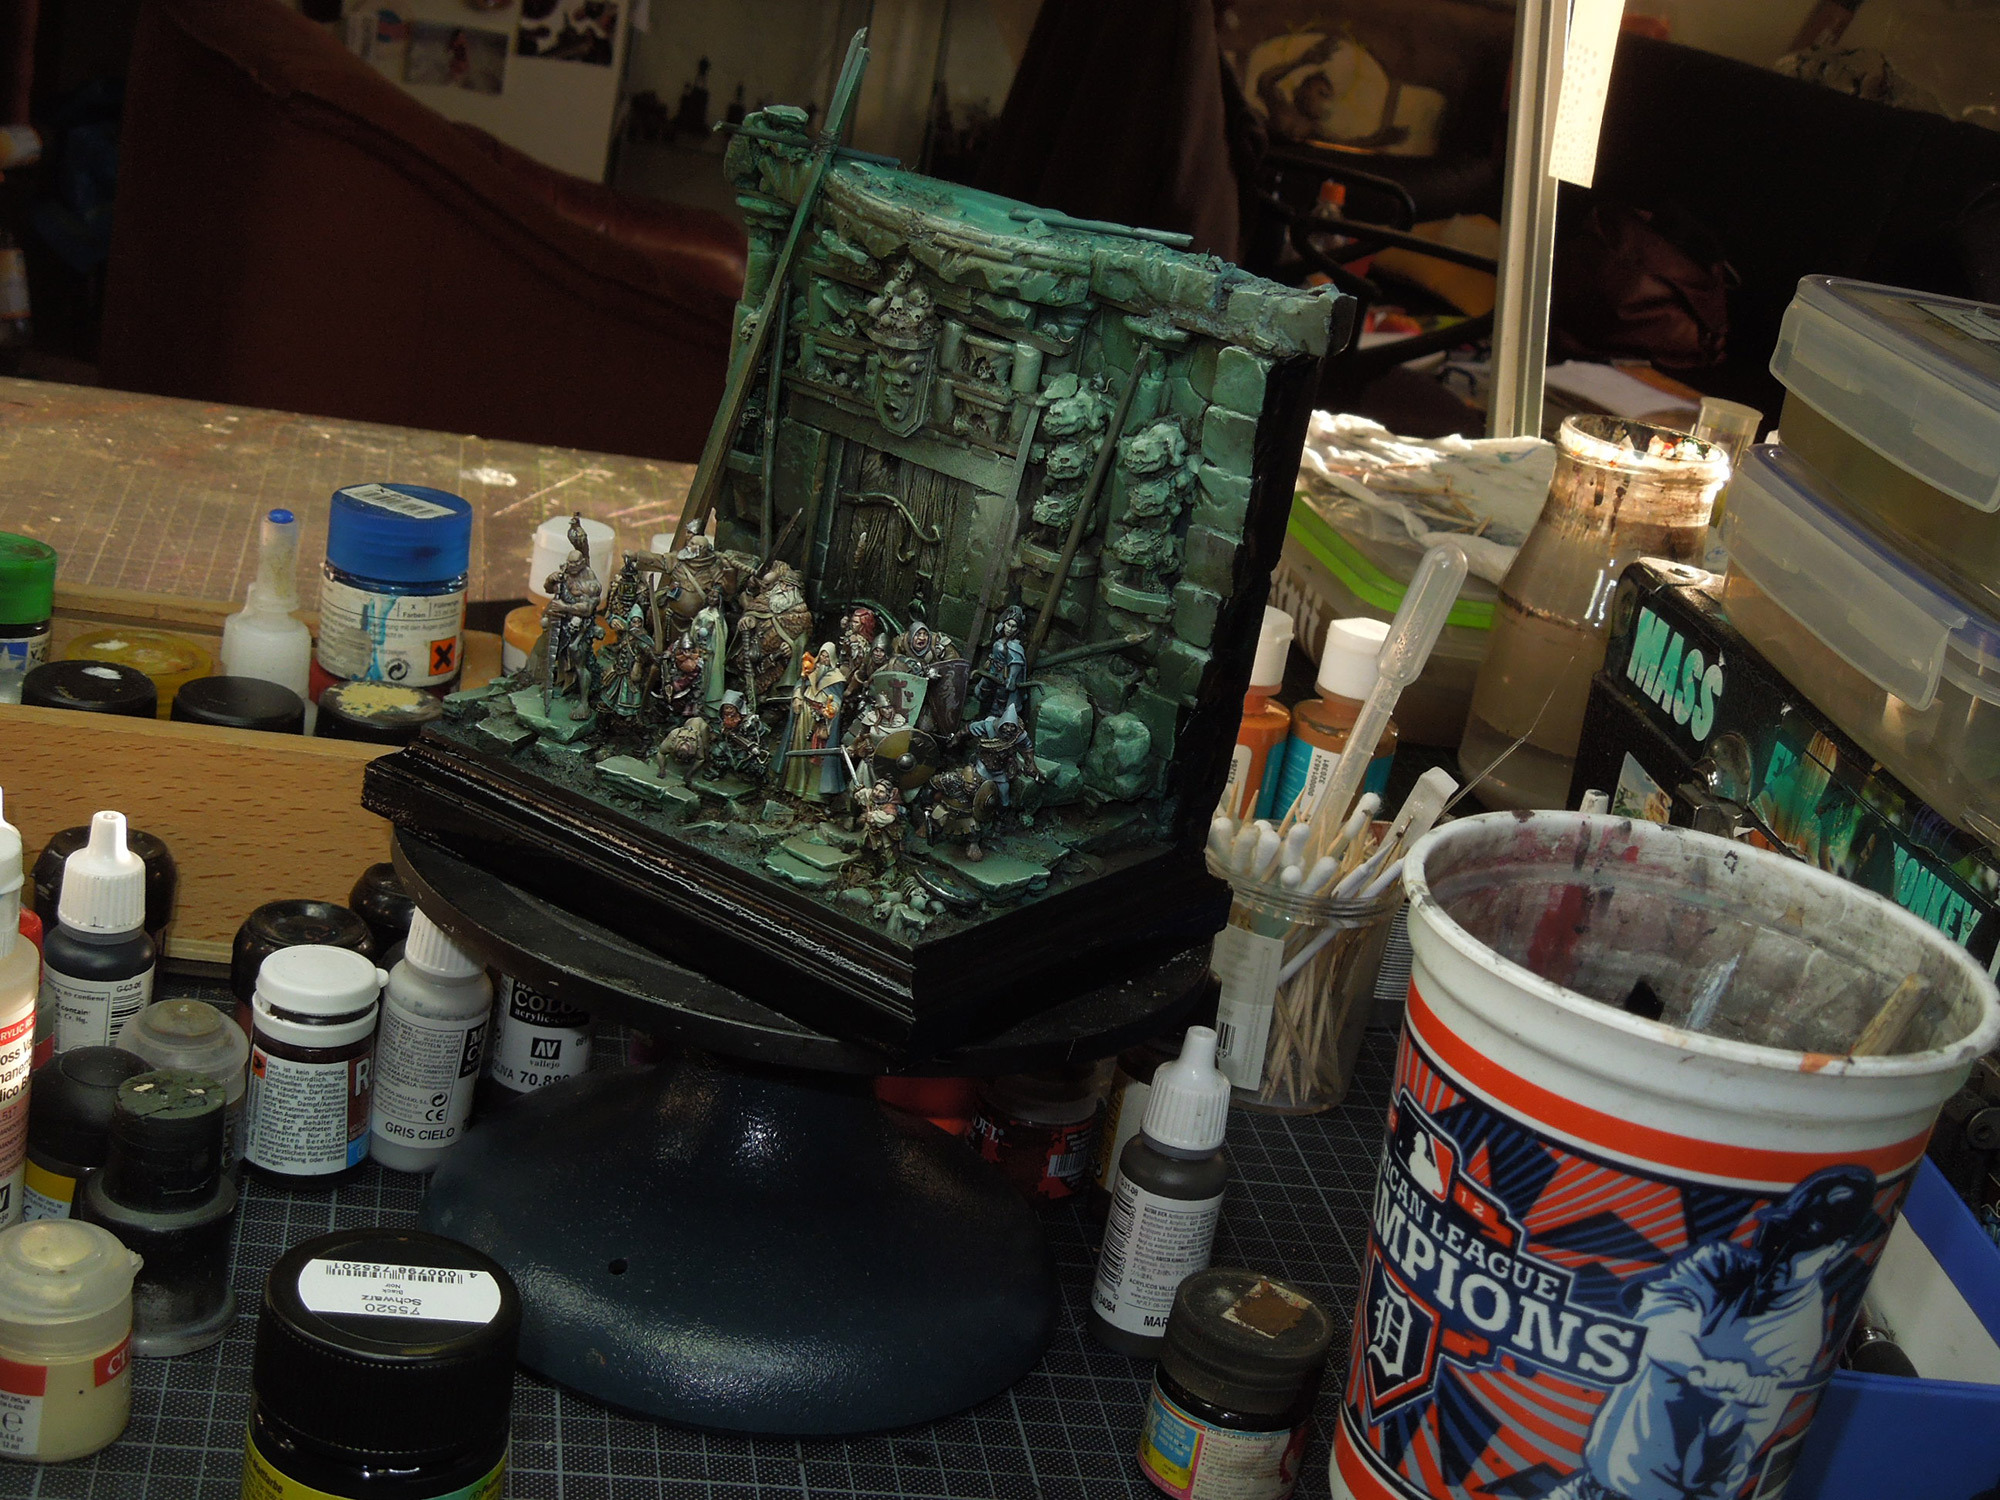
I was ordering some more RBG figures for the diorama. Some I really wanted to put in. While they were on the road to be delivered from RBG headquarters I decided to go for the base issue. I wanted a change with the complete base. I was so bored by the grey of the stones, by the lack of contrast and by the detail I was too lazy to work on. During these days one of my favourite colours was "Jade Green" from Vallejo Game Colour and I wanted it in every project during these days. So again it was time to listen to my heart and just do it. So I did via airbrush, also worked on the contrast and gave the details like edge highlights and stronger shadows more time with a brush afterwards. This felt good. Overcoming this neverending issue of that base ...


For me the colour change of the base made the whole scene more interesting, more dangerous, more magic, more fitting to a gathering of fantasy heroes. I know that stones are grey normally, but I never questioned what I did. I just told myself, c'mon this is a dangerous magical dungeon areal and if you look on PC-Games those dungeons are far from just grey colours. I really enjoyed how the figures now popped out with all their brown and earthy colours compared to the background of the "picture". Cold/Warm worked pretty well in specific spots now.


A basic approach on cold and warm colours.
My next approach were at the miniatures that were ordered and arrived. The point of no return was finally reached. There was only fun, no demotivation anymore of being unsure where the journey might lead me. I saw the final vision I had of this project now turning out. Screaming and yelling out to me. It was just about getting more figures to the gang. Position tests again and some WIP shots on the thiefs hanging at the wings of the gang.


So it was time to start some more and even finish of the barbarian brute. I even went a little to greenish on the base at this stage, but in the end I knew I am on track. From now on it had a workflow. When I was painting skin on that figure, I took another one and added a little different touch to its basic tone to paint skin on the next one. If I was painting leather parts I did the same to all the figures. Painting in a row and in line, if one was done it was placed to the base and another one took a working plinth. Felt great after this long time of stumbling around in that maze of inspiration.
So it was time to start some more and even finish of the barbarian brute. I even went a little to greenish on the base at this stage, but in the end I knew I am on track. From now on it had a workflow. When I was painting skin on that figure, I took another one and added a little different touch to its basic tone to paint skin on the next one. If I was painting leather parts I did the same to all the figures. Painting in a row and in line, if one was done it was placed to the base and another one took a working plinth. Felt great after this long time of stumbling around in that maze of inspiration.

The flame was burning and even I got distracted from it by different things, like painting classes and events I stuck to it in the days I was at the studio. I really wanted to have a dog to the gang and therefore used one great dog sculpt from degra-miniatures. The only non-RBG-combatant. And as the flame was burning the base got more companions, more detail work on contrasts and more and more members of the gang. This was the time the scene started to remind me of the painting "The Nightwatch".
I wanted to add some more lines to the basework, more directions by wood pieces, more interesting spots here and there ... more wood sticks were needed now. I prepared them off the base to paint them seperatly, added damage to them here and there via a knife and bend them in the way I wanted them to be ... remember back the inital thoughts of basing I explained here and you might see these lines strengthen the whole scene.
I wanted to add some more lines to the basework, more directions by wood pieces, more interesting spots here and there ... more wood sticks were needed now. I prepared them off the base to paint them seperatly, added damage to them here and there via a knife and bend them in the way I wanted them to be ... remember back the inital thoughts of basing I explained here and you might see these lines strengthen the whole scene.

After placing them it is just a gentle difference but that is exactly what I enjoyed. Final figures were closing in to be finished and soon I was able to check for the final look of everything and do a little more here and there.


When I was done with detail work here and there I reached a point of satisfaction. A feeling of "Yay, I am done soon!" I stopped working on it for some days to get a clearer view on stuff I really wanted to change, only minor things. Things the person who is not working on the piece does not see, I saw them, because I knew them. The one who studies the piece for a while would find them and I wanted to avoid that. For example making the one's figure legs fit better to the place where they stood. Removing another gap here with some additional debris. Placing an ancient, long forgotten warrior shield. Adding a little highlight here or cleaning up dirt from superglue on some legs here and there. Minor, but important things.
Still I was not done with adding gang members. The last one who entered the picture was a Bowman.
I did explain "How to create bowstrings" on this one - check it out here!
Finally I was able to paint the plinth black once again, but before I did I carefully sanded it by hand to remove dirt that occoured during the progress. Then it was painted black and I was happy ... even I knew some more spots some more work could have been put in, but I was happy with it right in this stage. The project said to me: "You made it, man! We heroes never would have imagined that!"
Afterwords
I know this article does not bring you colour recipes in any form.
Like I told you it is more a look behind the scenes how a bigger project can grow and how you can deal with motivation on such pieces. It's not always a good idea to wait for motivation to return, in this case it was. If you are preparing a competition piece and you want to finish it in time, than such behaviour will not lead you to your goal. It is also different - not only from project to project - but also from person to person. There are people who have more discipline and can pull such a similar project in the time they planned for it.
Honestly I think every painter gets to a point during a project where he/she is unsure how to proceed. Important in such a stage or moment is, that you make yourself clear where the problem is, what holds you from continuing. In my case it was mainly the base and I did not know how to proceed. In the end only you can find where this problem for you is to be find, but you can get some help - this is just my personal honest oppinion:
- Ask your friends on their oppinions, not only painter friends, also non-painters
- Ask in your painting forum, try to explain your "problem" or "goals" honestly to help others give better and more focused answers
- Learn to deal with different ideas from different people, learn to pick out what you think could help your project.
- Learn to deal with honest criticism, again, learn to pick out the right thing for you.
- Don't think it is ultrabad if a project needs its time. Even if you don't work on it all the time and if you spent your time on other projects, you learn. You go further on your way of the painter. This can not be bad in the end if you return to an old WIP-project with more experience or different ideas.
- Sometimes it helps to sit down in front of your project and take a pen to write down your own impressions
I hope you enjoyed this little journey through this project. If you want to see the final result once again I recommand to you to check it out on Putty&Paint. Here is just one photo just to close this article properly:

Let me and other readers know your thoughts you had while reading this, let me know your questions, ideas and if you ever were stuck the same way in a project.
Keep on happy painting!
Best Wishes
Roman


Like the green tones on the walls.
The videos... most excellent... seeing how you apply your wet on wet with paint thrown straight onto the base! And what colors come out of it when you did... very nicely done..
Wow. This is fantastic. Thanks, Roman, for sharing this with us.
Best, D.
Thanks for another helpfull article ,this diorama looks great , I am with Mr Lee it is so impressive to see just throwing all this paint on the base to do colour sketch works , if I didn`t try it by myself I would say that it can`t work . After your thoughts about the focus on this peace and how you can adchive a focus I had again a longer look on the picture and in my eyes it really worked out with this wooden pales .
At least I quote your words ,keep on happy painting ,but it seams to be that you always do :)
Fantastic article Roman. I very much appreciate the insight in how you developed this wonderful piece.
Thanks for the feedback, guys ... really happy that you enjoyed reading this. I would write more, but I am heading out to a painting class with Peter in a second, so I have to stop writing nau!!
Roman, once you told me (I think it was two years ago in Ingolstad) - when basing you have to stop thinking, free the mind and let the best things to come. Now you've made it again to this wonderfull finale. Thank you for sharing all of your ideas, photos, thank you for being part of our painting universe.
@DarkTower
I remember the moment and I think it was Ingolstadt two years ago, yes. And it is like that. A brain can play too much tricks on yourself, it does to me sometimes too as you can see in this article. A plan for your base is always a good idea, but don't worry if this plan changes a little during the progress. Do we see eachother this year in Ingolstadt? I do hope so, but I can already tell as I am judging during the contest, my time might be limited ... whatsoever, happy to read from you here in the jungle, did not see you around in the last months ...say greetings to all your painting companions!
Hi Roman,
awesome piece, all the other commenters just said what i wanted to say....
Just Thanks!
But there is one thing missing.
Those 19 characters (incl. the dog) definetly need a name!
Why not start something like the zombieadventure back in the days?
Take a character, let the people around here think of names and a little backgroundstory for him / her / it(in case of the dog), let them post each story here.
Decide with the other monkeys which one you like best, and in the end every models has a name and a little background.
I think that there is´t a price needed, or a winner to be declared in the end, i´am sure many would invent names and story just for fun.
One model, one week time to post, one entry per person, just a name and five lines of text to keep it compact and after roughly 5 month the gang is done...
seeya soon
hrld
Hello Roman, I would be happy to meet you all in Ingolstadt, but this year unfortunatelly I will not be present personally due to some serious family circumstances, but my friends Majo & Torsion will be there and they will bring my minis and my greetings to you all. I hope we can meet soon personally.
Best wishes
D.T.
Mental project... There really is some captured magic in this piece - glad to see it's finished now, and you're happy with the outcome. Applause!
Cheers!
Hey Roman
Great piece. Whenever you posted something about "The Nightwatch" I felt like teleported inside of the classical fantasy adventure stories where different types of characters heading to explore dungeons or whatever else. Also, whenever watching it I found myself in thoughts remembering the nights playing Hero Quest with my friends. Just a great piece!!
The article itself is great too. Wonderful reflection of the process and your personal thoughts. I’m sure everybody has made the experience to get stuck in a project. I thought about the question whether it makes a difference if you are a pro like you or someone doing it as a hobby? Imho the answer is “no”. Of course, we hobbyists have less projects and mostly smaller ones, but losing motivation for a piece can happen to everyone. How to proceed then? How to handle the lack of motivation? Usually the method of putting it aside and doing something else works for me too. Btw this matches perfectly to “do only what you like to do”. As in case of “The Nightwatch” this can prolong a project for years. This delay doesn’t matter as long it is not time-critical due to a contest and you have other interesting projects at your desk and/or ideas in your mind to realize. See the huge discrepancy to “The Last Light” which seems to have been an act of masochism and absolute subservience to the project…
Really love MV's year of the painter, your output of articles is immense and I enjoy it like hell. A big THANK YOU for this article series and please go on...
Best regards,
Cornel
Btw: Cool idea of hrld