


Ayoyoyo!
So your last vote on which article is next on MV puts up "Dwarf" to the blog.
You voted here and the decision is made. Be sure that the year of the painter here on MV will bring you Arrows tthat will fly another day with well prepared bowstrings.
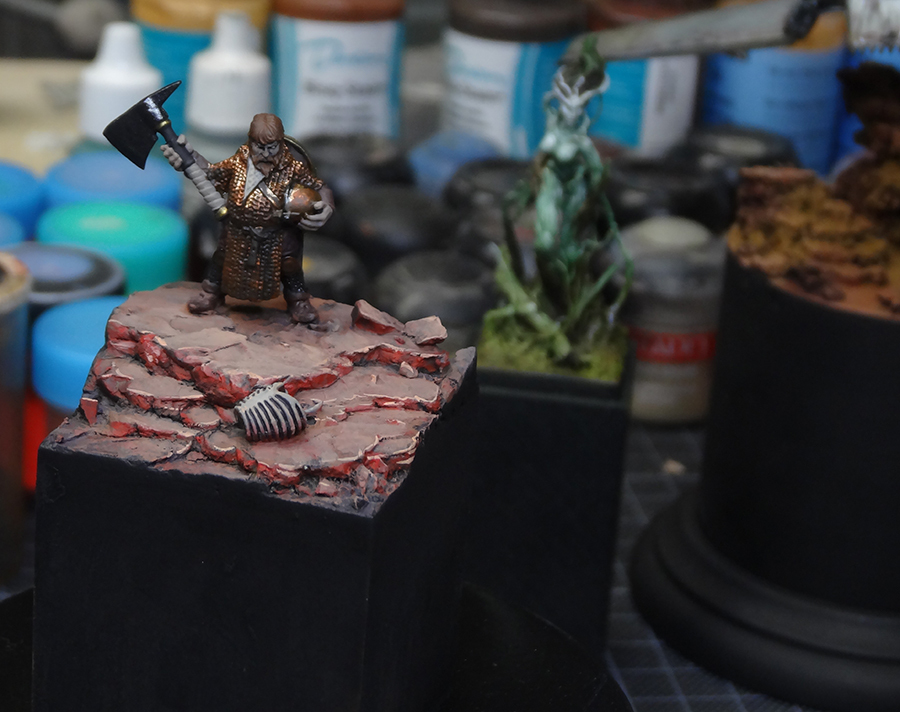
This article is - again not a tutorial that brings you a perfect colour recipe - it's focus is more to show you how I work on different projects with different goals. Lately I did show you how I work to get a quick and nice result on some gaming figures from Zombicide. This article will be the same, only the topic changes a little bit. This time it is about a quick display figure and I want to explain to you what am I doing. I am working my way through this Dwarf from Hasslefree:

The base was done during the article on how to stamp your Milliput and I really wanted to keep it simple, but still kind of cool. The skeleton torso is from Secret Weapon Miniatures and brings in a grim mood to the scene. On the following photo you can see what was used to create that base. In fact not much. Milliput groundwork, some tiny plaster parts, skeleton piece, done.

You hear me talking about the mood of the piece and that is what makes a big difference from a gaming figure to a display figure. On a gaming figure I got only the gaming base to build up the environment that sets the figure in its athmosphere and honestly, a gaming base does not give you much space. If you do a whole army it works again, as there are many figures with the same base "mood", but on a single gaming figure the mood or the athmosphere is limited. So a display piece is different in that point. You got a bigger base, on a plinth maybe and you have much more space to create athmosphere and maybe tell a story.
I was creating this piece just for fun and that means for me I do it quick for the joy of Happy Painting. I do not plan too much as it is just done out of imagination. Let me take you on the journey through this figure and see it primed black first ...

If you did read the article about the gaming Zombies you will find the same steps used here. Now I am not spraying pure white on it, I do the same as I did with the Zombies, choosing a basic colour to spray with the airbrush to get the main mood of the piece. In this case I went with a dark brown as I was pretty unsure were this will lead. I did paint a lot of greenish figures lately and I wanted to go in a different overall mood with this one.
My choice was US Olive Drab from Vallejo Model Colour, but I found this very boring already when I did put it on my wetpalette:

Well I did quickly decide to give my basetone a little touch of purple to it. Far away from all the greens and blues I was painting lately.

... and sprayed via airbrush to the whole scene. Now I miss a photo - sorry - I will explain what happened. Please imagine a desaturated brownish tone with a gentle purple in it to the whole project.
The Airbrush was cleaned properly and put aside (really?).
Now what happened?
I took some more colours to my wetpalette, one orange skintone to paint on the upper base surfaces (shadows are left in basic tone). VMC Green Grey was mixed with a tiny drop of US Olive Drab and painted to the weapons shaft and bone piece. From a mix of the skintone and a tiny drop of US Olive Drab I mixed the basic skintone colour. Again this all happened really quick and the steps are the same as those I did at the Zombies. Basic tone coat for different areas.


Well cool, looks like madness at the moment, but I fear not as I just have to clean up a little bit. First I paint all the metal parts black to again regain control of the figure and see what is going on there.

Having a closer look on this step I did use the same colours I already have on my wet palette. Some of the browns have been used to give basic tone to the hairs and leather pieces, some pure green grey was used for the piece of cloth close to his chin. Some desaturated brown/red mix was used for his clothing. Same procedure like on the Zombies, I painted the eyeballs black and after drying white. While I got some pure green grey on my brush I decided to put it in some of the basic skin tone and give the skin a little highlight to the areas that are hit by zenithal light. You see, kind of the same work as I did on the Zombies.

Right now the sketch is ok. Basic work done. I am pretty confused of the plinths edges that is why I paint my plinth black at this point of work.

With that black socket I decided to give the chainmail a basic tone of bronze, added a little silver to it to sketch some lights to it and totally went "wrong" by painting the shadows of the base (remember zenithal light where to place them!!) with pure strong red (Andrea's Basic Red). I liked that, you can't stop what you just can't stop while in the middle of happy painting :)
I've added some strong edge highlights to the base too at this step. Still working with all the same colours on my wetpallete I went for the pure skintone there.

Black Plinth, confusion gone. Looks far better now for the eye. Don't forget to paint your plinths black at some stage during your work. You won't regret it, it really helps.
Ok, now it is time to do what I always do while I am in the middle of happy painting - keep moving on. I did put some highlights in the skin, on the weapons shaft, on the bones painted the leather parts on top of the chainmail again to see them properly and added some dark silver to the axe's blade and the leg chainmails and sketched the eyes. I failed on the eyes this time with the first try so I will paint them white again and do the black eyeballs again.

Next I placed a wash of Army Painter's Quickshade (strong tone) to the whole figure. Again a step I also did to the Zombies too. This now leads me to a really dirty result, but I soon clean that up again. This is done to get more dark contrast to the whole piece. Added some highlights to the hair and iron metal areas.

The following step is to clean up areas again. Bringing back my skintone with the basic skin colour again, completly changed the chainmail again to a bright silver as I was not happy how it looks so far and the contrast to the helmet and the leather parts was too low to really make all that pieces understandable for the eyes. Added some more yellow to the hair tone. I also added some black pigments to the base.

I was not happy with the blond hair so I painted them black with highlights from grey to white on top of it. Added edge highlights to the leather parts plus the metal parts on the axe and chainmail have been washed again with the same colour I used before. Painted small highlights at the edges of the axe and some small highlight dots to the chainmail. Both done with pure silver from Model Air Colour.Painted some more gentle hightlights to the skintone to clean it up even more.

For a quick display piece that is just about fun I was close to being done now. I went back to take the pure red and tried to imagine where the figure will get some kind of reddish bounce light. That means I take a closer look on the base where the red light hits and add kind of the same reflections to the figure from the same angle. Edge highlights and reflections on the metals mainly.

The work so far took me about five hours, excluding the basework. This is how the figure looks when I placed it in the cabinet and I thought to myself, quick display piece was the goal - achieved:

Sure I could do more here, but as I told you it was planned to be quick. This one is not a display piece that might win me trophies or fame, but I never had this in mind when I started to work on it. It was just about fun and a build up article to the Zombie article.
So what is now different to the work I did on the Zombies?
- display plinth brings in more athmosphere
- more time was spent on working on highlight areas before applying the wash
- more time was spent on the clean up afterwards to bring back the colours
- more time was spent on detail edge highlights
- A little effect painting was included by the reddish bounce light which was applied to the figure


Ok, I am done here. As I told you this is a quick display piece, nothing too extraordinary but it was fun and that is what happy painting is all about. I hope you enjoyed this little journey through the project and I do like the outcome for about 5 hours of painting.
Let me know what you think?
Let me know if the article helps you?
Let me know if there should be a build up article?
Let me know if you got questions?
Read you in the future with more articles, maybe a build up to that one? Maybe on how to do a proper display piece with more time spent on it?
Keep on happy painting!
Best Wishes
Roman
So your last vote on which article is next on MV puts up "Dwarf" to the blog.
You voted here and the decision is made. Be sure that the year of the painter here on MV will bring you Arrows tthat will fly another day with well prepared bowstrings.
This article is - again not a tutorial that brings you a perfect colour recipe - it's focus is more to show you how I work on different projects with different goals. Lately I did show you how I work to get a quick and nice result on some gaming figures from Zombicide. This article will be the same, only the topic changes a little bit. This time it is about a quick display figure and I want to explain to you what am I doing. I am working my way through this Dwarf from Hasslefree:
The base was done during the article on how to stamp your Milliput and I really wanted to keep it simple, but still kind of cool. The skeleton torso is from Secret Weapon Miniatures and brings in a grim mood to the scene. On the following photo you can see what was used to create that base. In fact not much. Milliput groundwork, some tiny plaster parts, skeleton piece, done.
You hear me talking about the mood of the piece and that is what makes a big difference from a gaming figure to a display figure. On a gaming figure I got only the gaming base to build up the environment that sets the figure in its athmosphere and honestly, a gaming base does not give you much space. If you do a whole army it works again, as there are many figures with the same base "mood", but on a single gaming figure the mood or the athmosphere is limited. So a display piece is different in that point. You got a bigger base, on a plinth maybe and you have much more space to create athmosphere and maybe tell a story.
I was creating this piece just for fun and that means for me I do it quick for the joy of Happy Painting. I do not plan too much as it is just done out of imagination. Let me take you on the journey through this figure and see it primed black first ...
If you did read the article about the gaming Zombies you will find the same steps used here. Now I am not spraying pure white on it, I do the same as I did with the Zombies, choosing a basic colour to spray with the airbrush to get the main mood of the piece. In this case I went with a dark brown as I was pretty unsure were this will lead. I did paint a lot of greenish figures lately and I wanted to go in a different overall mood with this one.
My choice was US Olive Drab from Vallejo Model Colour, but I found this very boring already when I did put it on my wetpalette:
bo-bo-boring ...
Well I did quickly decide to give my basetone a little touch of purple to it. Far away from all the greens and blues I was painting lately.
This was mixed properly ...
... and sprayed via airbrush to the whole scene. Now I miss a photo - sorry - I will explain what happened. Please imagine a desaturated brownish tone with a gentle purple in it to the whole project.
The Airbrush was cleaned properly and put aside (really?).
Now what happened?
I took some more colours to my wetpalette, one orange skintone to paint on the upper base surfaces (shadows are left in basic tone). VMC Green Grey was mixed with a tiny drop of US Olive Drab and painted to the weapons shaft and bone piece. From a mix of the skintone and a tiny drop of US Olive Drab I mixed the basic skintone colour. Again this all happened really quick and the steps are the same as those I did at the Zombies. Basic tone coat for different areas.
Still wet on the base ...
Well cool, looks like madness at the moment, but I fear not as I just have to clean up a little bit. First I paint all the metal parts black to again regain control of the figure and see what is going on there.
Having a closer look on this step I did use the same colours I already have on my wet palette. Some of the browns have been used to give basic tone to the hairs and leather pieces, some pure green grey was used for the piece of cloth close to his chin. Some desaturated brown/red mix was used for his clothing. Same procedure like on the Zombies, I painted the eyeballs black and after drying white. While I got some pure green grey on my brush I decided to put it in some of the basic skin tone and give the skin a little highlight to the areas that are hit by zenithal light. You see, kind of the same work as I did on the Zombies.
Still a rough sketch to where this will lead in the end.
Right now the sketch is ok. Basic work done. I am pretty confused of the plinths edges that is why I paint my plinth black at this point of work.
See the confusion on the plinth edges...
With that black socket I decided to give the chainmail a basic tone of bronze, added a little silver to it to sketch some lights to it and totally went "wrong" by painting the shadows of the base (remember zenithal light where to place them!!) with pure strong red (Andrea's Basic Red). I liked that, you can't stop what you just can't stop while in the middle of happy painting :)
I've added some strong edge highlights to the base too at this step. Still working with all the same colours on my wetpallete I went for the pure skintone there.
Ok, now it is time to do what I always do while I am in the middle of happy painting - keep moving on. I did put some highlights in the skin, on the weapons shaft, on the bones painted the leather parts on top of the chainmail again to see them properly and added some dark silver to the axe's blade and the leg chainmails and sketched the eyes. I failed on the eyes this time with the first try so I will paint them white again and do the black eyeballs again.
Next I placed a wash of Army Painter's Quickshade (strong tone) to the whole figure. Again a step I also did to the Zombies too. This now leads me to a really dirty result, but I soon clean that up again. This is done to get more dark contrast to the whole piece. Added some highlights to the hair and iron metal areas.
Still wet here and there ...
The following step is to clean up areas again. Bringing back my skintone with the basic skin colour again, completly changed the chainmail again to a bright silver as I was not happy how it looks so far and the contrast to the helmet and the leather parts was too low to really make all that pieces understandable for the eyes. Added some more yellow to the hair tone. I also added some black pigments to the base.
I was not happy with the blond hair so I painted them black with highlights from grey to white on top of it. Added edge highlights to the leather parts plus the metal parts on the axe and chainmail have been washed again with the same colour I used before. Painted small highlights at the edges of the axe and some small highlight dots to the chainmail. Both done with pure silver from Model Air Colour.Painted some more gentle hightlights to the skintone to clean it up even more.
For a quick display piece that is just about fun I was close to being done now. I went back to take the pure red and tried to imagine where the figure will get some kind of reddish bounce light. That means I take a closer look on the base where the red light hits and add kind of the same reflections to the figure from the same angle. Edge highlights and reflections on the metals mainly.
The work so far took me about five hours, excluding the basework. This is how the figure looks when I placed it in the cabinet and I thought to myself, quick display piece was the goal - achieved:
Sure I could do more here, but as I told you it was planned to be quick. This one is not a display piece that might win me trophies or fame, but I never had this in mind when I started to work on it. It was just about fun and a build up article to the Zombie article.
So what is now different to the work I did on the Zombies?
- display plinth brings in more athmosphere
- more time was spent on working on highlight areas before applying the wash
- more time was spent on the clean up afterwards to bring back the colours
- more time was spent on detail edge highlights
- A little effect painting was included by the reddish bounce light which was applied to the figure
See the red bounce light in the figures here and there?
Yeah I could spent some more time on the chainmail's light situation ... but no!
The shield was painted with the colours on my wetpalette too ...
Ok, I am done here. As I told you this is a quick display piece, nothing too extraordinary but it was fun and that is what happy painting is all about. I hope you enjoyed this little journey through the project and I do like the outcome for about 5 hours of painting.
Let me know what you think?
Let me know if the article helps you?
Let me know if there should be a build up article?
Let me know if you got questions?
Read you in the future with more articles, maybe a build up to that one? Maybe on how to do a proper display piece with more time spent on it?
Keep on happy painting!
Best Wishes
Roman


Always cool to see how you go about to set up the scene with it, and how to approach the topic. Even for a fun mini showcase model like this one. Very cool.
Really nice for 5 hours. I like the overall warmth of the piece.
Thanks, Roman. This is, again, very insightful and informative!
Any other advice on painting bounce light? I always like how it looks on minis, especially with contrasting colors.
Mmh ... not really at the moment, but I think the possible next step by steps on MV about the Imperial Fist and Roman's demon bust "Abalam" might contain some more tips in the describtions.
It is an amazing post.Very useful to me.I liked it .And Swipe Your Credit Card And have Immediate cash With Cheapest Costs. Provide Your ID Card Photo Copy As A Document Resistant.Take a look to my blog
Spot Cash For Credit Card In Chennai at low interest.