


Hey guys,
two months ago I met with some friends to enjoy a weekend full of painting and nerding. I prepared a 54mm mini and was looking foreward to get started as I did not paint a lot for about two months. But as soon as I put the color on my palette and was ready to begin, everything went wrong... The colour was not flowing how I wanted it to do and the mini looked worse and worse every time I tried to fix my mistakes. After two hours of anger and frustration, I stopped and was ready to throw everything to pieces.
While brooding about the problem I realized that neither colour nor brush were the problem, but my lack of training. As most of you know it sometimes can be very hard to motivate yourself after getting home from work. In the months before the painting-weekend I had just a few hours of motivation and so it was no suprise my skills had suffered. I remembered one of Roman´s sayings: "Painting is like a muslce... it has to be trained to be strong."
I decided to take my time and train my "muscles" again. Thanks to Manuel who gave me one of his 28mm minis through which I could get back on the track...
While painting, I thought about doing a little Step by Step so I could fix the won knowledge by writing it down. I wanted to share my experiences with you as I know there are some of you who have the same problem.
The finished mini is nothing very special, but while painting it I realized one important thing: it´s not that important to paint very "clean", it´s more important to enjoy the paintjob and catch the play of light and shadow while doing it.

So here is the first part: paining the DáoFêi
Please notice: the pics are very big so you will see every mistake... always remember: nobody will ever have such an detailed look at your minis like you while painting them.
Basics
First Light
More Light
Detail Work
So, this is the end of the first part. In the second part I´ll will tell you some things about basing :)
I hope you enjoyed this Step by Step and if you have any questions feel free to ask.
Regards,
Peter
two months ago I met with some friends to enjoy a weekend full of painting and nerding. I prepared a 54mm mini and was looking foreward to get started as I did not paint a lot for about two months. But as soon as I put the color on my palette and was ready to begin, everything went wrong... The colour was not flowing how I wanted it to do and the mini looked worse and worse every time I tried to fix my mistakes. After two hours of anger and frustration, I stopped and was ready to throw everything to pieces.
While brooding about the problem I realized that neither colour nor brush were the problem, but my lack of training. As most of you know it sometimes can be very hard to motivate yourself after getting home from work. In the months before the painting-weekend I had just a few hours of motivation and so it was no suprise my skills had suffered. I remembered one of Roman´s sayings: "Painting is like a muslce... it has to be trained to be strong."
I decided to take my time and train my "muscles" again. Thanks to Manuel who gave me one of his 28mm minis through which I could get back on the track...
While painting, I thought about doing a little Step by Step so I could fix the won knowledge by writing it down. I wanted to share my experiences with you as I know there are some of you who have the same problem.
The finished mini is nothing very special, but while painting it I realized one important thing: it´s not that important to paint very "clean", it´s more important to enjoy the paintjob and catch the play of light and shadow while doing it.

So here is the first part: paining the DáoFêi
Please notice: the pics are very big so you will see every mistake... always remember: nobody will ever have such an detailed look at your minis like you while painting them.
Basics
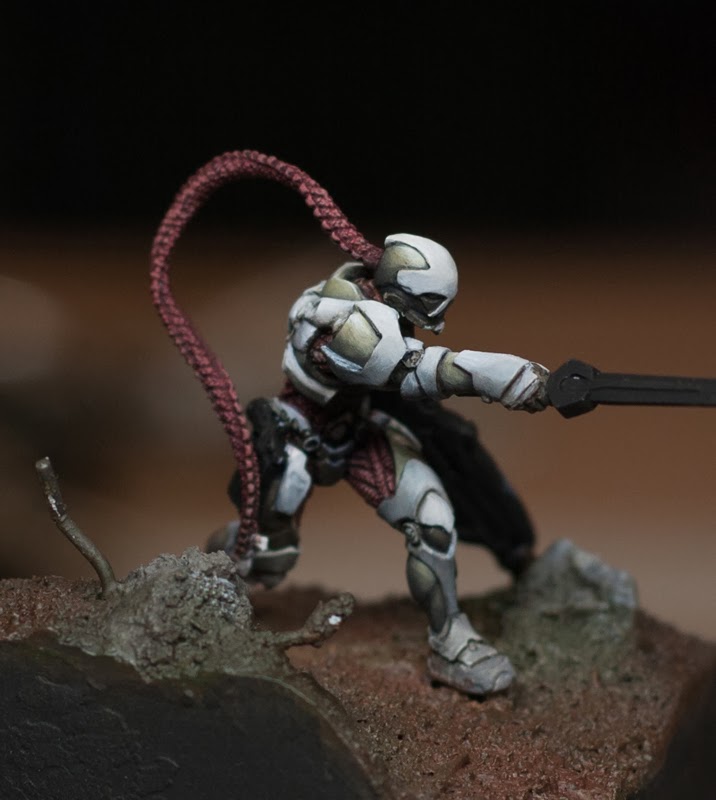
- An important first thought: what is the situation? Every mini shall tell a little story. I was inspired by the film "Total Recall" and this picture. I saw a soldier running through the jungle and following his victim. So just use google and get an idea about how a jungle could look like :)
- After priming I started by painting the whole mini in its basic tones. By this I can see if the colour-schemata works out. The basic idea: dark (perhaps greenish)/white and a little red for contrast.
- The most important thing for painting a miniature is the play of light and shadow. With a well made light/shadow the mini appears voluminious and not flat. The easiest way of doing it is via zenithal light.
- While painting I tried to use a good position to avoid pain in my back :)
- After the basic colours I painted a gentle first light by using my basic color and adding a bit of Vallejo German Cam. Beige WWII (it´s a little yellowish). As you see on the follwing pictures it´s not painted very smooth :)
- In the follwing steps I will focus on the dark areas as the white areas were not very complicated to paint (I just painted a light shadow at the beginning and finished it in the end rather quick).
 |
| basic colours and first rough light |
 |
 |
 |
| colours used for the base and basics of the mini |
 |
| colours used for the dark parts |
First Light
- After the basics I started by adding more Vallejo German Cam. Beige WWII into my base colour and enlarged the brighter parts to prepare the area for the next steps. Why did I do that? I realized that I painted my first light too gentle. If I would kept that it would have been hard to paint a light situation adequate to the form of the armour. (1st step)
- Now I used pure Vallejo German Cam. Beige WWII and painted my second light. I covered a smaller area then for the first light (it gets brighter here). As you see it´s quite rough, too. (2nd step)
- To smooth the area between the two layers I used a glaze made of my first and second light. "Cleaning" is very simple: use the glaze (very thin) and pull it over the level between the two layers. The glaze has to dry instantly. If you repeat this step 2-3 time you´ll see the level disappear. (3rd step)
 |
| 1st step: light |
 |
| 2nd step: more light |
 |
| 3rd step: cleaning |
More Light
- The next step is simple: I added some white into my German Cam. Beige WWII and painted a third light (again: a smaller area). (4th step)
- Now I started to smooth the level again but now I focused on the area between my basic colour and the light area, too. The more I repeat this step the more the "blending" gets smooth. (5th & 6th step)
- Finally a hard light with nearly pure white on the brightest parts (especially on the edges of the armour). (6th step)
- I did not focus on the feet/lower leg too much, as I will later use pigements to cover the not so clean parts ;)
 |
| 4th step: third light |
 |
| 5th step: cleaning again |
 |
| 6th step: last light |
 |
| 6th step: last light - different angle |
 |
| 6th step: last light - different angle |
Detail Work
- After finishing the darker parts I focused on the base and the white parts of the armour. The base was paintend in more intense colours to meet the jungle atmosphere (--> google). For the white areas I intensived the shades with glazes of black and "cleaned" the area to get a rather smooth result. (7th step)
- Now it was time for the details. First the "organic" parts: I added some beige into my basic red and painted the lights. Here I don´t used a smooth blending (like on the larger parts) because the areas are quite to small and you´ll get crazy by trying it. I just painted a first and a second (detail-)light: small and the last one with pure white. Even if it´s not a smooth blending your eye will recognize the volume. Just try to capture the play of light and shadow. (8th & 9th step)
- To make the mini more interesting I added a new colour. I choose blue/turqoise to keep a harmonic colour-schema: blue is a good contrast to the redish parts of the mini (cold/warm contrast). To recieve a strong effect I´ll recommend to paint the area in white first and then paint the colour on the white area. To strengthen the effect, add a little accent with pure white on the (blue) area: here two links which will help you: HERE and HERE. I also started to prepare the metallic parts. Unfortunatly I was not able to take good pictures of the process here, so I´ll recommend to use this tutorial. (10th step)
- Last but not least, I painted the weapon. Nothing fancy and in the same way I painted the "organic parts". Two layers of brighter colour. (11th step)
 |
| 7th step: painting the base and shadow for white areas |
 |
| 8th step: organic details |
 |
| 9th step: organic details |
 |
| 10th step: blue effects and metallics |
 | |||||
| 11th step: weapon |
So, this is the end of the first part. In the second part I´ll will tell you some things about basing :)
I hope you enjoyed this Step by Step and if you have any questions feel free to ask.
Regards,
Peter


I am looking forward to part 2 my friend!
I am very hapoy that you do this ...
I like how it turned out and Im looking forward to part 2
Great tutorial. I have learned a little more that I hope to apply to my minis soon.
can you tell what other colors were used for this figure please because I also have it and I just may do varation on it .
@Mcsnead17: uff... I try to give you the list, but it´s hard to remember:
VMC:
German Cam. Beige WWII
German Cam. Black Brown
White
Ice Yellow
Black
Dark Sea Blue
Military Green
Oily Steel
Citadel:
Hawk Turquoise
Dark Flesh
Khorne Red
Wow! Loving it and learning alot! This will be a great help to me painting my Mantic Deadzone Enforcers. All the little links you added for the other tutorials like the glaze, true metal, and energy weapons are also just what I've been looking for. The step by step with the areas circled in red really helps me see exactly where you are talking about. Thank you so much for this and looking forward to part two!