


Hey Jungle Painters!
The winner of this weeks tutorial voting arrived with little delay:

If you want to keep track with an overview on what has happened so far in
MV's year of the painter 2
please check this link!
_______________________________________________________________________________
You want to support Massive Voodoo?
If you like to support or say thanks the monkeys of Massive Voodoo in what they do, please feel invited to drop a jungle donation in their direction via paypal or check their miniatures they got on sale here.
_______________________________________________________________________________
Roman now takes over with the article - we hope you enjoy the read!
Step by Step: Slaughterpriest of Khorne
Allright.
Warhammer Fantasy.
Chaos.
Khorne.
Photo quality in this article may vary as I was using my smartphone, my digital camera and the big studio camera here and there.
INSPIRATION
Very important on each project is the vision you have. The idea, your vision you want to create. My inspiration for this project was fueled when I played my first campaign in the new Total War - Warhammer. Of course I started with Chaos and burned city after city with my hordes of Chaos, under the leadership of Archaon, the Everchosen.
My hordes of Chaos, ready for destruction:

Burning cities marked their way... from north to south!

BASING WORK
Well, Khorne is something special, like all of the four gods of Chaos are something special in their own ways and habits. If you want to praise Khorne you need skulls for the skull throne.
While doing this I remember with joy and laughter what I tell my students all the time on my classes: Do not use too much skulls on your bases, only if need be a skull can be a proper addition to a base, but take care not too many! Well I failed on that one here, but I am also praising the Khorne:
Many skulls out of my bitzbox:

Beastmen, Chaos Warriors, a giants head, Dark Elves and of course superglue.

When I was done I already was scared of painting this mess down there:

Primed black and white, ready for paint.

PAINTING WORK
When painting, many people ask me about my colors I used here or there. Well, all I can say is I use Schmincke Primeacryl primary colors and mix mostly everything out of them. Here is how my wet palette looked when I started this project:


I did not know where my vision would take me so I had my fun and on top of my black and white primer I used the airbrush and sprayed some powerful yellowish green to my two chaos models I was starting at the same time. Why this green? I have no clue but it helped me to spot out the areas I might miss to paint :D

I call this stage a rough sketch of what I want to do. Placed basic skin, armour and some wishy-washy tones over there and over here. Basic, rough sketching into the project.

I still was unsure, so I kept to what I know. Khorne. Red armour. I had to intensify the armour parts with more red. There we go. Still sketchy.

This is a photo of the first rough sketching phase done with the big camera. It is also a big photo so please do not hesitate to click on it.

With rough sketching I mean truely rough - here is a detail shot.

Well, stage 2.
Starting to put layers on it to define my rough sketch. Working on shadows and quick highlights, but still sketchy. Bring in more colors, just painting joy.

That sword was way to purplepink for a Khorne guy so I painted on top of it again. This will be a demonic sword and flail. I think you can already see me sketching this. Throwing blood for the blood god on the skull base. Yeawhr that was fun.
I also did it to the armour as it was too pinkish in the steps before.

Please no. Is that chaoshound-poo on your shoe?

Like I said it is still a little rough here and there, but that is just like I want it. I do not care about superclean work in this stage as this would just limit my creativity in making choices. I want some blue in that skin, ok I slap in some blue. See. blueish white there. Bam! Bam! Man his fingers on the big fist look a little weird, but its a demonic hand. Never get slapped by this one!

The famous elbow reds.

Again a photo made with the big camera showing the rough, but detailed sketchwork going on. Had to spray some blue to the one area of the base to balance the swords cold colors. Hit the model with some sparkles, enjoyed that for future work on it. Pfft!Pfft! Ooops!

From there on fun in sketching is less, it is time to clean up and start working on each single area that I put in place and decided a color for. Painting contrast to what I achieved via sketching. Shadows and Highlights. A little less sketchy, but more careful.
Not only did I want to have demonic weaponry on this guy I also wanted to make him a demon soul inside. That is why his eyes and armour parts are glowing here and there ... I switched from pinkish dayglow colors to orange ones. Not sure yet.


In this stage it is mainly about cleaning up and definition. This photo was done with the big camera but somehow with a weird light and background.

Allright. Told you I was not sure about the orange glow and like I say, everything happens for a reason. We went barbecueing back in that summer and after a summer day full of friends, swimming and barbecueing it went dark on that lake we were.
After some beers and great chats with friends we decided to throw stones into the lake. I was searching a good one in size to throw and burned my finger because it was a piece of coal out of the grill that was only cold on the outside. Damn I found inspiration there:

Destroyed it as I got a little khorny as I burned my hand ... but still it remained beautiful.

I wanted to paint this effect to the model but first ...
 ... decided to take some time to work on all these stupid skulls down at the base. Man way to many and it took me ages. Highlights, shadows, contrast, definition.


In the end I worked and spent more time on the clean up. I really enjoyed doing this on the model itself but for the base: Way too many skulls. They drove me nuts and I will never do something like that again. Yolo! Once in a lifetime for Khorne.


Skulls for his throne!
If you want to see more photos of the model, please check back with Putty&Paint.
I hope you enjoyed this walkthrough and also find inspiration here and there. Well, not speaking so much about painting technique. There are so many people explaining painting techniques out there in the world wide web. I never was like that. I rather give you my thoughts on my process and hope this finds you inspired. Enjoy painting!
_______________________________________________________________________________
You want to support Massive Voodoo?
If you like to support or say thanks the monkeys of Massive Voodoo in what they do, please feel invited to drop a jungle donation in their direction via paypal or check their miniatures they got on sale here.
_______________________________________________________________________________
Keep on happy painting!
Roman
The winner of this weeks tutorial voting arrived with little delay:
If you want to keep track with an overview on what has happened so far in
MV's year of the painter 2
please check this link!
_______________________________________________________________________________
You want to support Massive Voodoo?
If you like to support or say thanks the monkeys of Massive Voodoo in what they do, please feel invited to drop a jungle donation in their direction via paypal or check their miniatures they got on sale here.
_______________________________________________________________________________
Roman now takes over with the article - we hope you enjoy the read!
Step by Step: Slaughterpriest of Khorne
Allright.
Warhammer Fantasy.
Chaos.
Khorne.
Photo quality in this article may vary as I was using my smartphone, my digital camera and the big studio camera here and there.
INSPIRATION
Very important on each project is the vision you have. The idea, your vision you want to create. My inspiration for this project was fueled when I played my first campaign in the new Total War - Warhammer. Of course I started with Chaos and burned city after city with my hordes of Chaos, under the leadership of Archaon, the Everchosen.
My hordes of Chaos, ready for destruction:

Burning cities marked their way... from north to south!

BASING WORK
Well, Khorne is something special, like all of the four gods of Chaos are something special in their own ways and habits. If you want to praise Khorne you need skulls for the skull throne.
While doing this I remember with joy and laughter what I tell my students all the time on my classes: Do not use too much skulls on your bases, only if need be a skull can be a proper addition to a base, but take care not too many! Well I failed on that one here, but I am also praising the Khorne:
Many skulls out of my bitzbox:

Beastmen, Chaos Warriors, a giants head, Dark Elves and of course superglue.

When I was done I already was scared of painting this mess down there:

Primed black and white, ready for paint.

PAINTING WORK
When painting, many people ask me about my colors I used here or there. Well, all I can say is I use Schmincke Primeacryl primary colors and mix mostly everything out of them. Here is how my wet palette looked when I started this project:


I did not know where my vision would take me so I had my fun and on top of my black and white primer I used the airbrush and sprayed some powerful yellowish green to my two chaos models I was starting at the same time. Why this green? I have no clue but it helped me to spot out the areas I might miss to paint :D

I call this stage a rough sketch of what I want to do. Placed basic skin, armour and some wishy-washy tones over there and over here. Basic, rough sketching into the project.

I still was unsure, so I kept to what I know. Khorne. Red armour. I had to intensify the armour parts with more red. There we go. Still sketchy.

This is a photo of the first rough sketching phase done with the big camera. It is also a big photo so please do not hesitate to click on it.

With rough sketching I mean truely rough - here is a detail shot.

Well, stage 2.
Starting to put layers on it to define my rough sketch. Working on shadows and quick highlights, but still sketchy. Bring in more colors, just painting joy.

I also did it to the armour as it was too pinkish in the steps before.
Please no. Is that chaoshound-poo on your shoe?

Like I said it is still a little rough here and there, but that is just like I want it. I do not care about superclean work in this stage as this would just limit my creativity in making choices. I want some blue in that skin, ok I slap in some blue. See. blueish white there. Bam! Bam! Man his fingers on the big fist look a little weird, but its a demonic hand. Never get slapped by this one!

The famous elbow reds.

Again a photo made with the big camera showing the rough, but detailed sketchwork going on. Had to spray some blue to the one area of the base to balance the swords cold colors. Hit the model with some sparkles, enjoyed that for future work on it. Pfft!Pfft! Ooops!

From there on fun in sketching is less, it is time to clean up and start working on each single area that I put in place and decided a color for. Painting contrast to what I achieved via sketching. Shadows and Highlights. A little less sketchy, but more careful.
Not only did I want to have demonic weaponry on this guy I also wanted to make him a demon soul inside. That is why his eyes and armour parts are glowing here and there ... I switched from pinkish dayglow colors to orange ones. Not sure yet.

Edge highlights are starting to define ...

Cleaning up the golds. Scale75 Necrogold was used here.


Allright. Told you I was not sure about the orange glow and like I say, everything happens for a reason. We went barbecueing back in that summer and after a summer day full of friends, swimming and barbecueing it went dark on that lake we were.
After some beers and great chats with friends we decided to throw stones into the lake. I was searching a good one in size to throw and burned my finger because it was a piece of coal out of the grill that was only cold on the outside. Damn I found inspiration there:

Destroyed it as I got a little khorny as I burned my hand ... but still it remained beautiful.

I wanted to paint this effect to the model but first ...
 ... decided to take some time to work on all these stupid skulls down at the base. Man way to many and it took me ages. Highlights, shadows, contrast, definition.

In the end I worked and spent more time on the clean up. I really enjoyed doing this on the model itself but for the base: Way too many skulls. They drove me nuts and I will never do something like that again. Yolo! Once in a lifetime for Khorne.


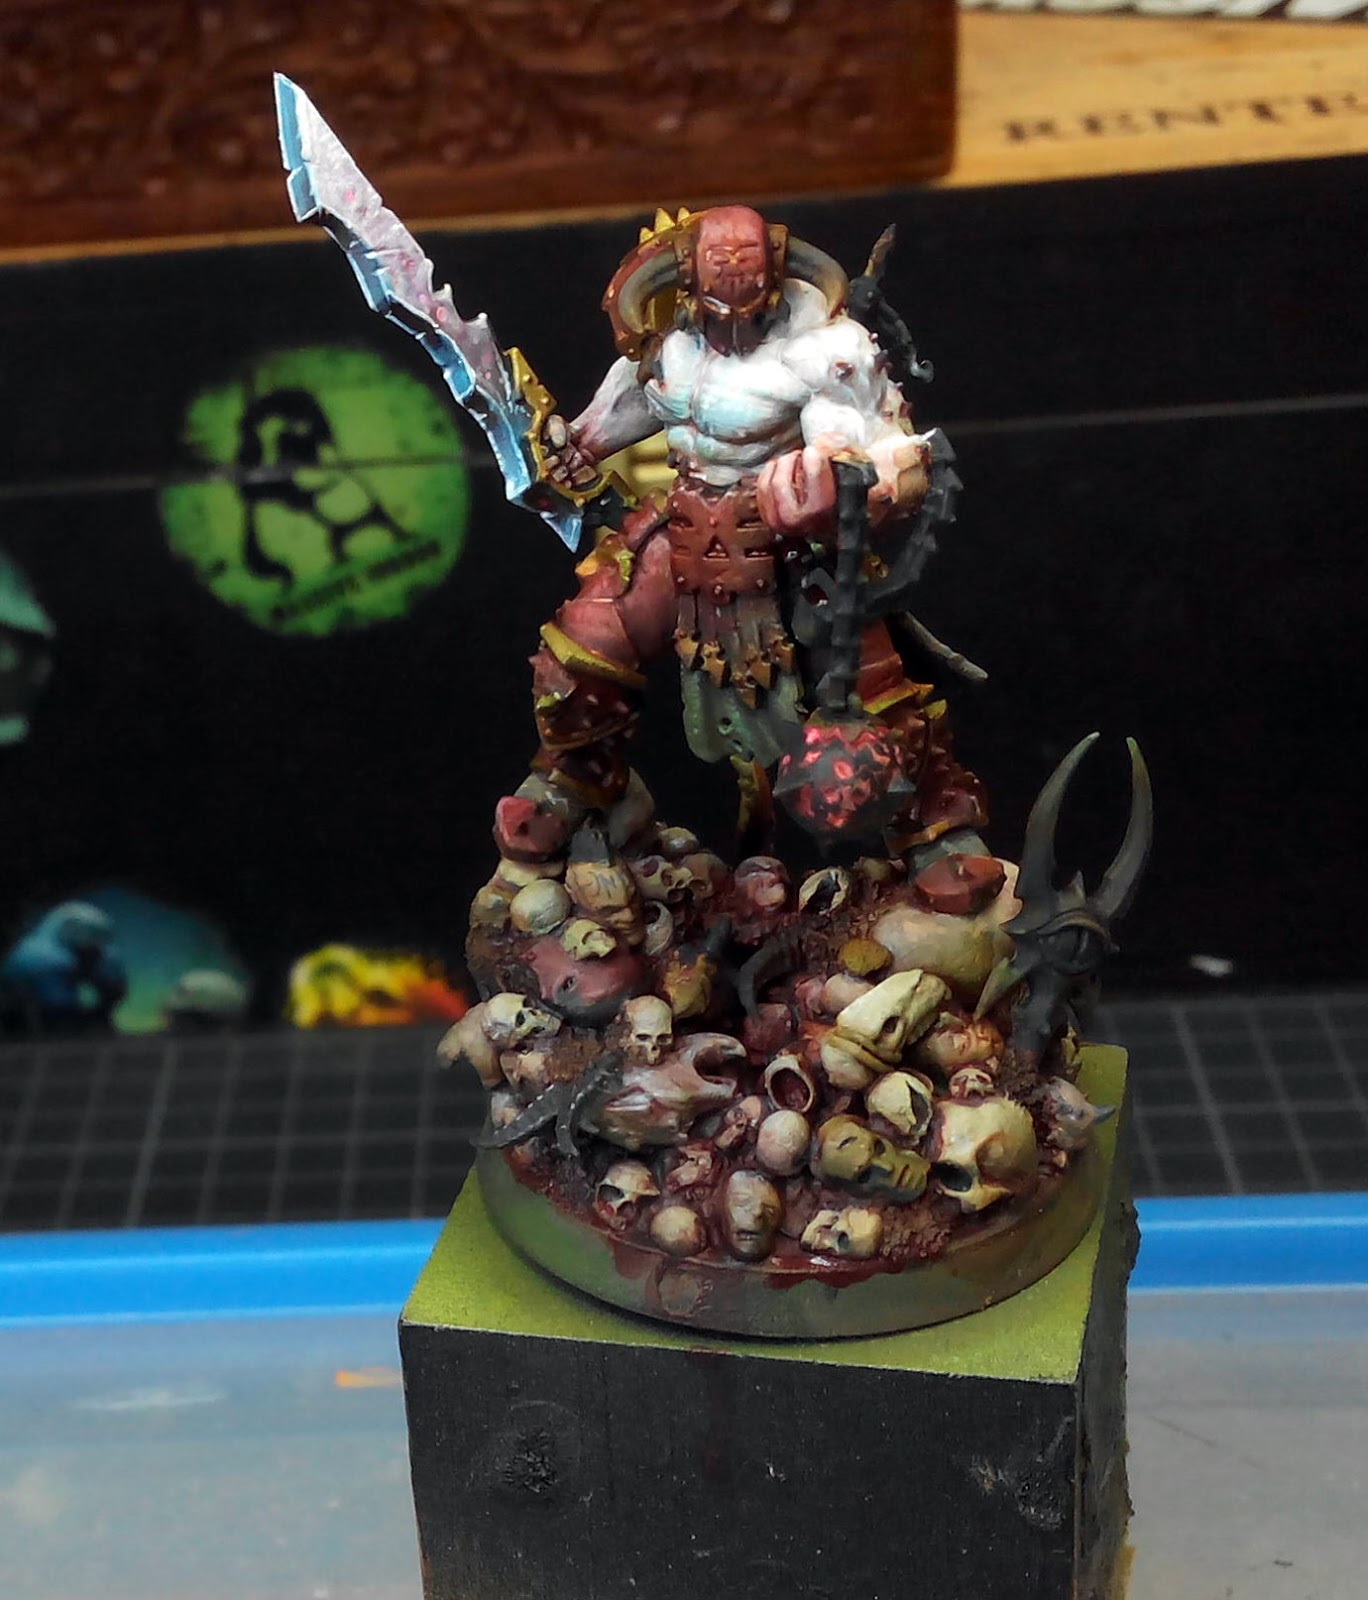
Skulls for his throne!
If you want to see more photos of the model, please check back with Putty&Paint.
I hope you enjoyed this walkthrough and also find inspiration here and there. Well, not speaking so much about painting technique. There are so many people explaining painting techniques out there in the world wide web. I never was like that. I rather give you my thoughts on my process and hope this finds you inspired. Enjoy painting!
_______________________________________________________________________________
You want to support Massive Voodoo?
If you like to support or say thanks the monkeys of Massive Voodoo in what they do, please feel invited to drop a jungle donation in their direction via paypal or check their miniatures they got on sale here.
_______________________________________________________________________________
Keep on happy painting!
Roman


Wow, fantastic article. I am starting to love this approach of crazy sketchy inspiration in the beginning, and then cleaning and smoothing. I truly believe that is the way to unleashed your creative inner beast. Thanks Roman for the inspiration!!! Keep on happy painting!
Great article - love the effects at the end! Fantastic work!
Thank you again for sharing your work!
Any chance to get colors for the skin?
@Kamil
Well not really as everything was mixed from primary colors, like described here: http://massivevoodoo.blogspot.de/2016/12/step-by-step-find-your-way.html