


Hey Jungle Painters!
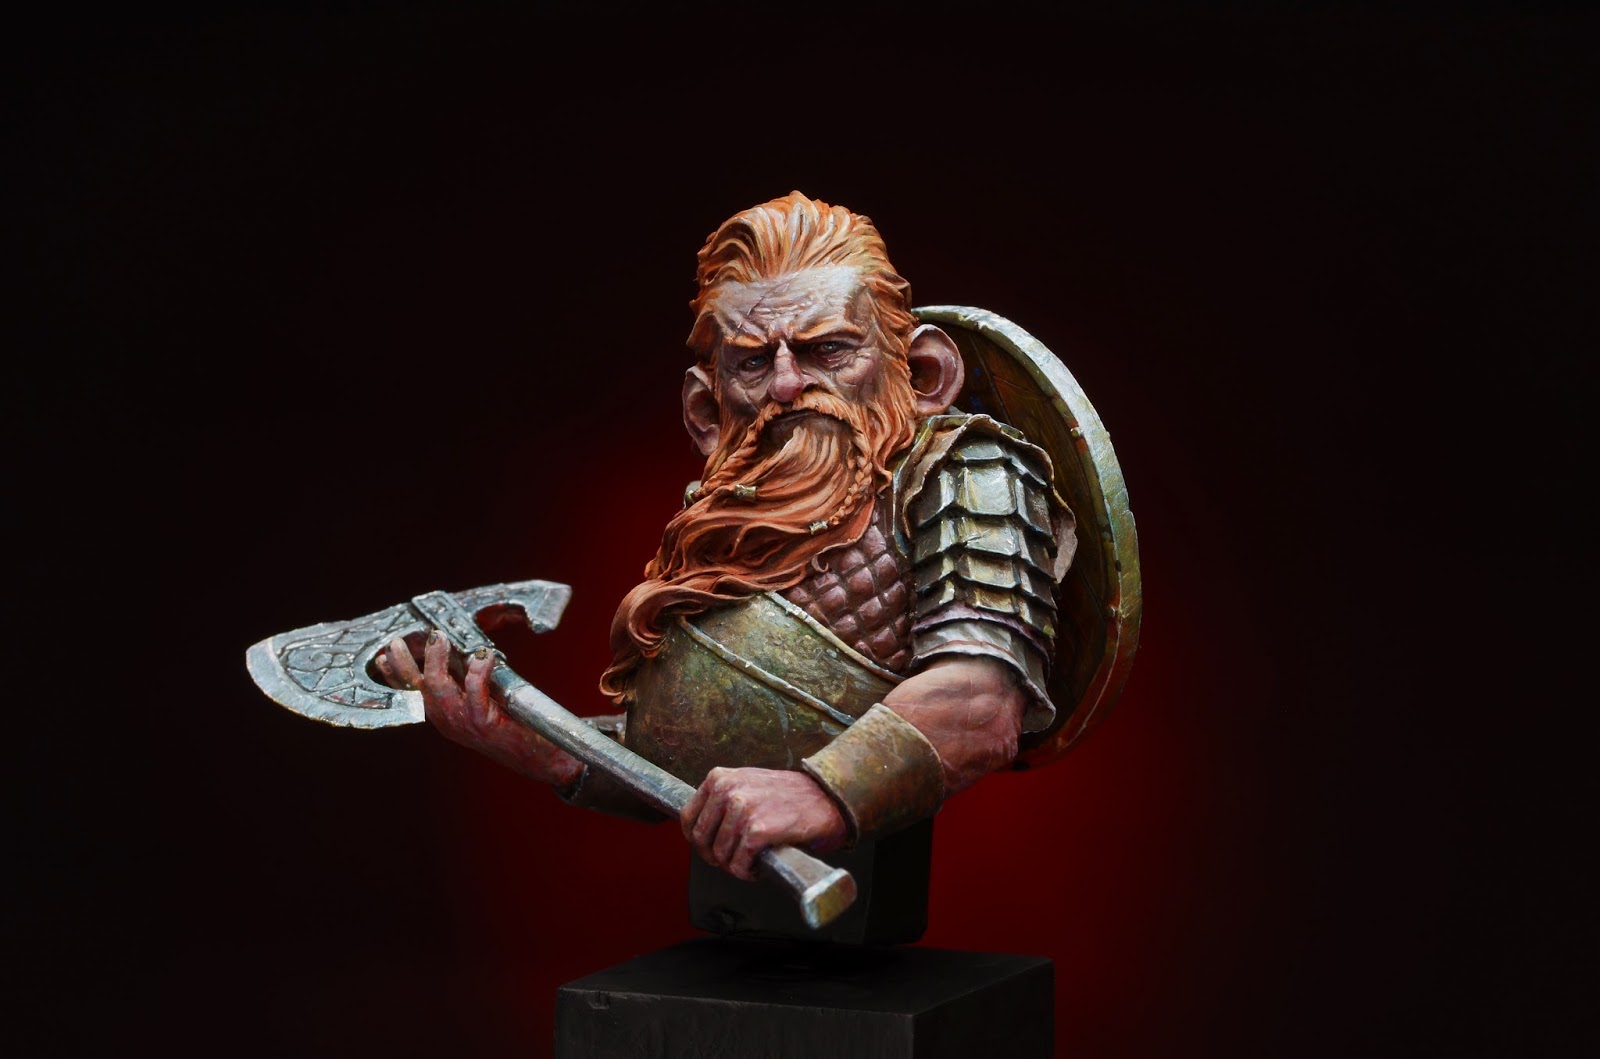
The winner of this weeks tutorial voting arrived. The voices were asking for the Heroes and Villians Dwarf named "Harald" that Roman named "Fire":

If you want to keep track with an overview on what has happened so far in
MV's year of the painter 2 please check this link!
_______________________________________________________________________________
You want to support Massive Voodoo?
If you like to support or say thanks the monkeys of Massive Voodoo in what they do, please feel invited to drop a jungle donation in their direction via paypal or check their miniatures they got on sale here.
_______________________________________________________________________________
Roman is taking over the article now - we hope you enjoy!
Step by Step: Fire
Introduction
Allright. A wonderful bust that I painted there, sculpt wise. A true Lucas Pina sculpt with tons of character. I did start my version during teaching a really cool two day MV private coaching with Josua about atmosphere.
My version looked like this when I called it done:

I will try to take you on a journey through this project. My thoughts on how I tackled what I did paint there and some insight into the process. Not a step by step with color recipes, nor technical advices in detail.
Thoughts on Painting this bust
Allright. The background story of this bust is funny in a way.
I did not have a color concept for it when Josua and I sat down for private coaching. I decided to go spontaneously on my scheme. Making it rise from the decision Josua would take. I wanted to do the opposite. I taught Josua on how to approach atmosphere painting and he decided to place his Harald in a cold environment with a warm light that hits him. Opposite for me would mean a warm environment with cold lights hitting him. Yay!
Orange it is for me! And of course other warm colors! :D

Both our starts. Sketching in basic colors. Blocking all areas with paint. Fire and Ice already.

So next step for me also going for a basic color on the metals. I had no idea yet and if I do not have an idea I start dark to be in control of what might happen there in the next steps. This is some copper metal paint with a lot of black in it. The skin and hair recieved some careful approaced shadows and shy lights.

As soon as the beard and skin recieved more contrasts in term of shadows I need to work on the metals. I was still unsure where the metal work might take me so I went on top of that dark basic color with some greenish metals that also would balance all the warm tones I got going on in that dwarf.

Thinking about metal being a very reflecting surface I also sketched in some of the warm reflections of the environment, but also in the leather areas. You can see this in the following photo:

I knew I would place his shield on his back and might cover most of his back, but well I painted it still. Good training ground.

So far no cold highlights were placed. Just some warm ones on the hair, leather and metals,
but that was not truely highlight work, it rather was saturation work.
So far it was mainly just working my way into shadows, coming from my basecolors.
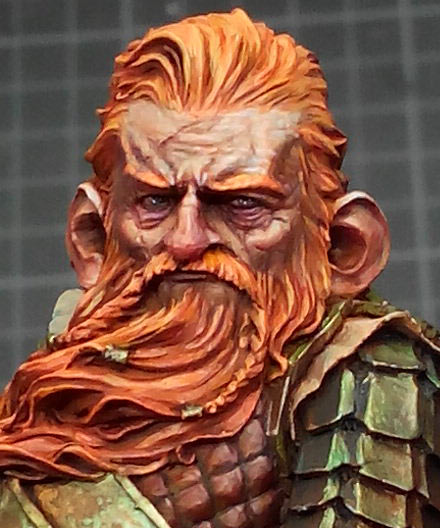
In the following photo I gave it a small try to highlight my basic skin color with a cold light. A cold light is a blueish white. I mixed this into my skintone and gave it a shy try on his forehead and face area.


For me this was very interesting and I was impressed on how strong they popped out. I really enjoyed their play with the skin variations I had going on around his nose and eyes and the scar on his forehead.

The shapes on his stuffed fabric were a joy to paint, but still no cold lights.
Some shapes are so much fun to paint, others are not :D


A big detail shot - the brush is dancing:

Allright,
balls to the wall and lets go for some cold lights mixed in that battle plan. I did start with the metals. Why? Well they are the most reflective surface I got on the miniature and somehow this cold blueish thing going on in that model is supposed a reflection of a blue sky. Something. I am still in the middle of learning and studying to paint such things, that is why I can not go more precise in my explanations. I still have to understand exactly what I am doing there to be fully able to break it down ...

Close up on the shield. I am painting a wooden structure here too ending up in cold lights. Can you feel it? Enjoyed the dirt splashes so much. Some watered brown sand pigments thrown at it and when they dry they turn out to be dusty again.

Allright the blueish cold lights in the metal did work. I got more brave in the facial area too and increeased them there too, but still the overall picture was not complete as the hair, skin and leather were missing in the overall cold light concept.

But I really enjoyed the look so far. From the top the cold blue sky was reflecting on the metals, from below the environment reflections kicked in.
 Cold lights appeard in the orange, clothes, leather and even more in the skin ... it works but still confused me. Time to go on :D


And I am starting on the skin of the arms too, also on the stuffed fabric. Everything that points upwards is getting colder.

So if you look from the top, everything that you did not miss thus far should look cold.

Allright. I enjoy where this takes me.
If I get that feeling I am always about making it more intense. I now start to increase contrast in detail. A stronger warm shadow here and there and stronger colder light here and there. This stage is often about checking back, control work if I missed something and intensifying.


Cold and warm play together in a symphony of color ...

Usually I paint warmer lights on colder surfaces. This felt so weird as it was the unusual way.

Again checking back with a look from the top to see if everything that points upwards is getting colder. Cool!

Summary
I did spent some more time in glazing here and there to smooth out transitions where I wanted them to be smoother. Increased contrast here and there, but soon deecided that I am done with my vision of this piece.
I hope you enjoyed my thoughts on this paintjob. I hope you are not angry that I am not able to tell you exact steps at the moment, its just that I am learning all the time, seeking for new and fresh horizons and particular in this year my way of painting changed so much to the better for my personality. I am open to so many new things and try to do experiment in the direction my muse takes me and I learn from it. I hope I will be able to explain such things even deeper in the future to come.
The final piece looked like this:


 R + A stands for me and my girlfriend :)


For Sale!
This bust is for sale. Contact me for more information via jarhead(at)massivevoodoo(dot)com.
Keep on happy painting!
Roman
The winner of this weeks tutorial voting arrived. The voices were asking for the Heroes and Villians Dwarf named "Harald" that Roman named "Fire":
If you want to keep track with an overview on what has happened so far in
MV's year of the painter 2 please check this link!
_______________________________________________________________________________
You want to support Massive Voodoo?
If you like to support or say thanks the monkeys of Massive Voodoo in what they do, please feel invited to drop a jungle donation in their direction via paypal or check their miniatures they got on sale here.
_______________________________________________________________________________
Roman is taking over the article now - we hope you enjoy!
Step by Step: Fire
Introduction
Allright. A wonderful bust that I painted there, sculpt wise. A true Lucas Pina sculpt with tons of character. I did start my version during teaching a really cool two day MV private coaching with Josua about atmosphere.
My version looked like this when I called it done:
I will try to take you on a journey through this project. My thoughts on how I tackled what I did paint there and some insight into the process. Not a step by step with color recipes, nor technical advices in detail.
Thoughts on Painting this bust
Allright. The background story of this bust is funny in a way.
I did not have a color concept for it when Josua and I sat down for private coaching. I decided to go spontaneously on my scheme. Making it rise from the decision Josua would take. I wanted to do the opposite. I taught Josua on how to approach atmosphere painting and he decided to place his Harald in a cold environment with a warm light that hits him. Opposite for me would mean a warm environment with cold lights hitting him. Yay!
Orange it is for me! And of course other warm colors! :D

Both our starts. Sketching in basic colors. Blocking all areas with paint. Fire and Ice already.

So next step for me also going for a basic color on the metals. I had no idea yet and if I do not have an idea I start dark to be in control of what might happen there in the next steps. This is some copper metal paint with a lot of black in it. The skin and hair recieved some careful approaced shadows and shy lights.
Sketchy.

As soon as the beard and skin recieved more contrasts in term of shadows I need to work on the metals. I was still unsure where the metal work might take me so I went on top of that dark basic color with some greenish metals that also would balance all the warm tones I got going on in that dwarf.

Thinking about metal being a very reflecting surface I also sketched in some of the warm reflections of the environment, but also in the leather areas. You can see this in the following photo:

I knew I would place his shield on his back and might cover most of his back, but well I painted it still. Good training ground.

So far no cold highlights were placed. Just some warm ones on the hair, leather and metals,
but that was not truely highlight work, it rather was saturation work.
So far it was mainly just working my way into shadows, coming from my basecolors.
In the following photo I gave it a small try to highlight my basic skin color with a cold light. A cold light is a blueish white. I mixed this into my skintone and gave it a shy try on his forehead and face area.
So far ...

And the ear.

For me this was very interesting and I was impressed on how strong they popped out. I really enjoyed their play with the skin variations I had going on around his nose and eyes and the scar on his forehead.
The shapes on his stuffed fabric were a joy to paint, but still no cold lights.
Some shapes are so much fun to paint, others are not :D

Painting cold lights on orange hair? Do I really want to do this?

Everything warm so far. I hope you can feel the temperature too?

A big detail shot - the brush is dancing:

Allright,
balls to the wall and lets go for some cold lights mixed in that battle plan. I did start with the metals. Why? Well they are the most reflective surface I got on the miniature and somehow this cold blueish thing going on in that model is supposed a reflection of a blue sky. Something. I am still in the middle of learning and studying to paint such things, that is why I can not go more precise in my explanations. I still have to understand exactly what I am doing there to be fully able to break it down ...

Close up on the shield. I am painting a wooden structure here too ending up in cold lights. Can you feel it? Enjoyed the dirt splashes so much. Some watered brown sand pigments thrown at it and when they dry they turn out to be dusty again.

Allright the blueish cold lights in the metal did work. I got more brave in the facial area too and increeased them there too, but still the overall picture was not complete as the hair, skin and leather were missing in the overall cold light concept.

But I really enjoyed the look so far. From the top the cold blue sky was reflecting on the metals, from below the environment reflections kicked in.


Cold lights appear everywhere.

A little blurry photo, but still my cold white lights are powerful ...

And I am starting on the skin of the arms too, also on the stuffed fabric. Everything that points upwards is getting colder.

So if you look from the top, everything that you did not miss thus far should look cold.

Allright. I enjoy where this takes me.
If I get that feeling I am always about making it more intense. I now start to increase contrast in detail. A stronger warm shadow here and there and stronger colder light here and there. This stage is often about checking back, control work if I missed something and intensifying.

Interesting:

Cold and warm play together in a symphony of color ...

Usually I paint warmer lights on colder surfaces. This felt so weird as it was the unusual way.

Again checking back with a look from the top to see if everything that points upwards is getting colder. Cool!

Summary
I did spent some more time in glazing here and there to smooth out transitions where I wanted them to be smoother. Increased contrast here and there, but soon deecided that I am done with my vision of this piece.
I hope you enjoyed my thoughts on this paintjob. I hope you are not angry that I am not able to tell you exact steps at the moment, its just that I am learning all the time, seeking for new and fresh horizons and particular in this year my way of painting changed so much to the better for my personality. I am open to so many new things and try to do experiment in the direction my muse takes me and I learn from it. I hope I will be able to explain such things even deeper in the future to come.
The final piece looked like this:


For Sale!
This bust is for sale. Contact me for more information via jarhead(at)massivevoodoo(dot)com.
Keep on happy painting!
Roman


It's a pleasure to follow your thoughts on the painting process! Thank you so much for the effort in creating this awesome step by step article!
Thank you for the feedback! Really appreciated!
Thanks for sharing this kinnda posts.
It helps me a lot and pushes me to feel more and more in every project. I do prefer a thousand times this articles to any recipie kinnda one.
Thanks thanks thanks a lot Roman,
Jero "Bruce" Carmona
Hey Jero, thank you so much for your kind words and the great feedback. I am looking forward to continue with articles like that!