


Good moning Jungle Painters,
today it´s time for a new step by step article.
This time, Peter will tell you a bit about the progress on his small army project. In this article he will show you his approach towards painting a pre-heresy World Eater Legionnaire for tabletop gaming. You can find many more step by steps in MV's article section.

But let Peter tell you more:
-----------------------------------------------------------------------------------------------------------------
Hey ladies and gentlemen,
it feels like my last step by step article was decades ago (1 or 2 years it might be). As you have possibly read in my last posting, I´m working on a small 40k army project to get some painting-motivation back. In the last months I have been very very busy with my daytime job and somehow lost the joy of painting high quality cabinet pieces for the moment.
I´m quite used to these ups and downs in my hobby, but this time I wanted to tackle the "problems" by doing something instead of waiting until my motivation returns. I also thought my experiences might be interesting for some of you as there are many gamers who are reading MassiveVoodoo. Perhaps I can give you some nice ideas...
The idea:
Well, I know that it would not be possible for me to paint a whole army with 50 models in the same colors. To get a nice diversification, my plan is to do a small warband of different pre-heresy Legionnaires who have rallied after the defeat of Horus. These are hateful, jealous, but very dangerous creatures. They fought their battles for millennias, but still keep their old colors in remembrance of their epic defeat. So, in my vision I see old armours, weathered, modified and full of battle damage.
The first steps:
I need variety! So, as a first step, I opened my old bitz-box (bitz from over 15 years!) and started to build some marines with the parts I had, but always tried to somehow stick to the pre-heresy theme. I could never do (or would like to afford) a simple "out of the box" army. I can perhaps tell you more about this creation process in a later article.

Now it was time to start painting. I was sure, as soon as I would start, my demand for a high quality would take over and I would invest far too much time for a gaming model. To prevent this from happening, I wanted to find an easy way to achieve good results in only a short periode of time. So, I decided to paint a test-mini for every Legion, I would like to have in my army. In the end, the "rank and file"-minis should not need more than 3-4 hours per model.
Painting the World Eater:
Initial Thoughts:
There are different ways to achieve nice results for weathering. Roman and Raffa have used different ways over the last years and wrote articles about it to explain their ways. You can find them here:
Theory: Rust
Weathering Overview
Weathering a wall with hairspray
How to: Rust Effects by ModelMates
Weathering with Salt and Hairspray
Weathering Video Tutorial
For my World Eater I wanted to try an approach with liquid mask. Roman achieved some nice results with this tool and my idea was to apply this technique on a smaller scale.
Painting:
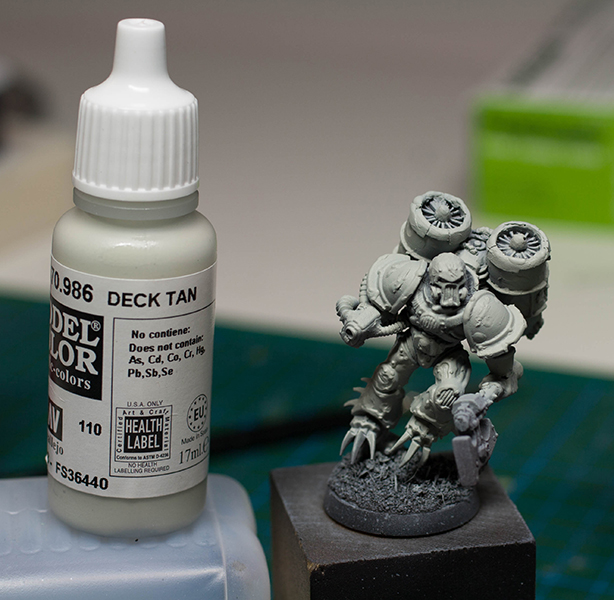
I decided to only use a black primer. For a start I would apply the basic colors with the airbrush, so an additional primer with white would be useless.

First, I covered the whole model with a rusty color.

After the basic color dried, I applied the liquid mask on all areas which would later be rusty battle damage. I´m quite satisfied with the liquid mask from Mr. Hobby. It´s not too fluid and dries in about 30 minutes. Be careful to use an old brush as the latex will kill your premium brushes for sure! It´s important to wait until the masking fluid has completly dried before you apply new colors.

In the next steps I used my airbrush and applied the colors in three steps: I started with a dark basetone. As a second layer I chose a bright midtone to get a good base for the white armour and spared only the (later) darkest areas. In a third step I used pure white and tried to cover only othe areas, where the brightest spots would be in the end. The result was start for the following brushwork.


Before I started with the brushwork, I used a pair of tweezers and removed the masking (very easy!). By doing this quite rough, the color "broke" and I received a basic weathering on all parts of the armour. In a later step I would use some rust effects and pigments to intensify this effect.

Of course the results on the marine are not perfect, if you have a closer look, but they are satisfactory for a gaming model. If I work on a display model I would take more time of course and use more glazes and a bunch of additonal colors to create interesting effects. Here, I focused on speed and knew that I would use some washes and rust-liquids later, which would ruin all perfect blendings in the end ;-)


After I was satisfied with the appearance of my marine, it was time to start with the weathering. I used some very watered dark and sepia washes to intensify the darker areas of the miniature. Especially for gaming models it´s important to maximise the contrast as you usually see them from quite a distance.
Then, I used the rust effect from ModelMates on all parts which should be rusty. To support the old, battle-worn effect on the armour, I later used a very thin glaze of the rust effect and covered all areas where rust would be washed into. Take your time to study how rust appears in nature. For inspiration click here!
After I finished the model and prepared this step by step, I got the feeling that I should have intensified the weathering effects on the whole armour. Additional small scratches and more rust in the dents would have made the model more intersting. Important knowledge for the next mini!


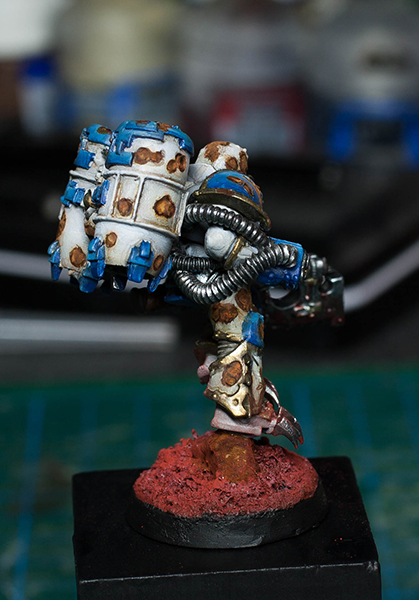
The rust effect from ModelMates is pretty cool, but in my opinion it was too dark and lacked the orange touch in the end. It was time to compensate this and to intensify the whole weathering effect in the damaged armour parts. For this I used pastel chalk to create my own pigments. I applied the pigments with a small brush on all rusty areas and blew them off afterwards. By this, you achieve a nice "dry" rust effect.


The final touches were simple: I used reddish pigments for the base and a decent blood effect for the weapon.
Addionally I used black color to do a bit of darklining and pure white color to intensify the edge-highlights. I concentrated these actions only on the upper part of the marine (it´s just a gaming model and we need a good result for the table and not for a competition judges ;-) ).
These are the final results after 4 1/2 hours of painting:


Final thoughts:
It was a very interesting to do this quick paintjob on the World Eater, somehow relaxing. I think with 4 1/2 hours for this concept miniature I got a nice solution for my army and I´m sure I can push the necessary time down to 3 1/2 hours, but for the next minis I will try a different technique for weathering effects. The World Eater´s armour is covered by too many big damaged areas but no small or medium sized ones. I think using a sponge to create smaller types of cuts could solve the problem.
What are the next steps?
Now it´s time to start a new concept mini and I think I will chose a Death Guard marine. Beside the World Eaters they are my favourite legion and I can use a lot of the experiences I made while painting this son of Angron.
I hope you enjoyed this step by step.
Let me know what you think and leave a comment :-)
Regards,
Peter
today it´s time for a new step by step article.
This time, Peter will tell you a bit about the progress on his small army project. In this article he will show you his approach towards painting a pre-heresy World Eater Legionnaire for tabletop gaming. You can find many more step by steps in MV's article section.

But let Peter tell you more:
-----------------------------------------------------------------------------------------------------------------
Hey ladies and gentlemen,
it feels like my last step by step article was decades ago (1 or 2 years it might be). As you have possibly read in my last posting, I´m working on a small 40k army project to get some painting-motivation back. In the last months I have been very very busy with my daytime job and somehow lost the joy of painting high quality cabinet pieces for the moment.
I´m quite used to these ups and downs in my hobby, but this time I wanted to tackle the "problems" by doing something instead of waiting until my motivation returns. I also thought my experiences might be interesting for some of you as there are many gamers who are reading MassiveVoodoo. Perhaps I can give you some nice ideas...
The idea:
Well, I know that it would not be possible for me to paint a whole army with 50 models in the same colors. To get a nice diversification, my plan is to do a small warband of different pre-heresy Legionnaires who have rallied after the defeat of Horus. These are hateful, jealous, but very dangerous creatures. They fought their battles for millennias, but still keep their old colors in remembrance of their epic defeat. So, in my vision I see old armours, weathered, modified and full of battle damage.
The first steps:
I need variety! So, as a first step, I opened my old bitz-box (bitz from over 15 years!) and started to build some marines with the parts I had, but always tried to somehow stick to the pre-heresy theme. I could never do (or would like to afford) a simple "out of the box" army. I can perhaps tell you more about this creation process in a later article.

Now it was time to start painting. I was sure, as soon as I would start, my demand for a high quality would take over and I would invest far too much time for a gaming model. To prevent this from happening, I wanted to find an easy way to achieve good results in only a short periode of time. So, I decided to paint a test-mini for every Legion, I would like to have in my army. In the end, the "rank and file"-minis should not need more than 3-4 hours per model.
Painting the World Eater:
Initial Thoughts:
There are different ways to achieve nice results for weathering. Roman and Raffa have used different ways over the last years and wrote articles about it to explain their ways. You can find them here:
Theory: Rust
Weathering Overview
Weathering a wall with hairspray
How to: Rust Effects by ModelMates
Weathering with Salt and Hairspray
Weathering Video Tutorial
For my World Eater I wanted to try an approach with liquid mask. Roman achieved some nice results with this tool and my idea was to apply this technique on a smaller scale.
Painting:
I decided to only use a black primer. For a start I would apply the basic colors with the airbrush, so an additional primer with white would be useless.

First, I covered the whole model with a rusty color.

After the basic color dried, I applied the liquid mask on all areas which would later be rusty battle damage. I´m quite satisfied with the liquid mask from Mr. Hobby. It´s not too fluid and dries in about 30 minutes. Be careful to use an old brush as the latex will kill your premium brushes for sure! It´s important to wait until the masking fluid has completly dried before you apply new colors.

In the next steps I used my airbrush and applied the colors in three steps: I started with a dark basetone. As a second layer I chose a bright midtone to get a good base for the white armour and spared only the (later) darkest areas. In a third step I used pure white and tried to cover only othe areas, where the brightest spots would be in the end. The result was start for the following brushwork.


Now it was time to take the brush to hand.
I covered all areas roughly with their basic colors to get a good idea of how everything would work together in the end. If you need any inspiration for your army, I can only recommend checking Pinterest. There are so many nice artworks of pre-heresy marines and you can create your own pinwall to collect the most interesting ones. I started a collection for the Legions I will use in my army: CLICK!
After the basic brushwork, it started defining the areas and create rough blendings by using a variation of Roman´s wet in wet technique. As there is no tutorial yet, which explains this technique properly I will try to give you a quick explanation with my own words:
Two important facts before you get started:
- it´s important to have the surface covered in your base color
- don´t use the colors too wet for this technique, as they will flow everywhere; the colors´ consistency should be some kind of "creamy"
- you apply the base color on the surface, again
- while the base color is still wet, you apply a brighter (or darker) color onto the area where you want to create a blending
- carefully mix the colors in the area where you want the blending to be, but still leave the basic color in the rest of the area; focus on the "borders" of both colors
- while drying the colors will create a nice transition
- you repeat the procedure after the colors have dried but this time use the brighter mixture as the base color in a smaller area
- use glazes to smoothen the transitions if necessary
Of course the results on the marine are not perfect, if you have a closer look, but they are satisfactory for a gaming model. If I work on a display model I would take more time of course and use more glazes and a bunch of additonal colors to create interesting effects. Here, I focused on speed and knew that I would use some washes and rust-liquids later, which would ruin all perfect blendings in the end ;-)


After I was satisfied with the appearance of my marine, it was time to start with the weathering. I used some very watered dark and sepia washes to intensify the darker areas of the miniature. Especially for gaming models it´s important to maximise the contrast as you usually see them from quite a distance.
Then, I used the rust effect from ModelMates on all parts which should be rusty. To support the old, battle-worn effect on the armour, I later used a very thin glaze of the rust effect and covered all areas where rust would be washed into. Take your time to study how rust appears in nature. For inspiration click here!
After I finished the model and prepared this step by step, I got the feeling that I should have intensified the weathering effects on the whole armour. Additional small scratches and more rust in the dents would have made the model more intersting. Important knowledge for the next mini!


The rust effect from ModelMates is pretty cool, but in my opinion it was too dark and lacked the orange touch in the end. It was time to compensate this and to intensify the whole weathering effect in the damaged armour parts. For this I used pastel chalk to create my own pigments. I applied the pigments with a small brush on all rusty areas and blew them off afterwards. By this, you achieve a nice "dry" rust effect.


The final touches were simple: I used reddish pigments for the base and a decent blood effect for the weapon.


Pure gore in here, always keep in mind that less is more.
Addionally I used black color to do a bit of darklining and pure white color to intensify the edge-highlights. I concentrated these actions only on the upper part of the marine (it´s just a gaming model and we need a good result for the table and not for a competition judges ;-) ).
These are the final results after 4 1/2 hours of painting:


Final thoughts:
It was a very interesting to do this quick paintjob on the World Eater, somehow relaxing. I think with 4 1/2 hours for this concept miniature I got a nice solution for my army and I´m sure I can push the necessary time down to 3 1/2 hours, but for the next minis I will try a different technique for weathering effects. The World Eater´s armour is covered by too many big damaged areas but no small or medium sized ones. I think using a sponge to create smaller types of cuts could solve the problem.
What are the next steps?
Now it´s time to start a new concept mini and I think I will chose a Death Guard marine. Beside the World Eaters they are my favourite legion and I can use a lot of the experiences I made while painting this son of Angron.
I hope you enjoyed this step by step.
Let me know what you think and leave a comment :-)
Regards,
Peter


Hey Peter, really nice step by step. It was interesting to read your opinions on the different steps. And it's good that you are very critical and open for change techniques but also are happy with the current result. I am looking forward for your next stuff, no matter if tabletop army, cabinet piece or something between ;)
Amazing SBS, thanks! I can see how smaller chips made with a sponge could make it look even better.
Do you think there would be anything to gain by having a more varied rust coat to start with, rather than just using one color? I know you're thinking about trying to keep this fast, but I have been thinking about using a similar idea on my own models and haven't had time to experiment yet.
Thanks a lot for your comments :) Regarding the idea with additional colors for the "basic rust-color". I think in the way I did the rust here, especially with using the Model Mates Effects, an additional basecolor would not change the effect at all. The Model Mates and the rust pigments would cover it.
BUT: the idea is interesting and I think about using it on another marine. Just trying it and see what we will achieve :)