


Good Monday Morning Jungle Painters,
today Massive Voodoo went back in its deep jungle archives to bring you a small tutorial about how to create a Wall piece from plaster. It is similiar to the article of Raffa on how to make a brick wall but in the same moment it is not similiar as other techniques and materials were used.
Well, this article is written by Roman, BUT the person who builds up the base is Kurt, our friend from the Pumpkin Painters. Deep in the archives of the jungle Roman found the photos of Kurt aka DarkEzekiel working on his base while he was visiting us in Augsburg a long time ago.
_______________________________________________________________________________
Carved Plaster Wall piece
What you need for a start:
- plaster
- Material to build a form/mold with.
In this example the form was made from architecture cardboard.
You could also do this with Lego for example.
- a tool to carve, like an old blade or a sculpting tool
- superglue
- water
- a pen
What kind of plaster should I use?
We recommand using harder plaster, like dental plaster or kind of. You can still carve it, but if you use too plaster that is too soft after drying you will encounter problems while painting your wall piece as the colours will get sucked into the material. Just annoying and demotivating.
Step 1:
Think about which kind of wall you want to create and make a sketch of it.
Try to find a shape that you like to create, take real life examples as reference if needed. Now take the architecture cardboard. The ones you can buy have different thickness and we recommand not taking the big ones. These used here were thick about one centimeter as far as I can remember and suggest.
Kurt signed his wall shape to both of the cardboard-parts and cut out each single piece with a cutter. Take care and don't hurt yourself.
Then he used superglue to put them together. You can already achieve a wall with one single piece of card board, but Kurt wanted a big column piece. Last, he glued a full wall of cardboard to one side to close the mold. Three pieces in the end.

While glueing take care that everything is glued properly or you will have a mess later on. Sadly I can not provide you with a photo of the basic form itself as this went missing somehow. Really, this is coming from deep out of the past.
Step 2:
Next, take a seperate bowl or plastic cup to mix the plaster with water like described on the plaster instruction. When mixed properly place the plaster into your form. You will recieve something that looks like this and after it is dry you can already start with carving your basic stones into the plaster.


Step 3:
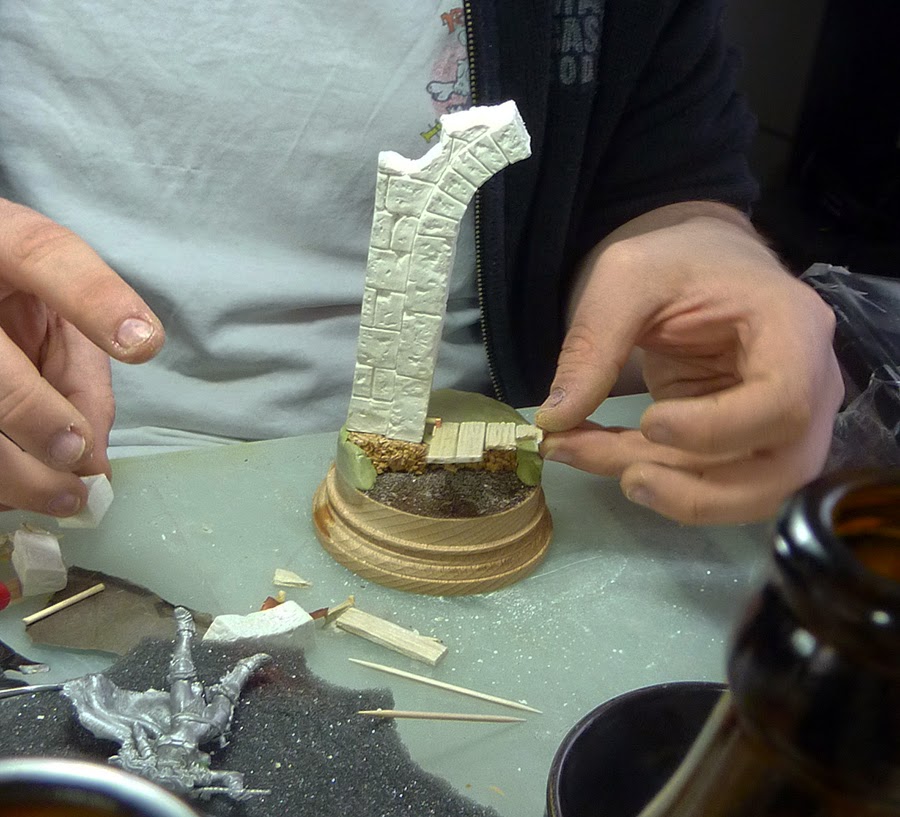
As the mold that Kurt made just allowed him to carve on the walls front side he had to work on the other sides still to make it an authentic wall piece from all angles. For sure, if you only do one side of a wall you are fine with carving one side. If you are done with the carving you can carefully cut away the cardboard to set your wall piece free and bring it to your base. If your wall piece is heavy, like the one of Kurt, than we recommend to pin it to your base.

Step 4:
Take your time while carving and think about detail damage and detail rubble if the wall is meant to be old and aged. Such detail damage will bring a more interesting light situation to your paintwork later on. It already can be seen on this photo:
You can use Hirst-Art Parts or plaster rests to place some rubble on the ground.
Well, that's it. Have fun with carving your wall of choice.
Thanks to Kurt for his guest presence in this article.
Keep on happy basing!
today Massive Voodoo went back in its deep jungle archives to bring you a small tutorial about how to create a Wall piece from plaster. It is similiar to the article of Raffa on how to make a brick wall but in the same moment it is not similiar as other techniques and materials were used.
Well, this article is written by Roman, BUT the person who builds up the base is Kurt, our friend from the Pumpkin Painters. Deep in the archives of the jungle Roman found the photos of Kurt aka DarkEzekiel working on his base while he was visiting us in Augsburg a long time ago.
_______________________________________________________________________________
Carved Plaster Wall piece
What you need for a start:
- plaster
- Material to build a form/mold with.
In this example the form was made from architecture cardboard.
You could also do this with Lego for example.
- a tool to carve, like an old blade or a sculpting tool
- superglue
- water
- a pen
What kind of plaster should I use?
We recommand using harder plaster, like dental plaster or kind of. You can still carve it, but if you use too plaster that is too soft after drying you will encounter problems while painting your wall piece as the colours will get sucked into the material. Just annoying and demotivating.
Step 1:
Think about which kind of wall you want to create and make a sketch of it.
Try to find a shape that you like to create, take real life examples as reference if needed. Now take the architecture cardboard. The ones you can buy have different thickness and we recommand not taking the big ones. These used here were thick about one centimeter as far as I can remember and suggest.
Kurt signed his wall shape to both of the cardboard-parts and cut out each single piece with a cutter. Take care and don't hurt yourself.
Then he used superglue to put them together. You can already achieve a wall with one single piece of card board, but Kurt wanted a big column piece. Last, he glued a full wall of cardboard to one side to close the mold. Three pieces in the end.
While glueing take care that everything is glued properly or you will have a mess later on. Sadly I can not provide you with a photo of the basic form itself as this went missing somehow. Really, this is coming from deep out of the past.
Step 2:
Next, take a seperate bowl or plastic cup to mix the plaster with water like described on the plaster instruction. When mixed properly place the plaster into your form. You will recieve something that looks like this and after it is dry you can already start with carving your basic stones into the plaster.
Step 3:
As the mold that Kurt made just allowed him to carve on the walls front side he had to work on the other sides still to make it an authentic wall piece from all angles. For sure, if you only do one side of a wall you are fine with carving one side. If you are done with the carving you can carefully cut away the cardboard to set your wall piece free and bring it to your base. If your wall piece is heavy, like the one of Kurt, than we recommend to pin it to your base.
Step 4:
Take your time while carving and think about detail damage and detail rubble if the wall is meant to be old and aged. Such detail damage will bring a more interesting light situation to your paintwork later on. It already can be seen on this photo:
You can use Hirst-Art Parts or plaster rests to place some rubble on the ground.
Well, that's it. Have fun with carving your wall of choice.
Thanks to Kurt for his guest presence in this article.
Keep on happy basing!


Ohhh, that´s me on MV. I like :)
Yes, it is you :)
See you soon!
Wow its looking cool and I am really interested now to try my hand on this! Thank you for explaining the whole in an easier way.