


Hey all,
as my first article in the jungle,
I want to share a short report on how I built the - second - base for a 1/72 Ashigaru-yari from Zvezda. I write "second" because I first built a base I was quite happy with, but ruined it when I added resin water (more on that below). So, I had to build a second one - and I have to say I am much happier with that second one.

Anyway. In the beginning is the idea. I wanted to portray the Ashigaru standing guard over his master's Koi pond. This idea was on the one hand born from the pure fun of it; but it also had something to do with my fascination with resin water, which I wanted to practice a bit more. In designing bases, I always aim to develop a story first, asking myself "What is going on on the base? What is the story/mood/atmosphere I want to portray with my vignette?" All else follows from this.
In translating the story into the vignette, I follow basically three general principles:
First,
the base should capture and portray the most important aspect of a hopefully natural scene, condensed into a very limited piece of space - thus telling the story by giving the feeling as if the vignette was cut and lifted out of the world in one moment (that's one reason, for example, why I don't like stuff "sticking out" beyond the boundaries of my base; and why I like deep-black plinths and photographs of my vignettes before very black backgrounds).
Second,
the vignette should be as large as necessary for the viewer to understand what's going on, but as small as possible to create a scene as dynamic as possible! So, for most 1/72 minis (on foot; riders, of course, are a different matter), I found plinths with a base of 2x2cm and height of about 5cm perfect.
Third,
the base should use variance in all three dimensions, and should have as few parallel lines and right angles as possible. So, there should be variance in height, in depth and in angles on the horizontal (and possibly vertical) lines. For an early example where I experimented with that, see my "Feeder of Crows" Vignette.
Keeping these three general principles in mind, I started building the foundation for the Ashigaru's base. I started with a 2x2x2cm beech wood cube (my brother once gave me a whole shopping bag of beech wood plinths in different heights and sizes for Christmas) as the basis, and glued 2x5cm rectangular pieces of plastic sheet to the plinth's right and back side to form the foundation for the "stone and earth" (or rather: cork and bark) work that would follow.
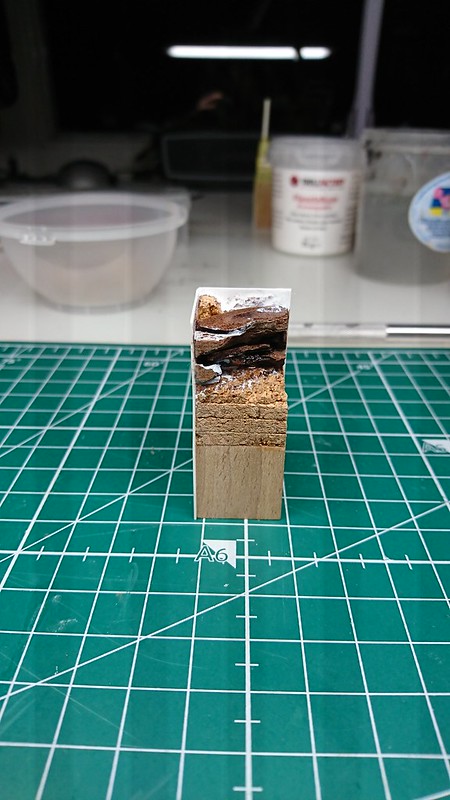
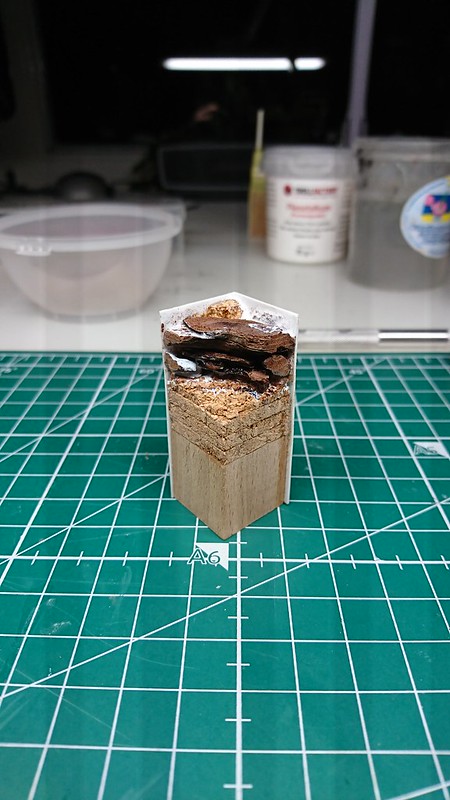
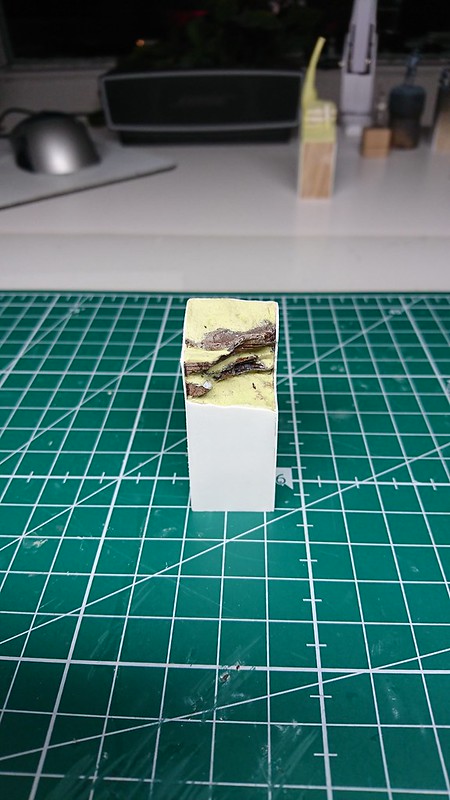
I then added four thin cork sheets (cut from cheap IKEA coasters) for more height and then irregularly destroyed the fourth cork layer to create a natural, rocky surface (which I didn't like too much, see below). I then cut and glued pine bark (bought cheaply and in bulk in a local flower boutique) on the cork base, to simulate rocks (pine bark is fantastic to simulate all kinds of rock and stone). I filled the back, between the bark and the sheet barriers, with some remains of the cork. And that's what it looked like after these first foundational steps (the white stuff is crystalized super glue):
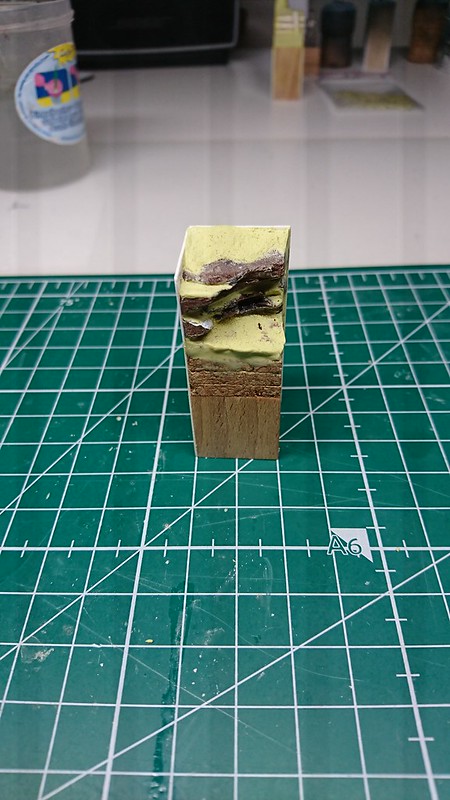
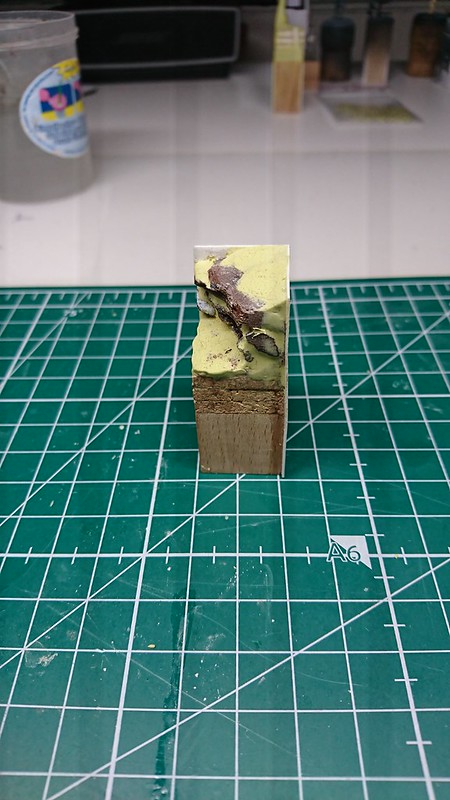
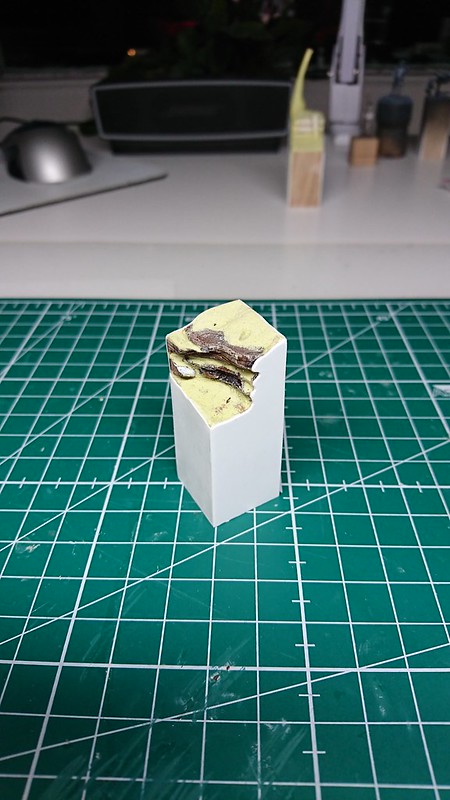
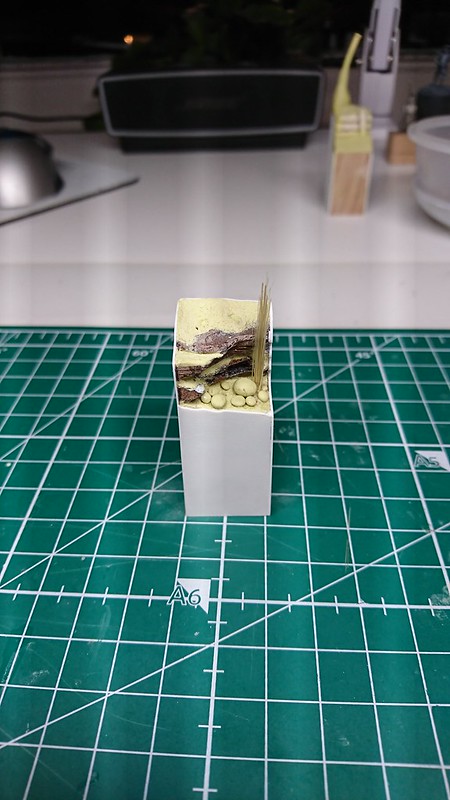
To fill the gaps and make the whole scene look more coherent, I added generous amounts of Milliput, which was spread over the floor (this would later become sand) and the top bark "rock" layer (which would then become moss/grass), and on/between rocks to enhance their looks (by feeling, this is not rocket science!):
What you can't see really well in the pictures is that I used a stiff-bristled brush in a stippling motion on the still un-cured Milliput that was supposed to be sand (pond-floor) and moss (on top of the rocks), to create more variance and some structure similar to coarse sand or moss. When finishing the stippling, I pushed the Ashigaru's feet into the Milliput, such that he would later look as if he would stand on soft ground.
I then sanded the edges and sides of the base to have a clean and flat surface and finished the foundational work by glueing plastic sheet to the remaining sides of the plinths. The sheets were pre-cut to approximate sizes, then glued - and after drying the final cuts were made such that the natural shape of the scene was reached:
I also added three or four very thin layers of water-PVA glue mix on the Milliput/cork/bark surfaces to seal tiny cracks that might be remaining and through which in later stages the resin water might sip through. That's what "killed" my first base: by its capillary action, the resin water was pulled into cracks and fissures in the cork not covered by Milliput and came out on top of the base - which of course meant that in the pond the water was too shallow...
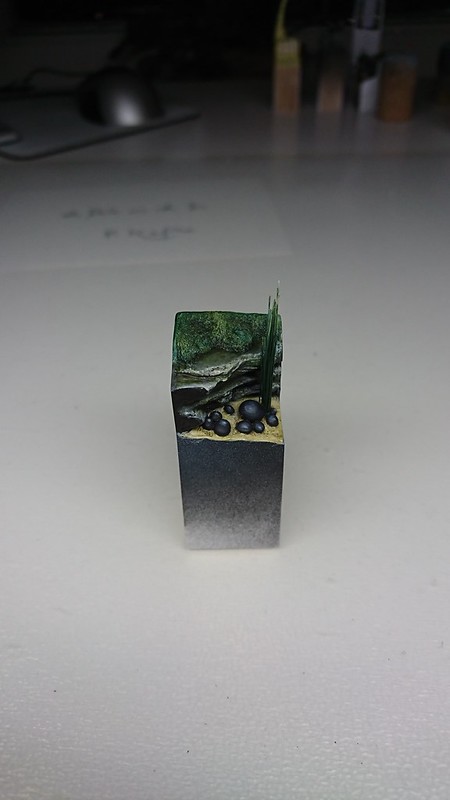
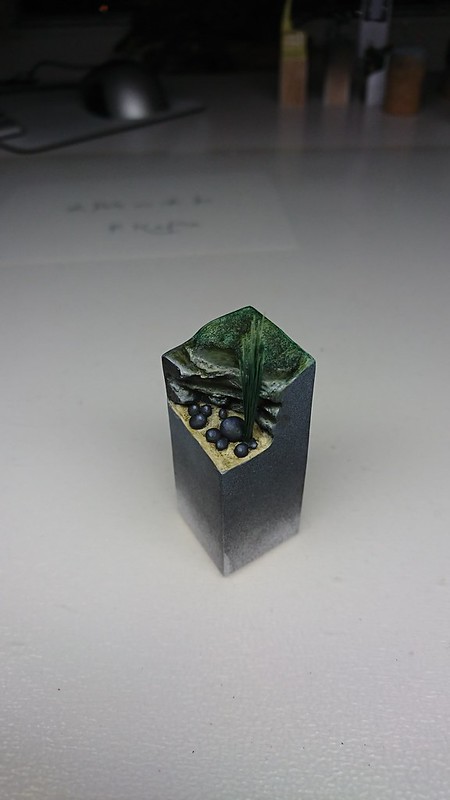
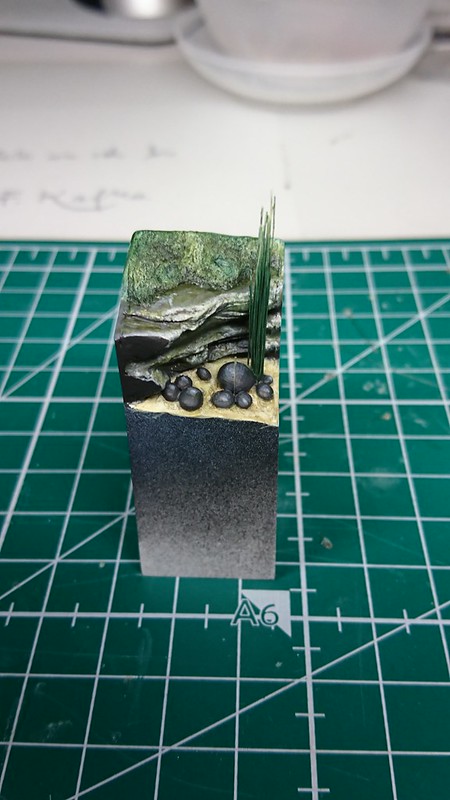
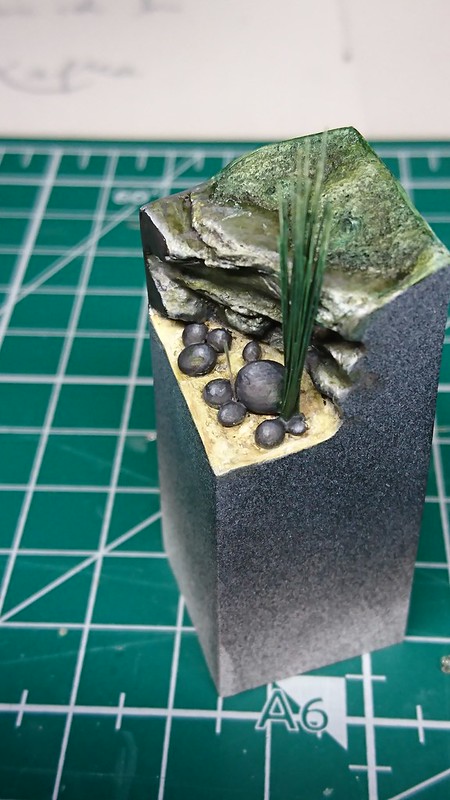
Then some first detail work commenced: adding stones (created earlier from Milliput remainders rolled into tiny balls and then flattened a little) and some reed. The importance here is, again, to think about the three general principles and create random-looking clusterings of the stones and vegetation.
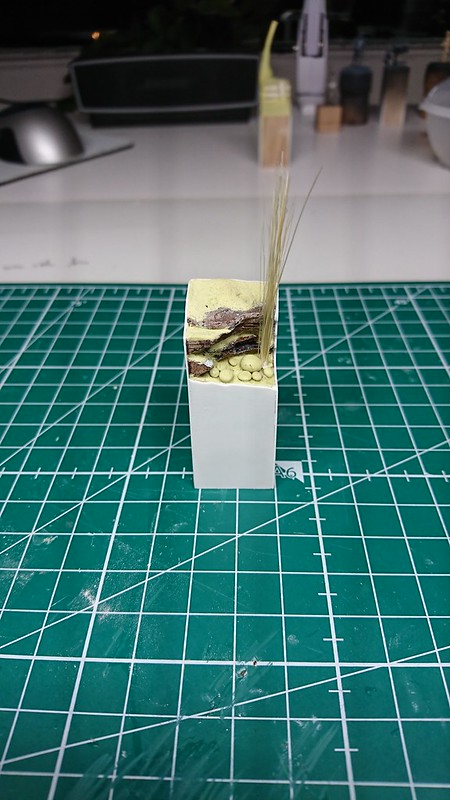
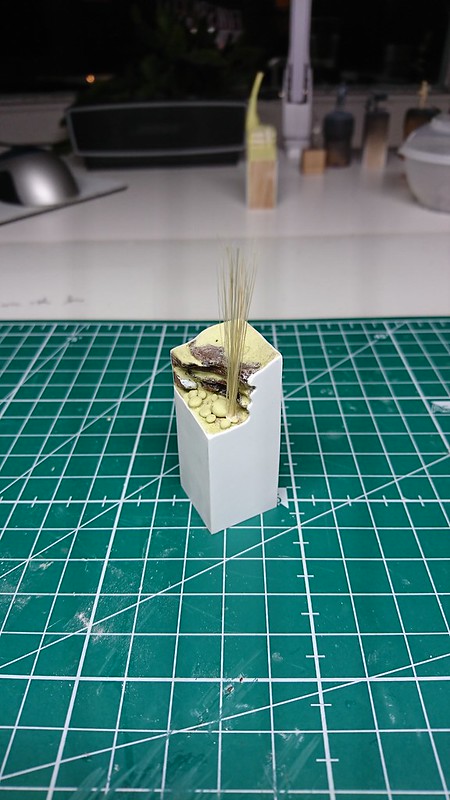
I then cut the reed to a "natural" length.
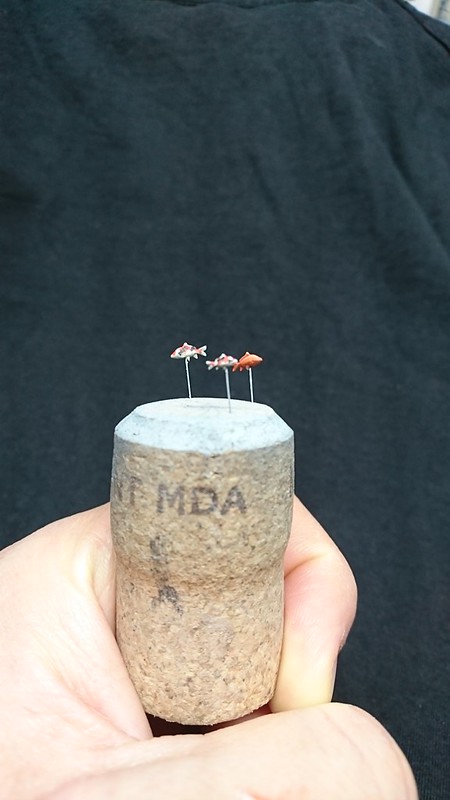
Well, then, I started on the fish. They are from the BUSCH small animals set (the animals are nominally in 1/87 scale; but they are also perfect for 1/72). I drilled holes into their bellies, pinned them on a cork using acupuncture needles and super-glue, primed them with Tamiya Light Grey Primer (that's what I had handy that day), and painted them using Vallejo Model Color Acrylics.
Then I primed and painted the base. For me, painting happens almost exclusively with Vallejo Model Color Acrylics; the only other brand I use regularly is Scale75 for inks and Army Painter for their washes. I always thin my paints on the palette (roughly one part water to two parts paint) and like adding a drop of AK Ultra Matte Varnish into the colors; I like the matte effect and how the colors' fluidity and properties change.
I did not take pics of the painting process, so here are pics of a rather advanced stage of painting the base:
I then very carefully drilled holes into the pond-floor (where I found it would make sense, always keeping the three general principles in mind) and glued very thin pieces of stretched transparent polystyrol sprue into the holes (you can see it on the next two pics if you look very closely) - on those the fish would then be glued.
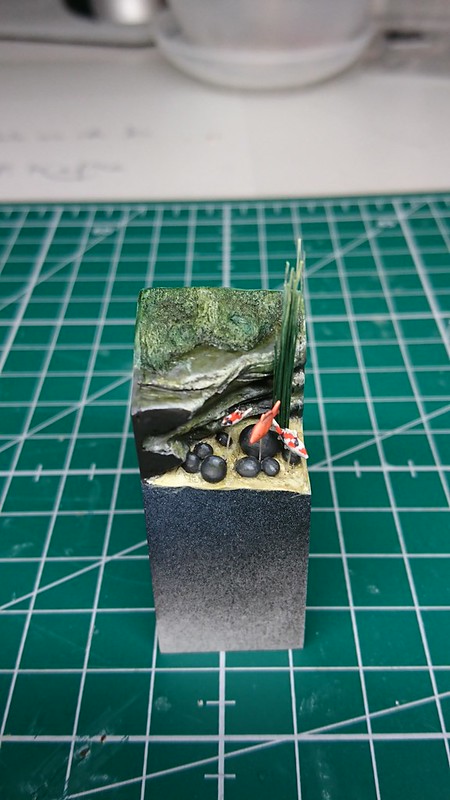
The next step was glueing the Ashigaru to the base (also making sure that his feet would not be "hovering" or there would be cracks between his feet and the moss; I often use very small amounts of Vallejo Plastic Putty to correct such small gaps on the miniature), and adding a few thin plants to further veil the transparent sticks on which the fish had been impaled:
And then it was time for the water effect. First, I created the boundaries for the pour by super-gluing transparent sheet to the sides and seeling everything with hot-glue. For this step and all other water-related topics, I learnt a lot from my jungle-brother Josua and his seminal 2k Water Tutorial.
And then the big experiment-with-no-return began. I prepared my stuff (AK Interactive 2K water; Vallejo environment effect Slimy Grime Light for tinting the water; syringes for the correct dosage of the two water components; a plastic shot glass for mixing the components, a pipette for the pouring; and a bowl of warm water). I carefully added the two components as per the instructions, added a tiny bit (!) of the grimy green color in it and mixed everything together slowly and carefully with the shot glass in the warm water. The warmth makes the water more fluid, which means that it can be easier stirred, that there will be less bubbles and that it will be easier poured.

And then I "poured" the water by using the pipette:
And then: I had to wait. I carefully put the vignette on my sideboard und put a drinking glass over it to ensure that no dust would ruin the surface.
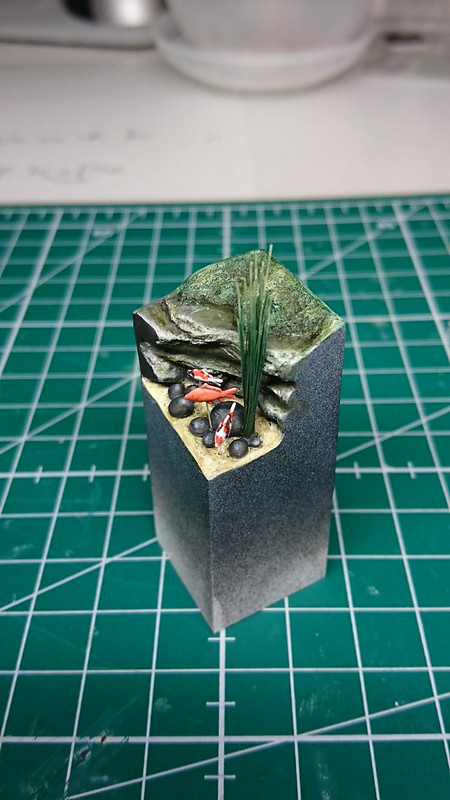
After roughly 36 hours under the glass, it was time for the final steps. After removing the barriers, I used a new scalpel blade carefully to cut those parts where the resin was pulled up along the edges of the barriers and then added (with gloss varnish) two water lilies on the water surface.
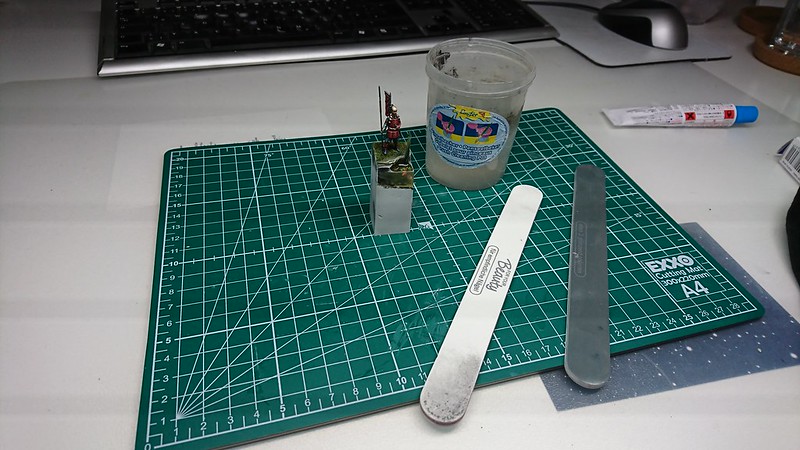
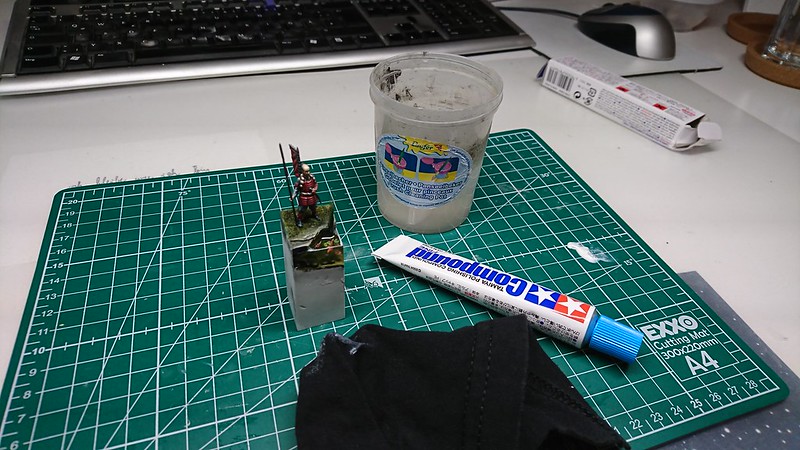
The next steps were the most grimy: wet-sanding the sides of the plinth and the resin water (I often use nail-files of different grits), polishing the resin using Tamiya polishing compound, and finally using two or three layers of AK Interactive's Gauzy Agent to restore the clear transparency of the resin:
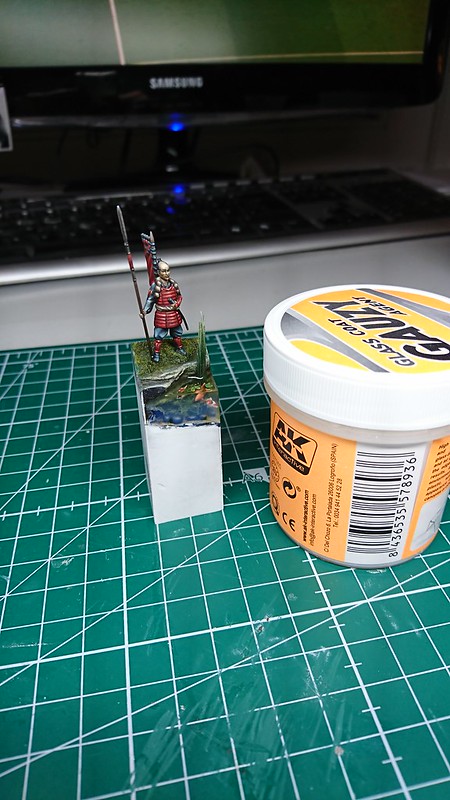
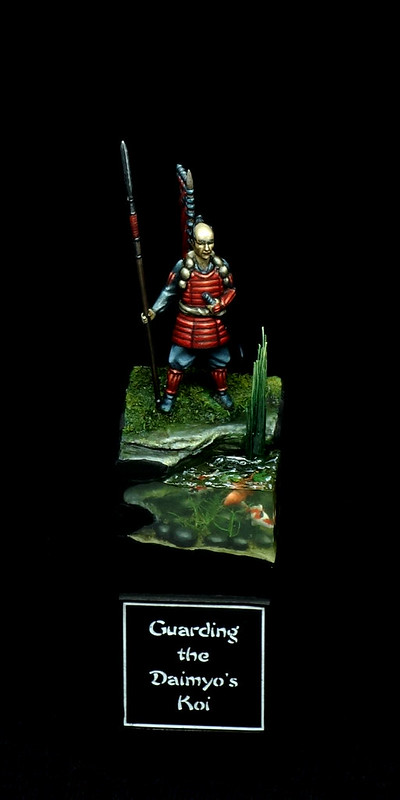
I finished the water by adding some random waves using Vallejo Water Textures (no pics, sorry). And finally, I painted the remainder of the plinth black, glued the plaque on it (made for me by Fredericus Rex) and took the final pictures (for more pics, please see the Ashigaru's Putty&Paint site):
So, I hope you enjoyed reading this. It was aimed at giving you a glimpse into my brain while I work on bases. Let me know if you have any questions.
D.
p.s.: this step-by-step tutorial was published first at Benno's Figure Forum
as my first article in the jungle,
I want to share a short report on how I built the - second - base for a 1/72 Ashigaru-yari from Zvezda. I write "second" because I first built a base I was quite happy with, but ruined it when I added resin water (more on that below). So, I had to build a second one - and I have to say I am much happier with that second one.

 |
| The Ashigaru, without his base. |
Anyway. In the beginning is the idea. I wanted to portray the Ashigaru standing guard over his master's Koi pond. This idea was on the one hand born from the pure fun of it; but it also had something to do with my fascination with resin water, which I wanted to practice a bit more. In designing bases, I always aim to develop a story first, asking myself "What is going on on the base? What is the story/mood/atmosphere I want to portray with my vignette?" All else follows from this.
In translating the story into the vignette, I follow basically three general principles:
First,
the base should capture and portray the most important aspect of a hopefully natural scene, condensed into a very limited piece of space - thus telling the story by giving the feeling as if the vignette was cut and lifted out of the world in one moment (that's one reason, for example, why I don't like stuff "sticking out" beyond the boundaries of my base; and why I like deep-black plinths and photographs of my vignettes before very black backgrounds).
Second,
the vignette should be as large as necessary for the viewer to understand what's going on, but as small as possible to create a scene as dynamic as possible! So, for most 1/72 minis (on foot; riders, of course, are a different matter), I found plinths with a base of 2x2cm and height of about 5cm perfect.
Third,
the base should use variance in all three dimensions, and should have as few parallel lines and right angles as possible. So, there should be variance in height, in depth and in angles on the horizontal (and possibly vertical) lines. For an early example where I experimented with that, see my "Feeder of Crows" Vignette.
Keeping these three general principles in mind, I started building the foundation for the Ashigaru's base. I started with a 2x2x2cm beech wood cube (my brother once gave me a whole shopping bag of beech wood plinths in different heights and sizes for Christmas) as the basis, and glued 2x5cm rectangular pieces of plastic sheet to the plinth's right and back side to form the foundation for the "stone and earth" (or rather: cork and bark) work that would follow.
I then added four thin cork sheets (cut from cheap IKEA coasters) for more height and then irregularly destroyed the fourth cork layer to create a natural, rocky surface (which I didn't like too much, see below). I then cut and glued pine bark (bought cheaply and in bulk in a local flower boutique) on the cork base, to simulate rocks (pine bark is fantastic to simulate all kinds of rock and stone). I filled the back, between the bark and the sheet barriers, with some remains of the cork. And that's what it looked like after these first foundational steps (the white stuff is crystalized super glue):
To fill the gaps and make the whole scene look more coherent, I added generous amounts of Milliput, which was spread over the floor (this would later become sand) and the top bark "rock" layer (which would then become moss/grass), and on/between rocks to enhance their looks (by feeling, this is not rocket science!):
What you can't see really well in the pictures is that I used a stiff-bristled brush in a stippling motion on the still un-cured Milliput that was supposed to be sand (pond-floor) and moss (on top of the rocks), to create more variance and some structure similar to coarse sand or moss. When finishing the stippling, I pushed the Ashigaru's feet into the Milliput, such that he would later look as if he would stand on soft ground.
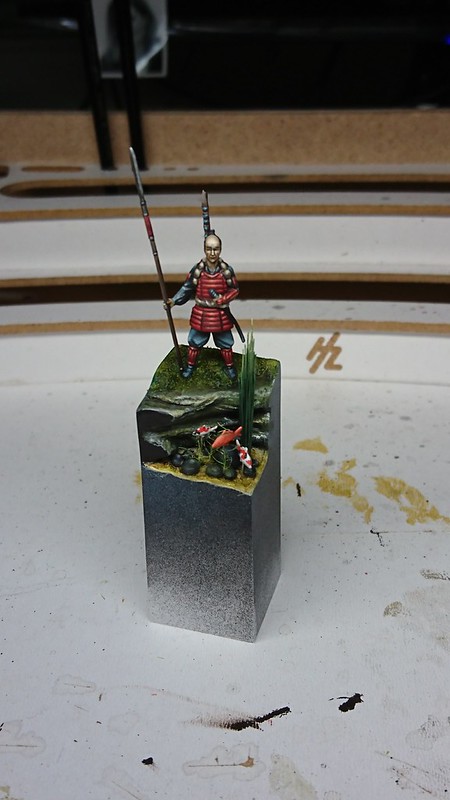
I then sanded the edges and sides of the base to have a clean and flat surface and finished the foundational work by glueing plastic sheet to the remaining sides of the plinths. The sheets were pre-cut to approximate sizes, then glued - and after drying the final cuts were made such that the natural shape of the scene was reached:
I also added three or four very thin layers of water-PVA glue mix on the Milliput/cork/bark surfaces to seal tiny cracks that might be remaining and through which in later stages the resin water might sip through. That's what "killed" my first base: by its capillary action, the resin water was pulled into cracks and fissures in the cork not covered by Milliput and came out on top of the base - which of course meant that in the pond the water was too shallow...
Then some first detail work commenced: adding stones (created earlier from Milliput remainders rolled into tiny balls and then flattened a little) and some reed. The importance here is, again, to think about the three general principles and create random-looking clusterings of the stones and vegetation.
I then cut the reed to a "natural" length.
Well, then, I started on the fish. They are from the BUSCH small animals set (the animals are nominally in 1/87 scale; but they are also perfect for 1/72). I drilled holes into their bellies, pinned them on a cork using acupuncture needles and super-glue, primed them with Tamiya Light Grey Primer (that's what I had handy that day), and painted them using Vallejo Model Color Acrylics.
Then I primed and painted the base. For me, painting happens almost exclusively with Vallejo Model Color Acrylics; the only other brand I use regularly is Scale75 for inks and Army Painter for their washes. I always thin my paints on the palette (roughly one part water to two parts paint) and like adding a drop of AK Ultra Matte Varnish into the colors; I like the matte effect and how the colors' fluidity and properties change.
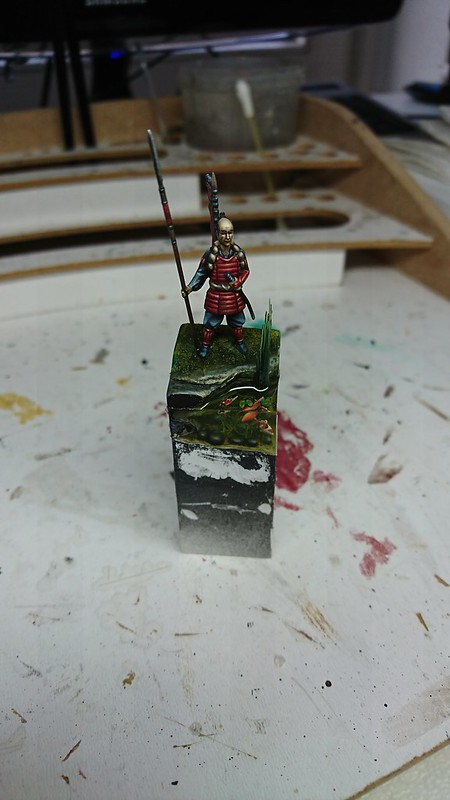
I did not take pics of the painting process, so here are pics of a rather advanced stage of painting the base:
I then very carefully drilled holes into the pond-floor (where I found it would make sense, always keeping the three general principles in mind) and glued very thin pieces of stretched transparent polystyrol sprue into the holes (you can see it on the next two pics if you look very closely) - on those the fish would then be glued.
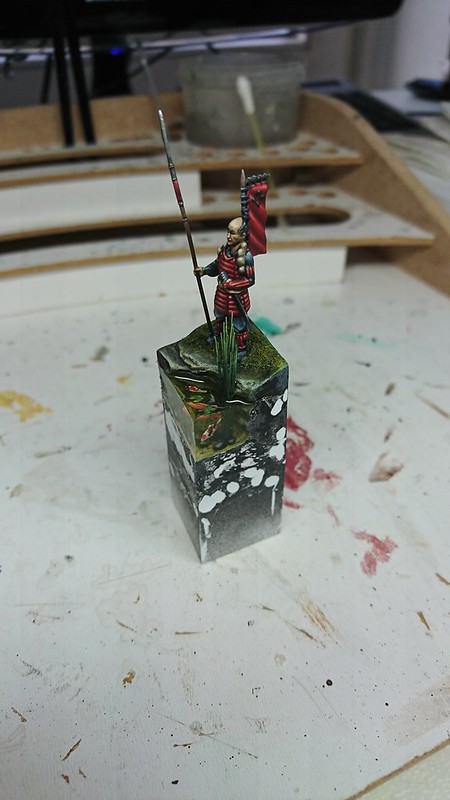
The next step was glueing the Ashigaru to the base (also making sure that his feet would not be "hovering" or there would be cracks between his feet and the moss; I often use very small amounts of Vallejo Plastic Putty to correct such small gaps on the miniature), and adding a few thin plants to further veil the transparent sticks on which the fish had been impaled:
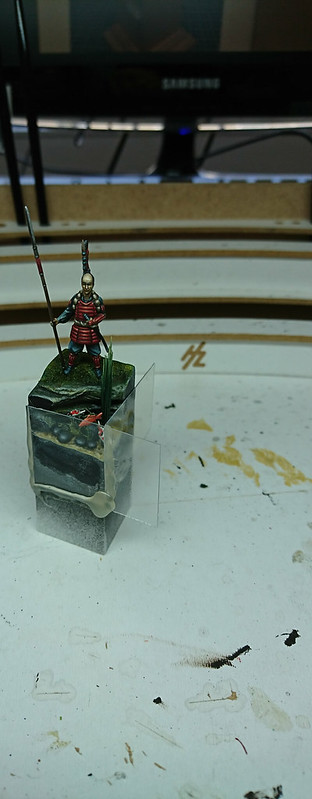
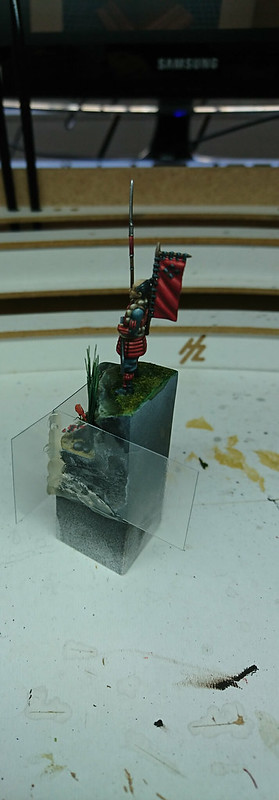
And then it was time for the water effect. First, I created the boundaries for the pour by super-gluing transparent sheet to the sides and seeling everything with hot-glue. For this step and all other water-related topics, I learnt a lot from my jungle-brother Josua and his seminal 2k Water Tutorial.
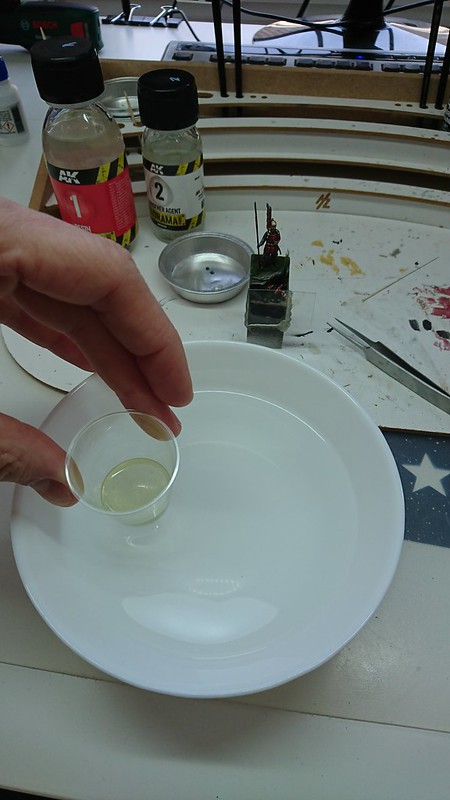
And then the big experiment-with-no-return began. I prepared my stuff (AK Interactive 2K water; Vallejo environment effect Slimy Grime Light for tinting the water; syringes for the correct dosage of the two water components; a plastic shot glass for mixing the components, a pipette for the pouring; and a bowl of warm water). I carefully added the two components as per the instructions, added a tiny bit (!) of the grimy green color in it and mixed everything together slowly and carefully with the shot glass in the warm water. The warmth makes the water more fluid, which means that it can be easier stirred, that there will be less bubbles and that it will be easier poured.
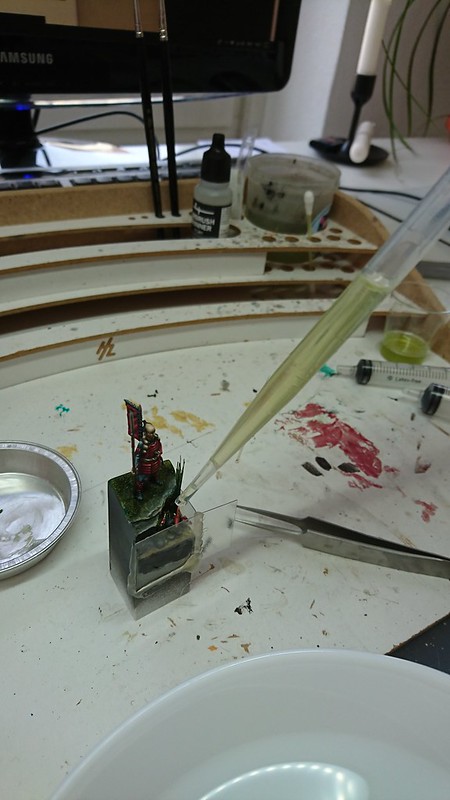
And then I "poured" the water by using the pipette:
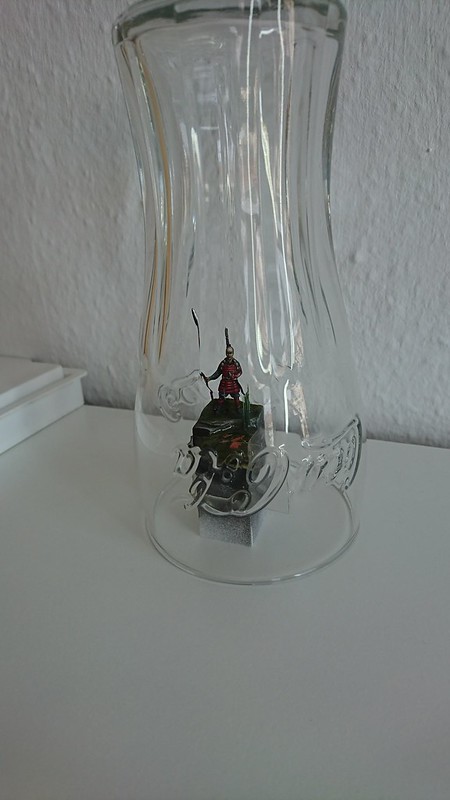
And then: I had to wait. I carefully put the vignette on my sideboard und put a drinking glass over it to ensure that no dust would ruin the surface.
After roughly 36 hours under the glass, it was time for the final steps. After removing the barriers, I used a new scalpel blade carefully to cut those parts where the resin was pulled up along the edges of the barriers and then added (with gloss varnish) two water lilies on the water surface.
The next steps were the most grimy: wet-sanding the sides of the plinth and the resin water (I often use nail-files of different grits), polishing the resin using Tamiya polishing compound, and finally using two or three layers of AK Interactive's Gauzy Agent to restore the clear transparency of the resin:
I finished the water by adding some random waves using Vallejo Water Textures (no pics, sorry). And finally, I painted the remainder of the plinth black, glued the plaque on it (made for me by Fredericus Rex) and took the final pictures (for more pics, please see the Ashigaru's Putty&Paint site):
So, I hope you enjoyed reading this. It was aimed at giving you a glimpse into my brain while I work on bases. Let me know if you have any questions.
D.
p.s.: this step-by-step tutorial was published first at Benno's Figure Forum


Post a Comment