 Hello again,
thanks for tuning in.
If you missed part one - check this link.
When I am done with all parts I will make a sum-up post and link it to the Article section of MV. Ok, here we go, part two is about the start of the painting process and believe me when I say this won't be easy to explain, but I hope you can follow me.
I know many of you are asking to see final photos of the diorama and I can promise they will come. In fact we were not able to do them in the week after the Games Day. Then I went for holidays for two weeks and the week after my holiday got me caught in Emails, more time at home and less time in the studio. Yet, the final photos are not done, but we have them on schedule. Believe me, it looks very strange if you look through a camera at this piece: You have no plan where to start ...
I have to study
Phil's great article series about taking photos more deeply!
Another fact is that Raffa and I are heading out to Hamburg this Thursday for two weekends of
BÄM² classes and we won't be at home or in the studio for twelve days. That means a) part 3 of the Step by Step will be written when we are home again and b) final photos won't be available until then as this is nothing that I want to do with stress and hectic. Sorry for that, but thanks for your patience. While the Internet does, normal, daily life doesn't care about if you won a Slayer Sword ;)
Everything should be handled with patience and good music!
Summary
...
6. Preparation before Painting
7. Priming and plans of Painting
8. Sketching the picture
9. Working on only four
10. Bringing the picture together
11. Don't forget to take a break and think
to be continued ...
6. Preparation before Painting
As told in part one I had some Marines that I planned to paint away from the base. So I rechecked their positions and prepared them final
(means ready for priming) on their working plinths.
I was happy how the PVC-glue and superglue mix turned out and added some more here and there. I was sure it will bring in some simple but interesting texture to the ground at the few spots you can see in the end
(they are really few, as the base consists of models).
Another point I did miss in part one was showing the check of the height. I did it so many times as the rules of Golden Demon said only 30 centimeters and I did not want to have the diorama disqualified because of 1 millimeter. Here is a shot that shows my first checks, still without the angel.
Next step was: I did cut away some PVC-superglue slime from the edges and took some time and sandpaper to clean the socket. The plinth should be ready for priming too. Then I had to take a brush and the pressure of my airbrush to clean all the models on the base, gna FIAL ... but happens.
Even I cleaned the masses of models from mould lines while I glued them to their spots, I took my time to recheck all around for even more of them
(I found the last one the night before Games Day). This took me hours, but every hour was well spent.
The Monstrum waiting for some primer ...
While I was closing in for the priming hot summer arrived at the outside and the temperature in our one-window-german-bunker-under-the-roof-studio increased. Thanks to Benedikt who helped me with his presence from losing my motivation at this point. It really was ugly hot, but it became worse :D
7. Priming and plans of Painting
I was not completly finished with building everything up when I decided to prime the diorama in its actual level of process. Those many colours from different plastic and some painted Tyranids made me go crazy so I primed the whole Diorama in black to recieve a mass effect. I still glued a model here and there in the upcoming progress but the biggest help for me at this point of work was seeing this mess as one unit, finally, all black.
I did not prime the black again with white as I usually do, because I was scared of throwing white at some places where I would not need it. The dark background of the black would help me after all if it might be impossible to reach a specific area. If I don't reach it with my brush, it is hard to see it, but it would be better if that spot is black instead of white.
8. Sketching the picture
Ok, now it was time for some prayers to the gods.
I had to start painting this massive beast. My thoughts: Looking at the piece I knew I am not painting a single figure for Games Day. What the hell have I thought by glueing this madness together? Were my friends right by saying this is impossible to paint? I am in way too deep now to stop, so let's get it on like I love to paint figures: Not the typical way of layering over and over again, more painting a picture on a canvas and working from rough to detail.
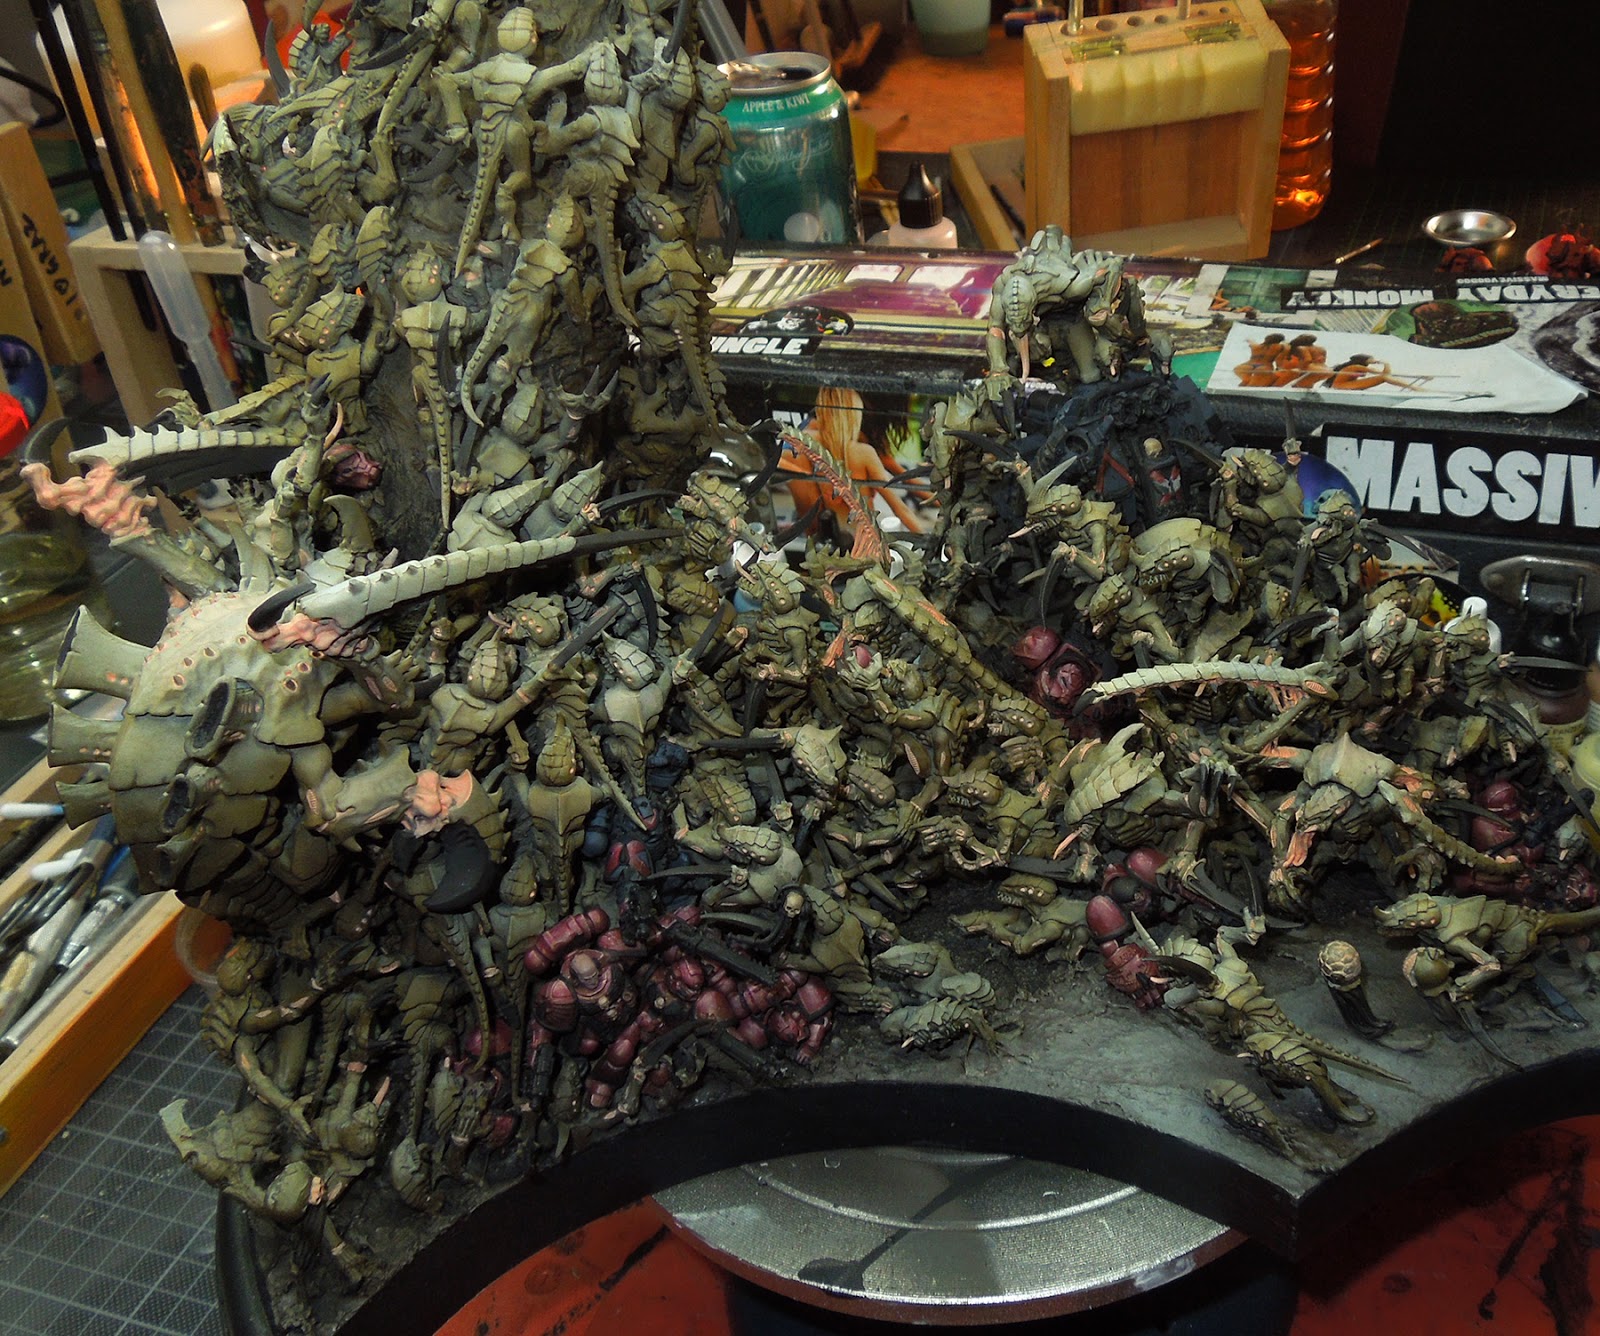
I was lucky that the heat in the studio melted away my fear so I just did it and started to basecoat the whole scene with the use of my airbrush. Colour used was VMC US Olive Drab. I had to refill the airbrush several times and I might remember changing the tone a little bit here and there because of a feeling from my belly. If you look close there is already a minor change in the tones brightness going fron right (dark) to the left (bright). It is not very important to mention that as I am still not far in my progress ... I just got confused, alsways saying to myself: this is a painting on a canvas, don't worry all will be fine in the end ...
US Olive Drab everywhere ....
Still not sure were the journey would take me I decided to throw a little light on my "picture" and used Citadel Snakebite Leather, a drop of white and some VMC Sunny Skintone into my basic colour and used the airbrush a second time. Again I had to refill it all the time, annoying it was, no goal in sight. I mainly followed to bright/dark situation I created during the first step and made it more intense.
It was now time to guide my painting by adding different colours. For example I choose a dark red tone to just see the Marines in the masses. I used also some black basic colour for the black armour parts on the marines and painted a basic skin tone to the faces of the marines. I did paint some bone parts in their basic colour too and drybrushed the ground a little more colder by using some blueish grey.
It is still sketching what I am doing here. You also see the colours change a little bit, this is because of the daytime change, different light in the studio while I took those photos, sorry for this...
1, 2, 3, 4, 5, 6, 7, 8 ... hey but I already had my fun with some highlights on that skull ...
Progress was slow and I knew I was just at the early start. So I had to sit down for a moment and look at it from the far to catch a breath again and regain powers. Lucky me I did not care about the thermometer anymore, I learned to ignore the heat wave I was sitting in ...
You can see the greatest help I had during the project in this picture: A rotary disc I did buy a while ago. Never found a proper use for it. This time I did.
With new energies I head for the Marines and Tyranids to paint more basic tone of black. I choose Citadel Dwarf Flesh for the fleshy Tyranid areas as a basic tone. Don't ask me why, it was just decided by the gods of colour. Meanwhile I did paint first gentle highlights on the red armour parts ...
For me this was the start of the picture and I saw a direction were it all may lead. I already hated The Tyranids for painting all those claws in black. There were many and for sure I did miss some which I found from time to time and painted. The same with the Dwarf Flesh parts. Really should have done more Marines and less Aliens ...
Next I did choose to use a dark brown Oil colour to paint the alien armour parts. Why I was using Oil colours at this stage I can not tell but it helped me later, so I was lucky again. The picture grew more and more. One thing: Don't think the several steps went by fast, they took days already at this stage of progress. The blacks did recieve a gentle work on the highlights with some added Space Wolves Grey to it.
For me the whole canvas so far was too brownish. So I took the airbrush to bring in a gentle green film. No idea where this would lead me but I felt in my belly again that it was needed:
9. Working on only four
At this point I felt a little lost as I now did see the overall picture but got horrible shocked by the amount of work waiting for me when it comes to detail work later on. I got a little ... uhm ... I need a break. I sat down and wrote a progress bar list that helped me to see the progress on different areas of the figures:
It works pretty simple. When I did spent some time at a specific area and finished a step I mark a box of the topic. This helps to see where I am when it comes to the overall progress. This list was pretty detailed and I did not feel very comfortable after some days and changed it again, but more info about the second list soon.
Let's get back: I decided to take the four single Marines I have prepared and started to paint them. Additional cool side effect the Oil colour could dry for one or two days. The plan was to paint the Marines with more patience then the big piece to make them stand out in the end and to have a guide how far I can go with all the figures. The airbrush was used to bring on some basic reds to the Marines. This felt really awesome, only working on four models instead of a mountain of figures.
While working on those brothers I soon realized that the reds I did paint on the Marines on base so far were not the same. I took my time to bring it up to a similiar red tone while working on the four.

I then took my brush to spent some more hours on those brothers. I still had in the back of my mind that I not should overdo them (paint them like a single competition model) because later on this might break my neck when it comes to make them fit all together with the base models. So after some days of work I leaned back and took a look ...
Band of WIP-Brothers ...
For this stage of progress they were ok. Not finished yet but ok. I knew about the legs which would be not very visible. It was now time to check for some details on them.
The Band again after some more hours ... and still not finished.
On the left oyu can see a banner that was prepared ...
10. Bringing the picture together
I put the four away for a while again, knowing they were still not finished but I had to keep an eye to the overall picture. I decided to head back to the big base and paint some little more work here and there on the marines, started to highlight the greenish alien skin but mainly I had my fun with painting the blacks. I really enjoyed working the black with adding more and more Space Wolves grey to the mix to bring it up to its highlights. Worked on the basic of the gold areas, other metals, skull parts, etc. and ... well, yeah tried to keep the overall picture together by spending hour after hour ...

I also took my time and fingers to gently rip over the oil colour areas on the alien armour. Removing the oil colour brought back the brighter area beneath. It worked best on the edges I guess, but I guess I waited to long and should have done it earlier You can see the result best at the front Tyranid Warrior's head plate, I guess.
I felt the need to take the four off from their work plinths and put them to the picture to get a better look on the mass picture while they were standing at their place. Just took two here but I was happy to see that the reds were closing in to a similiar reds with the base marines. They were not glued just placed and I took them off again. Oh well, I did paint the teetch of the Aliens in this step too with a basic tone and believe me when I say this was no fun ... And for the fun of this stage of work I worked a little bit on the big Carnifex ...
 11. Don't forget to take a break and think
In fact at this point I sat down again and made some thoughts: "Man, this takes all my energies and I am not really far yet. I am ok with my progress as I can see how every hour spent develops the picture and luckily there is still a good amount of time ahead of me. The heat was melting my brain and the airbrush thinner smell made me go crazy, but I was in a happy mood when I looked on what I had achieved so far.
A wet towel was my best friend everyday ... this kept my head kind of cool.
I just did not like the progress bar list I have made earlier. It was too detailed. It would work for a unit of five but not for this monster here. So I switched and made it more simple:
One day I did put it all back in my cabinet and I really like what I saw. The yellow lamp from my cabinet threw a cool light situation on top of the mountain of bodies. I thought about painting this light soon and found my title for the project ...
So far, from part two.
I hope you like it and can still follow my thoughts. I am a little sad that I don't find time to write on the Step by Step for the next twelve days, but I will be back from our classes in Hamburg, promised.
The next part shows the picture closing in and maybe I will be already able to show some of the detail work I that I have planned for part four. We'll see ... so far when looking back at the process of the project I felt that I was close to reach half time. That is what I guessed at this moment, but that was a failure. Most of the work was still ahead of me ... but let's see what happens in the next part when it comes to a big break in of motivation caused of the lack of energies and a strong input from the outside that kept me going further!
Lucky me I found a perfect song for working on this project.
Let me know what you think and let me know your questions if you got some. I would be happy to answer your thoughts ...
Keep on happy painting!
Best Wishes
Roman


.jpg)


