


posted by Roman, Jarhead, kong

Hiho.
This time it's me again trying to tell and explain some of my lately made experiences with Oil Paint.
This topic is not easy to catch and i was collecting material for this article about the last 3~4 months. In the end i hope i can give some of you a helping hand with the words following.
Here comes a little overview that might guide you through the article as i tried to order my thoughts, only you in the end can tell if i achieved it:
1. Introduction
2. Material and Equipment
3. Basic Use of Oil Colours
4. Mixing / Oil Colours
5. Glazing with Oil Colours
6. Final Thoughts + 17 Minutes video of further Explanation !!
Let's start right off - i just inform you that i will write this article day by day not at once. So my mood could change during the article from euphoric to melancolic as everyday has its moments. Also i want to let you know that Max the Maxican will bring up his oil experiences in form of an article up to the jungle too. Thanks for that Monkey bro'! Music if you like!

For a long time i did not use Oil colours for Miniature Painting, i never thought of it.
I was happy with painting with my well known acrylics and somehow learnt by training and painting all the time how to use those and what to use them for. Oil was never really an option as i just heard rumors that it is a completly different method during the process of painting. I have to be honest, i never really liked painting Oil in the schools i have visited years ago, i was mainly painting with acrylics and was happy that i did not have to change something i like. You know how it is - walking in circle keeps the horizon far away.
But on the other hand I also consider myself as a person who is hungry to learn - without learning and exploring the world would be a very dark place or even darker. Imagine what the world would look like without fire the humans invented a thousand years ago, there would be no BBQ nowadays for example. So i started to try with Oil as i heard many things about it, but always failed to try. The Exploration group was also with the help of my friend Raffa, who learnt with me or I with him in exchange chats of our experience. I did start it from the heart with massive painting as this is the place where it all sleeps. I did not read much about it during the process of learning. I just did and did and listen to hints and tips from others and so far i have learnt that Oil is a beautiful medium to work with, it works damn fine on Miniatures and is the perfect match when combinated with acrylic painting.
As my brain was collecting experiences during the last months and it is now time to write them down i want to excuse myself if there is maybe a problem with the "thought" i have and that it is not easy to understand, written down to words. From the soulswinging brush moment into the brain and from it pressed to words.
Please feel free to ask and ask and ask and if you this article could help you, please feel free to say thanks via the donation button.

When it comes to painting Oil there are several different things needed, some really must have. I will try to tell you now what you need, maybe in your country the brand is different or you won't get exactly the same product but in the end it will work out - i just can tell you what experiences i have won.
First, you don't need water to paint
If you are intrested in the deep explanation on how oil paint works please read here at Wikipidia.
For the use to thin Oil paint we are using so called white spirit, a non-smelling turpentine alternate. You can use Terpentine too but it smells like hell and you'll get high very fast and maybe very ill. I have heard rumors of some italian friend that you can also use pure essence of Petrolium to thin your Oil Paint. The white spirit we use is from the brand "Lukas" and can be bought in several different seized bottles. It is also the medium to clean your brush after painting with Oil. For a painting session we use it in small hard liquor plastic beakers, which are cheap and can be bought in every casual supermarket.

Always make sure you got your "Oil-Brush" when painting with oil. If you hit your Oil colours with water somehow for example a rest in the used acrylic brush you are not able to paint well. Chemicly water and oil are no good friends and I invite you to do a little testing at an unimportant piece of plastic to see what i mean.
Second, you will need Oil colours
I had my first contact with an Oil colour at Raffa's as he did buy his first row for testing. After this i bought my own. Here is a shot of my first row i did buy. Different brands and as i was mainly up to explore with painting skin, many skin tones.

After some weeks of testing my collection grew and is ever growing since then. There are so many different oil paints that i could go crazy, but i do it slow and easy as always. I lately bought a very cheap set of oil colours, in such a 1 Coin store and i did get 12 small tubes of "fine oil colours" for only 2.95 €. After testing i can say that i rather pay a bit more for my oil colours but have good quality products - i was not very please. You don't need to get much colours for a good start as Oil paint is great to mix.

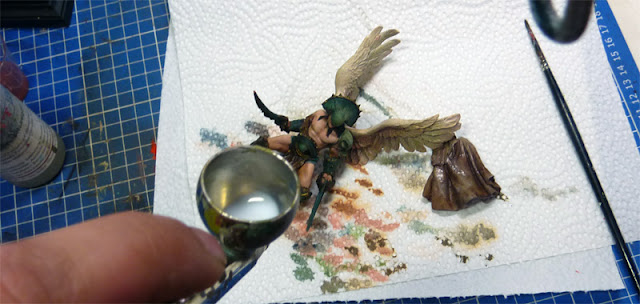
Third, you need a glossy underground to mix it all up
You might recognize the photos beside the colours in the upper pictures, for sure in the last one because of the overall composition and motive. You will need a glossy underground to mix and thin your oil colours on. Raffa for example is usinf an old flag he found some days ago as palette. Before he was also used to mix it up to photos. A little tip if you use photos is to use some pictures that you might be inspired by - for me this always gives the moment of using a new one something magical. Just hit your underground with the paint you want to use, straight out of the tube.


Sometimes it can happen that your Oil colour spits out a big blob when bringing it to your palette. Try to take be careful. Sometimes it also happens that your oil colour spits out colour with a big amount of oil - you can see this on my palette too sometimes - it is the oily stuff that surrounds the colour. If you hit some of this by accident and paint upon your miniature your area will be very shiny for a long time. You can avoid shinyness when painting with Oil Paint by distract the Paint Pigments from the Oil. Just hit a paper with it and you can paint very matte without an oily film. Now wait a moment /about 5 Minutes) and the Oil will be sucked up by the paper. You can still use the colour pigments by using White Spirit.

Brushes
You will for sure need brushes. I would recommand not using the best one you got for your first testings. I came out to need 2 brushes after a while one to put the colour where i want it with a good tip and one for the massage (more to this later on). I have also explored that a brush doesn't need to be a casual brush as i was working my way over some big tentacles with the use of a sponge from a blister (more to this later on). Bad photo following now, without the tip of the right brush - sorryio:

Fifth, additional equipment and summary
Oil colours need to dry over several days, when not influanced. You can fasten this process by using different methods, therefor you could need additional equipment. Also equipment will be listed that is just for your personal need, maybe.
- A furnace for baking the oil colour (more to this later on)
- A blow-dryer for fast and quick drying (will not be fixed, it's just for the moment, more to this later on)
- Airbrush
- Matte Varnish
- water
- tissues
- good music
- good mood
- bananas
Summed up, here comes the upper stuff again:
- White Spirit, Terpentine
- Oil Colours
- Brushes

I will now try to explain simple basics that you need to know when starting with oil colours, in fact how to use them and you will quickly smell where the difference is to Acrylic colours. First, Oil colours smell. They don't smell bad or good, they just smell, but please make your own impression of it.
As i told you i put my Oil colours on a glossy underground, mainly - there are some variations that i'll explain later on. Ok, all oil colours you need get applied to the photo or whatever you use. Here comes a great sketch on how i use Oil colours. Using the White Spirit first to make the brush wet - with this i now can mix up my oil paint on the photo. Using more White Spirit will thin the colour to glazes or work with thick colour (more to this later on). I would not recommand using Oil Paint unthinned, it is very sticky and not easy to handle, also it will leave your painted area very rough and the look very poor.
Most time, before i go at the model itself i hit a tissue to make most of the wetness dissapear out of the brush.


It might all look very wet, but as soon as the White Spirit dries it is getting matte again - so i was just out for hunting experience here and while working on the first steps, findind a concept it is not that important to do the cleanest work, this can be done later on. You have it much easier - in this article you may find tons of hints and tips that are waiting for you to try and learn from it. So up above it was only some testing around, with this playing around intensed in the next projects i found out the following intresting things you can use to fasten your oil experiences:


Another example of hitting a spot with strong oil and gently rubbing it in, first photo are the berserk dots, second photo is the look you can achieve with soft gentle rubbing. You can set your colour much more easier and get a faster goal in colour transitions with oil colours - that is my oppinion that i got from painting with both, acrylic and oil:


With Oil Colours you really can say put it where you want it and rubb it in. You can do whatever you like and if it doesn't make you happy at all you still can use white spirit to bring it all down again.
Oil colour can be used as a glaze to do some weathering:


When glazing with Oil colours it helps me a lot to have a tissue where i make a little test of the glaze and its degree of dilution. What you see is what you get. Before i went at the figure with glazes i did use the blow dryer and airbrush method to make it all dry and ready to be glazed on as i did paint some oil at the skin already:


Final Thoughts
As i have learned by planning such big article over time to collect experience to share i have to admit that this isn't easy. I came to the point where you should be introduced to the Use of Oil paint - this article is nothing more - just an introduction. It will grow by other upcoming articles and so on - but still the teacher soul inside my chest doesn't feel satisfied. For me it all sounds weird as i was sitting way too long in front of this article.
I have tried to summ it all up with a video. It is very big, around 17 minutes but it explains it a bit more in a more logical order, maybe. Sorry for the bad music, youtube free songs aren't the best when it comes to this video length. Enjoy in HD and make sure to read the article first or beside to get all the information that i am trying to tell ...
I am looking forward to your feedback and looking forward to the step by step of the Maxican where his explanations will for sure add big quality in understanding to this article here.
Best Wishes
Roman
Edit by Roman: If you are interested in painting more with Oil there is also Andrea's way available - both ways work, read, try and find your own :)

Hiho.
This time it's me again trying to tell and explain some of my lately made experiences with Oil Paint.
This topic is not easy to catch and i was collecting material for this article about the last 3~4 months. In the end i hope i can give some of you a helping hand with the words following.
Here comes a little overview that might guide you through the article as i tried to order my thoughts, only you in the end can tell if i achieved it:
1. Introduction
2. Material and Equipment
3. Basic Use of Oil Colours
4. Mixing / Oil Colours
5. Glazing with Oil Colours
6. Final Thoughts + 17 Minutes video of further Explanation !!
Let's start right off - i just inform you that i will write this article day by day not at once. So my mood could change during the article from euphoric to melancolic as everyday has its moments. Also i want to let you know that Max the Maxican will bring up his oil experiences in form of an article up to the jungle too. Thanks for that Monkey bro'! Music if you like!

For a long time i did not use Oil colours for Miniature Painting, i never thought of it.
I was happy with painting with my well known acrylics and somehow learnt by training and painting all the time how to use those and what to use them for. Oil was never really an option as i just heard rumors that it is a completly different method during the process of painting. I have to be honest, i never really liked painting Oil in the schools i have visited years ago, i was mainly painting with acrylics and was happy that i did not have to change something i like. You know how it is - walking in circle keeps the horizon far away.
But on the other hand I also consider myself as a person who is hungry to learn - without learning and exploring the world would be a very dark place or even darker. Imagine what the world would look like without fire the humans invented a thousand years ago, there would be no BBQ nowadays for example. So i started to try with Oil as i heard many things about it, but always failed to try. The Exploration group was also with the help of my friend Raffa, who learnt with me or I with him in exchange chats of our experience. I did start it from the heart with massive painting as this is the place where it all sleeps. I did not read much about it during the process of learning. I just did and did and listen to hints and tips from others and so far i have learnt that Oil is a beautiful medium to work with, it works damn fine on Miniatures and is the perfect match when combinated with acrylic painting.
As my brain was collecting experiences during the last months and it is now time to write them down i want to excuse myself if there is maybe a problem with the "thought" i have and that it is not easy to understand, written down to words. From the soulswinging brush moment into the brain and from it pressed to words.
Please feel free to ask and ask and ask and if you this article could help you, please feel free to say thanks via the donation button.

When it comes to painting Oil there are several different things needed, some really must have. I will try to tell you now what you need, maybe in your country the brand is different or you won't get exactly the same product but in the end it will work out - i just can tell you what experiences i have won.
First, you don't need water to paint
If you are intrested in the deep explanation on how oil paint works please read here at Wikipidia.
For the use to thin Oil paint we are using so called white spirit, a non-smelling turpentine alternate. You can use Terpentine too but it smells like hell and you'll get high very fast and maybe very ill. I have heard rumors of some italian friend that you can also use pure essence of Petrolium to thin your Oil Paint. The white spirit we use is from the brand "Lukas" and can be bought in several different seized bottles. It is also the medium to clean your brush after painting with Oil. For a painting session we use it in small hard liquor plastic beakers, which are cheap and can be bought in every casual supermarket.

Always make sure you got your "Oil-Brush" when painting with oil. If you hit your Oil colours with water somehow for example a rest in the used acrylic brush you are not able to paint well. Chemicly water and oil are no good friends and I invite you to do a little testing at an unimportant piece of plastic to see what i mean.
Second, you will need Oil colours
I had my first contact with an Oil colour at Raffa's as he did buy his first row for testing. After this i bought my own. Here is a shot of my first row i did buy. Different brands and as i was mainly up to explore with painting skin, many skin tones.

After some weeks of testing my collection grew and is ever growing since then. There are so many different oil paints that i could go crazy, but i do it slow and easy as always. I lately bought a very cheap set of oil colours, in such a 1 Coin store and i did get 12 small tubes of "fine oil colours" for only 2.95 €. After testing i can say that i rather pay a bit more for my oil colours but have good quality products - i was not very please. You don't need to get much colours for a good start as Oil paint is great to mix.

Third, you need a glossy underground to mix it all up
You might recognize the photos beside the colours in the upper pictures, for sure in the last one because of the overall composition and motive. You will need a glossy underground to mix and thin your oil colours on. Raffa for example is usinf an old flag he found some days ago as palette. Before he was also used to mix it up to photos. A little tip if you use photos is to use some pictures that you might be inspired by - for me this always gives the moment of using a new one something magical. Just hit your underground with the paint you want to use, straight out of the tube.


Sometimes it can happen that your Oil colour spits out a big blob when bringing it to your palette. Try to take be careful. Sometimes it also happens that your oil colour spits out colour with a big amount of oil - you can see this on my palette too sometimes - it is the oily stuff that surrounds the colour. If you hit some of this by accident and paint upon your miniature your area will be very shiny for a long time. You can avoid shinyness when painting with Oil Paint by distract the Paint Pigments from the Oil. Just hit a paper with it and you can paint very matte without an oily film. Now wait a moment /about 5 Minutes) and the Oil will be sucked up by the paper. You can still use the colour pigments by using White Spirit.

Brushes
You will for sure need brushes. I would recommand not using the best one you got for your first testings. I came out to need 2 brushes after a while one to put the colour where i want it with a good tip and one for the massage (more to this later on). I have also explored that a brush doesn't need to be a casual brush as i was working my way over some big tentacles with the use of a sponge from a blister (more to this later on). Bad photo following now, without the tip of the right brush - sorryio:

Fifth, additional equipment and summary
Oil colours need to dry over several days, when not influanced. You can fasten this process by using different methods, therefor you could need additional equipment. Also equipment will be listed that is just for your personal need, maybe.
- A furnace for baking the oil colour (more to this later on)
- A blow-dryer for fast and quick drying (will not be fixed, it's just for the moment, more to this later on)
- Airbrush
- Matte Varnish
- water
- tissues
- good music
- good mood
- bananas
Summed up, here comes the upper stuff again:
- White Spirit, Terpentine
- Oil Colours
- Brushes

I will now try to explain simple basics that you need to know when starting with oil colours, in fact how to use them and you will quickly smell where the difference is to Acrylic colours. First, Oil colours smell. They don't smell bad or good, they just smell, but please make your own impression of it.
As i told you i put my Oil colours on a glossy underground, mainly - there are some variations that i'll explain later on. Ok, all oil colours you need get applied to the photo or whatever you use. Here comes a great sketch on how i use Oil colours. Using the White Spirit first to make the brush wet - with this i now can mix up my oil paint on the photo. Using more White Spirit will thin the colour to glazes or work with thick colour (more to this later on). I would not recommand using Oil Paint unthinned, it is very sticky and not easy to handle, also it will leave your painted area very rough and the look very poor.
Most time, before i go at the model itself i hit a tissue to make most of the wetness dissapear out of the brush.

For mixing up i use an old brush, which whom i mix up my colours and do rough basic paintwork - you can see it in picture above. I can tell that my first steps with Oil really have been try and error. I've checked how to handle the colours and mainly i tried my experience start on bases or on some big areas, for example my first mostly chaotic go was at the Schell bust, on an airbrushed acrlyic bright basic with blue and brown oil paint. Take a look on my first try to see how an experiment can look like during the process - i did start with a very bright acrylic basic tone.


It might all look very wet, but as soon as the White Spirit dries it is getting matte again - so i was just out for hunting experience here and while working on the first steps, findind a concept it is not that important to do the cleanest work, this can be done later on. You have it much easier - in this article you may find tons of hints and tips that are waiting for you to try and learn from it. So up above it was only some testing around, with this playing around intensed in the next projects i found out the following intresting things you can use to fasten your oil experiences:
- I prime as usual.
- Acrylic Undercoat is important. Should be close to your main colour you will use for the area.
- You can mix up oil colours on top of it.
- Oil colour needs 3~4 days to dry at room air. You can fasten the process by using a) a hair blow dryer first to make it all dry (not really but for the eye) followed by using the airbrush and a mix of matte varnish and water or b) put it in the oven for 30 ~60 minutes (no plastic, Resin at 50°, White Metal at 60°~90°). Make sure you go check in between to make sure nothing is wounderable to the heat. You now can paint again on the surfaces.
- Make sure you don't use Acrylic on top of the Oil as it can break during the years. Put the fatty colour on top of it all to close the surface. The option a) with matte varnish seals it too so you can paint with acrylic on it.
- You can mix up Oil colour easily in 2 ways. Bring it up to an area as you like, midtone, shadow colour and light colour and then take a brush and mix it together wet in wet. Another way is using Oil colour as thicker dots, for example a shoulder where you want a light spot on it. Hit it with your light colour oil, take a dry old brush and genlte rub it in - it is hard to explain but when you do you'll see.
- Oil Colour can be used as a glaze on a dry underground.


Another example of hitting a spot with strong oil and gently rubbing it in, first photo are the berserk dots, second photo is the look you can achieve with soft gentle rubbing. You can set your colour much more easier and get a faster goal in colour transitions with oil colours - that is my oppinion that i got from painting with both, acrylic and oil:


With Oil Colours you really can say put it where you want it and rubb it in. You can do whatever you like and if it doesn't make you happy at all you still can use white spirit to bring it all down again.
Oil colour can be used as a glaze to do some weathering:


When glazing with Oil colours it helps me a lot to have a tissue where i make a little test of the glaze and its degree of dilution. What you see is what you get. Before i went at the figure with glazes i did use the blow dryer and airbrush method to make it all dry and ready to be glazed on as i did paint some oil at the skin already:


As i have learned by planning such big article over time to collect experience to share i have to admit that this isn't easy. I came to the point where you should be introduced to the Use of Oil paint - this article is nothing more - just an introduction. It will grow by other upcoming articles and so on - but still the teacher soul inside my chest doesn't feel satisfied. For me it all sounds weird as i was sitting way too long in front of this article.
I have tried to summ it all up with a video. It is very big, around 17 minutes but it explains it a bit more in a more logical order, maybe. Sorry for the bad music, youtube free songs aren't the best when it comes to this video length. Enjoy in HD and make sure to read the article first or beside to get all the information that i am trying to tell ...
I am looking forward to your feedback and looking forward to the step by step of the Maxican where his explanations will for sure add big quality in understanding to this article here.
It is just paint, ok - Oil Paints smells and doesn't taste good (make sure you don't lick your brushes) - but in the end it is all paint and is made for happy painting.>
Best Wishes
Roman
Edit by Roman: If you are interested in painting more with Oil there is also Andrea's way available - both ways work, read, try and find your own :)


Awesome article my friend :)
Great article to start learning oils. I normaly paint with oils and more or less this is my same technic.
Great article and video~~
Great article/video. Definitely going to give oils a go now. Thanks. :)
Great article :) covers all necessary information! Thank you for this ;)
Good article ;)
and beautiful palette and girl too :D :D
Who is she ? Your muse ?
Cheers
Thanks for your feedback ... that makes these weird thoughts seem better to me at least :)
@Dave
The muse is everywhere and everything around you - just find her, sometimes she hides, sometimes she sleeps but sometimes she unleashes heaven and hell at once and the time stands still :)
Great article - Thanks!
In a shop I found a series oilcolours from Winsor&Newton which you can thin with water.
Have you seen or tested this? (or anyboy else)
The colour is everything but not cheap - but i´m not sure if it can work like "normal" oilcolour.
LG
Gonzo
Nice article mate! Hope to finish mine soon, though I don't know if it's necessary as you're already covering nearly all information.
@Gonzo: Those water soluable oil colours work as well as normal ones, but not all people are satisfied with them cause they don't have the quality high class oil colours do.
Hab ich das richtig verstanden,dass wenn auf der Ölschicht ein Mattlack-film ist , ich dann mit Acryl weitermachen kann?
@Max
Gna, never do i cover everything - this is just a little trip - i myself would love to see an article by yours and i guess it would be a little less more in logical order :)
@Anonymous
Yes you are right!
Danke dir... (bin "anonymous") ... ka wieso :D
Thank you for this very good article. I am looking forward to read more about this topic. Personally, I received my first oil paints. So this article fits very well for me.
LG Zeph
Hey,
I just used Oil colours to highlight for the first time. I used it before but just for weathering on tanks. and I have to say its awesome. Blendings are much easier to achive as with acrylics. many thanks for giving me the little push I needed to finally try it out. ;P
Simon aka Katan
If I paint something in oils that is going to see time on the gaming table, how should I protect it from wear?
Thank you for one more of yours nice tutorials!
@Brian: Just the same way as it were painted in acrylics though oil colours aren't that touchy. Just a little varnish will work.
I would like to say thanks. This article gave me some great info. I decided to give it a try on a gw giant and was amazed after just a couple of hours of pushing paint what I ended up with. I used some W&N water mixable oils I had lying around, they seemed to do the job ok. Are there any brands that are better for miniatures?
Thanks for this add @Peter - great addition behind those links ...
I think I am going to use a similar blog template to yours. I find it very attractive to the reader.
Dyes And Pigments Importers In Delhi
Photo to Painting Photo to painting from photo 100% handmade in oil, charcoal, pencil or watercolor paintings from photos are unique personalized gifts by professional portrait artists. All of our portrait artists have degrees in fine art and years of professional experience. Every painting is examined by our senior portrait artists to ensure best quality. We only use premium quality specialized art supplies to create your painting. Contact us for custom made, high quality oil paintings at an affordable cost and quick worldwide delivery that allows you to express your creativity easily and make great art.
I really like this their work. Your blog is good.
BRAZILIAN ART AND CULTURE. The art of Newton Avelino.
www.aartedenewtonavelino.com
Thank you for sharing this interesting and informative article, painting with airless spray gun will be faster and more interesting!
regards,
Resin Paint
I have a quite technical question guys:I honestly do not understand why people use oil paint on miniatures. I get the point of not using acrylics for glazes and washes since they are emulsions, which means that they probably won’t reach the same intensity as oil colours. But Oil paints aren’t so vibrant because oft the oil. They are because of the pure pigments. The job of the oil is to hold the pigments together so you have an actual creamy paint to apply on the canvas. But for a glazing this is not necessary! If you would simply mix pigments with gum Arabic and water (=watercolour) or with dammar gum varnish (make sure not to use a shiny one!), you would have a bright and pure wash that would dry within 10-30 minutes and couldn’t harm previous layers or the miniature itself. If you want to use actual premixed oil paints from the tube for some reason (if you want to work on a glazing for more then 30 minutes …) you should put a drop of paint on a napkin and wait a while until most of the oil gets out. There is almost always too much oil in premixed oil paints – especially if you want to use them very liquid. My point is: Water dries in a minute, turpentine and dammar varnish in an hour and linseed oil in 40 years. Even if it seems dry after a few days it isn’t. So especially if I would want to keep on painting on this miniature I wouldn’t use a lot of oil. + Oil gets darker when its aging so that destroys the vibrant quality you’re looking for. Am I missing a point here? What exactly is the point of oil paint on miniatures?
Mmh ... we do not use Oil points very often in the meantime. Sometimes for special effects, but we believe that you can break this down to personal preferences.