


Hey Jungle Painters,
this week's tutorial voting results look like this - winner is:

If you want to keep track with an overview on what has happened so far in MV's year of the painter 2
please check this link!
_______________________________________________________________________________
Today we want to talk about rust a little bit, yes rust.
This time the rust will eat away a painted armor part.
We already had a couple of other tutorials available about this topic:
Theory Thursday #5: Rust
Weathering Video
How to create real rust pigments
Mu 45 - Tutorial - Model Mates - Rust Effect
Raffa will now take care of the article. We hope you enjoy!
_______________________________________________________________________________
You want to support us?
If you like to support or say thanks the monkeys of Massive Voodoo in what they do, please feel invited to drop a jungle donation in their direction via paypal or check their miniatures they got on sale here or here.
_______________________________________________________________________________
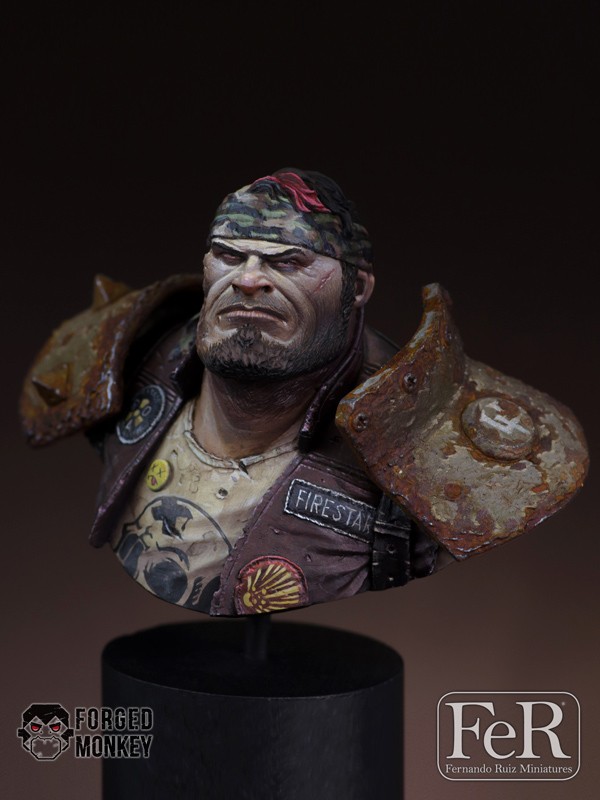
In this article you will see the armor part of the bust "Firestarter" that I sculpted and painted. The bust is released at Fernando Ruiz Miniatures if you are interested in getting one!

 The first step was to prime and basecoat the parts using 'Heavy Metal' by Scale Color.
 Now the parts were randomly dabbed with Medium Rust by Model Mates.
In the beginning it often looks a bit strange, but when it is dry, it looks very nice and rusty.
 Here is the other side.
 Both parts got a light drybrush of 'Heavy Metal'
 It makes the plates look like the edges still get some use and get randomly beaten up.
 I tried to apply 'Chipping Medium' from AK Interactive using my trusty Harder & Steenbeck Evolution airbrush...
 It created a very strange effect... Almost looks like the medium destroyed and crackled some of the rust color.
 Really a bit strange :D
 But for now I tried to ignore it and continued airbrushing the next layer, a very neutral olive grey.
It was an olive tone by AK Interactive airbrush colors.
 After the color was dry I started to remove some of the paint using a bristle brush and warm water.
By using the chipping medium you can easily remove top layers of paint with some rubbing and warm water.
 The rust color turned a bit yellow. It seems that chipping medium and water are not best friends with the rust paint.
 The Model Mates rust was applied another time taking care not to hit the areas where the olive paint was sitting.

 The edges of the chipped olive paint were hightlighted with a mix of white and olive.
This created a very three dimensional effect.

In the end a little freehand was painted with off-white and I airbrushed a shadow on the sides of the parts using 'Strong Tone' by Army Painter. To give it a slightly metallic look I used a graphite pencil to softly stroke some of the edges. The slight shine gives it a nice touch.
At this point I called the parts done. It's a really fast and nice technique to create this effect.
Try it yourself!
I really hope you enjoyed this Step by Step! Let me know in the comments!
this week's tutorial voting results look like this - winner is:
If you want to keep track with an overview on what has happened so far in MV's year of the painter 2
please check this link!
_______________________________________________________________________________
Today we want to talk about rust a little bit, yes rust.
This time the rust will eat away a painted armor part.
We already had a couple of other tutorials available about this topic:
Theory Thursday #5: Rust
Weathering Video
How to create real rust pigments
Mu 45 - Tutorial - Model Mates - Rust Effect
Raffa will now take care of the article. We hope you enjoy!
_______________________________________________________________________________
You want to support us?
If you like to support or say thanks the monkeys of Massive Voodoo in what they do, please feel invited to drop a jungle donation in their direction via paypal or check their miniatures they got on sale here or here.
_______________________________________________________________________________
In this article you will see the armor part of the bust "Firestarter" that I sculpted and painted. The bust is released at Fernando Ruiz Miniatures if you are interested in getting one!
This is how the effect looks on the final miniature
Now let's start!


In the beginning it often looks a bit strange, but when it is dry, it looks very nice and rusty.


It was an olive tone by AK Interactive airbrush colors.

By using the chipping medium you can easily remove top layers of paint with some rubbing and warm water.


This created a very three dimensional effect.

In the end a little freehand was painted with off-white and I airbrushed a shadow on the sides of the parts using 'Strong Tone' by Army Painter. To give it a slightly metallic look I used a graphite pencil to softly stroke some of the edges. The slight shine gives it a nice touch.
At this point I called the parts done. It's a really fast and nice technique to create this effect.
Try it yourself!
I really hope you enjoyed this Step by Step! Let me know in the comments!


Where can i get the Medium Rust color by Model Mates?
www.Battlefield-Berlin.de
www.PK-Pro.de
or you can also search google for other retailers.
I don't understand why the basecoat was silver, if you're going to cover it with rust, and then chip down to the rust layer later. ...? am I missing something? :)
Looks like Model Mates has gone out of business :(
The reason I painted it silver was to get a little bit of the metallic shine through the rust... it was covered later but at the beginning I didn't perfectly know where it will end ;)