


Good Monday Morning Jungle Painters!
The winner of last weeks tutorial voting arrived a little later like we told you on Friday night. This article just went to big and time ran out for Roman to finish it on Friday.
As voting time is present everywhere you also did vote last week here on the jungle blog.
Your votes went for the Big Child Creatives Black Sailors' bust named "Sharki":

Maybe the hobbit will never find his way?
He has such a good map we all thought?
Never send out a hobbit alone,
he will never return to MV's tutorial voting.
Roman takes over the article now.
We hope you enjoy!
And if you do consider this:
________________________________________________________________________________
You want to support Massive Voodoo?
If you like to support or say thanks the monkeys of Massive Voodoo in what they do, please feel invited to drop a jungle donation in their direction via paypal or check their miniatures they got on sale here.
_______________________________________________________________________________
Hoi!
I got myself this bust together with some great memories on this years MV's Jar's Beginners Class in Copenhagen, Denmark.
At home I was really drawn to work on it. The quality of the sculpt is magnificant and I am usually not painting many Orc busts. I even think this was my first Orc bust so far. Not sure.
I did paint it like that:

INTRODUCTION
This step by step again will not bring you color recipes in any form.
It will give you insight into my thoughts through the process of painting this bust like I did.
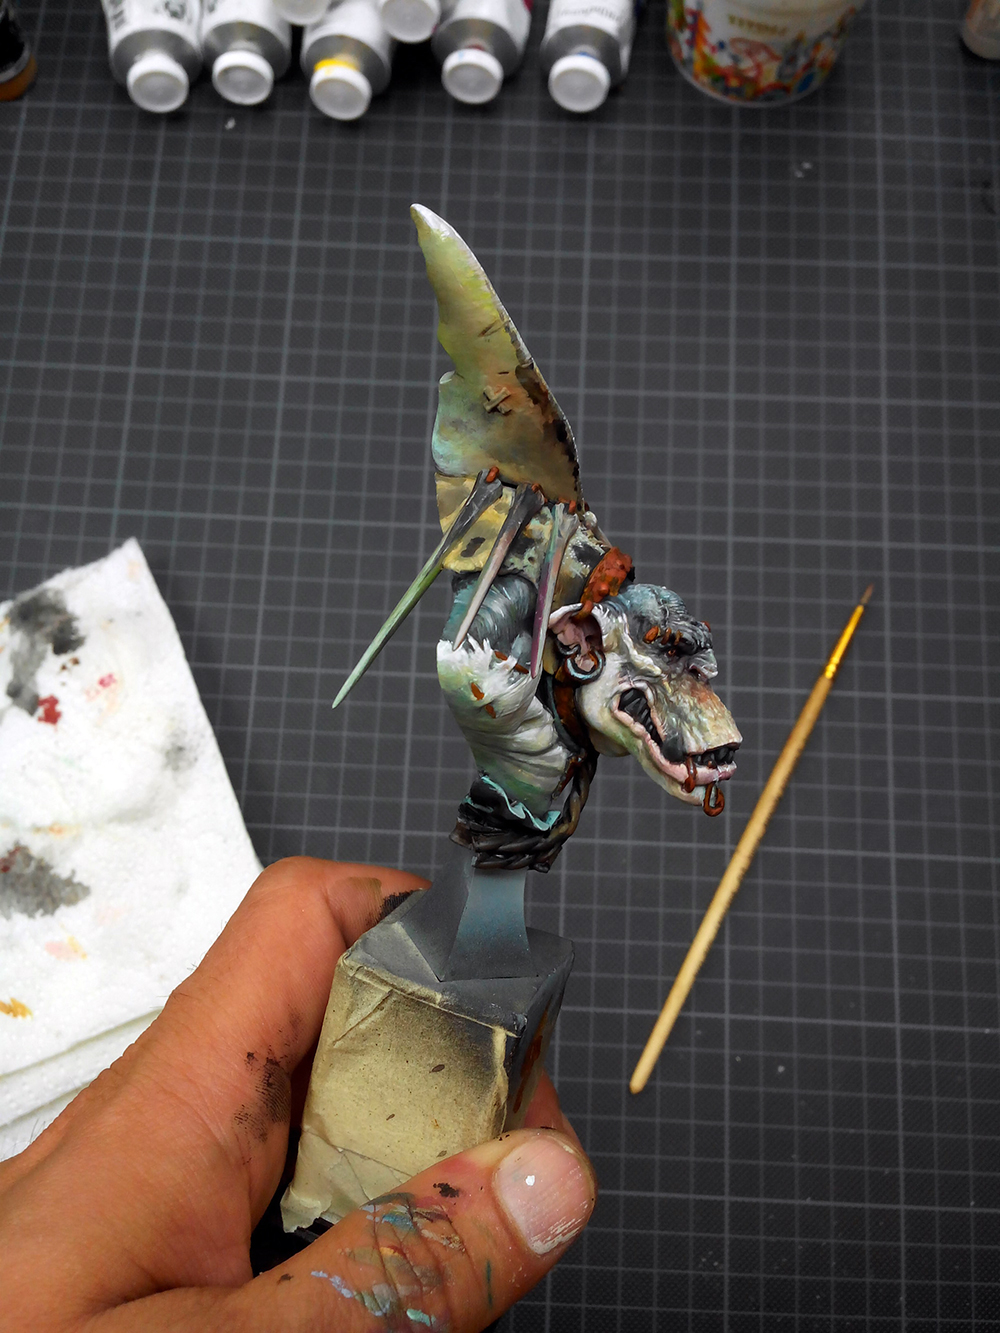
Well, I needed to find a plinth that fits. Here are my options I had.
1,2,3,4,5 ...

I really wanted to put him on a round plinth, but decided for me he looks best on that square one. So there is a need of thinner, highter round ones I guess. At least for me.

PAINTING WORK
Well, I just wanted to paint him. I had no clear vision ahead of me on how I wanted to tackle this beauty, but he was calling me and my brush to paint him. Usually this always happens together with an idea or a vision, but this time there was none ... sad, but the CALL was loud. We'll see.

I primed him black and white like described in this article about priming miniatures.
Unfortanetely I do not have a photo of the primed model,
but hey, would have been boring.
Not so boring might be thoughts happening now:
So the first steps I took after the priming I let loose. No vision ahead of me, so I needed to just take some color and start. Let's blue him up and work that skin to white. Let's do a white Orc, Albino Orc, Albino Orc Pirate Shark Hunter. Blue? Yes, because I thought if he is standing in his shark hunting boat the water would reflect back a lot. That's why blue.
He was blue, I went for the upper shark skin. I imagined shark skintone when it is dry, dead and out of the water for a long time must have this color. So I applied it. Mmh. If I make this exact color darker I could just paint him like a White Shark.
I even think that his nose looks like a tiny sculpted White Shark face :D
I decided to end the blacks here and put some reddish skin color in his mouth and ears and some more yellowish skintone to his face.
Great Orc color concept, I know :D
So this is how my base color color layout happened:

Btw photo quality in this article may vary, like always. I was using my old mobile phones on some, my digitalcamera, my new mobile phones camera and the bigger studio camera. Sorriyo!
Great Whites need more white so I was killing a lot of the blues with my next steps:

Painted rather pasty than thinned I hit the model with my brushstrokes. Sketching myself in ...

BAM! BAM! BAMALLAM!

As you might have seen I also did some sort of sketchwwork to other areas. I painted all future metallics black, gave a rough brushstroke texture to the leathers ..
.

... slapped paint on the ropes and used some of the reddish skintone as a glaze to bring it into the skin. White Sharks have pinkish areas around their mouth. I think that is what I thought while doing this:

n
I love sketching. I love my brushstrokes. They are full of my energies and movement. Very personal.
I like this. I love this. Thank you, Alfonso.
This was way too much white. I lost the blues.
Using my airbrush to spray in some thinned to a glaze-like blues again.

While I worked on his whites I also worked on some whites on other models. I like to be flexible and have a moment of different volumes to paint. That is why I often have way too many WIPs, but hey it works for me :)

A little more defination here and there. Some more red glazes to the face and eye and mouth area. Man this is so blue now. Dots, I want dots, variations in the skin to paint over them later on. Just to play around with them later.
And I was also checking back with tiger sharks and google to find something I can do with the upper shark skin. Found something, tried to copy it in my perception.
The eyes were sketched too to have a glimpse of the character hidden in that shark costume.
Funny thing were the shark bones on his back. I just played around with them using the colors I used on other areas. No particular goal in them. Just wanted to have them a little darker in the end to stand out from the bright shark skin, well which was not so bright anymore cause of the pattern. No worries, still in sketching mode. Just paint on ...
... and on.

Here is a better overview on how I did the tiger shark sketch on his back:

Btw I really enjoyed how his facial area turned out so far. I got to keep this in mind during further process to focus on not losing what I like here. Rather intensifying it.

I worked a little more on the whites again as I was making them to blueish. Wax on wax off I'd say. So back to the whites, but a little more on details like wrinkles and vulome highlights. Not to lose the blues again.

This being said it was time to work on some highlights again in the face. This time also on the dark brown black that was his forehead and the dark area on his two part shark skin. And his teeth with the same color just to push every area a little bit when closing in.
Also on his mouth, saving and pushing what I enjoy there. This time also I went for the smoother highlights. I thought of a sharks mouth when I was painting his nose, yes right, sounds weird but I did and painted some scars from the lower part of the nose to the upper darker part.

I wanted color back so I threw in some yellowish green on some areas. Why I did that? I can not tell you. I call it instinct of painting. A very personal technique. You got it too. No rules for it, just a feeling.

The yellow part should only be visible from one angle and I even think I have overdone it, but on the other hand I am far from finished, so why should I care right now? I will take care about this in the upcoming steps of my process. Do not get stuck in things you can and will work on the way. Ain't nobody got time for that.

Increasing highlights on the dark white shark upper skin area thingy. Not so dark anymore, but still in great contrast to the whites. For the whites there is more greenish tourqouise in the lower body part now as I was painting the fabric down there and wanted to have it reflect a little stronger to the white body elements. Also I did it from below to the busts area to simulate a carribian water reflecting look.


Even smaller ones and even ones that are not sculpted. Texture with brushstrokes you may call it. I got no name for it so far. BAM! BAM! but smaller.

From below we have the greenish tourqouise. What color I used for it? A tourqouise with a drop of yellow. Makes greenish tourquoise because yellow and blue makes green and tourqouise is made from mainly blue ...
Genithal light ...
 Pushing highlights further. Losing details in the dark.

So I was losing detials in the upper areas as my rough, but already detailed brushstroke work there was a little bit too enthousastic. I had to go back and paint the dark areas again. Seperating lines and volumes from eachother.
Modelmates Rust had also been painted to the metal parts. Way too rusty right now.

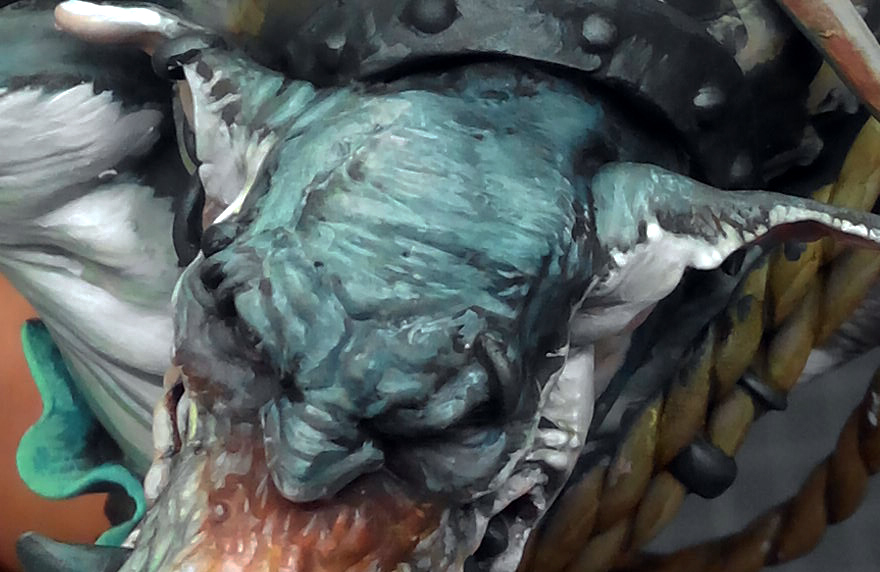
I also used a very thin glaze of purple twice around the nose and yes area to make it stand out and for a little variety.

While making the photos of this step by step ready for the article I really enjoyed my thumb. It shows a really good what colors I used to paint with in the last hours. Even the pasty and think look of my paint. Not much glazing going on. Slapping paint. Thomb! Excuse my dirty looking fingernail - I am at work and got a beard!

Forward I went with starting to paint detials. For the fish skin I decided to add small dots as highlights. I did so but definatly too bright, but knowing I will calm them down later on with glazes. Not everywhere, again mainly in areas hit by zenithal light. Dot. Dot. Dot. Dot. Dot. Dot.
Dot.

I again wanted to work on the whites and went on them with pure white. Thick, pasty but detailed brushstrokes and detailed placement. To increase the volumousity of the volumes. Shadows + Midtones + Highlights = Volume.
On smaller volumes, for example a wrinkle it might just be a small dot that appears. I was also starting to paint thin lines like scares from the white to the dark area in his skin. Not only in the face but also to the rest of his body.


The process of sharpening the resolution
Now I got to the point where big surface work would not matter anymore so I went in closer to paint on details. Reworking a shadow here, pushing a highlight here, but again not in the big scale of everything. This time I tried to look at each volume I could see and push it individually or ignore it on purpose or by accident.

I really enjoyed the yellowish touch that was left over on the shark's fin. Funny things are the bones. They pretty good show the same color play like my thumb before :D


And oh yeah I painted the metals finally.
I try to do such when I feel I am closing in to detail and final work. Metal pigments can be really evil to your paintjob. I mainly overpainted all the rust, but left it here and there for the rusty look. I worked my way from a dark metal tone up to brighter edge highlights.


Well I was pretty happy when I called him done. I was not scared of not having a vision first. I heard the bust calling me, that means it will tell me its vision during the process, hopefully.


The final Sharki looked like this,
photos now done with the big studio camera:


If need be you can find some more via Putty & Paint.
Oh and yes I added pink and tourquoise dots here and there. Why the hell :D
Keep on happy painting!
Roman
________________________________________________________________________________
You want to support Massive Voodoo?
If you like to support or say thanks the monkeys of Massive Voodoo in what they do, please feel invited to drop a jungle donation in their direction via paypal or check their miniatures they got on sale here.
_______________________________________________________________________________
The winner of last weeks tutorial voting arrived a little later like we told you on Friday night. This article just went to big and time ran out for Roman to finish it on Friday.
As voting time is present everywhere you also did vote last week here on the jungle blog.
Your votes went for the Big Child Creatives Black Sailors' bust named "Sharki":
Maybe the hobbit will never find his way?
He has such a good map we all thought?
Never send out a hobbit alone,
he will never return to MV's tutorial voting.
Roman takes over the article now.
We hope you enjoy!
And if you do consider this:
________________________________________________________________________________
You want to support Massive Voodoo?
If you like to support or say thanks the monkeys of Massive Voodoo in what they do, please feel invited to drop a jungle donation in their direction via paypal or check their miniatures they got on sale here.
_______________________________________________________________________________
Hoi!
I got myself this bust together with some great memories on this years MV's Jar's Beginners Class in Copenhagen, Denmark.
At home I was really drawn to work on it. The quality of the sculpt is magnificant and I am usually not painting many Orc busts. I even think this was my first Orc bust so far. Not sure.
I did paint it like that:

INTRODUCTION
This step by step again will not bring you color recipes in any form.
It will give you insight into my thoughts through the process of painting this bust like I did.
Well, I needed to find a plinth that fits. Here are my options I had.
1,2,3,4,5 ...

I really wanted to put him on a round plinth, but decided for me he looks best on that square one. So there is a need of thinner, highter round ones I guess. At least for me.
5

PAINTING WORK
Well, I just wanted to paint him. I had no clear vision ahead of me on how I wanted to tackle this beauty, but he was calling me and my brush to paint him. Usually this always happens together with an idea or a vision, but this time there was none ... sad, but the CALL was loud. We'll see.
Ready for priming ...

I primed him black and white like described in this article about priming miniatures.
Unfortanetely I do not have a photo of the primed model,
but hey, would have been boring.
Not so boring might be thoughts happening now:
So the first steps I took after the priming I let loose. No vision ahead of me, so I needed to just take some color and start. Let's blue him up and work that skin to white. Let's do a white Orc, Albino Orc, Albino Orc Pirate Shark Hunter. Blue? Yes, because I thought if he is standing in his shark hunting boat the water would reflect back a lot. That's why blue.
He was blue, I went for the upper shark skin. I imagined shark skintone when it is dry, dead and out of the water for a long time must have this color. So I applied it. Mmh. If I make this exact color darker I could just paint him like a White Shark.
I even think that his nose looks like a tiny sculpted White Shark face :D
I decided to end the blacks here and put some reddish skin color in his mouth and ears and some more yellowish skintone to his face.
Great Orc color concept, I know :D
So this is how my base color color layout happened:

Btw photo quality in this article may vary, like always. I was using my old mobile phones on some, my digitalcamera, my new mobile phones camera and the bigger studio camera. Sorriyo!
Great Whites need more white so I was killing a lot of the blues with my next steps:

Painted rather pasty than thinned I hit the model with my brushstrokes. Sketching myself in ...

BAM! BAM! BAMALLAM!

As you might have seen I also did some sort of sketchwwork to other areas. I painted all future metallics black, gave a rough brushstroke texture to the leathers ..
.

... slapped paint on the ropes and used some of the reddish skintone as a glaze to bring it into the skin. White Sharks have pinkish areas around their mouth. I think that is what I thought while doing this:
n

I love sketching. I love my brushstrokes. They are full of my energies and movement. Very personal.
I like this. I love this. Thank you, Alfonso.
This was way too much white. I lost the blues.
Using my airbrush to spray in some thinned to a glaze-like blues again.
Pfft!


A little more defination here and there. Some more red glazes to the face and eye and mouth area. Man this is so blue now. Dots, I want dots, variations in the skin to paint over them later on. Just to play around with them later.
And I was also checking back with tiger sharks and google to find something I can do with the upper shark skin. Found something, tried to copy it in my perception.
The eyes were sketched too to have a glimpse of the character hidden in that shark costume.
Funny thing were the shark bones on his back. I just played around with them using the colors I used on other areas. No particular goal in them. Just wanted to have them a little darker in the end to stand out from the bright shark skin, well which was not so bright anymore cause of the pattern. No worries, still in sketching mode. Just paint on ...
... and on.

Here is a better overview on how I did the tiger shark sketch on his back:

Btw I really enjoyed how his facial area turned out so far. I got to keep this in mind during further process to focus on not losing what I like here. Rather intensifying it.

I worked a little more on the whites again as I was making them to blueish. Wax on wax off I'd say. So back to the whites, but a little more on details like wrinkles and vulome highlights. Not to lose the blues again.

This being said it was time to work on some highlights again in the face. This time also on the dark brown black that was his forehead and the dark area on his two part shark skin. And his teeth with the same color just to push every area a little bit when closing in.
Also on his mouth, saving and pushing what I enjoy there. This time also I went for the smoother highlights. I thought of a sharks mouth when I was painting his nose, yes right, sounds weird but I did and painted some scars from the lower part of the nose to the upper darker part.
Arrr ... uhm, Orrr!

I wanted color back so I threw in some yellowish green on some areas. Why I did that? I can not tell you. I call it instinct of painting. A very personal technique. You got it too. No rules for it, just a feeling.
Click me to enlarge me!

The yellow part should only be visible from one angle and I even think I have overdone it, but on the other hand I am far from finished, so why should I care right now? I will take care about this in the upcoming steps of my process. Do not get stuck in things you can and will work on the way. Ain't nobody got time for that.

Increasing highlights on the dark white shark upper skin area thingy. Not so dark anymore, but still in great contrast to the whites. For the whites there is more greenish tourqouise in the lower body part now as I was painting the fabric down there and wanted to have it reflect a little stronger to the white body elements. Also I did it from below to the busts area to simulate a carribian water reflecting look.

Increasing level of detail volumes with highlighting.

Every volume gets hit by zenithal light from the top.

Even smaller ones and even ones that are not sculpted. Texture with brushstrokes you may call it. I got no name for it so far. BAM! BAM! but smaller.
From below we have the greenish tourqouise. What color I used for it? A tourqouise with a drop of yellow. Makes greenish tourquoise because yellow and blue makes green and tourqouise is made from mainly blue ...
Genithal light ...


So I was losing detials in the upper areas as my rough, but already detailed brushstroke work there was a little bit too enthousastic. I had to go back and paint the dark areas again. Seperating lines and volumes from eachother.
Modelmates Rust had also been painted to the metal parts. Way too rusty right now.

I also used a very thin glaze of purple twice around the nose and yes area to make it stand out and for a little variety.

While making the photos of this step by step ready for the article I really enjoyed my thumb. It shows a really good what colors I used to paint with in the last hours. Even the pasty and think look of my paint. Not much glazing going on. Slapping paint. Thomb! Excuse my dirty looking fingernail - I am at work and got a beard!

Forward I went with starting to paint detials. For the fish skin I decided to add small dots as highlights. I did so but definatly too bright, but knowing I will calm them down later on with glazes. Not everywhere, again mainly in areas hit by zenithal light. Dot. Dot. Dot. Dot. Dot. Dot.
Dot.

I again wanted to work on the whites and went on them with pure white. Thick, pasty but detailed brushstrokes and detailed placement. To increase the volumousity of the volumes. Shadows + Midtones + Highlights = Volume.
On smaller volumes, for example a wrinkle it might just be a small dot that appears. I was also starting to paint thin lines like scares from the white to the dark area in his skin. Not only in the face but also to the rest of his body.
Click me to see me large!

Whites are coming back. I really enjoy the colors that appeared so far in the skin.
And I also sketched the ropes with shadows using Army Painters strong tone and orange.
Wtf orange. Bad instinct.

The process of sharpening the resolution
Now I got to the point where big surface work would not matter anymore so I went in closer to paint on details. Reworking a shadow here, pushing a highlight here, but again not in the big scale of everything. This time I tried to look at each volume I could see and push it individually or ignore it on purpose or by accident.

I really enjoyed the yellowish touch that was left over on the shark's fin. Funny things are the bones. They pretty good show the same color play like my thumb before :D
Process of sharpening. Left: Before. Right: After.

And oh yeah I painted the metals finally.
I try to do such when I feel I am closing in to detail and final work. Metal pigments can be really evil to your paintjob. I mainly overpainted all the rust, but left it here and there for the rusty look. I worked my way from a dark metal tone up to brighter edge highlights.


Well I was pretty happy when I called him done. I was not scared of not having a vision first. I heard the bust calling me, that means it will tell me its vision during the process, hopefully.

I hope you enjoyed this article too.
Again I am very sorry to not be able to tell you exactly what colors I used, like in maths. I was never good in maths and I am mainly mixing 90% of my paint out of the primaries and black and white in the meantime. I am starting with the colors you can see to the left and then I do mixing. I learned that I enjoy to have three different red/magenta variations ready on my wet palette.

photos now done with the big studio camera:


If need be you can find some more via Putty & Paint.
Oh and yes I added pink and tourquoise dots here and there. Why the hell :D
Keep on happy painting!
Roman
________________________________________________________________________________
You want to support Massive Voodoo?
If you like to support or say thanks the monkeys of Massive Voodoo in what they do, please feel invited to drop a jungle donation in their direction via paypal or check their miniatures they got on sale here.
_______________________________________________________________________________


Thanks a lot for this nice SBS ;) enjoyed it a lot!
I have been following your work for a long time now, and I think this is easily one of the best things you've ever painted. It's got incredible contrast, a beautiful range of colours and is so uniquely you. I really love the process and it inspires reading your method. I don't want to read about maths and exact ratios... that doesn't feel like art to me. Art should be about how your brush dances on the canvas, in this case a fantastic model.
Thanks for the inspiration. Looking forward to seeing you in a few weeks hopefully!
How much time do you spend working on the bust during a single session. Do you apply a few glazes and then work on something else for a while, or do you spend an hour or more. I really like how you sketch in your colours and volumes before refining them. I also like to work with opaque paint first to get everything where I like it before I start glazing. So much quicker.
Great SBS. As always I really enjoy your sketching.
One of your best paintjobs !
@all
Thank you all for the feedback. I really appreciate this for the time invested to setup this SBS. Thanks!
@Trent
I hope so too. I'll try to make it, but like I told you I might be megabusy with packing for Madrid.
@Tyler
Well, depends. I can not put a finger on the time I spent in one session. I sit down with a project I want to work on today and if it draws me in I will paint 8 hours on it. If not maybe only one, sometimes I go for a particular area and finish it or push it forward and then switch to another model. It is a rather free process.
- Roman
Wow. No words for that one... The outcome is so genious!
And for sharing your thoughts a BIG thank you! Inspiration on the hightest level!
Cornel
Great article, thanks a lot for sharing! :)
I really love how alive the bust feels, very cool work on the various skintones.
Thanks for the great read, the awesome pictures and the colorful thumb! Keep up the great work ;)
In case you may consider it, I guess a lot people here would also love an article about a typical week at your work someday. Would be cool getting an insight, at least I know I would read it :)
Cheers
Simon
Wow! Can't say anything that hasn't been said already..
..except for maybe you seem to paint quite thick nowadays, and yet the end results are spectacular! Maybe "thin your paints" isn't always the best mantra? How do you mange from thick and sketchy to such a beautiful outcome is beyond me.. I've tried, but it ends up looking like a, well, a pile of thick paint :D
Mr Roman
I just have to say magnificent Sir!
The work you have produced on both Sharki and Fire was a true joy to behold. The levels and depths of colour and all the beautiful nuances you have created are spectacular.
It reminds me a lot of the beautiful oil paintings on canvas produced by some of the masters.
I love the way that you get paint onto models which can at times seem somehow rough and random yet manages to meander along to finish in something that just looks so `right`
Thank you so much for sharing your thoughts and time.
Your blog is more than ispirational. Never stop.
Many many thanks
Thank you all so much for your nice feedback. I am happy that you enjoy these articles and of course I am very happy that you all enjoy my explanations on Sharki.
@Surly
Onee day maybe. So far I have to learn to handle my work weeks myself before writing an article :D
What a phenomenal write-up. Just as intense and characterful as the paintjob itself. You capture the energy and liberation that goes into the piece. Love it!