


Hello Everyone,
I think all of us are traveling from time to time, or visit friends which live a bit further away. So do I and as I am recently in a very good sculpting mood, I didn´t want to leave my sculpting stuff at home.
Well, the only problem is, that I have lots of stuff for sculpting at home, some things are very useful, other things are only useful for a very special purpose, but as I want to have the travel kit as lightweight as possible, I had to reduce the things I can pack to the most needed tools and basics.
This was my first try, but I don´t really like the pouch for the tools, because it needs too much space for my taste, and also, those are too many boxes I would have separated in my pack. I want to have it more simple.

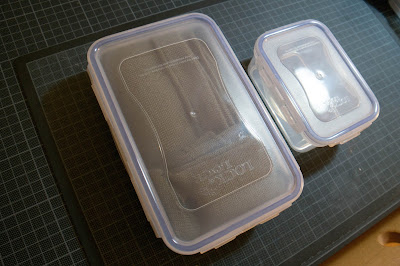
So that lead me to my second try, which I really like at the moment. Because it is one box less, but I even have a bit more space inside the box, so I can add some additional stuff later. For the boxes themselves, I really like the Lock and Lock boxes, because... they close really safe (which should be expected from the name). But this is a little thing which I think is important, as nobody will like it, when the whole content of the box is spread throughout the backpack.
So let me describe a little bit what I put inside the box to carry with me:

At first I like it to put some piece of cloth on top of all the stuff, so it doesn´t get thrown around too much, when I´m having the box in my backpack and walk around with it. The cloth also should protect the tools from damage and can even be used to clean and polish the tools after sculpting with them.

This is the other stuff I have in the box (sorted more or less by importance...not really):
1. My sculpting tools
2. Putties and Clay, for me this is usually BeesPutty (Firm or Summerfirm) and Green Stuff or Magic Sculpt
3. Small pliers (you can find those small ones on the internet or in a hobby store)
4. Wire
5. Cork, to place the sculpt on them
6. A little anatomy reference sheet
So far for the content in the bigger box. But there was also a smaller box on the first photo. It is empty, but has a quite important purpose, after you have started a new sculpt during travel.
This box is meant to transport the sculpt without getting damaged. Just use some blue-tac to fix the sculpt in the box, so you can transport it without having the miniature flying around in this little transport box.

That´s basically my attempt for a easily portable sculpting kit. I think it could be also a guideline for beginners, to see what the most needed things are (but maybe I´ll also write an extra article about that topic later).
Of course this set is fitted to my needs and preferences when sculpting. So don´t forget to adapt it to your own needs and taste. Chances are high that I will also change some things in the future, if I recognize that I miss something or if I don´t need something I have packed now.
So far I hope I could help you with this little tutorial and that you´ve found some inspiration for yourself.
Maybe you have already put something similar together for yourself?
I would love to hear your own solutions or ideas on this topic.
Cheers
Bene
I think all of us are traveling from time to time, or visit friends which live a bit further away. So do I and as I am recently in a very good sculpting mood, I didn´t want to leave my sculpting stuff at home.
Well, the only problem is, that I have lots of stuff for sculpting at home, some things are very useful, other things are only useful for a very special purpose, but as I want to have the travel kit as lightweight as possible, I had to reduce the things I can pack to the most needed tools and basics.
This was my first try, but I don´t really like the pouch for the tools, because it needs too much space for my taste, and also, those are too many boxes I would have separated in my pack. I want to have it more simple.

So that lead me to my second try, which I really like at the moment. Because it is one box less, but I even have a bit more space inside the box, so I can add some additional stuff later. For the boxes themselves, I really like the Lock and Lock boxes, because... they close really safe (which should be expected from the name). But this is a little thing which I think is important, as nobody will like it, when the whole content of the box is spread throughout the backpack.

So let me describe a little bit what I put inside the box to carry with me:

At first I like it to put some piece of cloth on top of all the stuff, so it doesn´t get thrown around too much, when I´m having the box in my backpack and walk around with it. The cloth also should protect the tools from damage and can even be used to clean and polish the tools after sculpting with them.

This is the other stuff I have in the box (sorted more or less by importance...not really):
1. My sculpting tools
2. Putties and Clay, for me this is usually BeesPutty (Firm or Summerfirm) and Green Stuff or Magic Sculpt
3. Small pliers (you can find those small ones on the internet or in a hobby store)
4. Wire
5. Cork, to place the sculpt on them
6. A little anatomy reference sheet
So far for the content in the bigger box. But there was also a smaller box on the first photo. It is empty, but has a quite important purpose, after you have started a new sculpt during travel.
This box is meant to transport the sculpt without getting damaged. Just use some blue-tac to fix the sculpt in the box, so you can transport it without having the miniature flying around in this little transport box.

That´s basically my attempt for a easily portable sculpting kit. I think it could be also a guideline for beginners, to see what the most needed things are (but maybe I´ll also write an extra article about that topic later).
Of course this set is fitted to my needs and preferences when sculpting. So don´t forget to adapt it to your own needs and taste. Chances are high that I will also change some things in the future, if I recognize that I miss something or if I don´t need something I have packed now.
So far I hope I could help you with this little tutorial and that you´ve found some inspiration for yourself.
Maybe you have already put something similar together for yourself?
I would love to hear your own solutions or ideas on this topic.
Cheers
Bene


And the elements, lancets, putties where shopping?
When I was doing consultancy (lots of boring evenings in Hotels) I took all my paints etc in a fishing tackle box
http://www.h2tuga.net/izwkc7wehsue3iuf-fishing-tackle-box.html
along with a stand light (the light can be bad in Hotels) and a magnifying glass on a stand.
@Tonete: Well, I didn´t include the information where to buy that stuff, because there are quite a lot of options. Here are some shops I can recommend for tools and putty:
- the beesputty/studioworx onlineshop. It is run by Stefan Niehues, the creator of beesputty. He also makes really good handmade sculpting tools, they are a bit pricy, but still definately worth the money.
- Pk-Pro is also a good supplier for your scultping needs
- and battlefiel-berlin too.
Those are all german shops, but they also offer international shipping. Still it might be that there are also good shops in your country I don´t know about. So maybe you also need to do some research on that too.
@Paul´s Bods: Very interesting. For my purpose it would probably a bit too heavy and big, but I can imagine that it also works very well. The thing about the light is also a very good aspect. So far I haven´t really thought about that, because I always had enough light. What I tested for drawing once and what probably will work for sculpting too (not for painting though), is to use a headlight. It is also pretty small and lightweight.
Hey Bene!
What's the model in the last photo? I really love his pose! This article was pretty useful too, I'm always travelling but never really thought about bringing my sculpting with me..until now!