


Hey jungle readers,
from time to time we ask talented painters and modellers to share their knowledge with our readers on MassiveVoodoo as a guest author. Today, we are happy to offer our good friend Josua a place, where he can tell us a bit about creating awesome water bases with a two component water effect.
You have not yet heard of Josua?
Josua

Josua lives in Bern (Switzerland) and is a passionate painter. The jungle knows him properly since about two years and he even visited Roman for a private coaching session, where both found out that they are quite the same thinking minds on many fields.
Since some time now Josua enjoys creating very powerful bases, mostly by using the element of water. We can only recommend to follow him on Instagram and Putty&Paint.
Roman really got fascinated by Josua's water bases and as Roman used to fail hard by creating his own ...


An article showing how you can work wrong with 2K water effect. Fail.
This guide shows you how you can work with 2K water effect.
... he just decided to ask Josua if he would like to share his knowledge on Massive Voodoo. Luckily for the MV readers Josua said yes :)
Some of Josua's splendid tiny bases

But now, let´s hear what Josua has to tell us:
---------------------------------------------------------------------------------------------
Two
component water effects
What a big topic…
In this tutorial, I will try to share with you all my experiences I have made during the last years of using this effect on my bases.
What a big topic…
In this tutorial, I will try to share with you all my experiences I have made during the last years of using this effect on my bases.
If you want
to start using resin the endless choice of different water effects that are out
there is simply overwhelming. First, you need to separate two things, most of
the time there are two different types of model build products to create water
effects. There is a water effect mostly called “still water” this type of
effect liquid you can find in the ranges of almost every big supplier for hobby
needs out there. On the other hand, there is 2-component resin and this is the
point where things get a little trickier.
Let me explain why:
still water is mostly used to recreate some wet or damp areas on bases/terrain you can also use it to fill some little pools of water, the experience I made is that these kinds of water effects are curing rather bad and shrink a lot if they are used in thick layers. For now, still water only comes to use if I need a good gloss coat.
If you are planning to create some deeper areas of water I recommend using two-component resin. This type of resin you can find in many different values and price ranges. Don’t just search in hobby related stores also have a look into the craft and self-made jewellery. Enough with all this theoretical stuff. Let’s start, shall we?
Materials
you need:
- Resin (in my case pebeo crystal clear)
- A Base to pour your resin in
- Superglue and Hot glue
- Plastic card (make sure it has a glass-like finish to it as the resin will show all the structure afterwards)
- Safety Gear containing Safety Googles and Gloves
- A container which fits over your base
- Plastic container which you put your base on during the drying process to protect your working area in case of leaking resin (yeah, these things happening sometimes)
- Hairdryer
- Lighter
- Stirring rod
- Two one-way plastic cups
- Optional:
- Syringes without needles
- Colours to dye your resin

Preparations
Let me talk
about preparation first. The outcome of your project stands or falls in this
phase of work. If somebody would ask me what the 3 important parts to create a
water base are, my answer would be preparation, patience and more patience. So let’s
dive into it.
First, start to plan your project. Think about where the water should be. From where the stream flows or where the deadly swamp has overtaken the land. As soon as you get your idea fixed think about what colour your water is, is it greenish or transparent, slowly faded to a dark nothing? I recommend searching for images at this stage or even going out to enjoy and study water in real-life.
First, start to plan your project. Think about where the water should be. From where the stream flows or where the deadly swamp has overtaken the land. As soon as you get your idea fixed think about what colour your water is, is it greenish or transparent, slowly faded to a dark nothing? I recommend searching for images at this stage or even going out to enjoy and study water in real-life.
So enough
poetic introductions let’s get a base done.
Before you pour your resin, the base should be built and painted completely at least in this area where the resin will settle later as you don’t have the chance to paint it after you poured the resin.
I also recommend doing all kinds of foliage or small bushes/grass work after the pour unless you want some plants in the water itself. Why? you may ask yourself now. I will explain this later. Your base should now be painted and ready for the pour. Make sure that any small grains or bits of groundwork are solid to the base to avoid pieces of groundwork swimming on top of your pond later.

Now
take your plastic sheet make sure the piece you use has no scratches in it and
has a high shine finish to it. This way you are sure that the plastic card will
peel off properly later. Cut it in shape now the piece should be bigger than
the area where it works as a barrier for the water. To create a smooth finish
in the end, make sure you are able to glue the piece of plastic card perfectly
close and aligned with your plinth this means that the rim of your plinth
should be the border for all the basing work at least in the areas where you
want the resin to be.
After you prepared your plastic card and base, grab your superglue and plastic card. I mostly lay my glue down about 1-2mm away from where the border of the base is. So, if your superglue tens to frost a little bit it won’t affect your base. Glue down the plastic card, make sure your glue path has no gaps as the resin will creep into every hole it can possibly find. It helps if the plastic card is translucent you can clearly see where your glue path may have got a gap. After your piece of plastic is solid glued onto your base seal the borders with hot glue. If you got the first part of gluing right the hot glue is only there to create a second security border for your resin. After this step is done, step back and drink a coffee or a tea.
Come back with fresh eyes and study your base closely.
Search for parts where the resin could leak potentially in the future. Take this step very seriously! There is nothing worse than a leaking water base!! If you are sure your borders will hold the resin inside you can start the pour. On the next pictures you can see how the wall is build up with all the components and a few bases I did with the barrier still on.
Before you pour your resin, the base should be built and painted completely at least in this area where the resin will settle later as you don’t have the chance to paint it after you poured the resin.
I also recommend doing all kinds of foliage or small bushes/grass work after the pour unless you want some plants in the water itself. Why? you may ask yourself now. I will explain this later. Your base should now be painted and ready for the pour. Make sure that any small grains or bits of groundwork are solid to the base to avoid pieces of groundwork swimming on top of your pond later.

After you prepared your plastic card and base, grab your superglue and plastic card. I mostly lay my glue down about 1-2mm away from where the border of the base is. So, if your superglue tens to frost a little bit it won’t affect your base. Glue down the plastic card, make sure your glue path has no gaps as the resin will creep into every hole it can possibly find. It helps if the plastic card is translucent you can clearly see where your glue path may have got a gap. After your piece of plastic is solid glued onto your base seal the borders with hot glue. If you got the first part of gluing right the hot glue is only there to create a second security border for your resin. After this step is done, step back and drink a coffee or a tea.
Come back with fresh eyes and study your base closely.
Search for parts where the resin could leak potentially in the future. Take this step very seriously! There is nothing worse than a leaking water base!! If you are sure your borders will hold the resin inside you can start the pour. On the next pictures you can see how the wall is build up with all the components and a few bases I did with the barrier still on.


Get your safety gear out!! Most of the resin
products are not that good for your skin and probably all of them have a really
bad smell. Make sure you wear protecting gloves, some safety goggles and a respirator.
Get your resin mixed up exactly how the introduction tells you. At this point I
mostly use syringes to measure the exact amount of your fluids. If your
containers got exactly the same lid on, make sure you mark them which lid is for
which container as you only mix them up once and you will possibly not be able
to ever take them off again. Also use two syringes to not contaminate one fluid
with the other.
Now take one of your one-way cups and pour the two components in there. Stir them really slowly together till they are mixed up really well. Don’t be irritated if your resin product turns cloudy at this stage, this has to do with the chemical reaction that goes on between the two parts. If you use a resin with a long curing time I normally let it sit in the cup for 3-5 minutes after mixing. This way the biggest air bubbles will work their way to the top already in your cup.
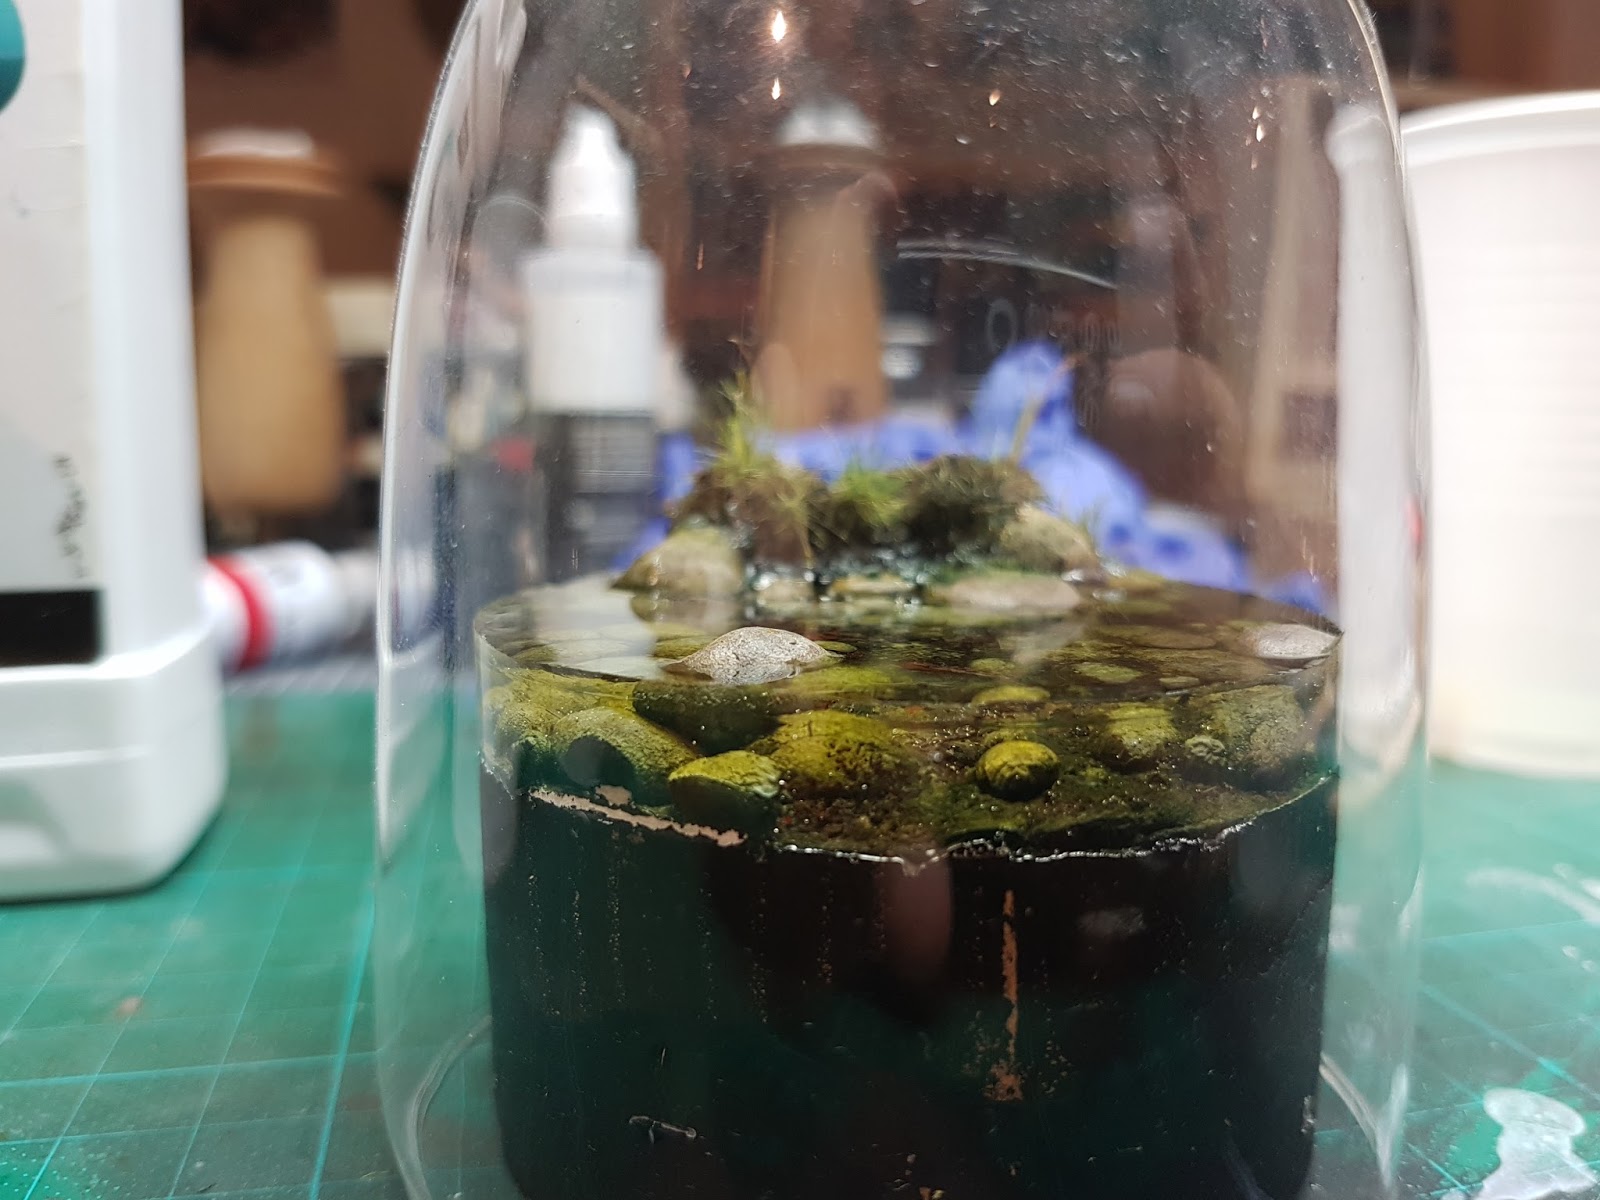
Now the moment of truth has arrived.
Place the base on a surface that is levelled well enough, make also sure you protect your workspace well enough, as in case of a leak you should better be prepared. I normally use an old lid from a plastic container that is big enough. Take your time while pouring the resin where you want it to be. Make sure you pour it only in one area and not move the stream that goes from your cup to the base too much. This way you prevent bubbles to appear because of the unregularly motions. Fill as much as needed.
To remove air bubbles there are two ways I learned during my resin pours. If you gently blow over the surface with a hairdryer you will see the bubbles start working the way to the top. Please make sure the distance between your blow dryer and the base is long enough, first that you not blow the resin right out of it…. Believe me I know why I tell you this. The second is a bit riskier and now you will understand why I told you to create all sort of foliage work after the pour. Take a lighter and slowly work your flame over the surface this will eliminate the bubbles as well. IMPORTANT: Please work responsibly with fire do not use the lighter technique if you already have some static grass or a Miniature on the base.

Now take one of your one-way cups and pour the two components in there. Stir them really slowly together till they are mixed up really well. Don’t be irritated if your resin product turns cloudy at this stage, this has to do with the chemical reaction that goes on between the two parts. If you use a resin with a long curing time I normally let it sit in the cup for 3-5 minutes after mixing. This way the biggest air bubbles will work their way to the top already in your cup.
Now the moment of truth has arrived.
Place the base on a surface that is levelled well enough, make also sure you protect your workspace well enough, as in case of a leak you should better be prepared. I normally use an old lid from a plastic container that is big enough. Take your time while pouring the resin where you want it to be. Make sure you pour it only in one area and not move the stream that goes from your cup to the base too much. This way you prevent bubbles to appear because of the unregularly motions. Fill as much as needed.
To remove air bubbles there are two ways I learned during my resin pours. If you gently blow over the surface with a hairdryer you will see the bubbles start working the way to the top. Please make sure the distance between your blow dryer and the base is long enough, first that you not blow the resin right out of it…. Believe me I know why I tell you this. The second is a bit riskier and now you will understand why I told you to create all sort of foliage work after the pour. Take a lighter and slowly work your flame over the surface this will eliminate the bubbles as well. IMPORTANT: Please work responsibly with fire do not use the lighter technique if you already have some static grass or a Miniature on the base.

Now the hardest part of the whole tutorial
arrives. Waiting. Put a container over your base to prevent little dust
particles or insects flying into you’re curing resin and wait as long as the
instructions of your product tells you to. I even recommend you wait a bit
longer as I had some bases that were drying a bit slower than they should. The whole drying process pretends on how precise your mixing ratio of the resin was
and the amount of resin you poured.

After
waiting in my case between 24-36 hours, I slowly start to pull away the barrier.
In this work step it is important that you work slow and precise. If you see
during the removing that the resin won’t let go the barrier it is probably not
cured well enough. If this is the case put it away again and try it in a few
hours again. Now we got a cool base already if your barrier worked well enough
you should have a smooth surface right away without any sanding.

Now what you got for sure is that your resin climbed your barrier walls a bit, this is totally normal and has to do with the capillary effect of fluids. To eliminate this there are two common ways. One way is to cut away the excess with a sharp exacto knife and sand it down. This is not the method I prefer to use though. I normally pour a second layer of resin on top of an already cured resin layer. I am sure most of you people tried to fill a glass with water or liquid of your choice up to the brim and even a bit more that it is barely not overflowing.

Now what you got for sure is that your resin climbed your barrier walls a bit, this is totally normal and has to do with the capillary effect of fluids. To eliminate this there are two common ways. One way is to cut away the excess with a sharp exacto knife and sand it down. This is not the method I prefer to use though. I normally pour a second layer of resin on top of an already cured resin layer. I am sure most of you people tried to fill a glass with water or liquid of your choice up to the brim and even a bit more that it is barely not overflowing.

This is
exactly what we will do now. Mix a second batch of resin and make sure you got
it right with the colours if you tinted the first layer then slowly start to
add resin on top of the first one till you got a good levelled water surface.
Let it dry as the first layer and you are good to go.
This is the
stage where I want to talk about test pours.
This way of creating realistic and cool looking water is not that easy to get right at the first try. It needs in the most cases some practise. This is why I highly recommend you do some test pours. Try the whole technique on a base that you don’t need any more or get yourself some cheap pieces with the same shape as your final base and test all the things I told you above on this base. It is heart breaking to see a base that was created with love get destroyed because of things you could experience and eliminate after a test pour.
This way of creating realistic and cool looking water is not that easy to get right at the first try. It needs in the most cases some practise. This is why I highly recommend you do some test pours. Try the whole technique on a base that you don’t need any more or get yourself some cheap pieces with the same shape as your final base and test all the things I told you above on this base. It is heart breaking to see a base that was created with love get destroyed because of things you could experience and eliminate after a test pour.
I give you
a small list of what things you should test in your test pours as I had
problems with all of the points that will be on the list and found a way to
eliminate them.
Problem
|
Solution
|
Colour reacts with
the resin and wrinkles up.
|
Coat all coloured
surfaces with one or two layers of gloss varnish or gauzy agent (I explain
what this product is, later).
|
Plastic card doesn’t
peel away from resin after curing.
|
Bad thing, but not so unlikely. Try another
type of plastic-card.
|
Basing materials
swimming on the surface.
|
Glue them down
properly. Thinned down white glue works good in this case. Make sure the glue
is completely dry and doesn’t react to the resin.
|
The time to
eventual repair a section of the resin is now.
Make sure that the resin is fully cured before you do any sanding on it, otherwise it will turn into a sloppy chewing gum mass. Sand the part down till it have the shape you want make sure you use really fine grit papers at the end to get the part as fine as possible. After sanding paint over the area with a good gloss varnish. I personally use gauzy agent from AK pro, this stuff works just like a gloss varnish but is made for enhance and repair canopies of scale model fight jets in the first place but it works like a regular gloss varnish with the ability to fill small scratches way better than gloss varnish. It is really good for exactly this task.
Make sure that the resin is fully cured before you do any sanding on it, otherwise it will turn into a sloppy chewing gum mass. Sand the part down till it have the shape you want make sure you use really fine grit papers at the end to get the part as fine as possible. After sanding paint over the area with a good gloss varnish. I personally use gauzy agent from AK pro, this stuff works just like a gloss varnish but is made for enhance and repair canopies of scale model fight jets in the first place but it works like a regular gloss varnish with the ability to fill small scratches way better than gloss varnish. It is really good for exactly this task.
 |
| right after removing the plastic |
 |
| after applying the gauzy agent |
You now
have all the knowledge I can give you at this point about how to create
resin bases. My last hint for you guys is not to get frustrated with the topic,
do as many tests as you need and if you feel secure enough hit your base. There
will be failing and bases that are not turning out as good as you want them to
but important is to learn from your mistakes.
Happy basing,
Josua
Happy basing,
Josua


Phenomenal results, thanks a lot for sharing!
Great tutorial, been looking for something like this for some time now
Great tutorial, Josua!
Big thanks,
Cornel
Thanks Josua
This tutorial is really helpfull , gonna try things out at the upcoming Projects .
Jens
The bases are great and I've ordered the resin to test it asap.
Just one question: when you glue the plasticard to the base you really use superglue?, it's easy to remove the plasticard when you have used superglue and the resin is dry?. I think it won't be easy to remove the plasticard if it's too attached to the base. Can you give us more details on this part.
Great tutorial, thanks a lot.
Actually i used superglue till now. Never ha a big problem to remove it afterwards. Even if the glue is ultra strong he was gone after a little bit of sanding. I am testing a version where i use masking fluid as a glue but i never did a pour like that till now.
Love the use of superglue for it. I am a big fan to use superglue for most of my glueing stuff. Superglue rules all dem other glues :D
MV has some very clever friends. Nice work Josua, thank you.
Thank you sir
Awesome tutorial Josua! Thank you very much for sharing this knowdlege with us. I'm a total newbie with basing stuff and wàter always frightened me.
if you had to sand the edges what grit sand paper would you use?
What do you typically use for the clear plastic sheet? I am about to attempt a watery bog themed base for my Flesh Eater Courts and am not looking forward to doing the 130mm Terrorgheist base. I have some chinese takeaway containers to try and experiment with but I'll see how I go.
Thank you for this turtorial! I suffered from 'Plastic card doesn’t peel away from resin after curing'... but the rest worked quite well!
thank you for sharing your knowledge!
Thanks for the info! Do you ever do water bases with something in the resin, suspended, like not attached to the base? What is the technique for that?