


Hoorrooiiiooo Jungle Painters!
The winner of last weeks tutorial voting is dropping in today. Sorry for the delay, but we think everybody will be happy to the see the article.
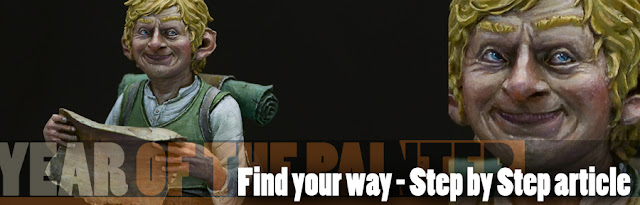
You did vote last week here on the jungle blog and it was a close call, but finally the little Hobbit did find his way. The winner with only one vote is:
Find your way!
As a little Christmas gift we will skip tutorial voting this week and you will just see the article about packing miniatures without voting for it. Cool, eh?
If you want to keep track with an overview on what has happened so far in
MV's year of the painter 2 please check this link!
_______________________________________________________________________________
You want to support Massive Voodoo?
If you like to support or say thanks the monkeys of Massive Voodoo in what they do, please feel invited to drop a jungle donation in their direction via paypal or check their miniatures they got on sale here.
_______________________________________________________________________________
Roman is now taking over and writing the article - we hope you enjoy!
_______________________________________________________________________________
Welcome,
this article takes you through my thoughts while painting this bust by Midnight Miniatures.
I really fell in love with the sculpt by Lucas Pina, a hobbit, smiling and ready to follow his wanderlust. A beautiful sculpt with no weaponry, no brutality, but still tons of character and mystique magic.
To let you know on what we are talking about, here is my finished version:


The Painting Process
In this article you will find - again - different photos of different quality. I took these some months ago while switching my mobiles, so some of them are really ... uhm, not so good.
My focus in this article will be - again - not a step by step guide and color guide, but a try to grab a wider thought on why he turned out like he did. These days it is really hard for me to give you exact or precise color recipes. Why you might ask? Well, I am starting all my paintjobs from primary colors and black and white on my wetpalette and mix every color I need on demand. So there can not be a color recipe of a specific Vallejo or Citadel Color as I am not using them.
This is where I start, with the purple and greenish yellow I just play around, the rest is primary colors from Schmincke Primeacryl.

I know that some of you now might ask, Roman - please explain more on your mixing process and be sure I will do in future articles, but still I need to understand everything myself through more painting hours before teaching more. And it is not subject of this article.
Subject is the little Hobbit ...
I primed him with black GW Primer, followed by spraying an olive bright green you can still see on the plinth's wood all over the place. Then I placed my basic color decisions via the brush and also placed first shadows here and there. If you look close on the color I used for his shirt (not the vest) you can see that even I aiming to paint white I am not starting with white. I used a tiny drop of green and grey in my basic color for this. Why? I can only recommend my article on painting white to you.
That was a quick jump into the first steps right and I can promise you that the full article will be a wild ride into my brain. I bet there are some thoughts who are helpful for some of you.
Sorry for the blurry photo.

As the photo is so megablurry I decided to take the next one with the bigger camera. I already did some more steps. Mainly focused on the face. First highlights and where painted in the skintone, careful glazes of red here and there and I had to paint the eyes. This face drew so much of my painting attention as the character who appears there is just too lovely.
On this photo you can also see that green is mixed in the basic color of the hair, the leather and well, yes everywhere to connect the model properly in the atmosphere I am seeing him in.

The hobbit's eyes.

My old mobile did really weird photos, when it comes to colors.

 Upper photo, in the back you can see how my wetpalette gets a mess from mixing what I need. Believe it or not right now it is hard for me to explain in words what is happening there. I focus back on the hobbit and can tell from the bottom of my heart that I enjoyed this smiling face on my workbench.
Allright, after the work on the basecolors and the kickstart on the face it was time to spent some time to on all the other areas. As I am working a lot with texture recently I can show you different versions of texture I am working with. On the clothings and fabrics you can see thin lines that follow the direction of the fabrics. On the leather and map part you can see some random dotting that was achieved with using my uncleaned airbrush, basicly this is mainly colors spits. Nothing to clap your hands for, but I am enjoying this way so much.
Spitting and slapping paint to the map and leather. And by happy accident to a lot more areas.

Very important for me in this stage was a black and white photo I did. It tells me about the seperation between the busts elements. Color hues are not too close to eachother to get lost in terms of readability. Well, the hair is quite close to the skintone though.

The leather texture went a little crazy, call it wild. Slaps of brown orange and yellowish browns appeared here and there with wild brushstrokes and -slaps, before the airbrush spitting did the rest to make the chaos complete, but where you find chaos you can clean up.

Spitting and sparkling with the airbrush. Lines for fabric while highlighting.
 Now it is turning white in the highlights. I was working my may to pure white over adding more and more white to my basic color.

All in all the most important message in this article that I want to point out is the vision you should have when starting a project. Mine was truely in a green environment. I made a quick sketch, but your imagination could take you further into a deep forest or field of spring grass.

With this color vision in the back of my mind I pushed further in the painting process. More detailed, edge highlights, clean up transitions here and there, but still I took care to have the green influance it all.

The map recieved some landmarks the little hobbit can follow on his journey. I mean if you go out for a journey it is always good to know where you are heading. X marks the spot. Maybe that is his friends tavern or barbecue party, who knows. It's all in your head.

In the upper photo and the one below you can see the quick sketch I made on the glass bottle. Slapadislap! Sketch.
Cleaned up the dotty mess from spitting color with painting highlights on the different material on top of it. The leather parts recieved a little detail love in their shadows by glazing in dark black browns, with brighter colors I worked with the texture that appeared due my wild approach. Did the metal parts black at this stage too.

Final work took me quite some time and was mainly about increasing detail. Sharper edge highlights, a little push in a highlight here and there. Finally painting the hair, that I did not like to touch earlier.


Darklining here and there. See backpack, plus the area where the leather parts meet the fabrics and where fabric meets fabric. This is important as it seperates different materials in detail and makes the model more readable for the viewers eyes.

Painted the metal parts, but in a simple way as they are no focus on this sculpt.

Painted the bottle to finish with searching for inspiration on wine bottle paintings via google and painted what I saw there. It is always good to check back with inspiration and how others painted something. Still the green is visible everywhere, right? In the hair, backpack, white fabrics, skin.
Green will influance it all if your vision is a green environment.


Still a black and white photo in the end also makes me see the seperation of areas I was aiming for. I got bright hues of colors, medium ones and dark ones. The setup here is nothing I would call perfect as for my part, still skintone and hair is a little bit to similar in the hue of the color choices.

Well, I really enjoyed that smiling fella a lot. It painted itself. I am still not sure in the end of the hair color, but I kept it as this guy reminded me of one of my godchildren, somehow ... when he will grew up.
Remember, when you start painting a project and you want to put love in your piece, think first about where the model is, what he/she is doing, even it is only a bust. You will think yourself in his/her shoes and this is always a good thing to do to understand many things in life.
I can highly recommend to paint this bust. He smiles at you all the time and the only two things you can do in return is smile back and paint.
Keep on happy painting!
Best Wishes
Roman


Hi Roman! Thanks for the tutorials. I was curious about your airbrushing: How much do you use it, and what pressure do you generally use? I'm just starting to fool around with one myself.
Nice and thanks for the way ;-)
We finally see the hobbit, thank you!
Wonderful bust and great write up, worth the wait, thank you.
Please. Please make another hardcover book and publish the best of your MV articles in print. I so love your work, but hate to paint and surf at the same time. I like big heavy tomes filled with miniature painting guides. You got all the contents, so just publish your stuff like Angel Giraldez or CMoN already did. I guess, it will be just as big a success...