Kong's WIP-Thoughts Oct02

by Roman aka jar

Hah! Quicker than expected here comes another one of my brain farts...

I am actual organising myself through these WIP-Thoughts, so i hope you don't mind getting served another one so quick. A lot of my projects are in the "Waiting for equipement - State" so i am talking about those who getting forward.

Thanks to Vittorio for his idea of weathering the statues on the strange base i have shown you lately. I am sorry for not being able to do a Step by Step on that base as it has been only one big step to come to the point i had shown earlier. The muse rode me well and so i wasn't able to get some photos in between. Sure there will be more articles about my weird style of doing bases but not on this one.

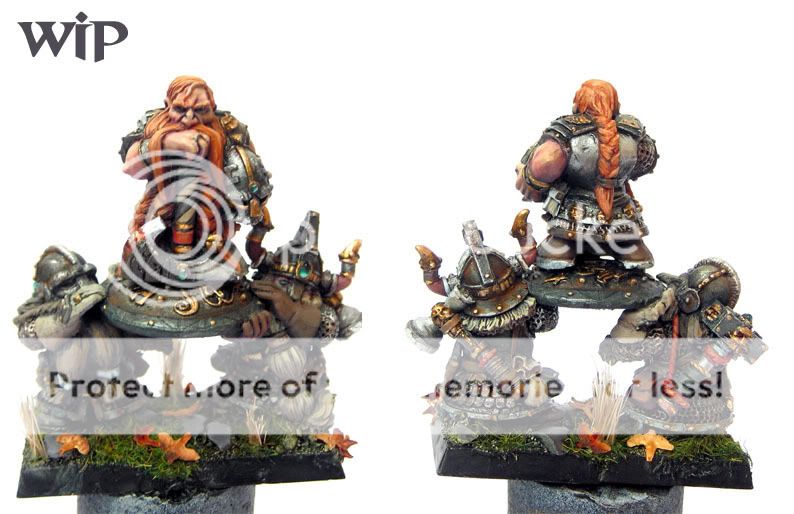
I told you about using a bible theme on this one and i would like to call this project Kain and Abel, this was inspired by 2 Red Box Games Miniatures i had other plans with but those plans really got stuck in motivation. So Kain and Abel, two brothers angry on eachother, one good the other bad, that was the reason for the base. I did finish one of them last night and the base also got some steps forward - still a Work in Progress thing but let some pictures explain what i have done:

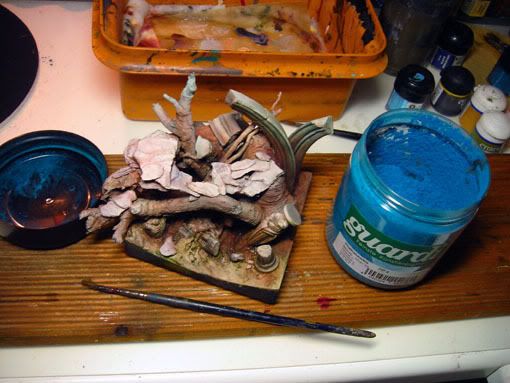
I have used tourquise artist pigments, brought to the base with a dry brush and did nothing more than using some Smoke from Vallejo, thinned with water on the statues around the base. The pigments now have been brushed off on those areas. If there were too many on one place i have used another brush to bring them together with the wet parts from the smoke...


After those great models from Red Box Games stood around for ages more or less finished i have decided to use them both for this idea - the first one is mostly finished, set on the base and will only get some final touches after both are up to the scene to get all together - also i guess i have to take the final pictures before a brighter background, the dark trees and roots are not really good to see... excuse me for that fact.

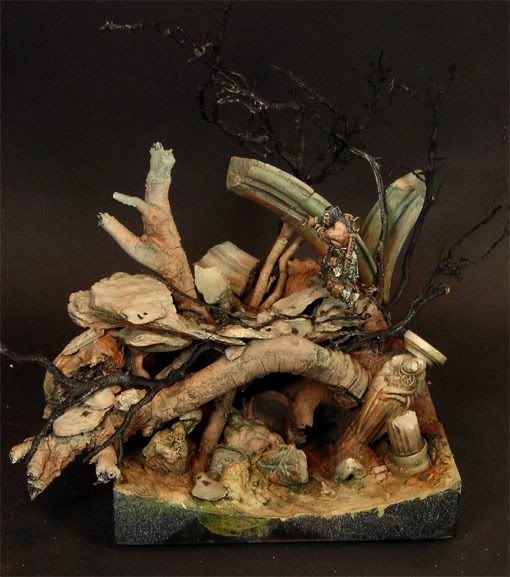
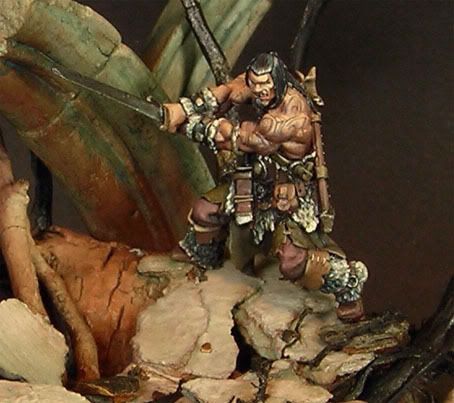


Today his brother will be painted - sure i don't know how far the muse whips me and the run of my brush. I hope you like it so far - sure there is still work to do, but i really like these 2 models grow finally in such a totally different direction as planned, haha.

I did take a photo on the balcony to see these dark roots around the base and to get a "normal" impression on what i am painting there - sorry for not being able in taking good pictures still - so here on the balcony with light from the sun, so also very strange like the pictures from the light box above:


After  Picster told me about a  competition over at the enourmous Warhammer 40K Space Marine platform, 'Bolter and Chainsword' about painting a Space Hulk Terminator in traditional Blood Angel chapter colour scheme or a following Chapter i thought about taking part, as i wasn't able to get hold of the Space Hulk game because of whatever, i asked a friend of mine if maybe i may get one of them i really like. In the end after a million times asked he decided to give it to me - thank you very much, my Kurtheit.

The rules of the comp say, just glue them together and paint them as they are without a special base or conversion. So i have started but sure cleaned and prepared him before painting him. I guess he will be a nice model to do another step by step. I have decided to make him from the chapter of the ANGELS SANGUINE, half red, half black. Time is to the 26th Octobre and i am not sure if i am able to make this... well see, the muse is the key and if she is with me maybe it'll work out in the end. Ok, here we go...  i call this project BASH, Blood Angel Space Hulk, hehe... stupid i know - stop blabla - allright:

Started him on a black/white priming, and went with about 3~4 Layers of thinned Red (Blood Red and a tip of Dark Flesh) on his red half to set the basics, sorry for the blurry pic this time:
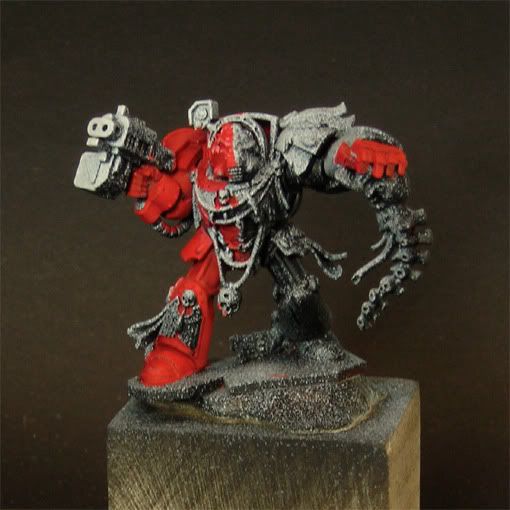
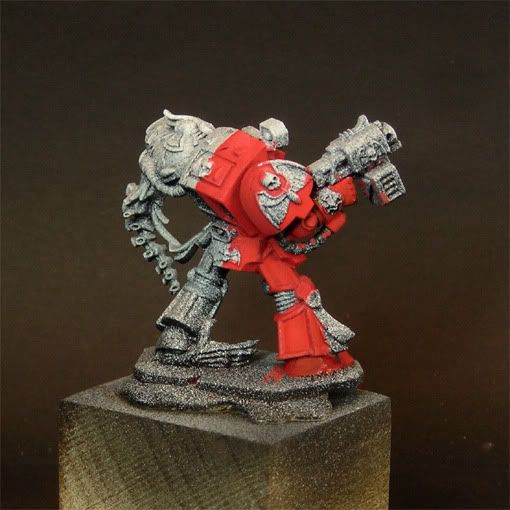


After this i took one of the GW inks, Badab Black with a tip of Dark Flesh and inked the red parts with it to get some depth to work with. Also i painted the other half of the Terminator in Black. I didn't use pure black here, because in my eyes it is a bit too intensive and doesn't look natural. I did put in some ice blue in chaos black to get a good basic tone for the black armour parts. To the top i put more ice blue in it, it is very subtile but while working it out i hope you will get what i mean. The skulls/eagle wings have been painted with a basecoat of dark flesh.
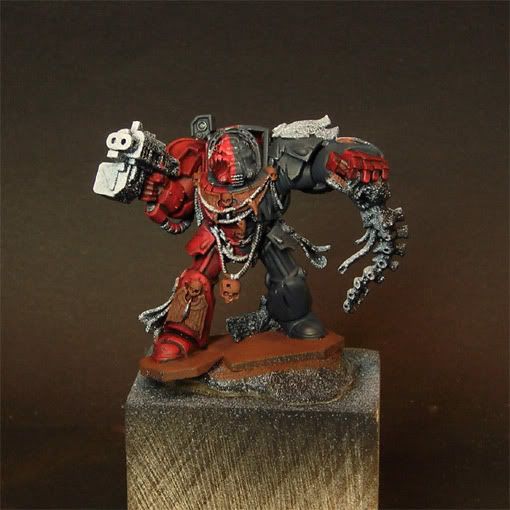
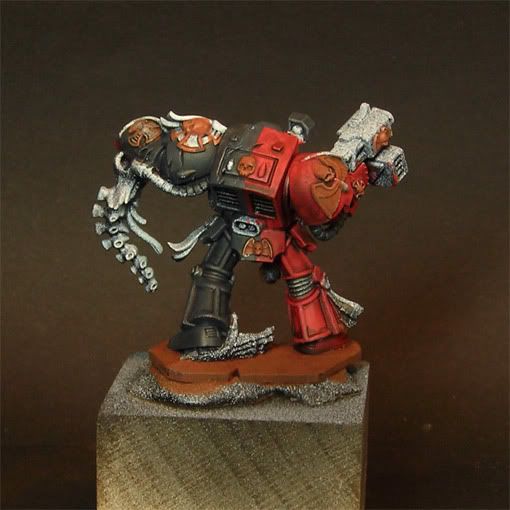


As you can see the model is just put on top of a wooden piece to get a better hold while painting him...  So far from the moment, i guess i will write soon, haha... i know that my river of workflow must seems strange to some :)


Hope you enjoy! Happy painting!
Regards
Roman


Catachan Standard Bearer up to ebay

by Roman aka jar


Good evening,

just a quick information that the latest painted Catachan Standard Bearer now is available over ebay. So if you want a well painted gaming miniature to held your flag of your Imperial Guard army high or just a nice model in your cabinet you are invited to check out the upcoming 7 days auction on him...

Klick here!

Regards
Roman


Kong's WIP-Thoughts Oct01

by Roman aka jar

Aloa,

uha, Rob your Maulg is already loved by me. I am so much... i mean really so much looking forward seeing this project grow. I wouldn't have been in the mood of a battle with you, except there won't be any chance of me winning this - this idea really rocks and i love to see it rise from the dust of your brain :) - as you see we are trying to organize this blog by seperating our WIPs from eachother, there is still a lot of thinking going on for improvement - if you got any ideas, please don't mind telling us.

Now, as the Chimp told you what he is up to, the Kong will do so too, before it is getting boring in here. First i want to say that this Chimp/Kong thing is not about any comparison of both of us neither it is about tail comparative or something like that. Chimp and Kong are just friends and a friend of mine told me lately that he saw a documentation about gorillas, where he did find out that these sort of wonderful animals have a really small penis - so you see, really i ain't up to challenge this crazy big dicked chimp anytime, never. Just running around the jungle together and smashing and roaring around... while sitting on our workbench doing tiny miniatures, haha.


Ok, what's up on my workbench lately? A lot and also nothing. 

Denise is still waiting for her Gagball i am preparing at the moment, i have tried to sculpt it 3 times and i failed, now i am waiting for a friend coming home from a sculpting workshop, haha.


The Sniper tower is waiting for 2 component water to get some steps further. Patience is the key to a harmonic state of mind.


I am thinking about stripping the Geisha off from colour - somehow i ain't sure anymore if i went in a good color direction with her and also there is a lot of colour on her, way too much at this state of progress.

Also i am preparing some comission work for the gaming table - some Tzeentch Models again. 


Carlos, the Miniature i am painting with my Padawan is still at the same progress, as i have a lot of things to organize at the moment i am not finding the time to get some more hours with Simon - at the moment i have to say sorry, but i am so damm hard looking forward to spent some moments on the brush with you again. 


As it is up mostly some preparation work at the moment, times of waiting and silence in my brain i can't stop Rock'n'Rolling - so i did pick up some mostly finished Models from Red Box Games to finish them up. While i did so i had - in my eyes - a very intresting idea, but i am hoping that noboby will blaim me to use a bible story for its background...  here is the base totally epic chaos with some statues from Confrontation in it. Also there is a root and my actual Work in Progress of the base, painted wet in wet on the base (mixing the colour on the base, like painting on canvas, you can still see that it is wet, haha). I have used Color, Pigments, Inks and coffee. Now i am waiting for it to dry before i start painting on this base ground for more detail... strange weirdo base, but perfect for my idea...


Which miniatures will be set there won't be told at the moment - as far as they are from Red Box Games again and they are telling a story from the bible... holy cow, i don't want to break any rules of faith in here but this fits so good. So please be patient with me.


So far from the Kong's Workbench... Enjoy your weekend with a brush in your hand and a barrel of fun in your heart...


Keep on happy painting!
Regards
Roman
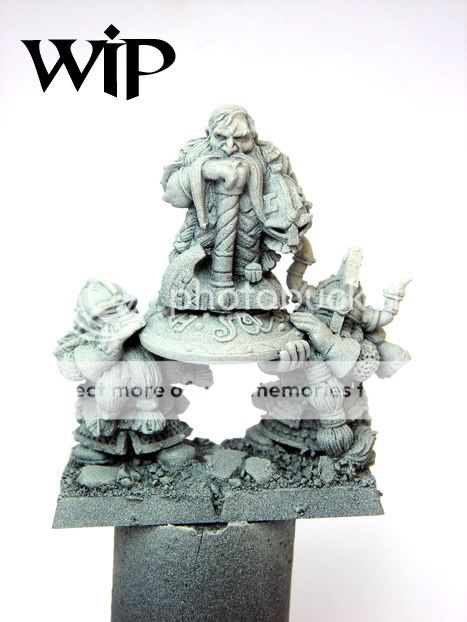

Chimp's Captain Maulg WIP 1

by Robert aka muhani

Hi, it's me this time. ;-)

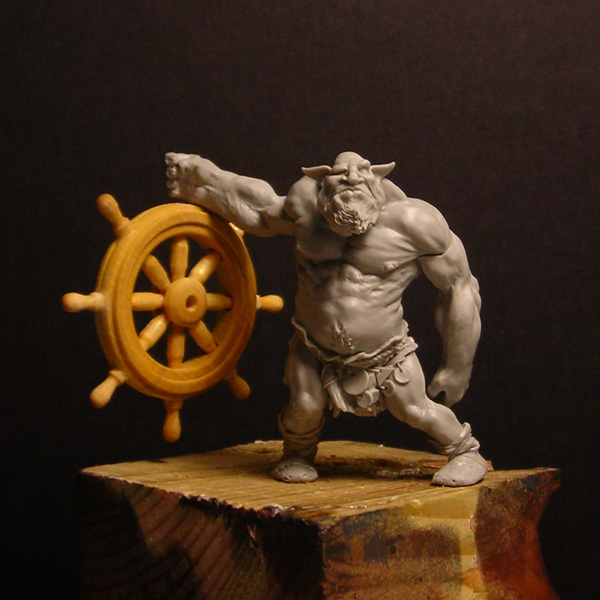
And the figure, I want to show you, is "King Maulg" from Artefactory.
I got this mini from Roman. We planned to battle against each other, painting the same mini and finding out who's one is better, just for fun. hehehehe
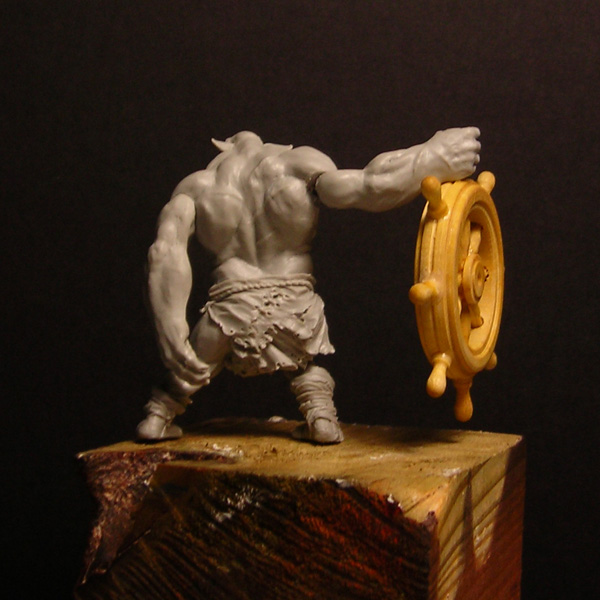
Roman has much more of this artistic color-harmony-vibrations, massive creativity and so on .... but what I have is massive patience and a regular job. So please have also patience with me - this will not be finished tomorrow, or next week, or ..... maybe Maulg will be some kind of long-term project. ... and not to give you false hope, Roman won't paint Maulg in the upcoming time. - He did already. - Ok, single battle. Me against me. .... thought, I could omit the battle-idea-thingy, but I have to tell you, because this explains, why I have made my thoughts about "King Maulg". ... and while thinking, I got the idea to make Maulg become a pirate, sinking with his ship. Sounds simple, but for me ..... long-term project.

So here are the first pictures:


Yes, there is not much, you can see at the moment. ... Maulg assembled, holding a steering-wheel, no ship ....

Just want to share this first impression with you. Doesn't he already look like a proud Captain. Are you already feeling the wind, smelling the salty air of the coast? Can't you hear the waves breaking against the planks of the ship? No, me neither. - but let's see, how it's going on. ... and patience, please. hihihi

Regards
Robert

Step by Step - Dwarf King

by Roman aka jar

posted by roman, jarhead, kong


Hello brush friends,

again its me - told you about those real old tutorials of mine, which i will spamm here sooner or later to have everything on one place.


This one is about 3,5 or 4 years old now, sure my painting changed, but i hope some thoughts might be intresting for one or the other who is reading this. Model is from Games Workshop, Dwarf King on shield bearers, but with another dwarf king above, as i can remember he is from the Mail order.

Introduction

This guide is obviously not high end or the true word of figure painting. It aims to those of you who are interested in just an insight into my way of working, gives my thoughts and my brush strokes a word and serve perhaps to one or other of you as a proposal while painting. Surely there are ways and means to paint the model at a higher level, in the end the model is used on the gaming table.


Basics

The dwarf king was set on top of the shield with a metal pin to get maximum security. Since there prevails a small conversion by using another dwarf king the bridge at the bottom of King was removed with a hand drill, sandpaper was used on the model so that it adjusts the curvature of the shield he will be standing on. 

The model has been primed with black primer, followed by white primer. Like always, click the pictures to get a bigger view, most of them are big, but not all - yeaha, weirdo style, hehe.


First Steps of paint - primary colors Order:

Used combinations of colors:

Skin: Tanned Flesh / Bleached Bone (approx 60/40)

Beard King: Vermin Brown / Fiery Orange ca (50/50)
Beard/guy left: Schorched Brown and Chaos Black (approx 80/20)
Beard/guy right: Bleached Bone / Skull White / Graveyard Earth (ca. 50/20/30)

Pouch on the back of the bright-haired: Bleached Bone / Skull White / Graveyard Earth (ca. 50/20/30)
Small bag, rear of the brunette one: Schorched Brown and Chaos Black (90/10)

Gloves on brunette: Bleached Bone / Skull White / Graveyard Earth (ca. 50/20/30)
Gloves bright haired: Schorched Brown and Chaos Black (90/10)

Axe handle - Part 1: Bleached Bone / Skull White / Graveyard Earth (ca. 50/20/30)
Axe handle - Part 2: Chaos Black / Bleached Bone ca (80/20)

Shoes of  King: Chaos Black / Bleached Bone ca (60/40)
Bearers: change color of the gloves and shoes

Since I have not used other combinations of colors, I think, should be recognizable to other areas.

Second coats Order - True Metal

Here, once a small illustration of how a single metallic tone (I have used Mithril Silver) could be mixed to different colors for metal.

Just mix an ordinary "other / normal" color to it and you open a lot of newl possibilities of a truly intresting metallic color. I have mixed here a lot  just to clarify what i mean with this point - I will not use all on the dwarf ...


A = pure Mithril Silver
B = MS / Ice Blue
C = MS / Hawk Tourquise
D = MS / Camo Green
E = MS / Dark Angel Green
F = MS / Schorched Brown
G = MS / Deadly Nightsade
H = MS / Space Gray Wolves
I = MS / Snakebite Leather
J = MS / Liche Purple
K = MS / little Chaos Black
L = MS / more Chaos Black

To the dwarf king - I hope this is understandable - extremly weirdo style i had those days some while ago - don't panic, take your time:


My basic thought on the metal parts on the Mini: man, these guys almost wear entire plate armour, chain mail, etc. ---> i had to focus on the king also with the metal parts.
The armor of the king was in the brightest shades of paint to stand him out. That is why his armour parts, already here in the beginning became the brightest and he gets more brighter parts than the two other dwarfs.

The axe was given a basecoat of G and was re-painted over with B. Here everything again without the lines and letters:


Initial Shades

You need to take care, that your color is thinned with water, also take care to get most of the water out of the brush by shed it over a tissue or something like that, because if there is half a river in your brush your miniature will drown in this shade and you are not able to control it very good. Always remember while using a thin shade to move the brush only in one direction, not with the tip of it, use the length side of the brush to move the pigments where they shall stay:

Since the previously applied metal is at its place i will do some shades, I'll explain this in detail. Starting with a simple shading, means thinning the colour you want to use very thinned with water. You can use whatever you like for this. Setting some basic shades on bright ground helps me to see where the lights will be and i can work myself to them. Now it is time to get wild, at the moment there is no need to work specificly concentrated, just have fun with your colours...


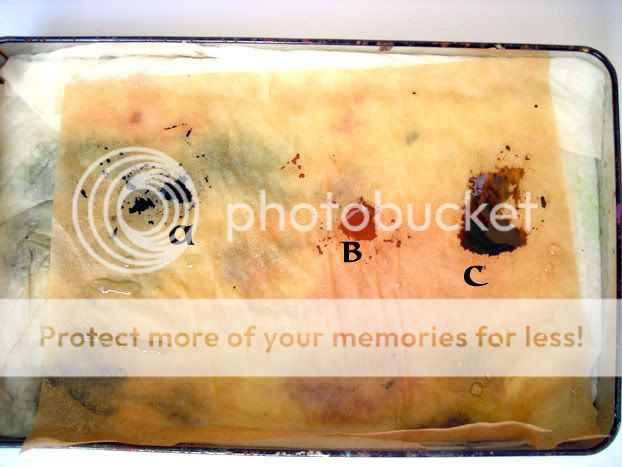
For the first shade i have used a mix of this:


And it looked like that on my wet palette:


First step:
A = Chaos Black / Smoke / W&N ink - Peat Brown (approx. 20/40/40)

Second step:
B = pure Schorched Brown
C = pure Chaos Black

Next, I used thinned pure Chaos Black, to roughly set the darkest places on the metal.

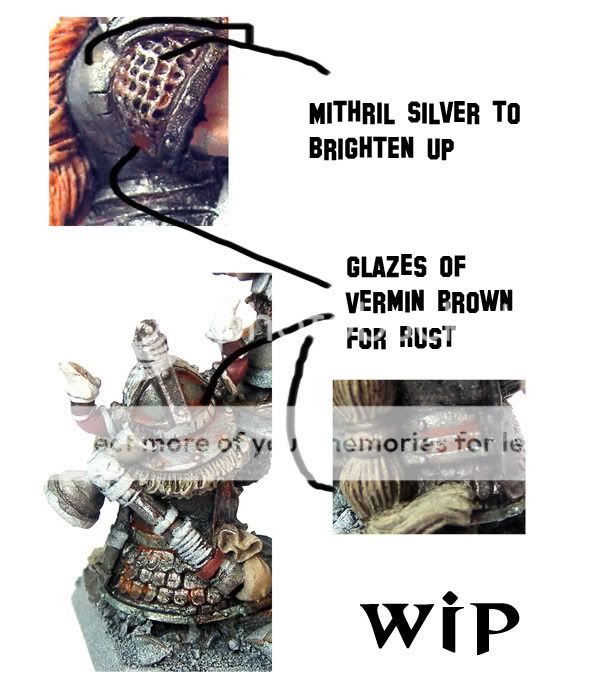
The Schorched Brown glaze was targeted at points, which I later want to have an old, tattered, used look, weathered and rusty - similar to these gentlemen:
klick!

Here, I will of course again get brighter and darker again and again and again brighter dark blubb, etc. - but more on this in the next round - this time the image to the text above:


Rust gain and first light points on the armour

Pure Vermin Brown, that was a little stretched with water was used to intense the rust effect. This has been done to intense the shades of Schorched Brown. Not as an additional special step, only for intensing what i saw and i did like - in my eyes it is always a good thought to intense things a bit more extrem when you like them.

The armor and chain mail were given a coat of Mithril Silver, which I had mixed again, as always, (water, etc.). The order was made on the points on which I have defined for me the light. Yet it all looks pretty rough. But the next steps will be here to clarify more precisely all the groundwork.


Shading the skin and setting the darkest parts of the metals

The skin was processed only with multiple glazes of Tanned Flesh, that by increasing the addition of Hawk Tourquise / Chaos Black (approximately 40/60) has been darkened. Thus, the dark areas of skin were determined. So far, this is all still the guide to begin shortly with the brightening and shading i was able to at this time ago.

The hair was retouched also available with the mix (as HawkT / ChaosB). At the hair on the top of the skull - i mean above where the light impinges on an even keel, i had done nothing here.

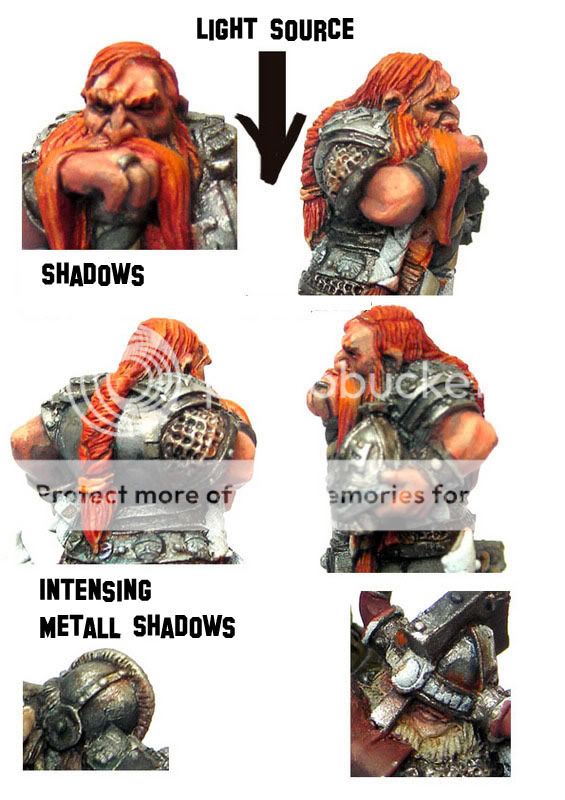
The metal has also received a strengthening of the darkest areas with this mixture.


Start skin brightening and gold

I mix gold, just like the rest of the metallic colors i use usually a drop of "normal"  color in. By gold i either use a bit of Dark Angels Green or Liche Purple. With Liche Purple, in my oppinion in the end it looks a little ostentatious, while the green leaves are more blunt look. But as I only mentioned my personal experience and evaluation.

The base layer consists of a mix Gold Shining Gold / Dark Angels Green (approximately 70/30).

The skin was coated in the direction of the brighter areas with glazes in Tanned Flesh. Now I'll start soon to work out the brighter parts.


More Brightness to the skin, other metal work
The skin was further lightened with Tanned Flesh, with increasing addition of Bleached Bone.

The hair of the king were darkened with a glaze Liche Purple.

The metal still got a dim stronger shadow with pure black - Warning too thin here, of course.

The floor was given a basecoat of Schorched Brown and Dark Angels Green. This mix leaves the ground, slightly earthy, mossy contribute, in my experience.


Skin Darklining, grass, straw, brown bags / gloves and eye start

The skin was further lightened with almost pure Bleached Bone. Here I note that I did not brighten the whole skin, now slowly beginning to grope in the places where the pure light will be predominantly - or at least I try it, haha.

The eyes and the gems were painted with black.

The bags / gloves were given darkness with the addition of Hawk Tourquise / Chaos Black (approximately 50/50) in their respective primary color (see above) to also begin there with shadows. By further addition to almost pure black, the shadows were also located there. For the first brightening step there was placed a drop of Bleached Bone in the base color.

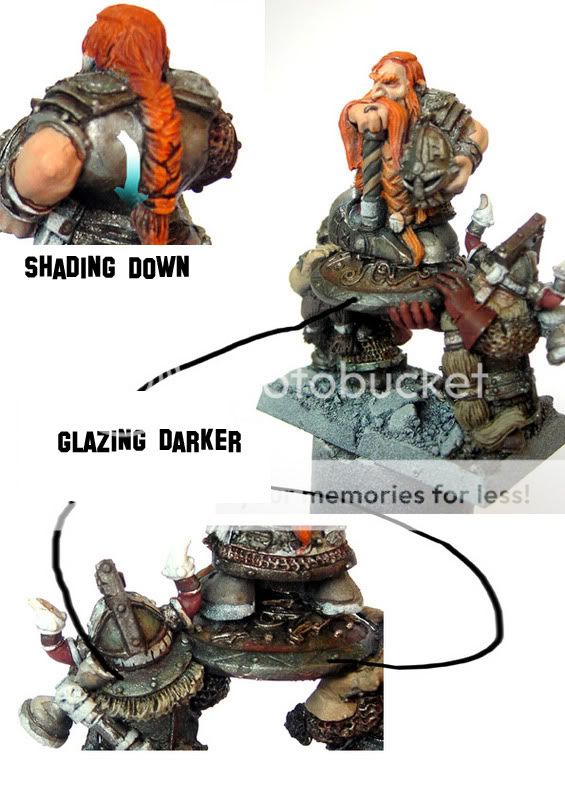
The entire miniature was given a total Darklinig cure to the areas targeted slowly separated from each other. This serves me as a basis for working out the respective areas. The black was applied for Darklining as always glazing, but this time a little water was held back in the brush so that everything selectively accumulates in the depressions.

The base was covered with grass litter. The retouched after drying with a heavy glaze of brown and watery, "has been flattened."


Further steps in the skin, lightening of the metals, eyes, hair of the King, Gold

The skin was given a final highlight of pure Bleached Bone.

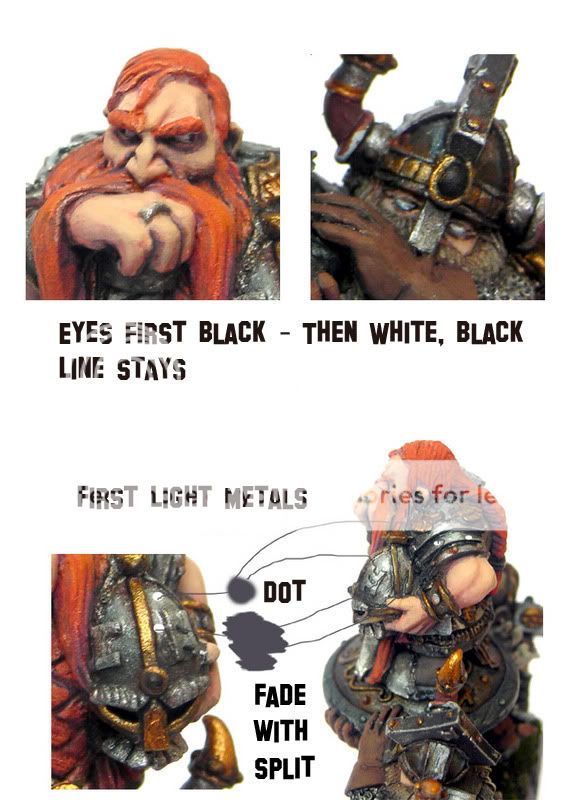
The metal parts have been marked upward slightly with an accent Mithril Silver / Ice blue (approximately 70/30). The mixture creates an - in my eyes - even brighter Mithril Silver, which looks significantly after polishing. Here, I make sure that I hit the lightest spot on the metal and then sit until the paint is still wet with one, forgive moistened in the mouth brushes to get a transition "- to leave here are no hard accents. Exercise is a little thing, but I hope that I could give more explanation these pictures below, ahh, sorry for my poor english skills, even to me my words feel strange, haha  hope you get what i mean by these pictures:

The eyes have been done white on the black. If the plotting and diluted milky color but before stripping off from too much wetness on a towel - you can minor misfortunes with another extra brush to use as quick as possible when a mistake has happened.

The hair of the king was again fundamentally made stronger after all the shading by adding a mix of Fiery Orange / Scab Red (approx 60/40) to the basecoat  and painted carefully again the single higher hair parts.

The gold was awarded to a layer of pure gold to the Shining light points. The approach here was the same as those of metal brightening.


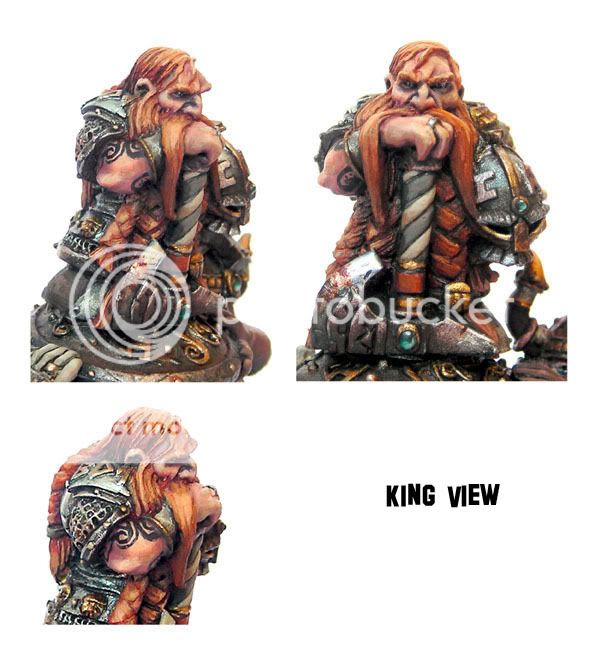
 King brightening the hair, eyes, gems, shading of the skin, blood

This step is preceded by the nighttime where the muse rode me, sorry - so a very big step, but I try to explain:

Tthe color of the hair at the step above has been given more and more of Bleached Bone and i did want to bring in a bit more light from above to the hairs, the hair and beard was further lightened.

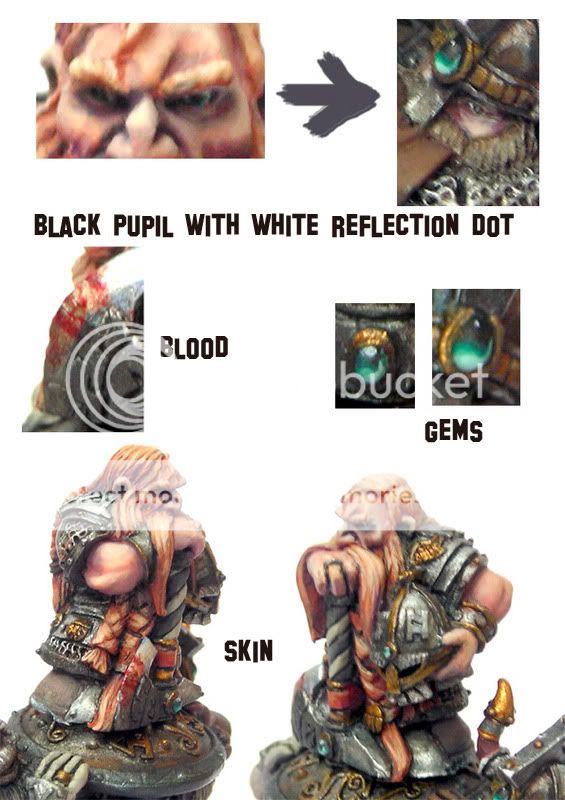
The eyes were given a central point of Chaos Black / Midnight Blue (approximately 60/40) and obtained after drying a white reflective dot in the pupil (on the king this has not happened yet -> see picture below). This approach is matter of practice, just a little trial and error - it will come with time and patience - also don't forget to breathe while doing - breathing is important.

The color of the gems was Vile Green. This I have first darkened  with Chaos Black, plotted and then went back again to the original color. This was then driven with increasing addition of Skull White in the brightness. Finally got the gems, a white reflex point - there - where the light from above strikes the gem.

The skin was with a heavy watery glaze before (well stripping) again tinted with Tanned Flesh. Here I am currently facing the problem that the skin and hair stand out not really good enough from each other. Probably I will make the hair a little darker.

The blood on the axe was created - as a test with my own blood, because i cut myself in a tiny accident on this day:


Hair of the king, gloves, leather bags, gold, base, minor  things

The beard and the hair of the king were made with a glaze of Schorched Brown 2-3 times to darken them.

The blond beard of the blond carrier has gradually brightened over Graveyard Earth / Bleached Bone (50/50) to Bleached Bone / Skull White.

The beard of the other carrier has been his base color lightened her lightly with Fortress Grey.

For the gloves / leather bags / belts / etc. I went back to their base color and have them gradually lightened with Bleached Bone. Here I have tried to mix up the middle tones with the respective primary color and produce a slight glaze to smoother transitions with Schorched Brown .

Shining Gold was gradually mixed with Mithril Silver to set the Gold dots of light. Into pure Mithril Silver, I would not necessarily go, so unless you have the special something that you would like to stand out strongly. To make this transition smoother, I have yet - very careful - 2 ~ 3 glazes Schorched Brown and Bestial Brown ca (60/40) held on the gold parts.

The leaves on the base are separated birch seeds, which I have attached the following:
- Glue to the desired location on the base
- Moisten the brush with spit
- Add selected "sheet" with moistened brush
- "Leaf" on the basket glue place
- Brush abruptly turn around and press down with the brush end of the "leaf" a little

The longer blades of grass have been separated from an old paint brushes with nail scissors and were delicately color the panels with glue - downwards with Schorched Brown and Chaos Black.


At these steps i have focused my attention on bringing all upper parts brighter from the light above:


Final Steps / finetuning / final sprint

Including the previous reasoning: "All light comes from above !"... now, all parts - primarily again the metal - have been checked for dirty places and colour irritations. Here and there a middle tone was brought in when it was needed. Especially in the metals, I again reached for the pure Mithril Silver and sat on the "spit-wipe technique" again last bright edges.

The tattoo of the king was placed with a milky glaze Chaos Black / Midnight Blue over repeated fine lines. Here it often helps to makesome sketches on paper to get used on what you want to draw and how the brush flows with your movement. Make the brush a friend of yours and get to know him.


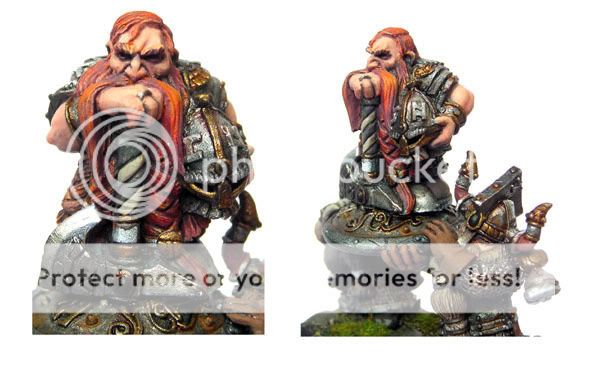
So that's it for now - in my eyes he was ready for a great looking on the gaming table
Hope I could help one or the other a little and maybe even inspire a little.

Should there be questions please feel free to ask. The finished model can be seen here - and as i told you it is an old model i have painted years ago:


Happy Painting all around the globe!
Regards
Roman


Material, Books and Miniatures Reviews

by Roman aka jar


Here you find some Reviews of unpacked miniatures, cool hobby material, insirational books and more stuff. All getting jungle approved with a honest impression while unpacking and reviewing.

INFO: If you are a miniature company or store and want a review of your product, posted to the blog, linked up to our facebook page and linked up in this massive overview please get in contact via: jarhead---at---massivevoodoo---dot---com
AK Interactive "Mastering Vegetation in Modeling"  

Banshee - A colorful mind

John Harris - Beyond the Horizon

The Art of Asura


USEFUL HOBBY MATERIAL

Mu 105  - Mini War Paint, Hobby Equipment 

Mu 104 - Scalecolor Artist Colors

Mu 103 - Artis Opus Brushes

Mu 96 - Masterson, the perfect wet palette?

Mu 91 - Artificer Terrain, Plinths

Mu 87 - Miniature Holders by Stephan Rath

Mu 81 - Broken Toad, MK 2 Brush Set

Mu 77 - CrazyGrip

Mu 76 - TriTube Daylight Lamp vs. LED Tube Daylight Lamp

Mu 67 - Agigator Balls, PK-Pro

Mu 66 - Optimo BigPanda Brushes

Mu 65 - Gameforces Magazin

Mu 60/ Tutorial - Scale75 Metal and Alchemy Steel Set + Inktensity

Mu 57 - Uschi van der Rosten, Decals

Mu 55 - ModelMates, Brick Joint Filler

Mu 54 - Broken Toad, Kolinsky Sable Brushes

Mu 52 - BrokenToad, Pigments

Mu 51 - Daler&Rowney, StayWet, Palette Paper

Mu 50 - ModelMates, Weathering Sprays

Mu 47 - ModelMates, Verdigris Effects

Mu 45 - ModelMates, Rust Effects

Mu 44 - ModelMates, Primer

Mu 42 - BeeS Putty Plastic

Mu 41 - Modeling. Stories in Miniatures. Book by Cursed Monkeys

Mu 40 -Duncan Acrylic Colours

Mu 36 - Kellerkind Miniaturen - Basing Material

Mu 30 - Photo Backgrounds by Hangar 18 Miniatures

Mu 26 - Hobby Zone, Tables for painting

Mu 23 - Miniature Mentor - Complete Guide to Photographing Miniatures

Mu 18 - Secret Weapon Washes Review

Mu16 - Ätztech Review

Mu 17 - Games Workshop Finecast Review


FIGURES / MINIATURES

Mu 107 - Mr Lee's Minis, Operation Knox

Mu 106 - Kensho Miniatures, Skylar

Mu 102 - Juweela, Tabletop Basing Set

Mu 101 - Bantam Alley, Wargaming Terrain

Mu 100 - Zay, the Golden Goblinnesse, Iter Miniatures

Mu 99 - Fehur, the Treeman, Mr. Lee's Minis

Mu 98 - Stoessi's Heroes

Mu 97 - Mindwork Games, Miniatures

Mu 95 - Uther, Light of the Realm, Black Crow Miniatures

Mu 94 - Kimera Models, Lord Dumah

Mu 93 - Welcome to the Metro, 75 mm

Mu 92 - Franchise Draft, Football Players, 32mm

Mu 90 - Queen of the North, Nuts Planet

Mu 89 - Hero of the Sky, Ben Komets Miniatures

Mu 88 - Miniature Madness: Smile

Mu 86 - Meinolf, the Last Captain, Ayora Studio

Mu 85 - Mr Lee's Minis, The Hermit

Mu 84 - Mr Lee's Minis, The Mutant

Mu 83 - Guild Ball, Hunters Guild

Mu 80 - Abalam, Prince of Hell, Hera Models

Mu 79 - Lands of Ruin, Baleans: Mulcibur

Mu 78 - Awaken Realms, Terrain Set, Objective Markers

Mu 75 - MV Insta-Bases

Mu 74 - Mawhi, Aradia Miniatures

Mu 73 - Broken Toad, Tooth Fairy

Mu 72 - 2dreamers, Space Adventurers, 1/9 busts

Mu 71 - North Star Models, End of Story

Mu 70 - Tiny Tales Studio, Interior & Wizard of Pumpkinland

Mu 69 - Tiny Leads, Dungeon Adventurers

Mu 68 - Kaha Miniatures

Mu 64 - Norsgard Miniature Game, Wulfkin Armsmaster, 32 mm

Mu 63 - Sasha, the Welding Girl, Industria Mechanika, 1:35

Mu 62 - Rocking Horses, 28 mm, 1:35, Kellerkind Miniatures

Mu 61 - Guild Ball, Boiler, 32 mm

Mu 59 - The Aquila, Roman Legionary, Nuts Planet, 1:10

Mu 56 - Amut & Gon by Arnaud Stranger

Mu53 - Aran, the Barbarian

Mu 49 - Induna, Ashral Shaman, 32 mm - Don't Panic Games

Mu 48 - Rocco, Figone

Mu 46 - Eskimo Fisherman, Romain van den Bogeart

Mu 43 - Toad King, Aradia Miniatures

Mu 41 - Tales of War, Slot Gunner Bust

Mu 39 - Roman Aquilifier, Nutsplanet

Mu 38 - Marrow Productions - Monkey King

Mu 37 - Heer 46 - Tanks

Mu 35 - Kellerkind Miniaturen - Zombie Diorama, 54 mm

Mu 34 - Alexandros Models, Freebooter, 1697, 75 mm

Mu 33 - Penal Guard 10 Man Resin Squad, Victoria Miniatures

Mu 32 - SciFi Figures, NorthStarModels, 54mm

Mu 31 - Satine, female bust, by Arktik Toys

Mu 29 - Yateem, Smart Max, SMOG, 1:35

Mu 28 - Bushman, Vertigo Miniatures, 200mm bust

Mu 27 - Sergeant Blackart, Terrible Kids Stuff, Roosevelt, 1:35

Mu 25 - Dragon Slayer, North Star Models, 54 mm

Mu 24 - Sherlock Holmes, Infamy Miniatures, 32 mm

Mu 22 - Henrietta Jekyll, Infamy Miniatures, 32 mm

Mu 21 - The Terror of Fortriu - Chimera by Maelstrom's Banebeasts, 28 mm

Mu 20 - The box "Action for Japan", 8 limited Figures

Mu 19 - Young Miniatures, British LRDG 1942 North Africa bust, 1:10 

Mu 15 - The Grinder, Roberto Chaudon, 1:8

Mu 14 - Hombre Toro, Spherewars

Mu13 - Roman Gladiator Thraex, Pegaso Models, 90 mm

Mu12 - Vietnam Rifleman, Pegaso Models, 90 mm

Mu11 - Nubian Guardian bust, SK-Miniatures, 200 mm


Mu10 - Matrona Romano bust, Pegaso Models, 1:9

Mu09 - Small Animal Set by Busch 

Mu08 - Supreme Intelligence Bust, Schell Sculpture Studio

Mu07 - Spanish Admiral bust, Pegaso Models, 1:9

Mu06 - US Marine Corps Soldier bust, Young Miniatures, 1:10

Mu05 - Huscarl, Romeo Models, 54 mm

Mu04 - Minotaur, FIGONE, 90 mm 

Mu03 - Greater Daemon of Tzeentch, Games Workshop, 28 mm gaming system

Mu02 - Arkvenger, Pegaso Models, 1:35 

Mu01 - Viking Chief, Pegaso Models, 1:20

Imperial Guard Catachan Standard Bearer finished

by Roman aka jar

Aloa,

a quick paintjob, well planned for the goal to be used on the gaming table someday, somewhere has been finished today. It is build from GW's Catachan Command Sprue and has been a lot of fun painting it, even if there are some areas which could have needed more attention. I took my focus on the skin and face while painting and i am happy how he turned out in the overall view... also the base has been build very quick at the Painter's meeting on the Edersee to show how i start with colours to some other painters - it is not the cleanest base, but ... no but - it is just the way it is, haha...


You can find him also on CMON:

So far, read you soon ... and keep on happy painting!
Regards
Roman