Inspiration: Loving Vincent

by Roman aka jar

Good Morning Jungle,

yesterday I saw a wonderful movie that every person who loves to paint should watch.
It is called "Loving Vincent" and gives an amazing interesting insight into the life of
Vincent van Gogh!

Highly recommended, truely inspirational!
Here is the trailer and some insight into the making ofs!


Keep on happy painting!
Yours,
Roman

SbS: Wading Ashore

by David

... or: a story of attempts, failures and fixes

It's time for another step-by-step on an older project of mine. 

This was the second 1/72 figure project I built after my love for the scale started in April 2017, in which I wanted to accomplish two different things: 

  • do another 1/72 mini 
  • and do another test with water effects. 

My choice for subject was initially triggered by an in-box review of the WWII US Marines set by Revell over at Plastic Soldier Review. Once I saw the figure of the Marine carrying his rifle above his head, I knew I wanted to portray the grunt during the 2nd Marine Division's landing on Tarawa in November 1943. Our Marine is one of the unlucky ones who were not ferried to the beach by an Amtrak, but had to wade ashore.


The first step was preparing the mini for priming. As is typical for these Revell sets, the figure is cast in very soft light beige plastic, which is a pain to clean up because it cannot be sanded or filed, but has to be cut very carefully with a brandnew scalpel blade. As promised elsewhere, I will discuss this issue in detail in a future article. The tiny beige flakes you see lying scattered around my cutting mat are what I cut off from the figure.


Next I built a small base for the mini, which I had already primed in between to check for moldlines I missed during clean-up. I created the sandy ocean floor on a simple 2 x 2 x 4 cm beechwood plinth using Milliput and added a few stones, also made from Milliput, and added a bit of drowned wood:


After finishing the base, the project was on hold for a while, but at some point motivation struck and I started to put some first colors on the figure. In the following pics, the mini has received some first lights and shadows on the uniform, while helmet, skin and webbing/equipment are still in base colors.


Some more work on highlighting and shading the uniform:


I then highlighted and shaded the equipment, and worked some more on the helmet and skin.


Next, I put some sandy color onto the ocean floor and painted the stones black; then highlighted and shaded the base.


When I declared the mini finished (for the time being), I started preparing the base for the water effect. I built a first barrier from transparent plastic sheet, following - as always - my jungle brother Josua's incredibly good tutorial here on Massive Voodoo. However, I made a mistake somewhere because a first test-run using tap water showed considerable leakage. Pro-tip: always test your barriers for leaks with water before you pour the "real stuff" ;-)). So, I pulled down the old barrier and built a new one:


And then, the great experiment began. Since I wanted to emulate some kind of depth in the water, I thought it might be a good idea to pour the 2k resin in three layers, each tinted with blue and green ink. The lowest layer would receive the darkest tinting, the upper two layers would be tinted in lighter tones. For inks I almost exclusively rely on the Scale75-Inktensity Inks, which are plain awesome-sauce, strongly pigmented and transparent.


Once the first layer had hardened, I poured the second, slightly lighter layer. On the pic you already see the problem with my approach: you can see the division between the layers. The pic shows it a bit more pronounced than in real life, where the visibility of the layer depends on the angle of view and the lighting. But I can't say that I was really happy...


Finally, the third and final layer was poured on top:


The worst surprise was yet to come, however. After letting the third and final layer of the 2k resin dry for about 30 hours, I started to peel off the plastic barrier. Alas, the second layer (which had been "drying" for more than 2 days) had still not completely hardened, but stuck to the barrier. I guess I made a mistake in measuring the two components or did not mix them well enough.

Anyway. I tried my best to peel off the barrier as carefully and gently as possible, including putting the whole thing into the freezer for half an hour, but it still did not work out: the second layer had a really nasty dent in the resin and it still would not harden. So there also would not be any help in sanding and rebuilding the layer. 

Another mishap happened while I filed away on the resin surface: the knife slipped and I cut into the Marine's arm, ripping off a tiny piece of paint and knicking into the soft plastic. I tried to repaint the part, but the surface remained rough, so I decided to just treat the mistake as something that might have happened to the Marine while he was boarding the landing craft, and gave him a small bloody bandage.

To add some detail and interest, I created straps for the M1 rifle and the grunt's helmet from post-it strips. These were cut with a sharp scalpel blade, glued in place with super-glue, "drenched" in matt varnish to make it malleable and, after letting it dry, painted, highlighted and shaded. 


The waves were created using Vallejo Water Texture, a white, gooey acrylic paste that becomes completely transparent once dry.


When all was set and done, I was really unhappy with the botched resin pour and the obvious "lines" that were showing between the layers. So, I decided to hide my troubles as good as possible by simply gluing strips of plastic sheet around the base to a height just above the line dividing the second and third layers. 

The final project - with the resin imperfections hidden behind plasticard

For more pics of the final thing, see the mini's own gallery over at Putty&Paint.

In the end, I have to say that I am really happy with the way the scene turned out, despite all the troubles I had with the water. It's not how I envisioned it and in between I felt really bad about the mess I created with the resin water, but in the end it worked out fine. Today, I think the scene is particularly special to me precisely because it didn't go as planned, but that it involved a lot of attempts, failures and fixes.

Thanks for reading. If you like, tell me in the comments about your biggest "fails" that you fixed and that made the project particularly dear to you!

All the best,

David

FM: Cats

by Roman aka jar

Hey Jungle,

this project needs some words ahead :)

2018 was a year were I questioned a lot of things.
I took a little step back in my painting output due private life changes. With it I questioned the crazy output I had on my miniature project workbench. During that year I saw how exhausting it was to always strive for new things, great ideas and projects that would amaze the viewers.

A step back in the race for evolving new and interesting things in  my personal miniature painting. A step back in inspiring many others with my work as a painter. A step forward to see my true strength in the work I do: teaching. I am a born teacher and I love to teach others my knowledge about miniature painting. First this was truely confusing, later on it felt better and better. A decision where to focus on in the future.

The question was: What makes me most happy in my job?
The answer was: Seeing happy students. Other painters that enjoy learning from me. Fresh and new faces as those who learn from me since several years and evolve impressive on their journey. This is why I love my job. It is not a finished miniature project or a new upload to Putty&Paint.

Teaching
makes me happy and my future focus will definetely go even deeper in this direction, but still without using patreon or any other online form in teaching. I love to teach hands on in weekend seminars or private coachings. It gave me so much insight into my students needs and it really helped me to learn to become a better teacher everytime. The teacher in me gets satisfied the most as hands on teaching is something different. Those of you who have been on one of my seminars know what I am talking about :)


Slowly the urge to paint bigger projects again came back to my soul.
Not reasoned by following an actual trend or drive, just for me. What really clicked me was one episode of the beautiful Netflix production "Love, Death and Robots" called "Zima blue". I can only recommend this episode to you. 

With that click moment I slowly returned to my #happypainting and therefore I decided to create a small project with something I darely love: cats. Plus the calm and joy they bring to me.

It  also was a good timing to finish a base that Raffa and I did build together during a private coaching with Hon in 2014.

I called it simply ...


'CATS' 
28 mm


You can see more photos on Putty&Paint or via romanlappat.com 

It was a very therapy-like project and I was happy to be able to enjoy its creation a lot. It has quite the deep meaning for me and I am happy that the outcome is so unique. 

The cat figures in 28 mm are from minisocles.fr.
Unfortanetely they do not ship outside France anymore :/


This unique diorama is for sale. If you are interested, please find more information via my PDF cataloge on my miniature art.

I hope you like this diorama as much as I enjoyed creating it!
Keep on happy painting!


Yours,
Roman 

SBS: Penguin for the MV Challenge 2018, by guest author Christoph

by Roman aka jar

Hello Jungle,

today I am  happy to present you an article by a guest author.
Means I got asked if MV want to publish it, even the author is not part of the regular and active MV-Team. Of course I said yes as this article is beautifully connected to last year's MV Challenge 2018.

The author of this article is Christoph
  from Germany, a well known, good guy for the MV-Team who also took part in many seminars with the monkeys. Thank you, Christoph for your time and effort in writing this up. Our task is only to put it to the blog, doing the format and adding the photos. The rest of the praise is yours for your wonderful project you created!

So, from here on you can read Christoph's words and thoughts.
I am sure you will enjoy them...

______________________________________________________________________

Of Puffins and Penguins

This will be a short trip through the thoughts and ideas I had when I was planning my entry
for the 2018 MV challenge as well as a small step by step on how it was executed.

When the MV challenge was announced last summer, I had some mixed emotions about it.
Among the first where “I love puffins” and “I must have the penguin picture Roman made”.

Of course, then the whole “I’m not good enough to win anything” complex surfaced. At that point
I was very happy about Petra’s post from earlier last year about the imposter syndrome. I
cheerfully started planning my puffin entry.

And of course, I remembered the MV article about
not participating in competitions. The irony made me smile at the time. But I would learn
about the difference between competitions and challenges later …

I’ve always been a big fan of puffins. 
For some years now, my cousin and his wife live and
work in Scotland. When we visit (and the weather allows) we usually make a trip to the Isle of
May where you can see huge numbers of puffins. I was able to take a nice picture of a puffin
which I still love to show off with. Zoom in to look the fishes in the eye.


I started thinking about what story I’d like to tell. 
Perhaps a sad story of a puffin waiting for the partner to return. To me they always look a bit sad. Or should I make a happy breeding couple of puffins? Since I didn’t find any suitable minis for my ideas, I was starting to think about sculpting the myself. But then it dawned on me that puffins might not be penguins.

I asked Roman and it turned out that puffins and penguins are completely unrelated. There
even is a scientific term for this – convergent evolution. On the one hand I was happy that I
wasn’t the only one having made this mistake on the other hand this pretty much killed my
steam for making an entry because it couldn’t be puffins.

Fast forward a few months to Scale Model Challenge

Kyle had a nice booth with many great new minis. While buying some, the penguin caught
my eye and I thought, well they are cute and bought the pair anyway. I like penguins after all,
just not as much as puffins. I also made another purchase at SMC which would come in
handy, a second round base. I needed one for another project and couldn’t decide which of
the two I’d want to use.

The following weekend I was in Augsburg for Banshee’s Color Theory Class which was
awesome. One of the new things I learned about were inks. I’d had been aware before that
they existed but never had a good understanding on how to use them. Alfonso changed that.
After Alfonso’s class I spend a few days at the house of my grandparent in a small town in
Franconia. Of course, the first thing I did Monday morning was trying to get my hands on
some inks to properly start painting Romain’s Manta. So much for the best laid plans of mice
and men…..

None of the arts and crafts or stationary shops had any acrylic inks but I ran across a
selection of Fimo blocks. I got one and thought about sculpting a puffin. Of course Daniele
had just joined MV and his post on sculpting was very inspiring. Especially how he made the
wooden mask spoke to me and I had the feeling that this might be the way for the puffin
feet….

I rolled out some Fimo on a piece of backing paper and started dabbling away. Quite
surprisingly to me a few minutes later I had a pair of nice puffin feet and put them in the oven
for curing.


I spend the rest of the afternoon making my first sculpt. Thankfully the puffin doesn’t have a
very complex shape.


All of a sudden, the MV challenge was back on for me! I started thinking about how my puffin
would interact with the penguin to make an entry that would be accepted by the MV
challenge. (At that time, I didn’t realize it yet but this project would pose a big number of
challenges to me and the difference between challenge and competition would soon become
clear.)

Edit by Roman:
I want to show you Christoph himself now ... it would be sad not having a face behind such beautiful words!


Christoph in absolute Zen-Painting during Alfonso's color theory class in Augsburg in 2018


One idea
I had was a penguin club and the bouncer penguin would not let the puffin enter.
Or should I go for a mirror with a puffin reflected as a penguin? Should I involve Darwin?
In the end I chose the idea of a globe with a puffin and a penguin being very far away from
each other showing the concept of convergent evolution.

The next task was giving it a name. It is “brother from another mother” now but working titles
includes “to penguin or to puffin”, “same same but different” and “oh brother where art thou?”.
The back and forth was going on for some time but I guess in the end the title wasn’t really
important.

How do I get a globe? 
You can buy small sized globes and I was thinking about getting one
and repainting it. Doing this the globe would have a perfect sketch of earth already.
Unfortunately, none of the globes I found really looked the way I’d have wanted.
I’d have to “scratch build” it. Back to the crafts shop to get a sphere. I settled for an 8 cm ~ 3-
inch Styrofoam ball. I soon found out that this wasn’t a good idea. I had thought a thick layer
of paint would close the holes on the surface and give me a smooth ball….


Well, we learn from our mistakes. I went back to the crafts store (I’m really happy that they
still exist, otherwise the whole project would not have happened) and bought a similar sized
wooded sphere and a rod to fix the sphere to the base. Then I started thinking how I’d be
able to get a nice globe on that ball. I started looking for all kinds of pictures but couldn’t find
anything fitting my needs. I postponed the globe till we got back home.


Instead I painted the puffin.


At that time, I started getting a bit nervous about my timeline. 

I’d have another two days of vacation before I’d go on a nine-day business trip to the US. After returning I’d have a nice jetlag and around 30 hours to finish the project and email the pics to Roman. Panic with capital P. But only for a short time.

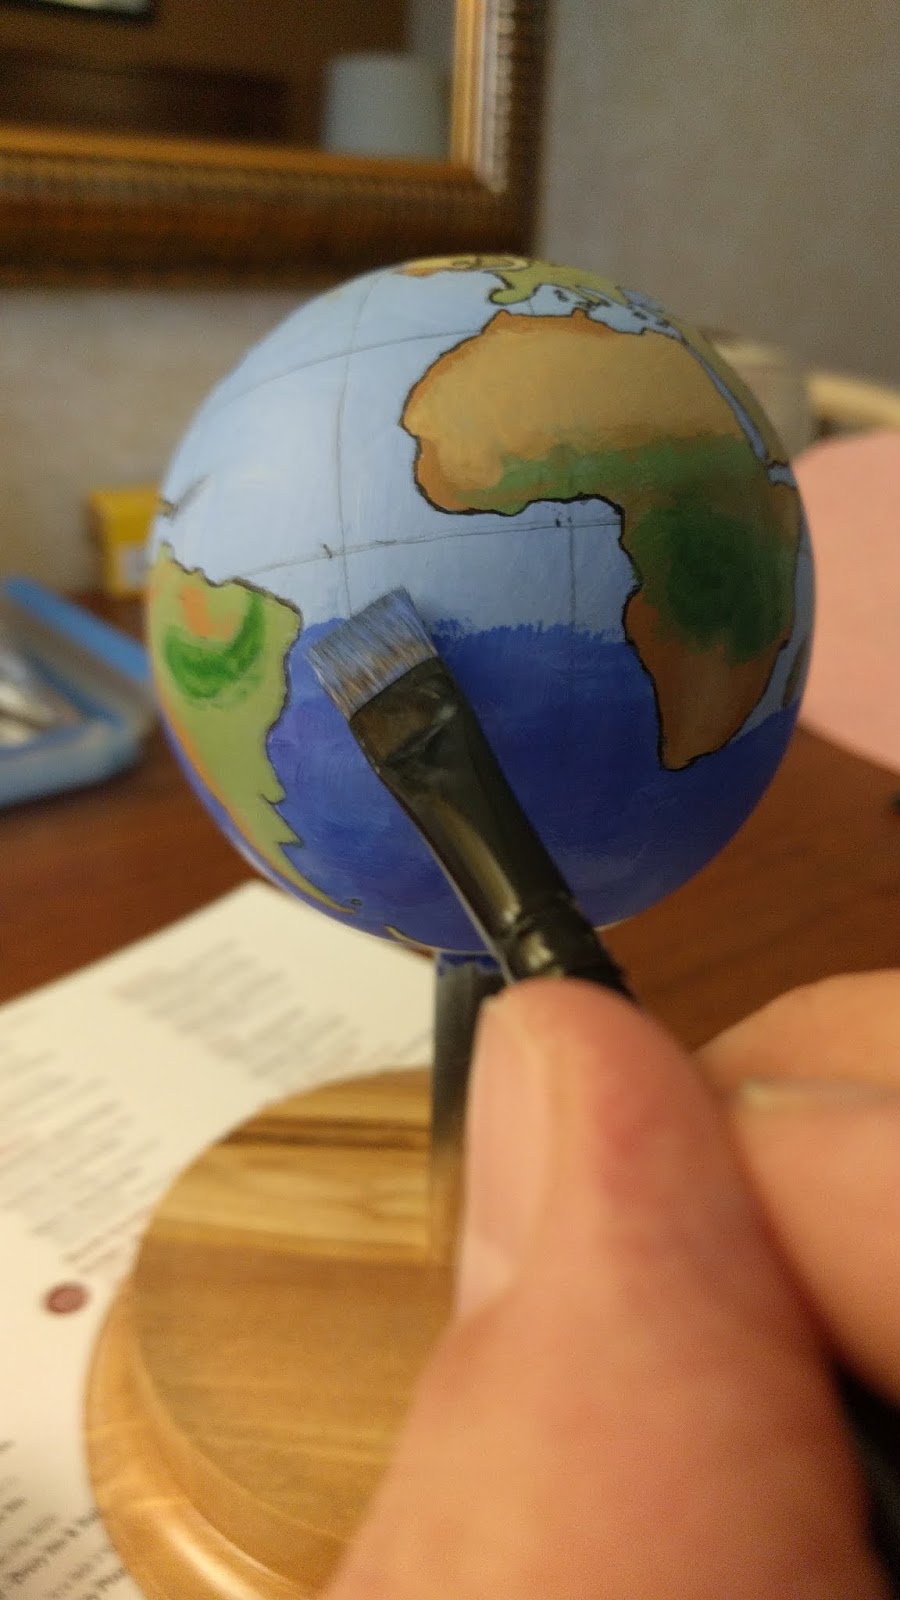
I came up with a plan to get a rough grid of longitudes and latitudes on the sphere and use
them and a globe to get a rough sketch of the continents and island on my sphere. A
compass really helped my get my lines on the globe. Getting the outlines of the landmasses
wasn’t very easy but at least it’s recognizable which planet is shown. I’m very sorry if the
home of anyone should not be depicted properly.


I took the globe and a small painting set with me on the trip to finish it. The trip was quite
busy with work and dinners. Still I try to get up around 3 in the morning. Most of the time it
helps me keep my jetlag to a minimum. I had some time to work on the globe while traveling
after all. You might notice the blob of milliput in the north Atlantic. This gave me some
trouble. The wood sphere had a hole drilled all the way through. I patched this up with
milliput before I primed the whole thing. When I painted the globe, I found that had left too
much of a hump in the ocean so I carefully sanded it down. This left me with an area of raw
milliput which would not take on paint. Fortunately, I was able to overcome this with a few
thick layers of ultra matt varnish and a hair dryer.


Roman often has a beautiful sunrise pic somewhere in his post, so I thought I’d copy that :)
Sunrise on a plane usually is awesome.


After getting home I mainly had the penguin left. 
Fortunately, was able to sleep a bit on theplane back so I jumped at painting the penguin directly after coming home. When I started writing on the base the color would just form little droplets. I sanded of the old finish and put some ultra matt varnish on.

Yeah finished just in time, or did I?
The photos were still missing. Well no biggy. After wrestling with my camera and RAW files
for an hour I decided that there will be another time to fully understand these and shot the
finished piece with my cell phone.


While numbering the photos I just realized that I didn’t have any pics showing the
Asia/Pacific/Antarctica regions properly. Quickly shot some more pics. As was to be
expected they are not as good as the original entry picks due to rushing things.


And off the pics go to Roman. 
Now the waiting for the other entries and the time forcontemplation starts.


What did this challenge mean to me? 
That I challenged myself to get out of my comfort zone and do new things. So far, my biggest “sculpt” had been cutting of one blade from a weapon and gluing on a different one. Now I have made a whole bird.

Of course, there’s still a way to go from there. But I won’t be so intimidated by the prospect any more.The situation for free hands is quite similar, so far this had been something I’ve been actively
avoiding. Now I painted the whole earth. Next stop will be the stars.

And last but not least, writing texts has also not been one of my favorite tasks so far.
A mere competition is just about having the best mini (however that would be defined) while
this challenge has helped me grow as a painter and I’m very thankful to Roman and Josua
for this.

Christoph

SBS: Mamabúho

by Roman aka jar

Good Morning Jungle Painters,
another article dropping into the jungle. Well, yeah it definetely has become a massive jungle. I will soon update the tutorial section and link up all the new and cool free articles. I am really interested in which number we hit soon!

Well, here is another one. 
About a witch, a great sculpt by Lucas Pina.

Mamabúho


When something as beautiful as this arrives on your workbench you know that there is a project ahead of you, where you will enjoy every moment ...


_______________________________________________________________________________
 
How to support Massive Voodoo? 
If you like to support or say thanks the monkeys of Massive Voodoo in what they do, please feel invited to drop a jungle donation in their direction via paypal or check their miniatures they got on sale here.
_______________________________________________________________________________

This is not a common step by step
that guides you through color recipes to copy a result by another painter. It is more an insight into my brain process and explains how I arrived at the vision I had at the end for this beautiful sculpt.

In the meantime I can not even give you precise color recipes as I am painting absolutely freely from these. I mix all the colors I want mainly from primary paints from various artist acrylics. I work mainly with Schmincke Primeacryl, but in the meantime grab some Scale75 Artist Colors, Jo Sonja's and Lascaux's. Of course I pick one hobby paint here and there, but the name nor brand do not really matter to me. It is mainly about the color itself, so I quit wasting memory energy on their names. Uncommon I know and some of our readers will say that they do not like these sorts of articles as they do not explain how to copy something exactly.

Well, back to the old lady, shall we :)

The vision
To be honest usually I do have a certain vision that I want to paint from the beginning. I often have a story I see in the figure, that tells me what the character is actually doing in the moment I am painting it. This vision goes from color choices, choice of sorrounding atmosphere that influances my color choices for shadows and highlights and also some certain details I want to create in my paintjob to make it as unique as it is in the end.

I did not know that in this case. 
I just wanted to paint her. 

In the last couple of years my job as a miniature painter turned more and more into becoming a hands on teacher. Less comissions, more time spent with my students in seminars. It was one of these seminars where I did start to paint her for technical explanations on how to handle paint.

If I am unsure about my vision I tend to start my colors I pick desaturated. I can always change something in the color and it is easy to bring in saturation. The other way around is hard path.

This is how the old lady looked with a little painting time ...
far from the final look, eh?


Very far if you ask me ...


Well, there comes the first issue I do not allow myself to take hold:

To be unsecure what I paint there because I do not know the outcome. How can I know the outcome?
Sure, if I plan properly and follow this plan of my vision strictly, but what if you want to paint something up and do not have a straight plan for it? Start painting flexibel and trust in your skills. You always can change something on the way. So the way is the key, not the plan. At least for me, sometimes.

Still absolutely unsure about the colors I am placing I contine to work on the following aspects:
  • Contrast in dark/bright
  • Placing all basic colors to see the full image
  • Including textures

These are all technical aspects that can be followed, no matter the color you are placing. Like I said if you keep it desaturated you will always have the option to bring back saturation.


Finding the character
After a while, after some painting sessions I start to search for the character. Very often with busts I do paint the eyes to see the character in front of me and its 'soul'. I slowly bring in colors that I want to see, for example the owl's eyes are important for me, so I pick them out of the pool of desaturation.

While doing so I called that grandma the 'Hydra of Owls' as there were so many appearing everywhere :D


Sometimes I paint a small detail
and focus on it, because I just like how the sculptor sculpted it. For example with the bottle over there. As you can see I was still unusre about the farbrics. On the upper part I created fabric texture already to at least understand the material that I want to paint. Still desaturated. On the other hand I did mostly nothing to the purple dress beneath.


Making decisions
It is important in life and in painting to make decisions.
I was not able to continue my path of desatoration without knowing where this would go. I was happy and self-confident until then, but slowly felt I need a vision to it ...

I imagined the hag standing in her hut.
In a dark hut filled with a lot of things a witch fills her hut with.
She was cooking a spell in a big massive witch bowl while her owls went nuts around her.
I decided to give to fluid in her bowl the color green.

With this decision in hand I went all in and used the airbrush and sprayed a medium olive from below into the figure. Everything I so far did got touched by the green. Nice effect of pulling everything together.

Her dark purple dress invited me to paint some grandma clothing pattern on it. So I did. 


I wanted her hair to stand out really strong so I increased the contrast in the hair to almost pure white in this stage, while other areas lacked behind such an intense contrast. I do what I want to see and what I need will be painted so I got to ask myself all the time:

  • what am I missing right now?
    • what do I want to change?
    • what is there that I do not like?
    • how can I change it to like it more?
These are the main questions I always ask myself to find a way through a project to call it done in the end. Questions everyone can ask himself. It does help, believe me.


Now I wanted to have the pool glow more powerful, so it was time to bring in more saturation in the greens. So I did with glazes.


And even more ... now adding a flouroscent green to the mix. This stage helps me define areas that are hit from the light below (genital light)  and helps me to guide my eyes on the areas I have to work from the top (zenital light).

In this stage I also rebuild textures I lost and continue in pushing contrast in both direction.


After several painting sessions I found my vision, even I started so way off from it.
Still it is not finished yet.


Detail work
It was time for focusing on the details that I so far ignored. Darklining, texture improvement, contrast, painting the little demon ...

You know you can click to enlarge the photos, eh?

That demon :D
Hiding in an owl costume :D
So ridicolous :D


I now also went for the 'hydra of owls' and tackled the birdies. Feathers recieved structure and contrast and all got eyes, but not without checking back with references on owl eyes.


In the final stage I went in for extra details.
That means a brushstroke here, another one there. A correction here, another one there. Always asking myself my certain questions. Playing with skin variation here, repairing a highlight, adding a stronger shadow here. This procedure is always the same until you say to yourself: It is finished!

Yes, I wanted tattoos or some kind of trival henna that she did put to her body. Or was it the litte demon?

I was also including the plinth and added a strong area of green there to make my final vision more easy to understand.


Summary
Well, well, well ...
Did you expect the outcome when you saw the first work in progress photo?
If your answer is 'no' than I am happy. With this article I wanted to show you that you can arrive everywhere you want with your project if you do not limit yourself in techniques and trained on process. They are important, no discussion, but after a time of copying a recipe over and over again you might feel a foul stench arriving in your painting spirit. This is a way to break this up! Do what you like, follow a vision, create one on the way, change where you want to see change, push it as far as you want to.

Do not stay limited in your creativity. Sculptor's don't, why should we painters when bringing a sculpt to life with paint?

Here are some final photos of Mamabúho


She found a new home with a private collector a while back and I am grateful for your support in my art, passion and work! Many thanks!

Keep on happy painting!
Yours
Roman

_______________________________________________________________________________
 
How to support Massive Voodoo? 
If you like to support or say thanks the monkeys of Massive Voodoo in what they do, please feel invited to drop a jungle donation in their direction via paypal or check their miniatures they got on sale here.
_______________________________________________________________________________