


Hey everyone,
today I like to talk a little bit about a relatively new sculpting putty and give you the opportunity to try out some of it for yourself... along with the chance of winning some other goodies!
Around 10 days ago I received a pretty packed parcel by Masq Minis.
 Nice! Goodies! I love to unpack stuff, it's always like christmas!
 In there I found 1 pack of grey BeeS Putty Plastic, 1 pack of black Bees Putty Plastic and some stamp form for making small parts and gaming bases (will be introduced later in this review), 1 pack of Bees Putty Plastic Firm (a lot harder than the normal BeeS Plastic), some trial packs to give away to friends and some already baked samples to get an impression of the material...
I also got one cigar smoking gorilla figure, pretty awesome! :D
 The gorilla is really cool, like a boss!
Before I really start with the review I want to explain some basic properties of this putty:
- A one component, oven baked, polymer sculpting clay
- Can be baked at around 120-130°C for 30 min (depending on thickness and size of the sculpt)
- Different colors aviable
- Different firmness levels aviable (Normal and Firm)
- Comes in packs of 100g for 6 Euro (= 6 Eur / 100g)
- In a bigger pack of 360g for 18 Euro (= 5 Eur / 100g)
- Or a big pack of 1,5kg for 45 Euro (= 3 Eur / 100g)
First, let's compare that to other wide spread polymer clays.
Fimo: 56g for around 2,50 Euro (= ~4,45 Eur / 100g)
Super Sculpey Firm: 454g for around 11 Euro ( = ~2,40 Eur / 100g)
The easiest thing to compare when checking out clays is the price.
BeeS Plastic is a bit more expensive compared to other clays, but to be honest, 100g of clay is very much when sculpting miniatures or "small" busts. Especially for 28mm or 54mm figures a 100g pack of clay will last you very long!
So the price is not a real killer argument, especially when you get the 2kg pack it almost beats the very cheap Super Sculpey Firm.
But more important than the price (at least for me) are the properties, so let's check them out.
Let's start easy ... with the stamps, a good first try for the material and I found the idea of stamping gaming bases pretty interesting.
 This is the stamp form made from a very flexible and robust material, I guess it's some kind of silicone rubber.
 Just took a little bit of the black putty, shaped a ball....
 ... and pushed the ball into the form. To bake it, just peel it out and place it on a wooden board.
After baking
I made some more test shapes from grey and black putty and baked it all at around 120°C for 25 min.
 Ok, so here you see the gaming base, looks like some mayan pattern.
I also shaped two very thin "banners" and a horn.
I wanted to test the properties of the material, so I made different shapes to test out stability, flexibility, hardness and how well it can be cut and sanded.
Describing a sculpting clays properties is kind of difficult.
Comparing it to other sculpting clays is a bit easier but this stuff is pretty unique, before and after baking. When baked it is very "plastic" like (hence the name).
It's very strong and almost "impossible" to break. It's very hard, but at the same time flexible.
As you can see with the horn, cutting and sanding it is very easy and you can really polish it back up.
 The rough shape of another horn was cut using a hobby knife, sanded a bit and finally gave it a quick polish up using a soft toothbrush and a veeeeeeery small amount of Vaseline.
 bend it this way...
 ... or bend it that way bend without braking, a very good property for a clay.
 The same goes for the baked banners and they are very thin! You can see light coming through it when put against a light source, so you can imagine how thin they are.
But still you can bend it in a very strong angle without breaking and after bending it returns to it's original position.
I really like that property, it's makes the clay very good to make original miniatures or busts that will be casted as the sculpture can take quite a beating before breaking or chipping.
Before baking
Now for the properties before baking - the sculpting qualities. For sure the second most important part (at least for me, if a clay is brittle or unstable after baking I cannot use it for my sculptures as they have to be solid enough to be casted or carried around and be painted).
How to describe this clay? It's kind of soft-rubbery, a bit like fimo, but on the other hand very different - It's a lot more wax-like.
It sticks very well to itself and to wire, it can get very soft using a microwave and it's very "flexible".
You can get a very good impression in these videos:
Properties of BeeS Plastic
Sculpting a 32mm Miniature (part 1)
Sculpting a 32mm Miniature (part 2)
To test it out for myself, I started sculpting a bust.
Just took some thick wire, stuck it into a piece of cork and go!
No greenstuff or other stuff is needed to make the putty stick to the armature, really nice :)
 Started with blocking in some basic volumes and shapes, the putty really feels nice and is very easy to work with. For my personal taste and first impression it works much better than my mix I use since the last sculpting workshop with Pedro Fernández ( Fimo Classic + Super Sculpey Firm - A really good mix, very stable and flexible after baking). At least for this bust.
 ... a bit further in the process.
At the moment I have a lot of work in progress projects going on with other sculpting clays, but I think when they are done I use BeeS Putty Plastic in more projects.
Some more impressions of my bust experiment after baking, you can also see the surface gets really matte and nice:


The putty holds detail very well and is very easy to smooth using some kind of balm (eg. Petroleum Jelly/Vaseline) or using white spirit, turpentine or orange-turpentine (just smells awesome and is less aggressive). But the properties of the putty allow it to also smooth it very easily with the normal sculpting tools.
Overall, I am really happy with this new option at my arsenal, I really like the properties it has while sculpting and even more after baking... it's really hard to break the sculpt at all! And I didn't find any negative sides about it, maybe one thing that I have found worthy of saying it here in the end: the putty get's very soft when baking it, so I advise you to watch out for "floating" parts, they need some kind of support or they will bend in the oven.
You can get your BeeS at the website of Masq Mini, they also offer a lot of great sculpting tools and other nice stuff, be sure to check it out if you are into sculpting or conversions.
Now to the part you have all been waiting for, getting free stuff!

You can win:
- 10 packs of BeeS Putty Plastic
- 5 funky Gorilla figures
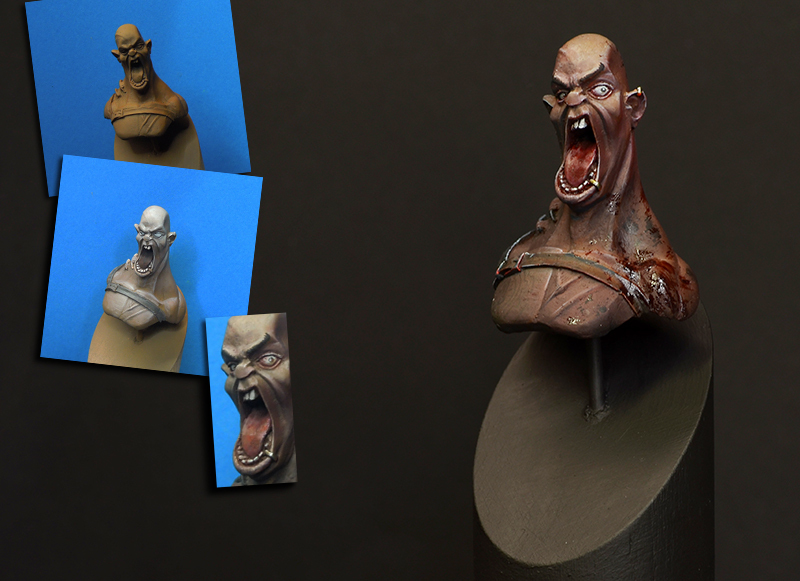
- 3 very exclusive "early access" casts of the "Jamal" bust shown below
 All the prizes are sponsored by Masq Mini! Thanks a lot Stefan!
So, how do you participate?
Very easy this time, just post a comment here with your reason why you want to have this stuff.
Try to be creative!
The best 10 answers will be chosen, top 5 will get a gorilla figure and top 3 will get a Jamal bust additional to a pack of BeeS Putty Plastic.
The winners will be announced in 1 week from now!
Good Luck and have fun sculpting!
Raffa
PS: Find this review linked up in the review section!
today I like to talk a little bit about a relatively new sculpting putty and give you the opportunity to try out some of it for yourself... along with the chance of winning some other goodies!
Around 10 days ago I received a pretty packed parcel by Masq Minis.
I also got one cigar smoking gorilla figure, pretty awesome! :D
Before I really start with the review I want to explain some basic properties of this putty:
- A one component, oven baked, polymer sculpting clay
- Can be baked at around 120-130°C for 30 min (depending on thickness and size of the sculpt)
- Different colors aviable
- Different firmness levels aviable (Normal and Firm)
- Comes in packs of 100g for 6 Euro (= 6 Eur / 100g)
- In a bigger pack of 360g for 18 Euro (= 5 Eur / 100g)
- Or a big pack of 1,5kg for 45 Euro (= 3 Eur / 100g)
First, let's compare that to other wide spread polymer clays.
Fimo: 56g for around 2,50 Euro (= ~4,45 Eur / 100g)
Super Sculpey Firm: 454g for around 11 Euro ( = ~2,40 Eur / 100g)
The easiest thing to compare when checking out clays is the price.
BeeS Plastic is a bit more expensive compared to other clays, but to be honest, 100g of clay is very much when sculpting miniatures or "small" busts. Especially for 28mm or 54mm figures a 100g pack of clay will last you very long!
So the price is not a real killer argument, especially when you get the 2kg pack it almost beats the very cheap Super Sculpey Firm.
But more important than the price (at least for me) are the properties, so let's check them out.
Let's start easy ... with the stamps, a good first try for the material and I found the idea of stamping gaming bases pretty interesting.
After baking
I made some more test shapes from grey and black putty and baked it all at around 120°C for 25 min.
I also shaped two very thin "banners" and a horn.
I wanted to test the properties of the material, so I made different shapes to test out stability, flexibility, hardness and how well it can be cut and sanded.
Describing a sculpting clays properties is kind of difficult.
Comparing it to other sculpting clays is a bit easier but this stuff is pretty unique, before and after baking. When baked it is very "plastic" like (hence the name).
It's very strong and almost "impossible" to break. It's very hard, but at the same time flexible.
As you can see with the horn, cutting and sanding it is very easy and you can really polish it back up.
But still you can bend it in a very strong angle without breaking and after bending it returns to it's original position.
I really like that property, it's makes the clay very good to make original miniatures or busts that will be casted as the sculpture can take quite a beating before breaking or chipping.
Before baking
Now for the properties before baking - the sculpting qualities. For sure the second most important part (at least for me, if a clay is brittle or unstable after baking I cannot use it for my sculptures as they have to be solid enough to be casted or carried around and be painted).
How to describe this clay? It's kind of soft-rubbery, a bit like fimo, but on the other hand very different - It's a lot more wax-like.
It sticks very well to itself and to wire, it can get very soft using a microwave and it's very "flexible".
You can get a very good impression in these videos:
Properties of BeeS Plastic
Sculpting a 32mm Miniature (part 1)
Sculpting a 32mm Miniature (part 2)
To test it out for myself, I started sculpting a bust.
Just took some thick wire, stuck it into a piece of cork and go!
No greenstuff or other stuff is needed to make the putty stick to the armature, really nice :)
At the moment I have a lot of work in progress projects going on with other sculpting clays, but I think when they are done I use BeeS Putty Plastic in more projects.
Some more impressions of my bust experiment after baking, you can also see the surface gets really matte and nice:
The putty holds detail very well and is very easy to smooth using some kind of balm (eg. Petroleum Jelly/Vaseline) or using white spirit, turpentine or orange-turpentine (just smells awesome and is less aggressive). But the properties of the putty allow it to also smooth it very easily with the normal sculpting tools.
Overall, I am really happy with this new option at my arsenal, I really like the properties it has while sculpting and even more after baking... it's really hard to break the sculpt at all! And I didn't find any negative sides about it, maybe one thing that I have found worthy of saying it here in the end: the putty get's very soft when baking it, so I advise you to watch out for "floating" parts, they need some kind of support or they will bend in the oven.
You can get your BeeS at the website of Masq Mini, they also offer a lot of great sculpting tools and other nice stuff, be sure to check it out if you are into sculpting or conversions.
Now to the part you have all been waiting for, getting free stuff!
You can win:
- 10 packs of BeeS Putty Plastic
- 5 funky Gorilla figures
- 3 very exclusive "early access" casts of the "Jamal" bust shown below
So, how do you participate?
Very easy this time, just post a comment here with your reason why you want to have this stuff.
Try to be creative!
The best 10 answers will be chosen, top 5 will get a gorilla figure and top 3 will get a Jamal bust additional to a pack of BeeS Putty Plastic.
The winners will be announced in 1 week from now!
Good Luck and have fun sculpting!
Raffa
PS: Find this review linked up in the review section!
















 Posts
Posts

