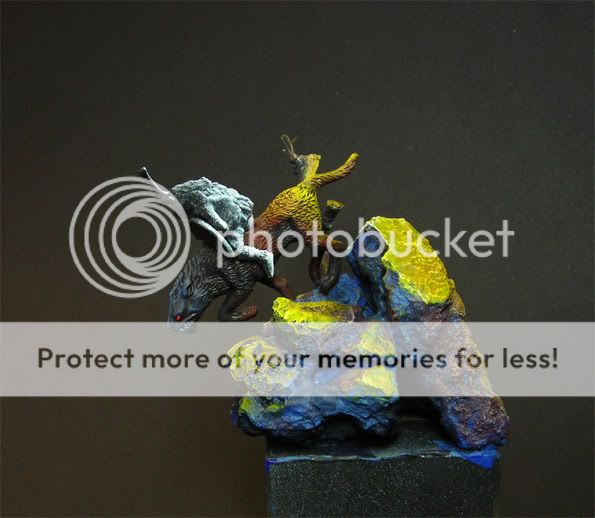
Tutorial - Snow on a base A

by Roman aka jar

posted by roman, jarhead, kong

Aloa,

this little Tutorial will show an easy way to get some snow on your bases. Please notice that this is really a quick technique and for sure will not achieve the highest quality results, but it does look fine and is quick :) - that is why this tutorial is named "A". As i spoke with Raffa lately and he told me that he will bring up the "B-Version" ;)

Ok, Step by Step. When you want to have snow on your bases like explained with this quick technique, then finish up your paintjob first. Finish him up to everything. Then you need this:

- PVC Glue
- an old brush
- bicarbonate of soda (in Germany it is called "Natron", i am not sure if i found the right translation to it)


Take your old brush and bring up some PVC Glue at the places you wish to be snowy later on. 


Then bring up the bicarbonate of soda by carefully throwing it at the places your PVC glue waits. Let everything dry (about 30 Minutes) and then go outside to blow away the non-fixed snow, you may also do this in your room, but then do it next to the carbage. Now you may redo the step before if the snow height is too small for your wish. 


The finish snow base could look like this:


This is actually my common way i use snow on miniatures - tested around a lot in the past few years and i got stuck at this technique. The "B-Version" by Raffa will be done with the Snow Powder by
Andrea Miniatures and i have seen the results - you could call this "B-Version" the deluxe way of bringing realistic snow on your bases - this one hear is the cheap one :)


Hope this could help some of you out there - Keep on happy painting!
Regards
Roman


Tutorial - Object Source Lightning

by Roman aka jar

Step by Step - Daemonette 3.0

by Roman aka jar

Ebay Reminder - Yarry and Nurok

by Roman aka jar


Just a quick reminder - the bidding at Yarry is ending today on ebay, check it out here!


Also the Nurok bust, sculpted by mati, painted by me is ending tomorrow! Check it out here!

Thanks for your time!
Regards
Roman

Workshop Review Augsburg I and II

by Roman aka jar

A new year, me cleaning up my workbench, i mean my brain workbench... something i already want to be done some months ago is this review. In May 2009 i held 2 Beginner's Painting classes in my own Hometown Augsburg. Thanks again to my old school for helping me out with the room and equipement. Really apprechiated. Also big thanks to my girlfriend Anna and also my friend Peter for their awesome angellike help at both of the workshops.

For sure i want to say thanks to those people which did take part in these 2 Weekend classes - i met a lot of great people and as you know without your intrest this never would have happened.

Those two workshops had been early in the beginning and i did try to do my "teaching" on a model from the Games Workshops Lord of the Ring range: a wargrider.

We had a great sunny weather during these two workshops and i guess the ladys and gentleman who did take part did hate me for being indoor with such a weather and have a talking Roman in front of them, telling something about colour theory all the time, about light and shadows and more strange blabla without a break. So there has been a barbecue also on the first workshop, but we all learned from this, that barbecue and beer is no good idea - you lose too much time for the workshop itself, haha.

Here are some impressions of the 2 Workshops in Augsburg/my hometown - our austrian guests took the ride for another workshop time to arrive in the beautiful city - my Paradise City, you know that Guns'n'Roses song ;) - Workshop Numero Uno:


Some bases of the Workshop Participants:


Priming Session:


Me telling something about colours and all the rest which is influanced by this great stuff:


Some Miniatures standing around at our Miniature Table:


Our work area over the weekend:


Me, seriously telling something about serious painting:


Concentrated Painting hours followed by the barbecue session:


It was eating, eating, painting and eating. More or less. Never do a barbecue again at a workshop, even it is great the lost time will never come back... The morning after was hard... Robert and me hanging around waiting for the participants, ape style:


Some more painting blabla has been filled up the complete sunny Sunday, still not sure which colour to grab:


We also made a groupshot of Augsburg's Workshop group number one, great to have you as participants - thank you for a wonderful weekend and all your helping hands, it was my pleasure meeting you and i hope i will do again in the future:


Hah! Got me - also we made a group shot of the Wargs we did paint up at this beginner's class over one Weekend - no! We did not, i was searching my hard disk but wasn't able to find a group shot - i found some single shots of some of the models - here you go with the one who did 2 bases in the same time, he who has the magic hands:


2 weeks later there had been the same procedure again at the same place with a little smaller group but for sure not less fun. Here we go, i am really sorry that i was not able to find a lot of pictures from this second workshop, all i can say is we had a great weekend too, but without barbecue and more time to paint things up ... Summer, Sun and skin burnt by the Sun, just kidding, it's the photo, we all had been angry again by sitting indoors :)


The results of the Weekend - Wargs again  as told in the start of this review:


Really a great weekends... with a lot of Happy Painting as far as i can remember! Thanks a lot to everyone!

And remember a brush is made for painting ;)

Regards
Roman

posted by Roman, Kong, jarhead


Tutorial - Building a base with wood from the Forest ...

by Roman aka jar

posted by roman, jarhead, kong

Another year, another day, another base...

I am recently asked so much about my basing work that i even can't answer every Message i got, guess that is the reason why another base tutorial rolls in. This time talking about using roots from the forest...

This is a forest. Now imagine Big Kong walking around there, breathing good fine air, enjoying the good life and searching the ground for great basing equipment. Always keeping an eye out for material. Always train the eagle eyes, always coming home with full pockets of strange things found and always being asked by my girlfriend: Wtf? Yeah i love those moments...keep an eye out while walking around your world - there is always something there which could be glued to a base ;)


This Tutorial again shows a process of one of my bases. First i did prepare a wondeful socket from Sockelmacher.de. I did tape it around the nice edges so that i only could make it dirty in one of those real great moments - i hope there is none approaching. Taping the socket looks like this:


 Make sure to really make the edges really plain so that no colour or whatever can run down there on the beautiful wood piece. I mostly do this with "special" sockets. I mean not those, more the so called special ones you for examples get by Sockelmacher.de.

Next step had been preparing Milliput Standard Yellow and collecting some stones i wanted to go up that base... maybe. A shows unprepared Milliput and the stones. B shows mixed Milliput brought up to the socket and the stones still lying around. C shows formed Milliput with stones in it. I did form it with my fingers first, used some water on my fingertips to have a better, softer control of it. After this i pressed the stones at place. Then i have used another stone to make some stamping action in the Milliput to get the texture of it in the Milliput. Make sure not to penetrate the tape with the Milliput - in the end this could be damaging your paintwork.


As the Milliput is still movable i thought a moment that maybe roots or something wooden might look better instead of stones. So i did search one of my resuources from the basement, where i am collecting wood that i have found in the Forest. When you are collecting wood make sure that it is completly dry before using it for a base. That means: Don't run in the Forest now and pick up some wood, run home again and glue it onto a base - that is wrong! How to make  your wood dry? Just keep it lying around where no one will be affected by the strange things from the Forest for a long while (at least 2 months). When the wood you use is dry it won't work anymore from the inside. Wet wood drys and makes you not really comfortable while painting. 

Why i use real roots and wood? Good question, bad answer: Maybe i am lazy to sculpt it on my own or i think that real natural curves and forms only can be formed by nature itself - not by mortals.


One of my collection bags looks like this:


So i have searched for the fitting parts, ripped of the stones again and picked the wood parts in place. After the Milliput is dry i checked the fixation of the wood parts by using sensual muscle power, when something is easy to move i glued it again with super glue. You now could make some hardening process for your wood but you ain't need to. I am not often doing this, but i'll tell you: Mix some PVC glue with water (50/50) and bring it on the wooden parts, letting this dry makes it more resitable against damage and while painting the wood is not soaking all your colour away. I have also put the miniature in the Milliput before to search for the place where it should stand. This one is from Red-Box-Games.


Yepp, that's it. Now wait until everything is dry and start priming. After finishing up your paintjob carefully pull down the tape again. Here are some more examples of bases where different wood has been used - if it got a surface, take a breath and paint it:


So far - Keep on happy painting!
Regards
Roman


A happy new year...

by Roman aka jar

Whatever a new year could bring in all its aspects - the Massive Voodoo Crew wishes you the best for yours. Stay healthy and happy. Here is a strange shot of the Firework i have made during our stay at New Year's Eve in Salzburg / Austria... it is really awesome when the mountains around you triple the noise ... uhm, yeah - sorry for the late wish i just came up to my feet again... Happy New Year!


Regards
Roman