SBS - Necromanceress by Ilyad Games

by Andy

Hello everyone,

Andi here! Remember me? I am the new monkey in the jungle!
Today I want to show you a step-by-step for a small scene I did earlier this year.


Everything started with a miniature exchange with my good hobby-friend Christoph. I had a bit of post-MV astronauts challenge blues and no sense for painting, so it was a good chance to spark new creative energies. We decided to send each other a secret miniature to be painted by the other, with minimal restrictions for the scene and painting. I received the beautiful Necromanceress from Ilyad Games. It’s a relatively rare, out-of-production miniature and I was a bit afraid whether I would be able to paint her in a way Christoph would like in the end.

Christoph's only request was to use a fantasy setting to match his Ilayd collection. Well, I’m not too much into fantasy, so it was a good challenge, which kicked me out of the comfort zone.

I started, like many times, with no idea how to start the project. Sounds pretty silly but it’s true ;)… but there are always tiny things I want to try. For years I have wanted to build a wooden door and had no proper project to implement one - this was my chance.

Measuring the height of the miniature, some calculations and cutting some wooden ice-sticks was pretty much everything I had to do. I attached everything with superglue, added some thin metal wire pieces as door handle and bolts and gently used a steel brush to create the wooden structured surface.

This was a good start, but not a base at all, so I glued the door to a piece of plasticard, created a frame for the door and some basic wooden structure. Again, the steel brush is a good tool for recreating the wood grain.


The free space was filled with Juweela stones, gaps were closed with Vallejo plastic putty and I did a first test on the base. With the wall and door in the background, the story of a zombie huntress, taking her bounty out of the house, developed in my head. At this point I was fully emerged in the project and the base building process began to flow easily .


To get a bit of extra height, I added some cork, filled the floor with chunks of Juweela plaster and used the same plaster to build the roof.


To get some life to the scene, potting soil and miniature plants have been added but it still looked a bit empty so I decided to add a tree. Sometimes I heard Bob Ross in my head saying „some bushes here and a happy little tree there“ :D

The tree was done with Vallejo plastic putty over a wire base and moss for the leaves/treetop.


I used my electrical scroll saw to get clean base edges and covered the whole base with plasticard. Basing work done.


After priming the whole scene with black airbrush primer, I was stuck again. 

How to approach the painting?? 

Thinking about atmosphere, daylight or nighttime, muted neutral colors or bright comic colors… comic colors… comic... sin city part one, the lady with the red dress… and BAM, there was the inspiration for the color scheme. 

And again, once I had the idea in my mind of the overall “feel” of the scene, everything went easy. In total it took about 4-5h to paint the whole scene with grisaille technique. I learned this at Roman's material masterclass workshop - which I highly recommend (some unpaid advertisement here *cough* ;) ).


The last step in the painting was the candy red dress popping out of the whole scene, which was glazed over the black-and-white grisaille with Schmincke AeroColor Brillant Red.

 still WIP but nearly finished


At the beginning of the painting process, I had no idea whether I would be able to handle the black and white scheme and how it would work with the red focus spot... but when he received it, Christoph was pretty happy, and that’s the most important part of the whole project. Thanks my friend for this opportunity;)


If you like the SBS, the result, or if you have any question, please leave a comment below.

Thanks for reading!

Cheers 

Andy 

Project diary: 1177 B.C. - 09

by David

Hey all,


welcome to Page Nine of my project diary. If you're wondering what this is, please check the announcement post, in which I explain the motivation and general goals of the diary. At the bottom of that post, you will find a link to all parts of this series (constantly updated as soon as new articles are published).

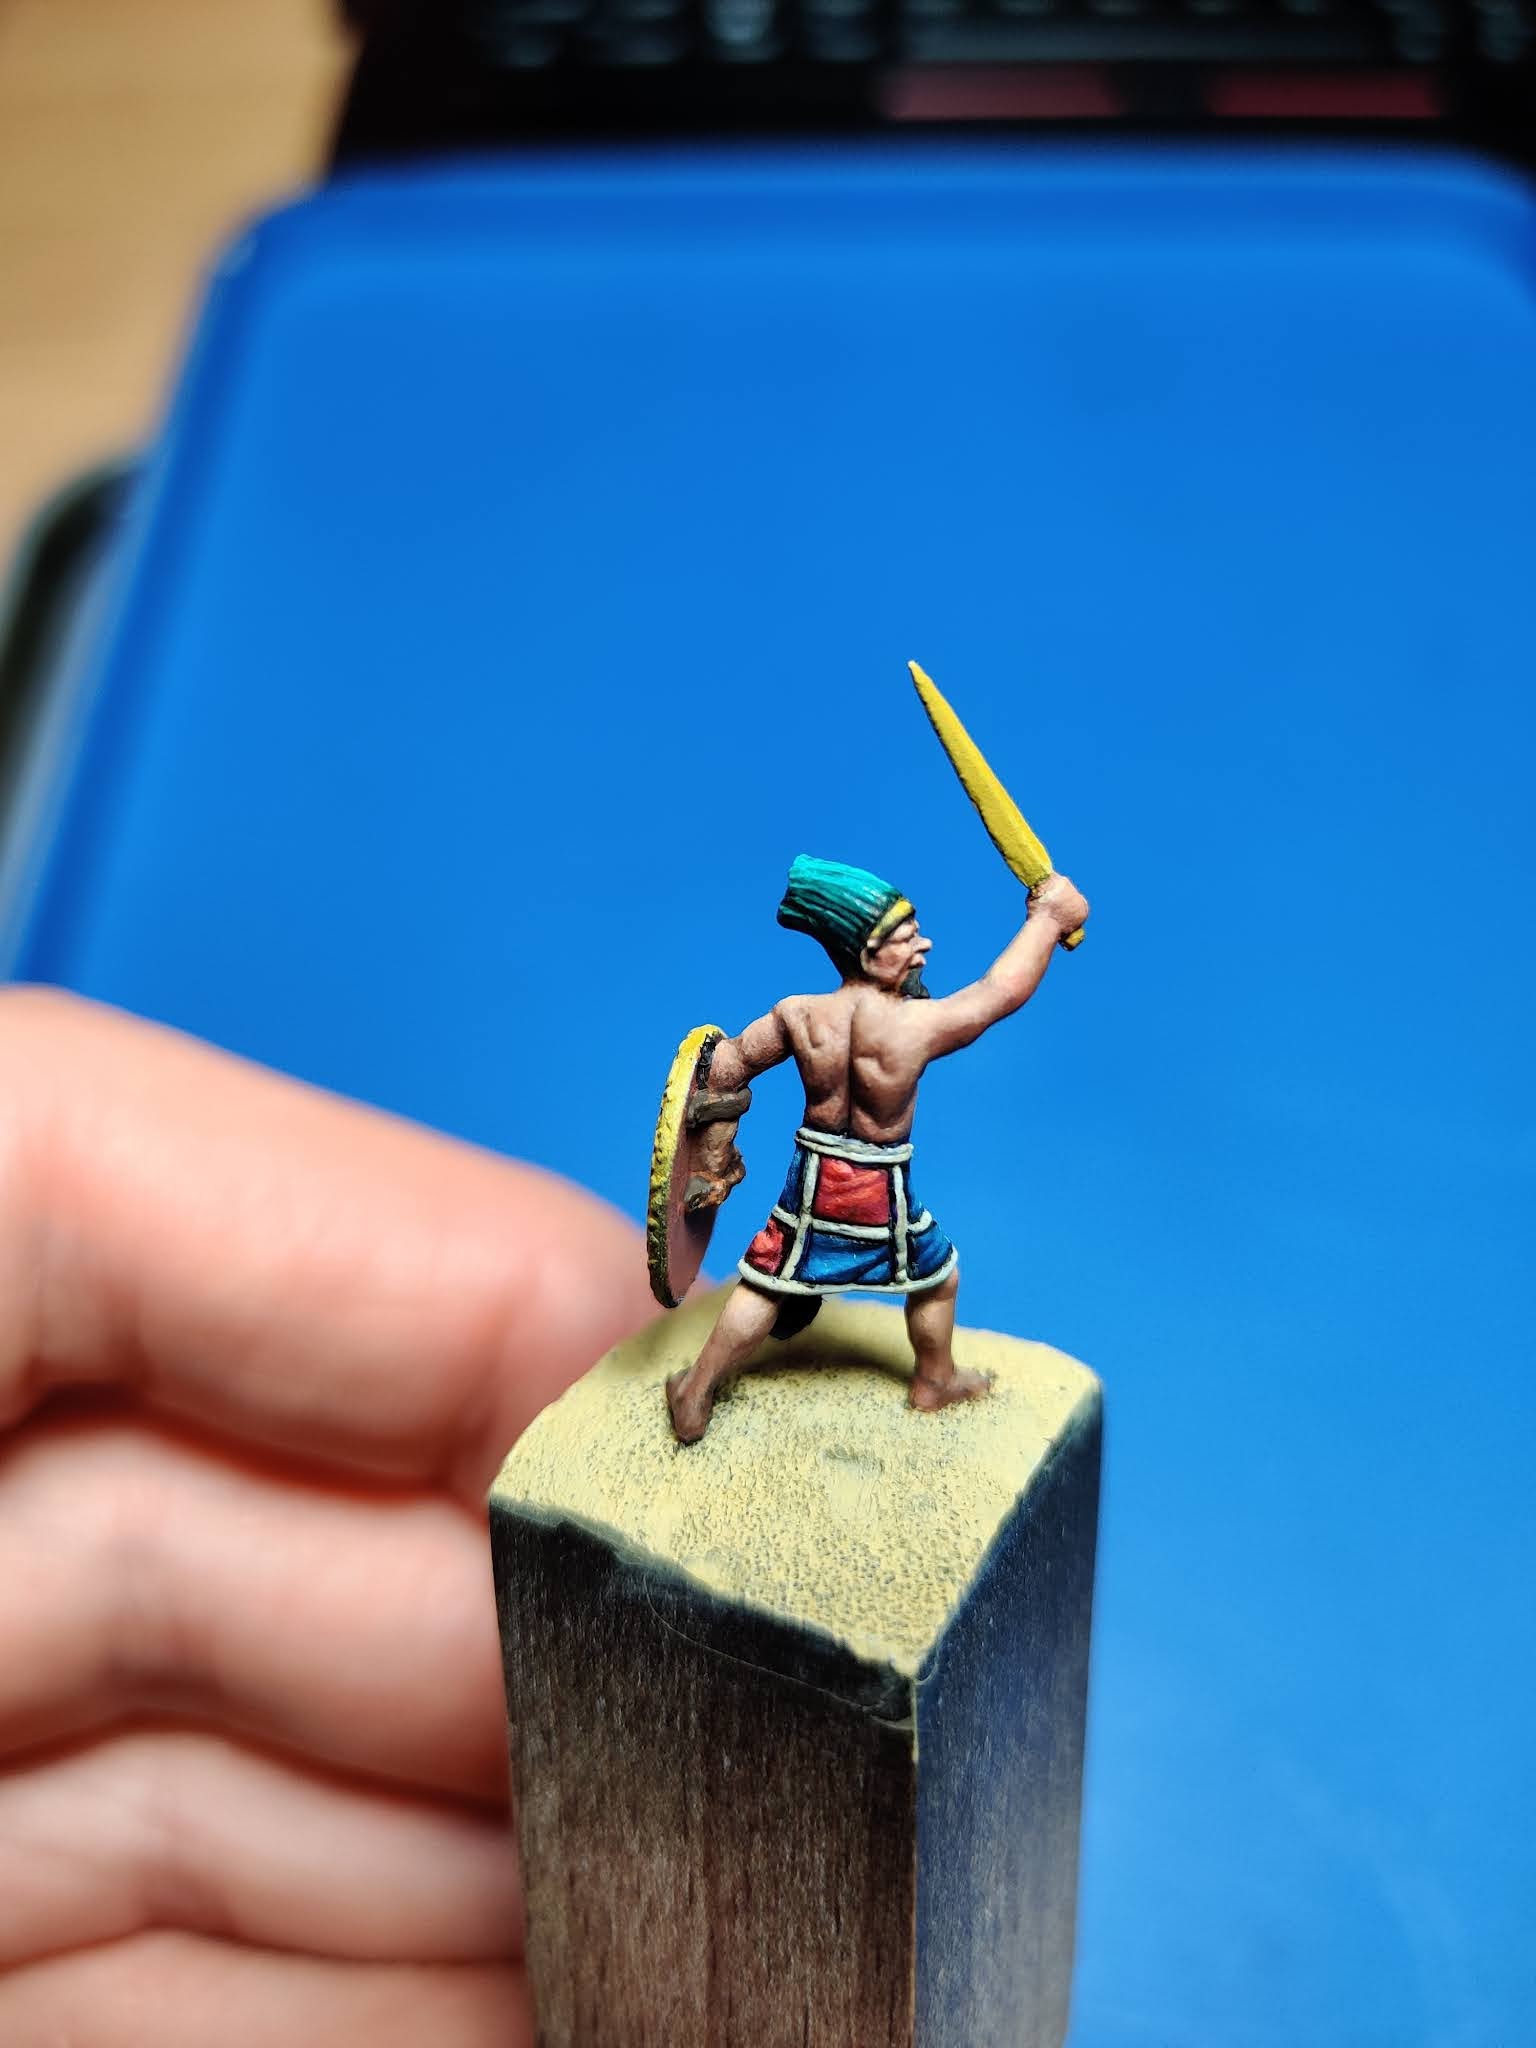
Finally, the day has arrived... My diary entry today will cover the painting of the sea raider's shield and sword. Let's get some Bronze NMM done! Starting with the shield, however, I first concentrated on the shield's inside. According to the archaeological and historical sources, the Sea Peoples' shields were mostly made of wood, which was covered with a thin sheet of often ornamented bronze. It is not documented whether the wood was also covered on the inside of the shield, for instance with leather. In any case, on the mini the shield's inside was sculpted blank and without any structure. Since I wanted to show the wooden core of the shield, I had to paint it. I started with a nice, warm brown basic tone (VMC Mahogany Brown), and then painted some very dark lines using VMC German Camo Black Brown to portray the wooden strips from which the shield was made. Then, I highlighted the individual strips (adding Tan Yellow and Ivory to the Mahogany Brown), and finally used a very diluted and carefully applied wash of the Black Brown to shade the whole area.

Painting on the strips, first the dividing lines...
... then some highlights...
... and shadows.

Once that was done, I could no longer dodge the NMM bullet - and I started with the shield front. Since I wanted the shield to be a nice, polished bronze, I decided to use the same color combination I already employed for the headband. I started with a slightly green-tinted, ochre-yellow (VMC Japanese Uniform) as the base-color. For the highlights, I used VMC Tan Yellow and Ivory, which were mainly applied in the upper parts of the shield. The outer-lower section was to reflect the ground area a little. For that, I again used VMC German Uniform Black Brown. For the mid-lower part, I wanted the shield to reflect the water (which reflects the blue sky), so I mixed a bit of VMC Turquoise into the Japanese Uniform color. Using these colors, I quickly laid down a first sketch:

Sketching the overall lights and reflections...

I then worked a little back and forth on the sketch, refining the reflections and softening the transitions, and especially I toned down the lower part of that strong very bright "stripe" of highlight in the middle. I also painted the shield rim, making sure to give it a nice edge-highlight where the Mediterranean sun would be hitting the shield directly from the top, and also added a few edge highlights on the little details engraved on the shield. I did not overdo this latter part, as too much of this detail lighting would quickly destroy the overall impression of the reflective surface. In retrospect - and if I ever did this mini again - I would remove the shield completely and replace it with a scratch-build shield made from plastic sheet...

Once I was sufficiently satisfied with the shield, it was time to tackle the sword. Since I wanted the sword's bronze color to differ a bit from the shield's color and have some variance, I started from a different base color, imitating a slightly different combination of tin and copper in the bronze alloy. For the base-tone, I used VMC Tan Yellow, to which I added a bit of VMC Woodgrain Ink, which is a warm reddish-brown tone. For the shadow and light colors, I used the same tones as for the shield, mixing Tan Yellow and Ivory into the base-tone for the lights, and Black Brown for the shadows. The final highlights were painted using pure Ivory. It was a bit of a struggle to find the a light/dark reflection range that looked somewhat realistic but also allowed the slightly reddish color to show. I did three of four attempts, and greatly benefitted from feedback from my MV brothers (special thanks go out to Hansrainer!). Ultimately, I got something done that I was somewhat ok with, even though I was not completely satisfied:

Not totally happy, to be honest...
... but I will return to it (maybe) in the final stages.

And with that, I left the mini as it was for the time being and went on to finalize the base - it was high time for some water effect! Read more on this in the next installment of the project diary. As always, if you like what you read or have questions, drop me a line in the comments. Talk to you soon!

Best, D.

Project diary: 1177 B.C. - 08

by David

Hey all,

welcome to the eighth entry to my project diary. If you're wondering what this is, please check the announcement post, in which I explain the motivation and general goals of the diary. At the bottom of that post, you will find a link to all parts of this series (constantly updated as soon as new articles are published).

Today I will talk briefly on painting the fancy headdress. Believe it or not, this thing actually is some kind of Bronze Age helmet. It supposedly was made of feathers or reeds, most likely painted or dyed, which maybe were attached to some kind of skull-cap of some organic material. In any case, the reeds were fixed to a bronze band, which gave the helmet its name: "tiara". On the following image, you can see a contemporary depiction of some Sherden warriors, who made up one part of the sea peoples mentioned by the Egyptian sources, wearing the fancy helmets.

Since it's such a small part of the mini, the painting of the helmet was a relatively quick affair. The archeological remains of one helmet show that the reeds were likely dyed in a light blue tone. But, since I wanted the warrior to be really colorful, I went for a slightly more saturated tone and picked VMC Emerald, which is a nice, intensive greenish-turquoise, as the base color of the "feathers". This I first gave an overall light and shadow sketch, mixing a bit of VMC Hull Red and Black into the Emerald for the shades, while Ivory and a very light blue tone was used as highlight colors. Then, I gave a "pin-wash" (that is, a targeted wash) with Scale 75 black ink, slightly thinned down with some water, to define the individual strands of the "feather-bush". Then I went back-and-forth again with the base-tone, highlights and shadows to give the whole thing a bit more depth, and used the black ink for a first darklining.

Some turquoise for the reeds...
... slightly shaded and highlighted.

Then, I tackeld the bronze band. First, I restored the base tone, using VMC Japanese Uniform (a slightly desaturated ochre-yellow with a very light greenish tint), and corrected a few slight mistakes, where the darklining color had crossed over to the base tone. Then I sketched the light-and-shadow play on the polished bronze metal, using VMC Tan Yellow and Ivory for the lights and a mix of the base color and Hull Red for the shadows. I paid particular attention to adding a strong highlight along the edge. Once the bronze band was done, I worked a bit more on the feather-bush (just highlighting a few individual strands), and did a final round of darklining to clean up the paint-job and separate clearly the individual parts of the headdress and between the headdress and the skin of the raider's face.

And the headband of bronze...
... a shiny tiara for our sea raider.

And at that I left the helmet for now and set my eyes on the big bronze elephant on the beach: the warrior's bronze equipment needed some NMM love!

Follow me next time when I tackle the shield and sword. And, as always, if you like what you read or have questions, why not drop me a line in the comments? Talk to you soon!

Best, D.

FM: Ultramarine Primaris with Plasma gun

by Roman aka jar

Buonas dias Jungle,

this is the Ultramarine I painted during the one day private coaching session with Philip for explanation purposes. It was fun.

Sometimes it is just great to help someone else and teach fundamentals that need a good foundation to build on top of them. Nothing too crazy or fanzy, but focused on the "why" to help your student undersand. And always a good lesson for oneselve.


This miniature is for sale!
Feel invited to check back with my PDF cataloge via
https://www.romanlappat.com/for-sale


So far,
Keep on happy painting!
Roman


  _______________________________________________________________________________
You want to support Massive Voodoo? 
If you like to support or say thanks the monkeys of Massive Voodoo in what they do, please feel invited to drop a jungle donation in their direction via paypal or check their miniatures they got on sale here.
_______________________________________________________________________________

MV-Team: Andy

by Andy


Name: Andreas aka Andy

Job: Specialist for particle analysis

Painting: wargaming since early 2000 and display painting since 2013

Media: acrylics, gouache and aquarelle. Mostly heavy body Schmincke, Lascaux and Golden; Inks by Liquitex. Sometimes I use Vallejo and Scale colors but mainly their metallic paints. Gouache and aquarelle colors for tinting. 

Brushes: Windsor&Newton Series 7, sizes 0, 1 and 2 for most jobs and some no-name brushes for different topics like priming, base coating, wet-in-wet stuff and so on. One of my most loved brushes is a no-name one – it gives me freedom to slap paint without taking to much care about details.

Airbrush: H&S Evolution and H&S Ultra

Miniatures: I’m totally into sci-fi, modern, cyberpunk and post-apocalyptic stuff in every scale from busts to miniatures.


Sculpting: Now and then I sculpt traditionally and digitally but its more trial-and-error than anything showable… anyway I show it :D


Inspirational Miniature Painters: Roman Lappat, Alfonso Giraldes, Jeremie Bonamant, Josua Lai, Arnau Lazaro, Sergio Calvo, Trent Denison, Richard Sharp, Dmitry Fesechko, Alex Varela, David Soper

Inspirational Miniature sculptors: Raffaele Picca, Romain van den Bogaert, Lucas Pina, Allan Carrasco 

Gallery: putty&paint – not always up to date


Hello everyone, it’s a new guy in town!

My name is Andreas. I’m living near Nuremberg, Bavaria.

I’m on and off approximately 25 years into the hobby and started, like most of us, with wargaming. I first came into contact with Warzone in the mid-90s, followed by a break for a few years. My best friend came up with the idea of Warhammer 40k back in the early 2000’s. I had no idea what he was talking about and had no idea what was coming towards me… 
I thought to give it a try and ended up with a 4000 points Necron army, followed by 2500 points Space Orks and 1500 points Sororitas (formerly known as witch hunters). We also had a small excursion to fantasy where I started chaos barbarians but they never saw the table. In general, it was building gray models and gaming - painting was necessary but more or less a pain in the a$$ for me. Think about a Leman Russ hits the spot and you take out a handful of Ork-Boyz… naaa, it hurts to paint them.


Years went on and we did less gaming, so painting was the only hobby-related activity and the grey pile of shame was still huge. I took the chance to attend the beginner workshop with Roman in 2013 and I was hooked for more painting. I repainted my Necron army entirely with airbrush and changed the painting process of the Orks for more efficiency. (Both Armies got sold several years later without ever seeing the table again)


One of the first models I've painted after private coaching


In 2014, after a private coaching with Roman and Raffa, my focus changed from army painting to single models and the way to cabinet painting was set up. Over the years I attended many classes, e.g. with Roman or Banshee, and the joy of painting remains until today.

Painting miniatures is a very relaxing activity to me. I really enjoy getting lost in time and space while putting paint on busts or build little stories around models. I’m always telling the story to friends of a Wednesday evening several years ago when I just wanted to paint an hour and ended up looking at the clock at half past one in the morning totally shocked where the time has gone. I like the flow of creative energy. 
I’m a less structured guy than some of the other MV-Members, my process is often chaotic, wild and plans about projects evolve while working on them. 


Examples of chaotic works from first idea to finished piece:


My creative energies work the same way, like in waves of high output and calm times. I always try new things on projects just to keep my interest alive. Sometimes there are good results… sometimes not and I do my best to fix it ;)


In the future I’ll try to bring you some step-by-steps and other detailed articles about my projects, also some hobby-hacks and maybe some crafty stuff ;)

I’m very pleased to be a member of Massive Voodoo and thankful for the invitation - was some kind of secret wish since my hobby beginnings.

See you around!
Yours
Andy