Article: The joy of WiP

by David

Hey, y'all,

this is a personal reflection on my joy of having a lot of miniature projects in
Work in Progress (WiP) status
.

Some goblins (15mm and 28mm) patiently waiting to receive some color!
Before I get into this, let me start with a small look back. I love reading - so much that I basically made reading (and writing) my job. A long time ago, I thought that it was a great thing to finish books, even to force through books that I did not particularly enjoy or liked. And I made myself feel bad if I didn't finish a book. I thought that if I finished books it would somehow be of value in and of itself. At some point, though, I realized that this thinking put barriers to my reading, since in order to minimize the "suffering" I only started reading books I was sufficiently likely to finish, or even re-read books I had liked before rather than starting a new one I was unsure about. Something in me always rebelled against this thinking, and at some point I decided to read only what I liked and not be feel "bad" when I put a book away after 20, 30 or 100 pages. Or to put it in Marie Kondo's words: if it doesn't spark joy, I say thank you and goodbye! Since then I started a LOT of books of which I finished maybe 10%. But those that I finished I really enjoyed.

Really looking forward to painting these two!
Fast forward to today and the same basically applies to my approach to miniature painting. I remember that in the beginning, I was very anxious to start only figures I was sufficiently likely to finish. But that quickly changed and I started a large number of projects, some of them I finished at some point - mainly those I painted as presents for friends or those I wanted to take to competitions/exhibitions. But a lot of them are still in some more or less advanced WiP status. Most are based and primed, others I started painting but for some reason I didn't feel like proceeding, or I lost interest in the mini, or I was just not in the mood for painting at all and when the mood came back, some other project was more interesting. I am sure that I will pick up some of those WiP projects at some time, but I am also sure that I will never finish some others, and that's fine. I enjoyed "playing" with them when I did, and if their time never comes, so be it.

Some 1/72 projects whose time has not yet come.
If I tried to come up with some kind of an explanation, I would say that it's because I particularly enjoy the conceptual aspect of our hobby. I have so many ideas for stories I want to tell in miniature, for vignettes and small dioramas I want to create, techniques I want to try and materials I want to use. And whenever I see a mini I like I usually have something in mind that I want build with it. Sometimes I even think that I like the idea of putting together a miniature, conceptualizing and building a base, and painting the mini, a slight bit more than actually doing it (here I am just a little kidding... ;-)). Another part of the issue is that sometimes, I just want to build bases, to play with different materials and compositions and do not want to paint. So, a lot of WIPs are just finished bases with fitting minis, both of which have never seen any paint other than primer from the rattle-can.

Two 1/72 guys on the flanks, a silvery Hasslefree lady in the back,
and my single most favorite 28mm mini of them all in the front.
Don't get me wrong. I realize that it's very important to finish stuff and that one shouldn't get lost in a myriad of projects - if one's job, livelihood or personal relationship depend on it. And even in the hobby world it is greatly rewarding to finish something. And: it's of course especially important to keep commitments made to others. However, for the hobby stuff I strictly do for myself, I enjoy the liberty to develop new ideas and to work on that project that calls me the most at that particular moment in time. This is my hobby, my spare time, my autonomy - which I value above all. And while, of course, it's nicer to show finished stuff to your friends than primed WiPs and one (usually) takes finished minis to competitions/exhibitions, a look into the WIP section of my miniature cabinet really sparks joy for me!

"Pile of Shame" - Not for me!
How do you approach this?
Do you have a lot of WiPs? Or do you only have one project at a time that you work through from start to finish? Let me know your thoughts in the comments!

All best, D.

FM: Simone Segouin aka Nicole Minet

by David

Hey all,

today, I want to share with you the second project I finished in 2019 (at some point, I hope I will be able to take some pics of finished project no 1).

It's a figure I painted as a present for my friend Thomas, a mini from his own WWII miniatures series Stoessi's Heroes. Her name is Simone Segouin, also known under her nom-de-guerre Nicole Minet, and she was French Resistance fighter during World War II. Please check out her story over at Wikipedia.


There are a few additional pics over at Putty&Paint.

All best, D.

Tutorial: What I learned from building small Bases

by Josua Lai

Less is more 

Sounds simple but this turned out to be the hardest point of all to understand and master. Why so?
Try to think of famous brands and they're logo. What have all these logos in common quite surely? They are simple, cut down to a simplicity where only that thing is left that matters in case of the logos the name or the brand. Due the simplicity of them,don't get me wrong simple does not means easy to creat, the logos they are easily recognisable.
   
How can we implement this on your dioramas and bases now? 

I often see scenes and dioramas that have a great story to tell but the way they are build or constructed does not really help to build up or carry the story. They are to crowded or to busy for example, which is not a bad thing done on purpose. This is why I forced myself to cut down on the essentials. Asking me with every element I added does it help the story or scene. By doing that I felt the experience I gained with every piece I finished.


Keep it "simple"  

On the firsts sight sounds pretty close to my first point. But let me explain... If I build a scene my goal is to tell a story. The story could just start for example a lone survivor is leaving his vault. The story could also end for example a Dark Elf hunter is hunting down his prey and just hit the deadly arrow right into the target. But you get also the option where the story has no real start or a real end and that for me is often the sweet spot. Lets talk about with my mini diorama of the cat swimming on a piece of wood in the ocean. Now try to think about a start and an end for this story. I am 99% sure you would tell a different start and end of a story then I would. And exactly that is what I am striving for. I want the viewer to feel something I want him or her to care about the Story and I personally feel like this happens in a special way when the story is not to complex and pretty clear. This does not mean that you not have to think about how you transfer the story. This means that you have to think about how you could guide the viewer and make him feel certain ways, indicating some things. For example the rather big waves around the cat are giving an indicator about the surrounding. The colours are chosen to be rather cold on purpose etc. To break it down:

Keep your story simple and visible. It is not a bad thing to not tell the start or the end of a story. Use colour or surroundings to softly indicate what is happening. Guide the viewers eye softly but guide it!


Consistency

Another rather big word when it comes to creating stuff. I want to focus on consistency in size. I learned that if you build minimalistic and small bases you have to be aware of the dimensions of things like stones, twigs and other elements. It goes hand in hand with all the above points. Rethink if it is necessary or not and use elements wisely instead of just placing random stuff.

Consistency is also a big thing for me regarding the whole process of building especially when it comes to the finish of a plinth, this means that I also pay attention in areas that are not on the main base itself. If I have sides to sand down or plasticcard areas that going along with a wooden plinth I putt at least the same amount of attention to make them smooth and appealing to the eye as I would for the main area where the action is going on. If I look at it as a whole it should be non irritating things around the scene, at least that is and will be an important thing to me.


Keep it simple!

Yours,
Josua

Seminar Update February

by Roman aka jar

Hey Jungle,

a quick little update on the seminars for the first half of 2019.
Find all information via the Seminar Roadmap 2019.

Just recently I held the first seminar this year in Augsburg with a great handful of students, my Material Masterclass. Thanks everyone for joining up! It was awesome to see you all learn so much! I will prepare the review for the blog soonish! Next one will be in Hamburg, Germany and I will teach my one day OSL Masterclass there. Really looking forward to the students who signed up for it!
 
While most of the other seminars are filling up greatly and also first appointments for private coachings during the year are made I got sad news on one hand too:

Unfortanetely the Beginner Seminar in Graz, Austria
has to be cancelled due the small number of people interested. This is now official. Sorry to Austria. Thanks to those of you who are going to travel from Graz to April's Augsburg Seminar! You rock!


If you want to join one of my seminars,
feel invited to check back with


Stay tuned for more!
Happy Painting and happy learning!

Yours
Roman

FM: Nurgle Chaos Warrior

by Roman aka jar

Good Morning Jungle,

just recently I finished another figure that I was starting during a private coaching for explanation purposes. It is a Games Workshop Nurgle Chaos Warrior that I converted a little bit to make him look even more nasty.

The purpose of this paintjob was to make the figure look good for gaming.


Nurgle Chaos Warrior
Games Workshop, 32 mm


This model is for sale.
If you are interested to make it yours, please find details in my PDF cataloge!

Greetings from the busy jungle!
Keep on happy painting!
Roman

MV Challenge 2018 Prizes incoming!

by Roman aka jar

Hey Jungle People,

slowly the prizes from the MV Challenge 2018 are dropping in via postal service to their new owners. Slowly. Three random prize pool parcels still have to be sent to their new owners. You can check back with the winners over here!

I just have to bring home the suprise boxes from the studio one by one (I do not own a car) and sent them. Thank you for your patience everyone!

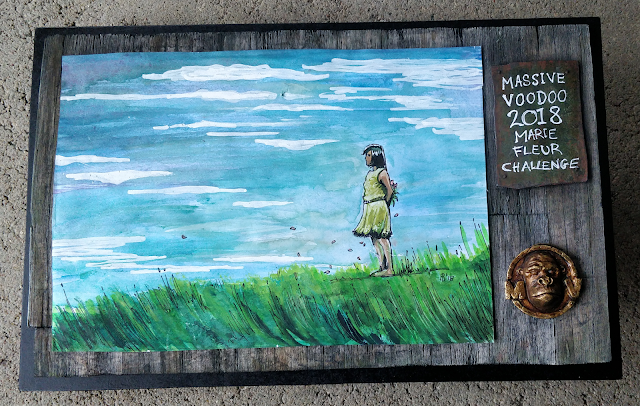
Henrik who has won the 1st prize in the Marie Fleur Challenge with his great diorama - my illustration from Marie Fleur - contacted me as the postal service managed to break the glass of the frame. He did build up something on his own now which I wanted to show you! So beautiful! Thank you, Henrik!


So far!
Soon all the challenge prizes are sent!
Stay tuned for more jungle content!

Roman

SBS: Uther, Light of the Realm

by Roman aka jar

Good Wednesday Morning jungle,

welcome to another step by step insight into a project I did paint in 2017. You can not imagine the amount of articles I got from this era, still unwritten. Well, what can I do? Yes, write them for you so you can enjoy them and hopefully be inspired :)
_______________________________________________________________________________

You want to support Massive Voodoo? 
If you like to support or say thanks the monkeys of Massive Voodoo in what they do, please feel invited to drop a jungle donation in their direction via paypal or check their miniatures they got on sale here.
_______________________________________________________________________________

Uther, Light of the Realm
This article is about the steps I took and the thoughts I made to finish this bust, a sculpt by Raul Garcia Latorre:


First,
I fell in love with the sculpt when I saw it for the first time.
A fierce warrior priest that could be easily transported into the realm of Warhammer Fantasy. My senses were tingeling so I decided to paint him up. This is always a good sign and I often follow this call.

After preparing the bust and removing mould lines and glueing everything, except the sword together I decided for a very uncommon priming method ...


I used GW's colorful primers to prime the figure. Using a brown, blue grey and yellow here. Why?
Well, I was just bored starting always with black and white and my thought behind this was to place the colors I wanted to place influanced by the primers guideline.


Well,
it did not work as I was to shy somehow. After I placed all my basic colors on the bust I quickly realized that this was a neat idea, but I was not able to pull it together somehow. I got stuck on the red dark brown color from below and some gentle touch of yellow in the highlights of the face.

I do not see such things as a mistake. It is just part of the journey.


After this step I worked more and more on the true metallic metal - using mainly Scale75 silver colors - which in this case was quite the surface. Slowly the figure turned from a cool sculpt that I want to paint to a massive metal monster that was exhausting to paint.


Still keeping that red glow from below in the process ... if you flip him and look from below.

If you look from the front you don't see that ... yet.


The face was the most fun part on the bust for me. I enjoyed playing with skin variation colors, like the yellow influance on the forehead, the reds and oranges in the middle area of the face as these areas are packed with organs that need a lot of blood: eyes, nose, ears ...


The lower parts and neck kept a touch of green in it.


I wanted more of that red back, so I used the airbrush and sprayed it in from a steep low angle.


From below, yes.

From the top, no.

Having a second light on the figure, a colorful from below allows the figure to deliver more interesting areas, especially when you got such big metal surfaces that reflect from here to there or elsewhere. Like a mirror.


I also painted more detail to the armour by checking back with its upper light situation. It is a pain in the booty to take proper photos of this, but who am I telling you this. Everyone who paints a lot of true metallic metal knows about this issue.


So far the red glow was just sprayed to the figure and not really included in the concept ...


So it was time to paint it over again, but using redish tinted metal colors for it. Focused on strong edge highlights from bellow. Kept it dark in areas of shadow and the overall look closed in much better.


My highlights on the armour turned blueish, cold. I did the same to the hair, skin and cloak as there is no reason to change highlight color here. Metal is always a great guideline to show the color of the sky and so delivers a guideline of colors you should use to bring other areas to brightness.


The cold/warm contrast appearing in the figure is really enjoyable, even it is far from my initial primer plan :D


This photo of a brush sneaked in this step by step. I do not find a reason for it, so let's take it as a beautiful photo of a brush ...


In the final stages I increased the contrast from dark to bright areas in the armour by glazing in darker shadows and painting stronger highlights. This is when the shine of a polished armour appears.


I was checking back with single volumes of the armour that pointed downwards and should recieve stronger reddish influance and added this with reds and oranges.


Here you can see what I mean. I focused with more orange and yellowish orange to the edges of the metal that would reflect the strongest.


For the final steps I increased the level of detail here and there. Mainly on the face, smaller highlights, deeper small shadows. The sword was painted and added to the light situation with the reds. Then glued to the figure.


Somehow I was really fascinated by the character of the bust, while painting it was kind of too much metal going on . I know, some of you will say, there can never be enough metal :D ...


The way I paint is always from a rough overall look to detail. Usually in the middle of it I know the final look and where I want to go. I see my vision. Somehow I was missing this in this bust as I saw too much metal all the time. Nonetheless I finished it, but far from my initial primer color vision. Well, happens. I am really happy about the amount of textures I was able to bring into the metallics and it was a pleasure working on that red light.


I hope you enjoyed the insight!
More to come in the future!
Keep on happy painting!

Sincerly,
Roman

Review: Dani's Beginner Speedsculpting Class

by Daniele "Found" Trovato

Workshop Review

Dani's Beginner Speedsculpting Class


Super focus :-)

Good morning my dear sculptors friends,


today I'm talking about about my Miniatures Sculpting class I recently taught at Nautilus Art Academy, Catania.


My workshop was born thanks to the kind concession by Ambra Cucinotta and Filippo Silvestro, the owner and founder of the Academy.


I had a webcam over me that show my students what i did


Different students


Ambra and Filippo are two great artists who have created this awesome school of Character Design, Digital Art, 3d Sculpting, Filmmaking and Videogames Development.


I covered all the parts od sculpting process


They have collaborated with some of the greatest international artists and boast successful partnerships with many production companies and more.

Thanks to them I have been able to teach my introductory class to miniature traditional sculpture, born as a link to 3D sculpture.


The Goal

My idea was to create a beginner class that provide you the basics to start in miniature sculpting.

Essentially this class is the course version of this my article i wrote previously.

The course goal is  to provide a complete overview of all the materials, the main techniques, and the methods to start with miniature sculpting.


Seriously: Is it possible to learn to sculpt miniatures in just one day ?

The answer is obviously NO. :-) :-)  

But you can learn what you need to improve yourself and start with the right step.


While I'm showing the tools i use most


What We Did

The students sculpted a 1/10 bust  and they learned the basics of traditional sculpture, we talked about:

-What are miniature sculpting
-Link between 3D and  Traditional
-Sculpting process analisys
- Intro to different Materials, and how to use them
- Basic techniques with first masses and volumes
- Intro to to create basic texture such as hair, skin and scales
-How to use the references to sculpt a thumbnail
-Examples of clay sketching and creation of unique characters
-How to create the different armature and how to correctly set the supports for the sculpture
- Cooking, finishing, and presentation of the models

Clay sketching

Masses and Volumes

Create textures (introduce)


Filippo helps me to show better details
First part to create e bust


We also talked about exhibitions, painting and how to start sculpting miniatures as amateur way or professional way.


We had a lot of fun, and I'm sure we'll repeat this workshop in the future.


Keep Sculpting
Daniele


Link and resources:
-Ultimate Guide to Miniatures sculpting
-Nautilus Art Academy
-Daniele Found Miniatures
_______________________________________________________________________________

You want to support Massive Voodoo? 
If you like to support or say thanks the monkeys of Massive Voodoo in what they do, please feel invited to drop a jungle donation in their direction via paypal or check their miniatures they got on sale here.
_______________________________________________________________________________