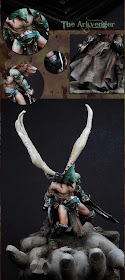
"MV's year of the painter" presents to you another long forgotten article.
A step by step article through a project which I did back in 2011.
You voted this article to be up next here.
The figure itself comes from the well known company "Pegaso Models" and the unpacking can be seen behind this link. The sculpt was done by Roberto Chaudon.
___________________________________________________________________
This is where this journey will lead ...
INTRODUCTION
This figure was my first bigger one single model comission work I did for my friend Vittorio from Italy. I was asked to paint my vision of this figure for his collection and you can guess I was really excited about it. I wanted to deliver something extraordinary, something that is me, some personality in it. I did put myself under high pressure to recieve that goal and in the end maybe too much, but you got to read to understand.
I also promised V. to write a step by step article about it and failed so far as the wind of fortunes have been bad to keep my promise. Now, in the year 2014, three years after my oath I am sitting here to sit down and keep my promises. I know why silverbacks have grey hair: They never forget what they promised and pay their debts. That is what I am doing now, sitting down with a coffee and a mountain chain of work in front of me.
_____________________________________________________________________________
THE PROGRESS
This article will give you a behind look on facing that project. Thoughts of mine, techniques I used, changes I did during the progress, some colour recipes, but not many as I am never aware of which colour was used. I just paint the colour I want it that place and names or brands often don't matter to me.
Article showing you, how to prepare a miniature before painting.
While I did prepare the white metal figure I already had the wish to do a big and epic base to it. That was already some result of the pressure I did put myself in. The first idea of that base went way too big and I never used that base. It was just too big for one single figure (I guess you can see that), but it was the epicness I wanted to achieve. So more a sketch of the base I wanted to see in the end. Progress, it can be like that. On that base you find some candle sticks used as columns and some bones from a dead caiman.
Now I call that a massive plinth, eh?
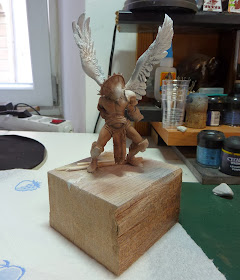
The figure was primed white only. No two component priming technique as I prefered only white on this figure back in 2011. No special reason for it as far as I remember, just a change in the things I was so used to. You might already see in the next photo that I planned to paint the figure in parts. The left hand with weapon and lower right arm with weapon were supposed to be painted single to get a better hold and reach to all the areas around the model.
I also changed the head a little bit before priming. In the beginning I really had problems with that sculpt to get motivated. I was searching for its character and the face that was not there did not make that easier for me. So my first change was to make the head more unique to other versions I have seen from this sculpt by using a piece from a GW Khemri chariot. The piece was brought in a gentle new form by heating it with the hairblower and the transition between the original head was sculpted with Magic Sculp. Maybe I was up to paint that kind of fleshy in the end, but as you see I was pretty unsure as there was no character for me to get hold of.
White Wings ... oh lalala!
I soon realized that the initial base I did build first was way too big and went back to a more "casual" base. Still I was very unsure were that journey would lead me and as I am known from working with an initial sketch rather with a perfect plan at the start just said to myself lets give it a go with the airbrush to see where this will lead me.
This article really brings up good memories from our old, small flat, the place where I started with all what is now. My workbench in the living room, build up completly in MacGyver-Style. Good times spent there.
As far as I can remember this was one of my first models I used my new airbrush for help ...
You can already spot that I was pretty unsure what colour to use a for the first sketch when looking at the next photo. I was just searching for a nice skin tone to put on with the airbrush and I mixed one from all the colours you see here:
Well, I was definatly very unsure about the projects path as I did not yet see it in front of me. I kept going, but I know today that the start was so strange because I did put too much pressure on me to make my customer very happy and I was not used so far to be kept alone with my decisions back in those days. Before the Arkvenger my comissions were mostly gaming pieces. GW. Blue Space Marine here, Orc here, Eldar there, skinned barbarian there. The customers wishes were easy to follow. Now I was on my own to decide, to bring in my personality, to fullfill the wish of V. I had to learn that. Nonetheless I did bring on some bright basic skin tone ...
I wanted some more contrast to it and sprayed it darker overall again. Being unsure is something very bad sometimes as it does not help to find a walkthrough.
Well, it was too dark now and I did place some brighter, even pale skin tone on top of all that. Wow, great achievement so far. Pressure was growing and I did feel very strange during these first steps.

Yay that 's a start, but honestly I didn't help much either. Where was my focus? Where did my figure visions went? Why did I not connect with the project as I did with so many others before? Well, there was no answer to that still ...
I decided to give the figure more colours to see where it might go. Some colours for the wings, some colours for the metal parts, some green ... why did I use green in here. I had no idea. I was somehow very disconnected to this particular figure and I was not sure what to tell my comissioner on the progress.
Mmh, mmh, mmh ... was I thinking ...
I attached the arms meanwhile as you can see above as I thought maybe that is the reason why I am missing something in the sculpt or why all I did so far felt so incomplete. It did not help and I told myself to get away from the project for a little while. To get my head together to find a better plan.
The figure was placed in the back of my cabinet, in the hall of shame, for some weeks to see what a free mind would bring.
________________________________________________________________________________
Weeks passed by.
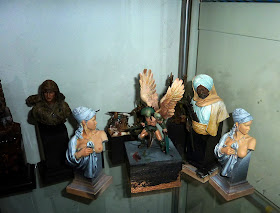
I started another comission, also with a lot of skin, two busts at once of the "Roman Matrona", also Pegaso. Ok, skin to paint, I can do that too on the Arkvenger when I do start on the busts. Back in 2011 I was slowly discovering the use of Oil colours and wanted to give my little collection of Oil colours a little try on the skin of all three models. Additional to that I work further on the increasing the contrasts on different parts of the model. Leather, wings, green armour plates and so on ...

Mkay. That felt good finally. Still not back on track but feeling better. The break was not a bad idea.
During these days I even came up with a new base idea, as I was unhappy with the second base I did build up. I wanted it more epic and the second try was far from being epic and unique. I went to ebay to search for hand statues. I wanted to achieve the feeling of a big statue's hand lying on the ground and also had the thought of maybe placing little humans to the base to make the Arkvenger a manifestation as their god. A god sorrounded by his worshippers maybe?
The small figures are from the company Preiser in scale ... I think I forgot that and just say very tiny :D
I did spent some time on the figure to increase the contrast even more and find out the different materials his armour is made of in my vision. Bringing the look of the figure together slowly.
Now it was time to build up a new base to get a better feeling of the blurry vision I finally recieved.
Using Milliput on top of cork to integrate the hand to a plinth by Sockelmacher.de I wasted no time. Some soil was also used to create old earth which sorrounds the statue's hand since ages. I skipped the idea of the small humans around their god as I was pretty happy on the "epic result" the hand already achieved on that base ...
After sanding the dry Milliput it was time to paint the base, sketching again. During the first colour appliements I wanted to try something new again. Man, I was young and searching and experimenting all the time. Good times indeed. This was the first time I got in contact with Tim Holtz's Crackle Paint and I wanted to give it a try on the hand to create an even older looking stone hand with structure on it. I did put on top of the colour already placed and painted it again, from sketch to more detail, like I always do. I also placed the figure sometimes to the base to see how it might look in the end to have a clearer view on the vision ahead:
fresh crackle paint in place ...
Painting the base again with the crackle paint ...
More work on it and after it was dry I used some pigments. First brown, later in the progress even some black ones. Now it was time to head back to the figure to let base and figure grow together.
I decided to paint the leather parts again with oils as I was getting more comfortable with them during the progress. First a bright basic tone (acryl) was drybrushed over a dark brown (acryl) to recive some old leather textures later on.
Started with a little Oil colour on top of that ...

Oil colours have been my best help to finish this project. I used more and more, so many different tones to bring in more colour vibration to the skin and contrast to all the parts. Joy of painting again.
I did place more contrast on the figure to point out a light situation to it and worked a lot of times with oil colours. Sadly I do not have much more photos of the progress as I got really into it. In the end he turned out to be very pale and still I was facing my major problem: I still did not find proper connection to the sculpt's character because of the missing face. When the project turned to its end I sculpted a little face mask to the face area with a little help by my friend Mati aka Badsmile. And finally it worked for me. I found the Arkvenger's character.
With it I soon finished the figure and was able to show V., my comissioner a very personal interpretation, as he wished. You can believe me when I say that this project was a hell of a ride, with emotional ups and downs never seen before.
In the end I learned a lot from it. I learned not to be afraid of what I am doing, I learned how to find a path to my visions. I learned that I am not comfortable with painting figures without a face or proper charcater. I learned a lot of personal things during that time and Vittorio told me that he was very happy with the unique interpretation he did recieve of this sculpt. I think he just did not know how I was suffering. Maybe that is the reason why this promised article took me ages.
THE RESULT
I hope you liked this wall of text and photos.
I hope it might help you to see that giving up on a project is not a good solution.
Take your time, find your path, find your vision and give it the project the time it needs.
And always keep your promises, no matter what time it will take. Speak them wisely and keep them, it feels good in the end.
Keep on happy painting!
Best Wishes
Roman


Nice tutorial :) remember the time when you were stucked to this mini... happy it worked out in the end ;)
ReplyDeleteCool insights to your process, and how this was a growing experience as well! Ok.. maybe I am not so bummed that the Zombies lost out, again, for the tutorial here as it shows a very interesting process and how you overcame it! Very cool mate, very cool indeed!
ReplyDeleteAwesome work! I always liked this Pegaso model :)
ReplyDeleteGreat tutorial, I LOVE wings :-)
ReplyDeleteA great tutorial. More about motivation and idea finding than a step by step but I think this tutorial shows a lot of your way of the painter as you teach it in your class.
ReplyDeleteThanks for the tutorial.
Wonderful! These tutorials are amazing... the possibility to read inside your artist mind is something fantastic!
ReplyDeleteThanks! :)
Roman, you are the MAN!! Your zest for art, joy and life are truly inspiring. I've been hugely enjoying your blog for about a month, and this was a very insightful picture of the struggle we all go through to "see" a piece. I also loved and laughed along as you gave the amphora a pfft pfft and chop chop--that's what it is to see a master at work. My hat is off to you -- wonderful work and attitude to it all!
ReplyDelete