SBS: Puss in Boots' Today
____________________________________________________________________________
Hey there!
This is Daniele :-) First of all, I apologize if I don't write on the blog as much as I'd like, but I'm pretty short on time, and there are plenty of sculptures to sculpt! :-)

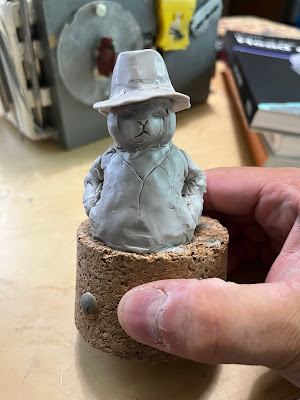
I'm excited to share with you the story behind my latest creation: the Detective Cat in a NOIR style from the '20s and '30s!
It all started with my deep love for the Puss in Boots sculpture I made at the beginning of 2023.
The first one had this 18th-century vibe, chilling on an old armchair with those iconic boots. It got such a fantastic response that many folks asked me to make more sculptures in a similar theme.
So I wanted to create the exact same character. So the same attitude, the same face.
I pictured him as an undercover detective, somewhere between James Bond and Mission Impossible. ahahahahhaha
The inspiration for this new creation struck me while rewatching Martin Scorsese's "The Untouchables."
I pictured him as an undercover detective, somewhere between James Bond and Mission Impossible. ahahahahhaha
The inspiration for this new creation struck me while rewatching Martin Scorsese's "The Untouchables."

Before I dive into the creation process, let me emphasize the importance of references in art.
Picasso said,
"Good artists copy, great artists steal."
But I believe there's another quote that perfectly fits art:
"Nothing is created, nothing is destroyed, but everything transforms."
In 2023, art is all about evolving thoughts and continuous transformation.
Now, let's talk about how I brought this sculpture to life.
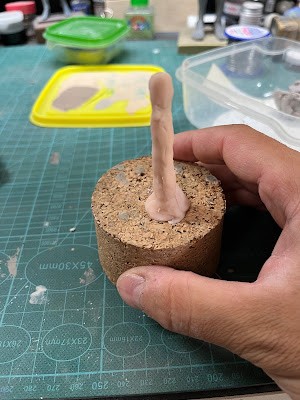
I used a simple cork as a base, and I inserted pieces of steel wire.
Normally, I don't use steel because molding it into a shape can be tricky (especially if I need to cut some parts), but for this project, I wanted something straightforward, something anyone could paint without much hassle.
Next, I covered the structure with Super Sculpey Original (that pink modeling clay).

When you're creating the initial masses in a sculpture, "block-out" is crucial, and speed is your best friend in any art form.
That's why I adore water-based clay—it's incredibly soft initially, and as the water evaporates, it takes on a different consistency.
After laying down the first layer, I baked the sculpture in the oven for about an hour at 120°C (250°F).
I highly recommend using a good-quality internal thermometer to monitor the Fimo's temperature during baking. .
My suggestion is: never fully trust your oven's temperature setting.
Then, I added the first masses to shape the cat.
My mix has stayed consistent over the years:
Then, I added the first masses to shape the cat.
My mix has stayed consistent over the years:
My recipe: 50% Fimo Professional, 30% Super Sculpey Medium, 10% Beesputty, and 10% Mix Quick Steadler.
Remember my rule:
Less sticky --> less Beesputty and less Mix Quick --> More hardness --> more details
More sticky -> more Beesputty and more Mix Quick --> less hardness --> perfect for first masses

To prevent the material from sticking to the table while working, I always place a sheet of paper underneath.
For smoothing the surface, I use either turpentine or white spirit.
Finally, I baked the sculpture again using the same instructions as above.
I hope you enjoy the final result as much as I enjoyed creating it.
Thanks for joining me on this artistic adventure.
Daniele
Thanks for joining me on this artistic adventure.
Daniele
Please consider to follow me on my site https://www.foundminiatures.com/
____________________________________________________________________________
We could watch the newest TV series on Netflix, instead, we're here to write articles for you!!
Support NOW Massive Voodoo!
If you like to support or thank the monkeys of Massive Voodoo for what they do, please feel invited to drop a jungle donation in their direction via PayPal or check the miniatures they got on sale here.


