


posted by roman, jarhead, kong
Aloa jungle visitors,
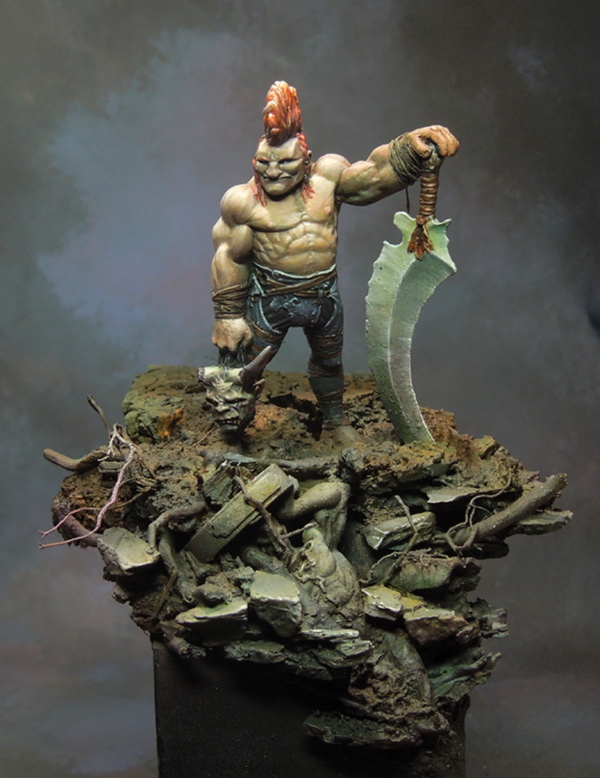
I got asked several times on how I did the base from the latest painted Jareck, the demon hunter by Enigma Miniatures.
I will try to sum it all up and give a little overview on the steps I went through while doing that base. I have to say sorry that this step by step isn't a true step by step article as there was no plan to do it upfront. It is just a summ up afterwards, but I hope it'll help the one or the other ... we are talking about this base here:

Ok, as said the figure was started on one of my painting classes for explanations. I prepared that base at home and it was very simple for the class: Some Stones, some roots, a statue and some soil. Nothing moe so far.

Somehow I did not find the energies to work on the figure after the class, so it stood around my cabinet as WIP for a long time. During these months I went to a model and hobby supply store in our hometown (the one were you can get tanks, airplanes, railway stuff and ships) and found a tunnel wall piece from the railway accessoires that I really liked. Yet, I did not plan it for Jareck. After returning to our studio I shared the tunnel wall with a friend of us, Felix, who was visiting us these days.
The idea to put my part of the wall to Jareck came to life during talks with my friends.

For me, a base can always grow further if the change fits the scene. I wasn't sure about the scene for a long time, but this wall gave me some further visions. I prepared the base with some additional cork to to prepare a place on the base where this big wall will be glued. I did finish painting the back of the figure before I did bring the wall to the base. Meanwhile I did prime and paint the wall with its basic colours and a rough light/shadow situation.
While the glue was drying I used another statue from good old Rackham to be placed to the wall. I did paint it single on top of a piece of cork and glued it in place when it was done.


As you can see the base in the picture above it was a very greyish scene still. The figure disappeared again in my WIP cabinet for some weeks. After a while I choose to make the whole scene more colourful and I created the final look with using moss, products from MiniNatur and some stuff from the jungle ambience article. Some work with the Airbrush and the brush on the natural elements was done to get it all together ot a more greenish overall athmosphere, afterwards I did some final work on the figure itself and finished the green parts, for example the moss with painting a zenithal light situation on them.
Final step was using the hanging grass technique Raffa explained in this article.

Well, in the end it turned out the way it turned out and I was pretty happy to finish the figure.
I hope this article helped those who have asked.
Sorry for not having more detailed photos available for this topic.
Maybe next time!
Best Wishes and keep on happy painting!
Roman
Aloa jungle visitors,
I got asked several times on how I did the base from the latest painted Jareck, the demon hunter by Enigma Miniatures.
I will try to sum it all up and give a little overview on the steps I went through while doing that base. I have to say sorry that this step by step isn't a true step by step article as there was no plan to do it upfront. It is just a summ up afterwards, but I hope it'll help the one or the other ... we are talking about this base here:

Ok, as said the figure was started on one of my painting classes for explanations. I prepared that base at home and it was very simple for the class: Some Stones, some roots, a statue and some soil. Nothing moe so far.
WIP
Somehow I did not find the energies to work on the figure after the class, so it stood around my cabinet as WIP for a long time. During these months I went to a model and hobby supply store in our hometown (the one were you can get tanks, airplanes, railway stuff and ships) and found a tunnel wall piece from the railway accessoires that I really liked. Yet, I did not plan it for Jareck. After returning to our studio I shared the tunnel wall with a friend of us, Felix, who was visiting us these days.
The idea to put my part of the wall to Jareck came to life during talks with my friends.

For me, a base can always grow further if the change fits the scene. I wasn't sure about the scene for a long time, but this wall gave me some further visions. I prepared the base with some additional cork to to prepare a place on the base where this big wall will be glued. I did finish painting the back of the figure before I did bring the wall to the base. Meanwhile I did prime and paint the wall with its basic colours and a rough light/shadow situation.
While the glue was drying I used another statue from good old Rackham to be placed to the wall. I did paint it single on top of a piece of cork and glued it in place when it was done.


As you can see the base in the picture above it was a very greyish scene still. The figure disappeared again in my WIP cabinet for some weeks. After a while I choose to make the whole scene more colourful and I created the final look with using moss, products from MiniNatur and some stuff from the jungle ambience article. Some work with the Airbrush and the brush on the natural elements was done to get it all together ot a more greenish overall athmosphere, afterwards I did some final work on the figure itself and finished the green parts, for example the moss with painting a zenithal light situation on them.
Final step was using the hanging grass technique Raffa explained in this article.

Well, in the end it turned out the way it turned out and I was pretty happy to finish the figure.
I hope this article helped those who have asked.
Sorry for not having more detailed photos available for this topic.
Maybe next time!
Best Wishes and keep on happy painting!
Roman


Thank you for once again giving us an inspirational insight into the way you work.
Very inspired work!!
Phil.