


Aloa,
and welcome to the third - and hopefully last - article about snow on your scenery.
You can find two other articles in the article section of MV with the same topic but with different time efforts and final looks.


This guide is for simple snow, i would recommand the advanced technique explained next.

Easy and cheap way of creating realistic looking snow on your base.

I am not really into using the word "masterclass", but you read it everywhere nowadays so I thought this might lift up this article over the other two. In the end there is no master here and it ain't a class - it is just a sum up of my thoughts ...
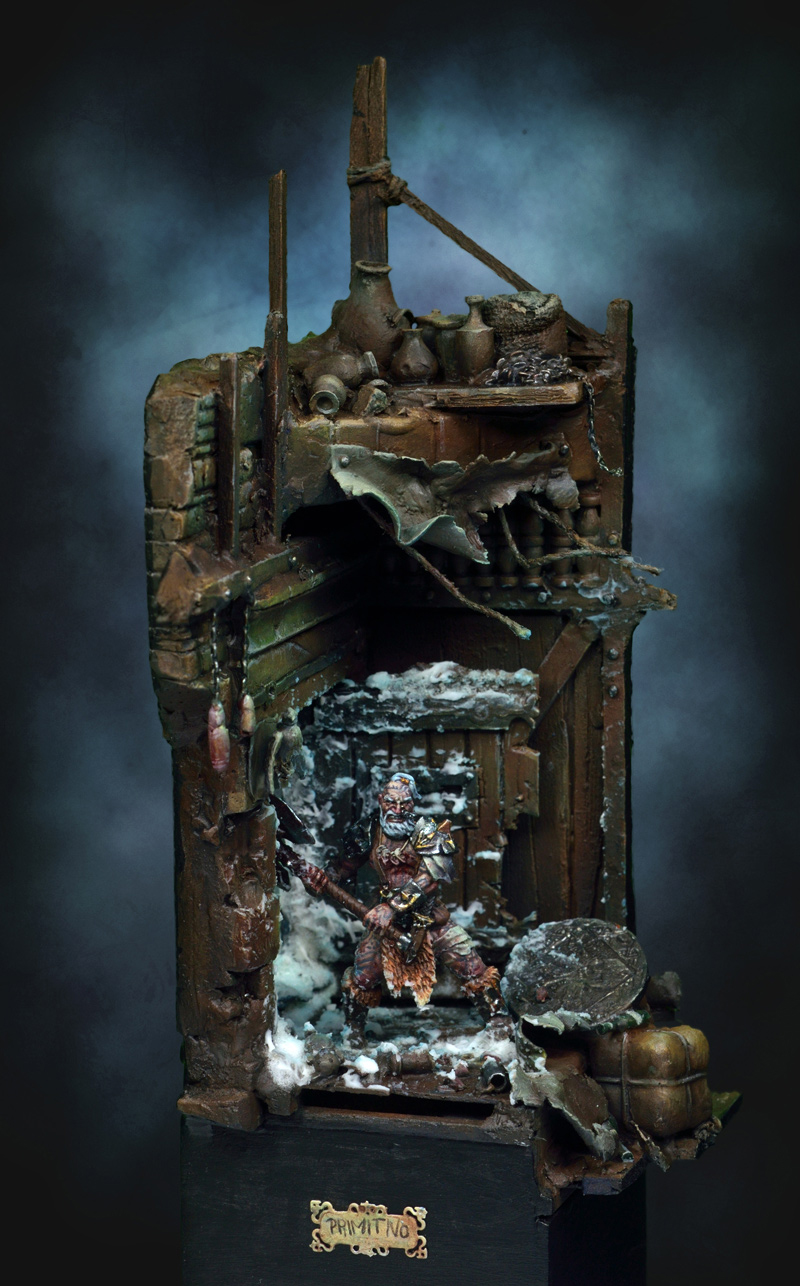
Very often snow looks kind of weird on a base. Sometimes it is used to hide something. Sometimes it is the best solution for a base. Sometimes when you take your time on snow it looks pretty nice in the end and not like something only white on your base. This guide will take you through a little trip on how I did the base at "Primitivo" and will explain materials, thoughts and stuff.

_______________________________________________________________________________
You want to support Massive Voodoo?
If you like to support or say thanks the monkeys of Massive Voodoo in what they do, please feel invited to drop a jungle donation in their direction via paypal or check their miniatures they got on sale here.
_______________________________________________________________________________
Material____________________________________________________________________
I still use the same technique from the Advanced snow article on mainly all my snow bases but explored a little more lately. I was lucky to recieve a gift from my australian friend, Weisern (thanks to him) who told me to try the following for the effect of snow - it is ...

I found it for myself only over in Australia and I have to admit that I am not able to search where you can get it in your specific country and neither do I have a clue :) - So google is your best friend there. But first let me explain how cool this works for snow.

You can use it straight from the pot - me is using a toothpick - and hit your painted base with it. Remember to paint your base to finish before you apply it. You won't have a funny time painting it afterwards. At least remember NOT to apply it before priming. If you use the paste only (you can acutally do that) it dries out very nice, like ... I don't find words ... 'sugar snow' ... uhm, strange I know. In fact if you use this paste only I recommand using it for small areas of snow and kind of snowy flakes on some tiny spots. This will work out nice, like I did here - this is just the paste, nothing more ...

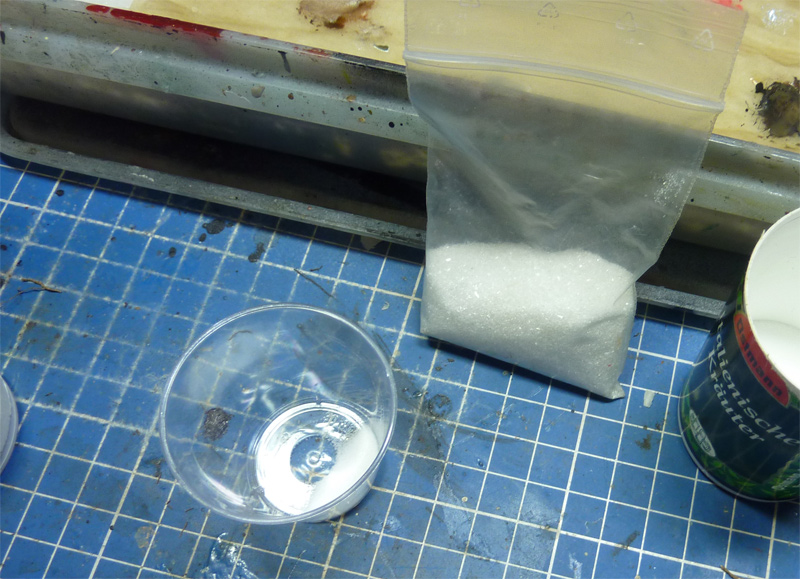
If you combine this kind of paste now with the techniques explained in the advanced article you will need some time but the effort is worth it. If you want to get fine detail snow I recommand using bicarbonate of soda (in Germany it is called "Natron", i am not sure if i found the right translation to it) BUT make it even more fine by using a mortar and your arm powers. Sounds stupid but it gets finer, believe me. For sure you can use whatever you prefer for your snow creations. There are so many products out there that anyone should be happy in the end. This is just my point of view and how I do.
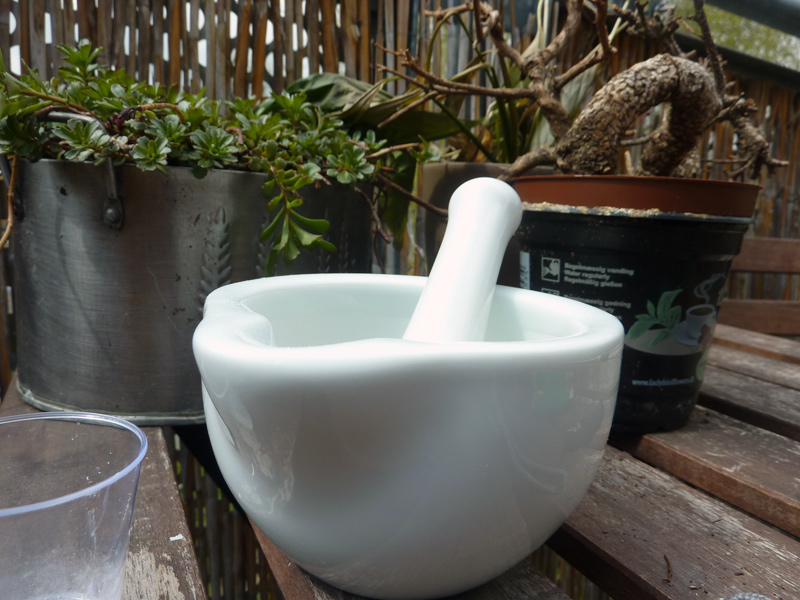
I am using plastic mug to collect it and take it to the workbench. I don't want that big ceramic bowl at my workbench as I soon might lose my head while bringing colour on it by mistake.
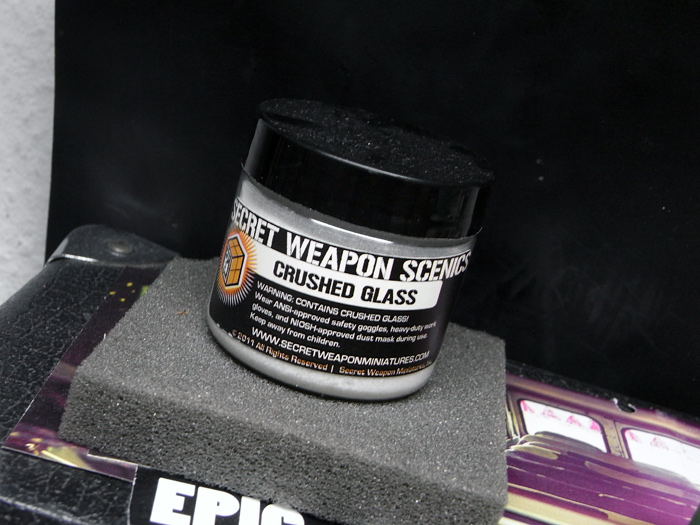
Another thing I use is crushed glass from Secret Weapon miniatures.

Another thing I use is crushed glass from Secret Weapon miniatures.
Working______________________________________________________________
Remember, painting your base first you must do. So check, check base painted. Yes.
In fact I have to tell that I did paint on the base later on. So on this shot it is not completly finished yet as I picked out detailed spots later on that are not hidden from the snow and put some time in them. Not many, but some.
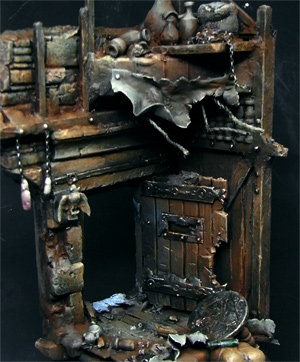
I first applied the Texture Paste to get a feeling for where I want my snow to be and how the material forces into the room through the open door, due to the stormy wind out there. It easy to create controlled volumes with this paste. Give it time to dry good and add more if you like or switch to the next step. All work in Progress as you might see. Just a little here and there. I really like the look of the dried out paste, just check back with the little witch above or these 1:72 Samurais:

This paste looks like snow but shortly from melting away. If you want to create such an effect the paste fits perfect. You can also add some gloss varnish to the edges where the snow hits the normal ground to intense this effect. If you want to go further and bring in some snow variety I go back to the bicarbonate of soda, the one I did prepare in the mortar and add some tiny flakes of snow (same as the advanced way). This brings in some variety and makes it nicer in the end. Using matt varnish to apply it, which looks often very strange while not dried yet.
To add some final glitter I used crushed glass. Please read the safety instructions first before working with crushed glass as this product can harm your health. I have two options of crushed glass. The first one was given to me by a friend and I have no idea where it comes from, maybe it is real crushed glass, crushed by his own (I would not recommand that) and the other option is Secret Weapon Miniature's crushed glass which you can use straight from the pot, but still read the safety manual first.
First option ... strange stuff.
I also crushed it with a mortar as the pieces are way to big.

With the crushed glass I added a gentle sparkle of the snow, a gentle glittering here and there, but not everywhere. It is not best to describe this at photos as you really see it best when turning around the figures it was used upon.
While finished the base I jumped back to the different steps and added more here and there where I thought there is some more needed. For the final attempt I took my airbrush with some massively thinned (water) tourqouise in it to spray a gentle touch of this cold colour coming in the room from the door - you know outside there is a dark grim night and screams and terror and a cold future awaits ... Don't forget to clean your airbrush afterwards. Maintenance tips can be found here!

Another example of this version of masterclass snow. In the end the snowy areas was gently airbrushed with a cold blue tone to make it even more athmospheric:First option ... strange stuff.
I also crushed it with a mortar as the pieces are way to big.
Second option works way more easier ...
With the crushed glass I added a gentle sparkle of the snow, a gentle glittering here and there, but not everywhere. It is not best to describe this at photos as you really see it best when turning around the figures it was used upon.
While finished the base I jumped back to the different steps and added more here and there where I thought there is some more needed. For the final attempt I took my airbrush with some massively thinned (water) tourqouise in it to spray a gentle touch of this cold colour coming in the room from the door - you know outside there is a dark grim night and screams and terror and a cold future awaits ... Don't forget to clean your airbrush afterwards. Maintenance tips can be found here!

And another example:

In the end this article shows you one of many ways to create your snow. Please be aware that this is no must-do-guide, as there are many other different materials and products outthere with whom you can create your snowy base ...
You can even combine several techniques, snow, painting, still water effects, gloss varnish to recieve very realistic looking snow effects - some examples:


I hope you enjoyed this little write up and may the snow be with you!
If you want some icicles taste this!
And if you want to learn how to paint cold looking miniatures read this article about
Cold Vikings and cold and warm colors, maybe also visualising and visualising winter.
If you got questions or ideas or thoughts or bananas just hit the comments!
Keep on happy painting!
Best Wishes
Roman
_______________________________________________________________________________
You want to support Massive Voodoo?
If you like to support or say thanks the monkeys of Massive Voodoo in what they do, please feel invited to drop a jungle donation in their direction via paypal or check their miniatures they got on sale here.
_______________________________________________________________________________


thanks for the article, I's really helpful.
One other method I've seen for partially melted snow was with "powdered sugar".
It was simply put to the surface where it should be and the water/thinner/varnish melts it like it was true melting snow.
Might be worth a try to experiment with it.
I hear about poeple who having problem with soda, it suppose to become yellow over time...
Nice very nice,
I have tried the crunched glass and it works perfectly... even better with artificial water to make ice !
thanks for this tuto
Yay! I like your idea of gloss varnish on the texture paste to make melted areas look better. Brilliant!
Like Roman said, it is just so fast and easy to use, and you can apply it with your brush in thinner layers for a see through look, on fiddly parts like twigs on a tree. And it does not go yellow.
If anyone's google skills find the product online, please share the link. If there is enough interest, I could ship some over to Roman to distribute?
Many art material brands have similar pastes. It looks pretty similar to Vallejo's White Stone or Heavy Gel, or W&N's Gels, or Golde or Liquitex. We just need to figure which is the right name in each brand or what to add to get the perfect result (gloss, as Weisern said, for melting snow).
Also W&N has one paste with glass beads. No idea if that one will look as good as crushed glass mixes, but maybe someone wants to try what it can be used for (water with bubbles?).